
Setting up a Frappe Framework environment has traditionally been a multi-step process requiring server configuration, database setup, and various deployment considerations. While these steps are valuable for understanding the underlying architecture, they can create a significant barrier for developers who simply want to get their applications up and running quickly.
Enter DigitalOcean's App Platform – a fully managed solution that dramatically simplifies the deployment process. In this guide, I'll walk you through how to deploy a complete Frappe Framework application with just a few clicks, eliminating hours of configuration and troubleshooting.
Whether you're building a custom ERP solution, a business application, or exploring Frappe's capabilities for the first time, this streamlined deployment approach will help you focus on what truly matters – developing your application rather than managing infrastructure.
Let's dive in and explore how the combination of Frappe Framework's powerful capabilities and DigitalOcean's developer-friendly platform creates the perfect environment for your next web application project.
Table of contents
- Prerequisites
- tl;dr
- Building the Dockerfile
- Nginx Configuration
- Supervisor Configuration
- Entrypoint Bash Script
- Redis Configuration
- MariaDB Configuration
- App Platform Configuration
- GitHub Action Setup
- Generating a DigitalOcean Access Token
- Forking the Repository
- Adding Repository Secrets
- Triggering the Deployment
- Creating a New Site
- Adding Custom Domains
- Conclusion and Production Considerations
Prerequisites
- DigitalOcean Account
- DigitalOcean Access Token
tl;dr
For those who want to get up and running quickly without diving into the details:
- Fork do-frappe
- Generate a DigitalOcean token with scopes
update,read,createunderapp(or give full permissions) - Link your Github Account with App Platform.
- Update
repovalue on.do/app.yamlto be your Github username - Add this token as a secret in your forked repo named
DIGITALOCEAN_ACCESS_TOKEN - Trigger the CI/CD pipeline
- Wait for the deployment to complete
If you don't want to go into the technical details, jump to Creating a New Site
Building the Dockerfile
I'll use the Dockerfile from the official frappe_docker repository as a reference point.
The main modification we need to make is to the entrypoint. We'll delete the CMD command and add our custom configurations. Copy and paste this code at the very end after the VOLUME command:
USER root

COPY ./config/nginx-template.conf /templates/nginx/frappe.conf.template
COPY ./config/nginx-entrypoint.sh /usr/local/bin/nginx-entrypoint.sh
COPY ./config/supervisor.conf /etc/supervisor/conf.d/frappe.conf

RUN apt-get update \
    && apt-get install --no-install-recommends -y \
    sudo \
    supervisor \
    jq

# Install Redli client for Redis TLS connections
RUN curl -L https://github.com/IBM-Cloud/redli/releases/download/v0.15.0/redli_0.15.0_linux_amd64.tar.gz -o redli.tar.gz && \
    tar xzf redli.tar.gz && \
    mv redli_linux_amd64 /usr/local/bin/redli && \
    chmod +x /usr/local/bin/redli && \
    rm redli.tar.gz && \
    apt-get clean && \
    rm -rf /var/lib/apt/lists/*

EXPOSE 8000 8080 9000

ENTRYPOINT ["nginx-entrypoint.sh"]
Let's understand each part of this configuration:
USER root- We switch to the root user because we need to install additional packages and configure nginx and supervisor in the App Platform.COPYcommands - These copy our configuration files for nginx, supervisor, and the initialization script into the container.RUN apt-get update...- By default, DigitalOcean App Platform doesn't have thesudopackage installed. We're also installingsupervisorfor process management andjqfor JSON processing.Install Redli client...- This client supports TLS connections for Redis, which is useful if you're configuring a managed Redis instance from DigitalOcean's database offerings.EXPOSE 8000 8080 9000- We expose port 8000 for Gunicorn binding, 8080 for the frontend, and 9000 for Socket.io.ENTRYPOINT ["nginx-entrypoint.sh"]- This runs our initialization script when the container starts.
Nginx Configuration
Let's configure the frappe.conf.template for Nginx. We'll use the template from the official frappe_docker repository with one important addition: a health check endpoint.
Inside the server block, after the location @webserver{} section, add this health check config:
# Health check location
location = /health {
    access_log off;
    add_header Content-Type text/plain;
    return 200 'OK';
}
This ensures that DigitalOcean App Platform's health checks will pass after building and deploying the Dockerfile. The complete nginx configuration will be:
upstream backend-server {
    server ${BACKEND} fail_timeout=0;
}

upstream socketio-server {
    server ${SOCKETIO} fail_timeout=0;
}

server {
    listen 8080;
    server_name ${FRAPPE_SITE_NAME_HEADER};
    root /home/frappe/frappe-bench/sites;

    proxy_buffer_size 128k;
    proxy_buffers 4 256k;
    proxy_busy_buffers_size 256k;

    add_header X-Frame-Options "SAMEORIGIN";
    add_header Strict-Transport-Security "max-age=63072000; includeSubDomains; preload";
    add_header X-Content-Type-Options nosniff;
    add_header X-XSS-Protection "1; mode=block";
    add_header Referrer-Policy "same-origin, strict-origin-when-cross-origin";

    set_real_ip_from ${UPSTREAM_REAL_IP_ADDRESS};
    real_ip_header ${UPSTREAM_REAL_IP_HEADER};
    real_ip_recursive ${UPSTREAM_REAL_IP_RECURSIVE};

    location /assets {
        try_files $uri =404;
    }

    location ~ ^/protected/(.*) {
        internal;
        try_files /${FRAPPE_SITE_NAME_HEADER}/$1 =404;
    }

    location /socket.io {
        proxy_http_version 1.1;
        proxy_set_header Upgrade $http_upgrade;
        proxy_set_header Connection "upgrade";
        proxy_set_header X-Frappe-Site-Name ${FRAPPE_SITE_NAME_HEADER};
        proxy_set_header Origin $scheme://${FRAPPE_SITE_NAME_HEADER};
        proxy_set_header Host $host;

        proxy_pass http://socketio-server;
    }

    location / {
        rewrite ^(.+)/$ $1 permanent;
        rewrite ^(.+)/index\.html$ $1 permanent;
        rewrite ^(.+)\.html$ $1 permanent;

        location ~ ^/files/.*.(htm|html|svg|xml) {
            add_header Content-disposition "attachment";
            try_files /${FRAPPE_SITE_NAME_HEADER}/public/$uri @webserver;
        }

        try_files /${FRAPPE_SITE_NAME_HEADER}/public/$uri @webserver;
    }

    location @webserver {
        proxy_http_version 1.1;
        proxy_set_header X-Forwarded-For $remote_addr;
        proxy_set_header X-Forwarded-Proto $scheme;
        proxy_set_header X-Frappe-Site-Name ${FRAPPE_SITE_NAME_HEADER};
        proxy_set_header Host $host;
        proxy_set_header X-Use-X-Accel-Redirect True;
        proxy_read_timeout ${PROXY_READ_TIMEOUT};
        proxy_redirect off;

        proxy_pass  http://backend-server;
    }

    # Health check location
    location = /health {
        access_log off;
        add_header Content-Type text/plain;
        return 200 'OK';
    }

    # optimizations
    sendfile on;
    keepalive_timeout 15;
    client_max_body_size ${CLIENT_MAX_BODY_SIZE};
    client_body_buffer_size 16K;
    client_header_buffer_size 1k;

    # enable gzip compression
    # based on https://mattstauffer.co/blog/enabling-gzip-on-nginx-servers-including-laravel-forge
    gzip on;
    gzip_http_version 1.1;
    gzip_comp_level 5;
    gzip_min_length 256;
    gzip_proxied any;
    gzip_vary on;
    gzip_types
        application/atom+xml
        application/javascript
        application/json
        application/rss+xml
        application/vnd.ms-fontobject
        application/x-font-ttf
        application/font-woff
        application/x-web-app-manifest+json
        application/xhtml+xml
        application/xml
        font/opentype
        image/svg+xml
        image/x-icon
        text/css
        text/plain
        text/x-component;
        # text/html is always compressed by HttpGzipModule
}
Supervisor Configuration
Next, let's configure the Supervisor configuration file supervisor.conf. This is inspired by the supervisor.conf file in the bench repository.
One important modification is the location of the supervisor socket:
[supervisorctl]
serverurl=unix:///tmp/supervisor.sock
As noted in the DigitalOcean App Platform documentation, /var/run is treated as a special path and can cause deployment errors. We're moving the socket to another location to avoid these issues.
The complete supervisor configuration file should look like this:
[supervisord]
nodaemon=true
user=root
logfile=/var/log/supervisor/supervisord.log
logfile_maxbytes=50MB
logfile_backups=10
loglevel=info

[supervisorctl]
serverurl=unix:///tmp/supervisor.sock

[program:frappe-web]
command=/home/frappe/frappe-bench/env/bin/gunicorn --chdir=/home/frappe/frappe-bench/sites --bind=0.0.0.0:8000 --threads=4 --workers=2 --worker-class=gthread --worker-tmp-dir=/dev/shm --timeout=120 --preload frappe.app:application
priority=100                                ; Lower number means higher priority - start this first
autostart=true
autorestart=true
stdout_logfile=/dev/stdout
stdout_logfile_maxbytes=0
stderr_logfile=/dev/stderr
stderr_logfile_maxbytes=0
user=frappe
directory=/home/frappe/frappe-bench/sites

[program:nginx]
command=nginx -g "daemon off;"
priority=200                                ; Start after Gunicorn is ready
autostart=true
autorestart=true
stdout_logfile=/dev/stdout
stdout_logfile_maxbytes=0
stderr_logfile=/dev/stderr
stderr_logfile_maxbytes=0
depends_on=frappe-web                       ; This explicitly requires frappe-web to be running

[program:node-socketio]
command=node /home/frappe/frappe-bench/apps/frappe/socketio.js
priority=100
autostart=true
autorestart=true
stdout_logfile=/dev/stdout
stdout_logfile_maxbytes=0
stderr_logfile=/dev/stderr
stderr_logfile_maxbytes=0
user=frappe
directory=/home/frappe/frappe-bench

[program:frappe-scheduler]
command=bench schedule
priority=100
autostart=true
autorestart=true
stdout_logfile=/dev/stdout
stdout_logfile_maxbytes=0
stderr_logfile=/dev/stderr
stderr_logfile_maxbytes=0
user=frappe
directory=/home/frappe/frappe-bench

[program:frappe-queue-long]
command=bench worker --queue long,default,short
priority=100
autostart=true
autorestart=true
stdout_logfile=/dev/stdout
stdout_logfile_maxbytes=0
stderr_logfile=/dev/stderr
stderr_logfile_maxbytes=0
user=frappe
directory=/home/frappe/frappe-bench
stopwaitsecs=1560
killasgroup=true
numprocs=4
process_name=%(program_name)s-%(process_num)d
startretries=10

[program:frappe-queue-short]
command=bench worker --queue short,default
priority=100
autostart=true
autorestart=true
stdout_logfile=/dev/stdout
stdout_logfile_maxbytes=0
stderr_logfile=/dev/stderr
stderr_logfile_maxbytes=0
user=frappe
directory=/home/frappe/frappe-bench
stopwaitsecs=360
killasgroup=true
numprocs=4
process_name=%(program_name)s-%(process_num)d
startretries=10

[program:frappe-queue-default]
command=bench worker --queue default
priority=100
autostart=true
autorestart=true
stdout_logfile=/dev/stdout
stdout_logfile_maxbytes=0
stderr_logfile=/dev/stderr
stderr_logfile_maxbytes=0
user=frappe
directory=/home/frappe/frappe-bench
stopwaitsecs=1560
killasgroup=true
numprocs=4
process_name=%(program_name)s-%(process_num)d
startretries=10

[group:frappe-web]
programs=frappe-web,nginx,node-socketio

[group:frappe-workers]
programs=frappe-scheduler,frappe-queue-long,frappe-queue-short,frappe-queue-default
Entrypoint Bash Script
Now let's create the initialization script nginx-entrypoint.sh. This script will configure Redis endpoints and generate the Nginx configuration with appropriate values.
First, we configure the Redis endpoints:
su - frappe -c "cd /home/frappe/frappe-bench && bench set-redis-cache-host $REDIS_CACHE"
su - frappe -c "cd /home/frappe/frappe-bench && bench set-redis-queue-host $REDIS_QUEUE"
su - frappe -c "cd /home/frappe/frappe-bench && bench set-redis-socketio-host $REDIS_SOCKETIO"
The bench commands can only be run by the frappe non-root user in the frappe-bench directory. The variables $REDIS_CACHE, $REDIS_QUEUE, and $REDIS_SOCKETIO will be configured in the DigitalOcean App Platform configuration file later.
Next, we set default values for variables that might not exist:
# Set variables that do not exist
if [[ -z "$BACKEND" ]]; then
  echo "BACKEND defaulting to 0.0.0.0:8000"
  export BACKEND=0.0.0.0:8000
fi
if [[ -z "$SOCKETIO" ]]; then
  echo "SOCKETIO defaulting to 0.0.0.0:9000"
  export SOCKETIO=0.0.0.0:9000
fi
if [[ -z "$UPSTREAM_REAL_IP_ADDRESS" ]]; then
  echo "UPSTREAM_REAL_IP_ADDRESS defaulting to 127.0.0.1"
  export UPSTREAM_REAL_IP_ADDRESS=127.0.0.1
fi
if [[ -z "$UPSTREAM_REAL_IP_HEADER" ]]; then
  echo "UPSTREAM_REAL_IP_HEADER defaulting to X-Forwarded-For"
  export UPSTREAM_REAL_IP_HEADER=X-Forwarded-For
fi
if [[ -z "$UPSTREAM_REAL_IP_RECURSIVE" ]]; then
  echo "UPSTREAM_REAL_IP_RECURSIVE defaulting to off"
  export UPSTREAM_REAL_IP_RECURSIVE=off
fi
if [[ -z "$FRAPPE_SITE_NAME_HEADER" ]]; then
  # shellcheck disable=SC2016
  echo 'FRAPPE_SITE_NAME_HEADER defaulting to $host'
  # shellcheck disable=SC2016
  export FRAPPE_SITE_NAME_HEADER='$host'
fi

if [[ -z "$PROXY_READ_TIMEOUT" ]]; then
  echo "PROXY_READ_TIMEOUT defaulting to 120"
  export PROXY_READ_TIMEOUT=120
fi

if [[ -z "$CLIENT_MAX_BODY_SIZE" ]]; then
  echo "CLIENT_MAX_BODY_SIZE defaulting to 50m"
  export CLIENT_MAX_BODY_SIZE=50m
fi
Then we generate the Nginx configuration file with these values:
# shellcheck disable=SC2016
envsubst '${BACKEND}
  ${SOCKETIO}
  ${UPSTREAM_REAL_IP_ADDRESS}
  ${UPSTREAM_REAL_IP_HEADER}
  ${UPSTREAM_REAL_IP_RECURSIVE}
  ${FRAPPE_SITE_NAME_HEADER}
  ${PROXY_READ_TIMEOUT}
    ${CLIENT_MAX_BODY_SIZE}' \
  >/etc/nginx/conf.d/frappe.conf
Finally, we start Supervisor:
supervisord -c /etc/supervisor/conf.d/frappe.conf -e debug --nodaemonThe complete entrypoint script should look like this:
#!/bin/bash

su - frappe -c "cd /home/frappe/frappe-bench && bench set-redis-cache-host $REDIS_CACHE"
su - frappe -c "cd /home/frappe/frappe-bench && bench set-redis-queue-host $REDIS_QUEUE"
su - frappe -c "cd /home/frappe/frappe-bench && bench set-redis-socketio-host $REDIS_SOCKETIO"

# Set variables that do not exist
if [[ -z "$BACKEND" ]]; then
  echo "BACKEND defaulting to 0.0.0.0:8000"
  export BACKEND=0.0.0.0:8000
fi
if [[ -z "$SOCKETIO" ]]; then
  echo "SOCKETIO defaulting to 0.0.0.0:9000"
  export SOCKETIO=0.0.0.0:9000
fi
if [[ -z "$UPSTREAM_REAL_IP_ADDRESS" ]]; then
  echo "UPSTREAM_REAL_IP_ADDRESS defaulting to 127.0.0.1"
  export UPSTREAM_REAL_IP_ADDRESS=127.0.0.1
fi
if [[ -z "$UPSTREAM_REAL_IP_HEADER" ]]; then
  echo "UPSTREAM_REAL_IP_HEADER defaulting to X-Forwarded-For"
  export UPSTREAM_REAL_IP_HEADER=X-Forwarded-For
fi
if [[ -z "$UPSTREAM_REAL_IP_RECURSIVE" ]]; then
  echo "UPSTREAM_REAL_IP_RECURSIVE defaulting to off"
  export UPSTREAM_REAL_IP_RECURSIVE=off
fi
if [[ -z "$FRAPPE_SITE_NAME_HEADER" ]]; then
  # shellcheck disable=SC2016
  echo 'FRAPPE_SITE_NAME_HEADER defaulting to $host'
  # shellcheck disable=SC2016
  export FRAPPE_SITE_NAME_HEADER='$host'
fi

if [[ -z "$PROXY_READ_TIMEOUT" ]]; then
  echo "PROXY_READ_TIMEOUT defaulting to 120"
  export PROXY_READ_TIMEOUT=120
fi

if [[ -z "$CLIENT_MAX_BODY_SIZE" ]]; then
  echo "CLIENT_MAX_BODY_SIZE defaulting to 50m"
  export CLIENT_MAX_BODY_SIZE=50m
fi

# shellcheck disable=SC2016
envsubst '${BACKEND}
  ${SOCKETIO}
  ${UPSTREAM_REAL_IP_ADDRESS}
  ${UPSTREAM_REAL_IP_HEADER}
  ${UPSTREAM_REAL_IP_RECURSIVE}
  ${FRAPPE_SITE_NAME_HEADER}
  ${PROXY_READ_TIMEOUT}
    ${CLIENT_MAX_BODY_SIZE}' \
  >/etc/nginx/conf.d/frappe.conf

supervisord -c /etc/supervisor/conf.d/frappe.conf -e debug --nodaemon
With these configurations, we should have a running Frappe instance, right? RIGHT???

Redis Configuration
To ensure our Frappe instance works properly, we need to set up Redis instances. Let's create a minimal Dockerfile for our Redis image:
FROM redis:6.2-alpine
CMD ["redis-server"]
This simple configuration is all we need. The CMD ["redis-server"] line might not be strictly necessary, but we'll include it for clarity.
MariaDB Configuration
For testing purposes, we'll also need to add a MariaDB instance. Create another Dockerfile with this code:
FROM mariadb:10.6

# Set environment variables
# MARIADB IS FOR TESTING PURPOSES AND IT'S NOT RECCOMENDED TO BE DEPLOYED IN DO APP PLATFORM.
#   IT WILL LOSE THE DATA ON EVERY DEPLOYMENT.
# EITHER USE MANAGED DB OR SETUP YOUR OWN MARIADB SERVER.
ENV MYSQL_ROOT_PASSWORD=pEBMMlB1s2H6oBQE07Bw4phoQhnlqSGa

# Configure healthcheck
HEALTHCHECK --interval=1s --retries=15 CMD mysqladmin ping -h localhost --password=$MYSQL_ROOT_PASSWORD

# Set the command with all required options
CMD ["mariadbd", "--character-set-server=utf8mb4", "--collation-server=utf8mb4_unicode_ci", "--skip-character-set-client-handshake", "--skip-innodb-read-only-compressed"]
Important Note: This MariaDB setup is not recommended for production use. The database instance will be deleted and recreated every time you redeploy the application, resulting in complete data loss. For production environments, use a managed database service or create a separate droplet with a properly configured MariaDB instance.
App Platform Configuration
Now let's create the App Platform configuration file at .do/app.yaml. This file defines how our application components will be deployed and configured in DigitalOcean's App Platform.
First, let's set up the basic configuration:
name: do-frappe
region: nyc
alerts:
  - rule: DEPLOYMENT_FAILED
  - rule: DOMAIN_FAILED
This establishes the application name as "do-frappe", sets the region to New York City (nyc), and configures alerts for deployment and domain failures.
Next, let's define the services that make up our application:
services:
  - name: redis-cache
    dockerfile_path: images/redis/Dockerfile
    source_dir: .
    github:
      branch: main
      deploy_on_push: true
      repo: energychoiceinc/do-frappe
    internal_ports:
      - 6379
    instance_size_slug: basic-s
    instance_count: 1
  - name: redis-queue
    dockerfile_path: images/redis/Dockerfile
    source_dir: .
    github:
      branch: main
      deploy_on_push: true
      repo: energychoiceinc/do-frappe
    internal_ports:
      - 6379
    instance_size_slug: basic-s
    instance_count: 1
  - name: redis-socketio
    dockerfile_path: images/redis/Dockerfile
    source_dir: .
    github:
      branch: main
      deploy_on_push: true
      repo: energychoiceinc/do-frappe
    internal_ports:
      - 6379
    instance_size_slug: basic-s
    instance_count: 1
  - name: mariadb
    dockerfile_path: images/mariadb/Dockerfile
    source_dir: .
    github:
      branch: main
      deploy_on_push: true
      repo: energychoiceinc/do-frappe
    internal_ports:
      - 3306
    instance_size_slug: basic-s
    instance_count: 1
  - dockerfile_path: images/frappe/Dockerfile
    name: frappe
    github:
      branch: main
      deploy_on_push: true
      repo: energychoiceinc/do-frappe
    http_port: 8080
    internal_ports:
      - 9000
      - 8000
    health_check:
      initial_delay_seconds: 10
      period_seconds: 10
      timeout_seconds: 5
      success_threshold: 1
      failure_threshold: 5
      http_path: /health
      port: 8080
    instance_size_slug: basic-m
    instance_count: 1
For a more detailed documentation, see Reference for App Specification
Last but not least, we are going to add environment variables:
envs:
  - key: REDIS_CACHE
    scope: RUN_AND_BUILD_TIME
    value: "redis-cache:6379"
  - key: REDIS_QUEUE
    scope: RUN_AND_BUILD_TIME
    value: "redis-queue:6379"
  - key: REDIS_SOCKETIO
    scope: RUN_AND_BUILD_TIME
    value: "redis-socketio:6379"
  - key: BACKEND
    scope: RUN_AND_BUILD_TIME
    value: "0.0.0.0:8000"
  - key: CLIENT_MAX_BODY_SIZE
    scope: RUN_AND_BUILD_TIME
    value: "50m"
  - key: FRAPPE_SITE_NAME_HEADER
    scope: RUN_AND_BUILD_TIME
    value: "$host"
  - key: UPSTREAM_REAL_IP_ADDRESS
    scope: RUN_AND_BUILD_TIME
    value: "127.0.0.1"
  - key: UPSTREAM_REAL_IP_HEADER
    scope: RUN_AND_BUILD_TIME
    value: "X-Forwarded-For"
  - key: UPSTREAM_REAL_IP_RECURSIVE
    scope: RUN_AND_BUILD_TIME
    value: "off"
  - key: PROXY_READ_TIMEOUT
    scope: RUN_AND_BUILD_TIME
    value: "120"
  - key: SOCKETIO
    scope: RUN_AND_BUILD_TIME
    value: "0.0.0.0:9000"
Notice that redis URL is redis-cache. It's the same logic like docker compose containers that are in the same network. Final configuration should look like:
name: do-frappe
region: nyc
alerts:
  - rule: DEPLOYMENT_FAILED
  - rule: DOMAIN_FAILED
envs:
  - key: REDIS_CACHE
    scope: RUN_AND_BUILD_TIME
    value: "redis-cache:6379"
  - key: REDIS_QUEUE
    scope: RUN_AND_BUILD_TIME
    value: "redis-queue:6379"
  - key: REDIS_SOCKETIO
    scope: RUN_AND_BUILD_TIME
    value: "redis-socketio:6379"
  - key: BACKEND
    scope: RUN_AND_BUILD_TIME
    value: "0.0.0.0:8000"
  - key: CLIENT_MAX_BODY_SIZE
    scope: RUN_AND_BUILD_TIME
    value: "50m"
  - key: FRAPPE_SITE_NAME_HEADER
    scope: RUN_AND_BUILD_TIME
    value: "$host"
  - key: UPSTREAM_REAL_IP_ADDRESS
    scope: RUN_AND_BUILD_TIME
    value: "127.0.0.1"
  - key: UPSTREAM_REAL_IP_HEADER
    scope: RUN_AND_BUILD_TIME
    value: "X-Forwarded-For"
  - key: UPSTREAM_REAL_IP_RECURSIVE
    scope: RUN_AND_BUILD_TIME
    value: "off"
  - key: PROXY_READ_TIMEOUT
    scope: RUN_AND_BUILD_TIME
    value: "120"
  - key: SOCKETIO
    scope: RUN_AND_BUILD_TIME
    value: "0.0.0.0:9000"
services:
  - name: redis-cache
    dockerfile_path: images/redis/Dockerfile
    source_dir: .
    github:
      branch: main
      deploy_on_push: true
      repo: energychoiceinc/do-frappe
    internal_ports:
      - 6379
    instance_size_slug: basic-s
    instance_count: 1
  - name: redis-queue
    dockerfile_path: images/redis/Dockerfile
    source_dir: .
    github:
      branch: main
      deploy_on_push: true
      repo: energychoiceinc/do-frappe
    internal_ports:
      - 6379
    instance_size_slug: basic-s
    instance_count: 1
  - name: redis-socketio
    dockerfile_path: images/redis/Dockerfile
    source_dir: .
    github:
      branch: main
      deploy_on_push: true
      repo: energychoiceinc/do-frappe
    internal_ports:
      - 6379
    instance_size_slug: basic-s
    instance_count: 1
  - name: mariadb
    dockerfile_path: images/mariadb/Dockerfile
    source_dir: .
    github:
      branch: main
      deploy_on_push: true
      repo: energychoiceinc/do-frappe
    internal_ports:
      - 3306
    instance_size_slug: basic-s
    instance_count: 1
  - dockerfile_path: images/frappe/Dockerfile
    name: frappe
    github:
      branch: main
      deploy_on_push: true
      repo: energychoiceinc/do-frappe
    http_port: 8080
    internal_ports:
      - 9000
      - 8000
    health_check:
      initial_delay_seconds: 10
      period_seconds: 10
      timeout_seconds: 5
      success_threshold: 1
      failure_threshold: 5
      http_path: /health
      port: 8080
    instance_size_slug: basic-m
    instance_count: 1
GitHub Action Setup
The final step is to create a GitHub Action that will automate the deployment process. Create a file at .github/workflows/deploy.yaml with the following configuration:
# .github/workflows/deploy.yml
name: Deploy to DigitalOcean App Platform

on:
  push:
    branches:
      - main
  workflow_dispatch:

jobs:
  deploy:
    runs-on: ubuntu-latest
    steps:
      - uses: actions/checkout@v4

      - name: Install doctl
        uses: digitalocean/action-doctl@v2
        with:
          token: ${{ secrets.DIGITALOCEAN_ACCESS_TOKEN }}

      - name: Deploy app
        run: |
          # Check if the app exists
          APP_ID=$(doctl apps list --no-header --format ID,Spec.Name | grep "do-frappe" | awk '{print $1}')

          if [ -z "$APP_ID" ]; then
            # App doesn't exist, create it
            echo "Creating new app 'do-frappe'..."
            doctl apps create --spec .do/app.yaml
          else
            # App exists, update it
            echo "Updating existing app 'do-frappe' (ID: $APP_ID)..."
            doctl apps update $APP_ID --spec .do/app.yaml
          fi
This GitHub Action is triggered in two ways:
- On push to the main branch
- Manually through the workflow_dispatch event
The workflow installs the DigitalOcean CLI tool (doctl), checks if your application already exists, and either creates a new application or updates the existing one based on your App Platform configuration file.
Generating a DigitalOcean Access Token
To enable the GitHub Action to deploy to your DigitalOcean account, you'll need to generate an access token:
- Go to the API Tokens page in your DigitalOcean account.
- Click "Generate New Token".
- Give it a descriptive name and set an expiration date if desired.
- Under "Custom Scopes", expand the "app" section and select
update,read, andcreatepermissions. - Click "Generate Token".
Important: Save this token securely. Once you leave or refresh the page, you won't be able to see it again and will need to generate a new token.
Forking the Repository
The next step is to fork the do-frappe repository to your own GitHub account. Then, update repo value on .do/app.yaml to be your Github username.
You also have to link your Github account with DO App Platform.
Adding Repository Secrets
After forking the repository, you need to add your DigitalOcean access token as a secret:
- Go to your forked repository on GitHub.
- Navigate to Settings > Secrets and variables > Actions.
- Click "New repository secret".
- Name the secret
DIGITALOCEAN_ACCESS_TOKENand paste your DigitalOcean access token as the value. - Click "Add secret".
Triggering the Deployment
Now you're ready to trigger the deployment:
- Navigate to the "Actions" tab in your forked repository.
- Select the "Deploy to DigitalOcean App Platform" workflow.
- Click the "Run workflow" dropdown and then "Run workflow".
The GitHub Action will now deploy your Frappe Framework application to DigitalOcean App Platform.
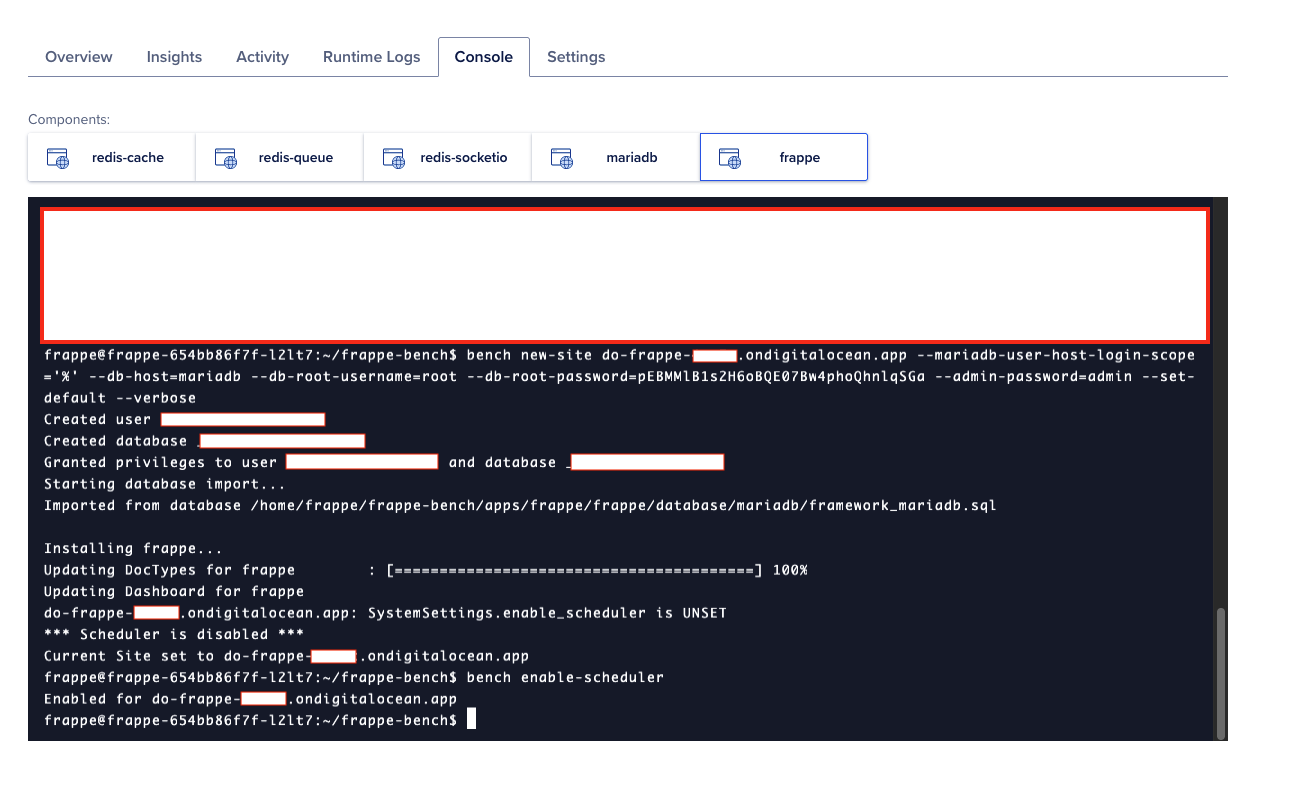
Creating a New Site
Once the deployment is successful, a public domain will be created for your application (something like do-frappe-XYZT.ondigitalocean.app). Now you need to create a new Frappe site:
- In the DigitalOcean App Platform dashboard, go to your application and click on the "frappe" component.
- Open the console and switch to the frappe user with
sudo su frappe. - Create a new site with the following command:
bench new-site do-frappe-XYZT.ondigitalocean.app --mariadb-user-host-login-scope='%' --db-host=mariadb --db-root-username=root --db-root-password=pEBMMlB1s2H6oBQE07Bw4phoQhnlqSGa --admin-password=admin --set-default --verboseNote that the database host is mariadb because that's the name of the service in our app.yaml file.
Adding Custom Domains
For a professional deployment, you'll likely want to use your own domain instead of the default DigitalOcean domain. There are two ways to add custom domains:
-
Through the App Platform UI:
- Navigate to your app in the DigitalOcean dashboard
- Go to Settings > Edit > Domains
- Add your custom domain
Through the
app.yamlconfiguration (recommended for deployments with CI/CD):
domains:
     - domain: test.mydomain.com
       type: PRIMARY
       zone: mydomain.com
     - domain: test2.mydomain.com
       type: ALIAS
       zone: mydomain.com
     - domain: test3.mydomain.com
       type: ALIAS
       zone: mydomain.com
The second approach is recommended if you're deploying with the .do/app.yaml file, as it will automatically add or remove domains based on your configuration.
You can create multiple Frappe sites on the same instance by running additional bench new-site commands:
bench new-site test.mydomain.com --mariadb-user-host-login-scope='%' --db-host=mariadb --db-root-username=root --db-root-password=pEBMMlB1s2H6oBQE07Bw4phoQhnlqSGa --admin-password=admin --set-default --verbose

bench new-site test2.mydomain.com --mariadb-user-host-login-scope='%' --db-host=mariadb --db-root-username=root --db-root-password=pEBMMlB1s2H6oBQE07Bw4phoQhnlqSGa --admin-password=admin --set-default --verbose
Conclusion and Production Considerations
This deployment approach provides a quick and easy way to get a Frappe Framework application up and running on DigitalOcean App Platform. However, there are several important considerations for production deployments:
Database Persistence: The MariaDB configuration shown here is for testing purposes only. The database will be wiped with every redeployment. For production, use a managed database service or set up a dedicated MariaDB server on a separate DigitalOcean Droplet.
Redis Persistence: Similarly, consider using DigitalOcean's managed Redis service for production deployments instead of the simple Redis containers shown here.
Storage Limitations: DigitalOcean App Platform offers limited storage (2GB). For production applications with significant file storage needs, consider using an object storage solution like DigitalOcean Spaces.
Security: Update the configurations to use more secure passwords and remove hardcoded credentials in production environments.
For more information on DigitalOcean App Platform limitations and best practices, refer to:
By following this guide, you've successfully deployed a Frappe Framework application on DigitalOcean App Platform with automated deployment through GitHub Actions. This setup provides a solid foundation that you can build upon for your specific use case.
EOF