Introduction
One of the ways to ensure that applications do not become overly complex as they grow is to maintain loosely coupled components.
Jakarta EE CDI is a specification that, quoting directly, "defines a powerful set of complementary services that help improve the structure of application code". CDI stands for Context and Dependency Injection and Weld is its reference implementation.
CDI enables us to write loosely coupled code, and in this post we will see how we can leverage Weld for this purpose.
Loose coupling and @Inject
One of the most common forms of coupling is the knowledge that one component has about how to instantiate another component, as shown in the following example:
public class A {

  public void perform() {
    // Knowing how to instantiate B increases A's coupling to B.
    B b = new B(...);
    b.method();
  }
}
When using Weld, the previous code would be modified as follows:
public class A {

  private final B b;

  // Weld will instantiate A and inject it with an instance of B
  public A(B b) {
    this.b = b;
  }

  public void perform() {
    b.method()
  }
}
The easiest way to get started with Weld is by using Weld SE, which allows you to explore Weld in a standard Java SE application. The simplest approach is to use the weld-se-shaded artifact:
org.jboss.weld.se
    weld-se-shaded
    6.0.2.Final
With Weld SE on the classpath, let's assume we have a class named Bean and that we want to delegate the responsibility of instantiating it to Weld.
What we need to do is build a container by adding Bean as a bean class—and then initialize the container.
A container is essentially what instantiates beans, satisfies their dependencies and manages their lifecycle.
Disabling auto discovery means, in broad terms, that we prefer to programmatically build and initialize the container.
import org.jboss.weld.environment.se.Weld;
import org.jboss.weld.environment.se.WeldContainer;

public class Main {

  public static void main(String[] args) {
    WeldContainer container = new Weld()
        // We will provide everything programmatically
        .disableDiscovery()
        // We add Bean to the container so that it can
        // instantiate it for us
        .addBeanClass(Bean.class)
        .initialize();

    // We ask the container to provide us with an instance
    // of Bean so that we can utilize it
    Bean bean = container.select(Bean.class).get();
    bean.perform();
  }

  private static class Bean {

    public void perform() {
      System.out.println("Bean has performed");
    }
  }
}
Running Main.main() will print "Bean has performed" to the console.
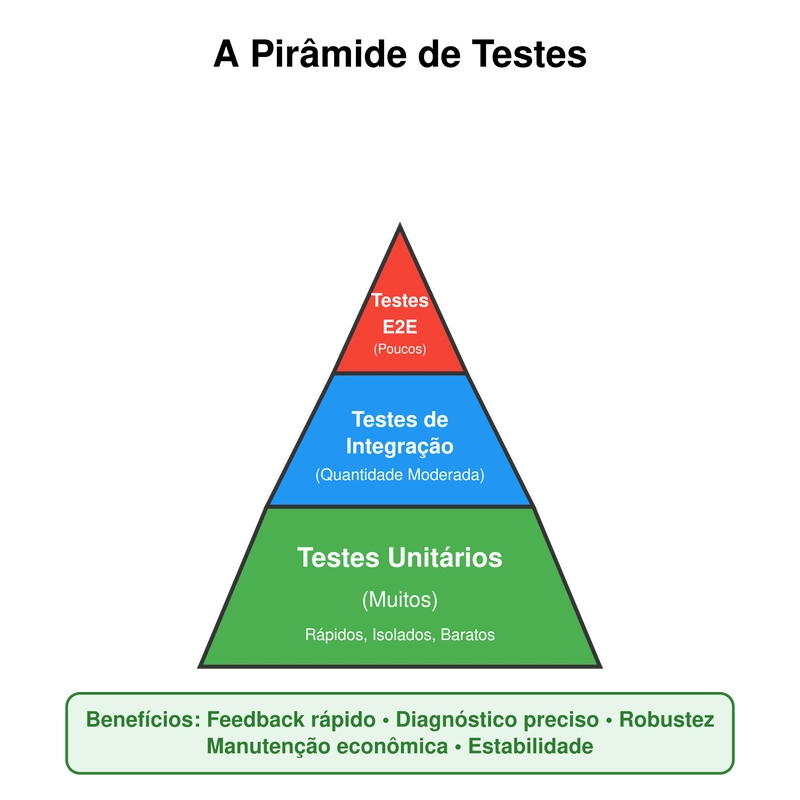
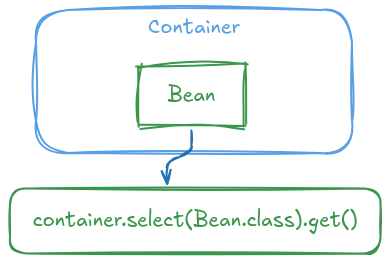
As depicted in the image below, container.select(Bean.class).get() will return an instance of Bean.
Let's make things more interesting by having the Bean class depend on another class: TransitiveBean. We want to leverage Weld to instantiate TransitiveBean for us and then pass the obtained instance to Bean. To achieve this, we can add TransitiveBean to the Weld container, restructure Bean to receive an instance of TransitiveBean via its constructor, and annotate the constructor with @jakarta.inject.Inject.
public static void main(String[] args) {
    WeldContainer container = new Weld().disableDiscovery()
        // Adding the beans to the container so that we can
        // delegate their instantiation to it.
        .addBeanClass(TransitiveBean.class)
        .addBeanClass(Bean.class)
        .initialize();

    Bean bean = container.select(Bean.class).get();
    bean.perform();
  }

  private static class Bean {

    private final TransitiveBean transitiveBean;

    @Inject
    public Bean(TransitiveBean transitiveBean) {
      // The container will first create an instance of
      // TransitiveBean, and then pass (inject) it as
      // an argument to this constructor
      this.transitiveBean = transitiveBean;
    }

    public void perform() {
      transitiveBean.transitivePerform();
    }
  }

  private static class TransitiveBean {

    public void transitivePerform() {
      System.out.println("TransitiveBean has performed");
    }
  }
Note that a bean may annotate at most one of its constructors with @Inject.
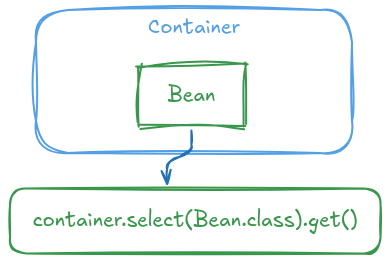
This time, running Main.main() will print TransitiveBean has performed. The container relieved Bean from being more tightly coupled to TransitiveBean than necessary. The following picture depicts what the container did for us.
The container is pretty flexible when it comes to finding a way to satisfy an injection point. If TransitiveBean were to implement an interface—say, TransitiveInterface—then Bean could safely replace its constructor parameter type TransitiveBean with TransitiveInterface, and the container would still be able to satisfy it. If we don't intend TransitiveBean to satisfy injection points typed with TransitiveInterface, we can restrict the types it can satisfy by annotating it with @Typed. More on this can be found in the CDI rpecification: Restricting the bean types of a bean.
Injection can also occur via two more mechanisms. It can be done via initializer methods—such as a setter method—or via field injection—directly on the fields. More on injection can be found in the Weld specification—Injection points.
In real-world applications, the container will be utilized to manage many more beans, with more complicated dependency relationships. In the following sections, we'll explore other ways to declare beans, their scope, and the lifecycle of a bean instance.
Scopes
In simple terms, the scope of a bean determines the lifecycle of its instances. It tells the container whether to create a distinct instance for each injection point that resolves to a given bean type, or to inject a single shared instance instead.
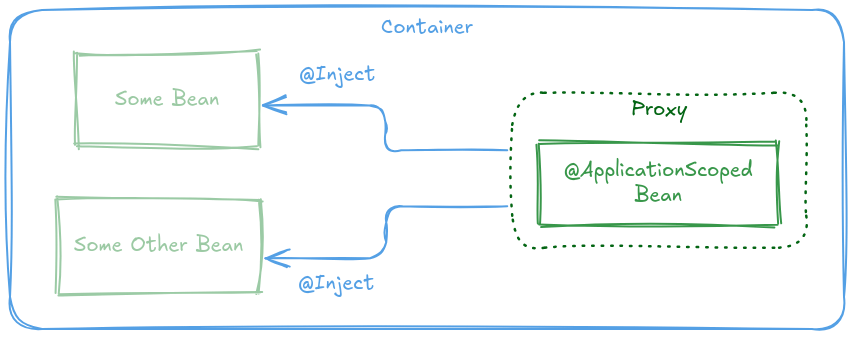
@ApplicationScoped
A bean annotated with @jakarta.enterprise.context.ApplicationScoped is instantiated only once by the container, and that single instance is used to satisfy all applicable injection points. @ApplicationScoped is considered a normal scope by the Weld specification, meaning that a proxy to the actual bean instance—also known as a client proxy—is what's injected.
Why a client proxy?
Using client proxies comes with a set of advantages. Paraphrasing from the Weld documentation, these include:
Serialization — Client proxies are serializable, even if the actual bean instance is not. This can be useful in certain scenarios, as explained in more detail in the Weld reference documentation.
Lazy Creation — The proxied bean instance isn't created until it's actually needed. This behavior can improve performance, as discussed in Weld Tip 3 - Boost performance of Weld apps.
Circular Dependencies — Client proxies make it possible to handle circular dependencies, which would otherwise be problematic in dependency injection.
Manual Bean Destruction — Since the injected object is a proxy, the actual bean instance can be safely swapped or destroyed manually when needed.
That said, client proxies can sometimes interfere with the expected behavior of an application. This might happen when a bean cannot be proxied—such as when it's a final class—or when its fields are meant to be accessed directly.
@Singleton
Just like with @ApplicationScoped, a bean annotated with @jakarta.inject.Singleton is also instantiated only once. However, unlike @ApplicationScoped, it is injected directly—without using a client proxy, as illustrated in the figure below:
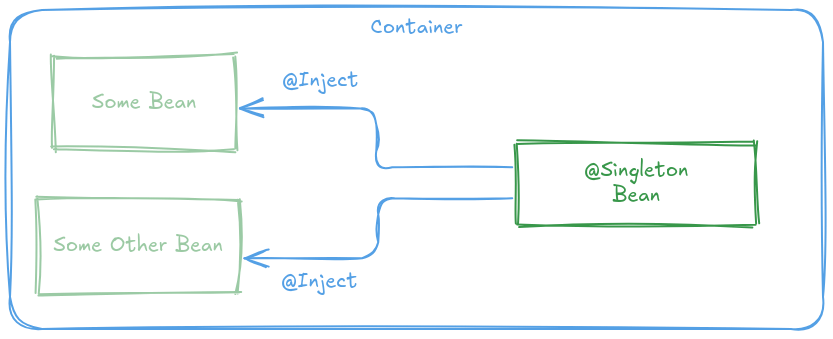
This lack of a client proxy is what makes @Singleton a pseudo-scope.
@Dependent
If a bean is not annotated, or is annotated with @jakarta.enterprise.context.Dependent, the container will create a distinct instance for each injection point that needs to be satisfied. Just like @Singleton, @Dependent is a pseudo-scope, and bean instances are injected directly—without the use of a client proxy.
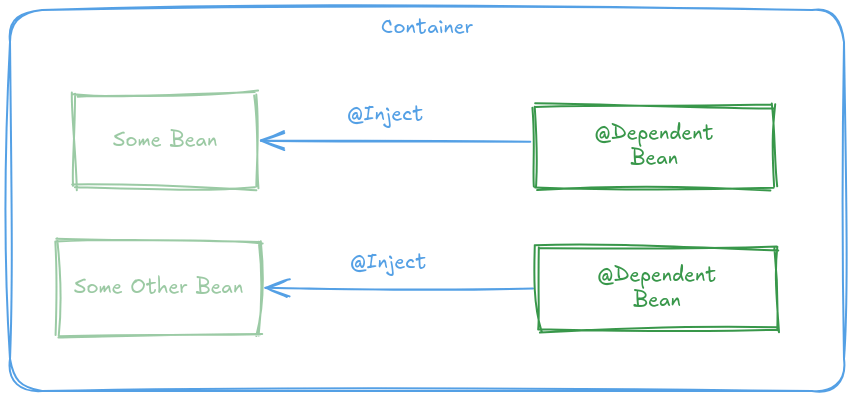
@Dependent bean instances are created when the injected bean is created, and destroyed when the injected bean is destroyed.
Further reading
More about scopes can be found in the CDI specs: Scopes.
Producer methods
Bean classes aren’t the only way the container can create injectable instances—producer methods can also be utilized. A producer method is created by annotating a bean method with @jakarta.enterprise.inject.Produces. The container will invoke a producer method when it needs an instance of the same type as the one returned by the method.
Producer methods offer some flexibility:
- The produced objects don’t need to be actual bean instances.
- The specific type of the produced object can be determined at runtime.
- You can produce and inject instances of types from third-party libraries.
The following snippet shows how to make the Weld container aware of methods annotated with @Produces:
public static void main(String[] args) {
    WeldContainer container = new Weld().disableDiscovery()
        .addBeanClasses(BeanWithProducers.class)
        .initialize();

    External external = container.select(External.class).get();
    external.perform();
  }

  public static class BeanWithProducers {

    @Produces
    public External produceExternal() {
      return new External();
    }
  }

  public static class External {

    public void perform() {
      System.out.println("External has performed");
    }
  }
Running Main.main() will print External has performed.
Producer methods are treated as initializer methods, which means that if they have parameters, the container will try to satisfy them when invoking the method.
@Produces
    // When this method is invoked, the container will pass an instance
    // of AnotherBean as an argument.
    public External produceExternal(AnotherBean anotherBean) {
      return new External(anotherBean);
    }
The scope of a producer method is not inherited from the bean it's defined in. Just like with bean classes, the default scope for a producer method is @Dependent, and it's possible to explicitly use other scopes, such as @ApplicationScoped and @Singleton.
Disposer methods
Along with producer methods, it's possible to specify disposer methods. A disposer method is defined in a bean class and has one of its parameters annotated with @jakarta.enterprise.inject.Disposes:
@Produces
  public External produceExternal() {
    return new External();
  }

  public void disposeExternal(@Disposes External external) {
    external.dispose();
  }

  [...]

  public static class External {

    public void perform() {
      System.out.println("External has performed");
    }

    public void dispose() {
      System.out.println("External has been disposed");
    }
  }
When an instance of the same type as the one annotated with @Disposes needs to be destroyed, the disposer method will be invoked.
Running Main.main() will print External has performed, followed by _External has been disposed.
Further reading
More on producer methods can be found in the Weld reference—Producer methods.
Lifecycle callbacks
Bean instances are created and eventually destroyed according to the scope they are given. It's possible to intercept these lifecycle events and invoke methods accordingly. CDI provides the @jakarta.annotation.PostConstruct and @jakarta.annotation.PreDestroy annotations, which can be used on methods of a bean:
public static void main(String[] args) {
    WeldContainer container = new Weld().disableDiscovery()
        .addBeanClass(Bean.class)
        .initialize();

    Bean bean = container.select(Bean.class).get();
    bean.perform();
  }

  private static class Bean {

    public void perform() {
      System.out.println("Bean has performed");
    }

    @PostConstruct
    public void postConstruct() {
      System.out.println("postConstruct() invoked");
    }

    @PreDestroy
    public void preDestroy() {
      System.out.println("preDestroy() invoked");
    }
  }
Running Main.main() will print the following output:
postConstruct() invoked
Bean has performed
preDestroy() invoked
Note that @PostConstruct methods are called after all injection has been performed.
What now?
Covering Weld SE is a large task—this post alone probably just scratches the surface of all the capabilities it has to offer. If you want to delve deeper into the topics introduced here—or explore more advanced concepts—check out the Weld reference and the CDI specification.
You might also be interested in checking out my Weld playground, which I created to support many of the examples featured in this post.
Happy welding!