
As AI agents move from prototypes to production, one of the most important — and most overlooked — aspects of working with them is how to test and evaluate their different behaviors.
Developers are constantly tweaking prompts, adjusting tools, or changing logic. QA engineers are tasked with verifying that responses are accurate, relevant, and aligned with product expectations. Yet, most teams lack a structured way to experiment, compare, and improve AI agents across different versions.
This guide outlines the core challenges and introduces a solution based on isolating agent versions, logging structured evaluations, and making experimentation reproducible and measurable.
The Challenge: Experimentation Without Chaos
AI agents'behavior changes based on:
- Prompt instructions
- Tool availability
- Model versions
- System context or user inputs
When you have multiple versions of an agent — say one that summarizes and another that provides detailed analysis — it's critical to compare them side-by-side. But teams often face several issues:
- Data contamination: Logs and test results from different agents get mixed together, making it hard to know which version produced which response.
- Lack of reproducibility: There's no easy way to re-run a previous experiment exactly as it was.
- No structured QA: Lacking structured QA feedback (such as latency, token count, relevance).
- No baseline comparison: Teams can’t measure progress across versions with consistent criteria.
These problems slow down iteration, introduce risk in production deployments, and leave QA teams guessing whether an agent is truly ready.
A Better Approach: Isolated Agent Versioning and Structured Evaluation
To solve this, we propose a workflow where each version of an AI agent is treated as a first-class experiment, with its own:
- Configuration (prompts, tools, goals)
- Interaction logs
- Quality metrics
This allows teams to compare behaviors in a clean, consistent, and repeatable way.
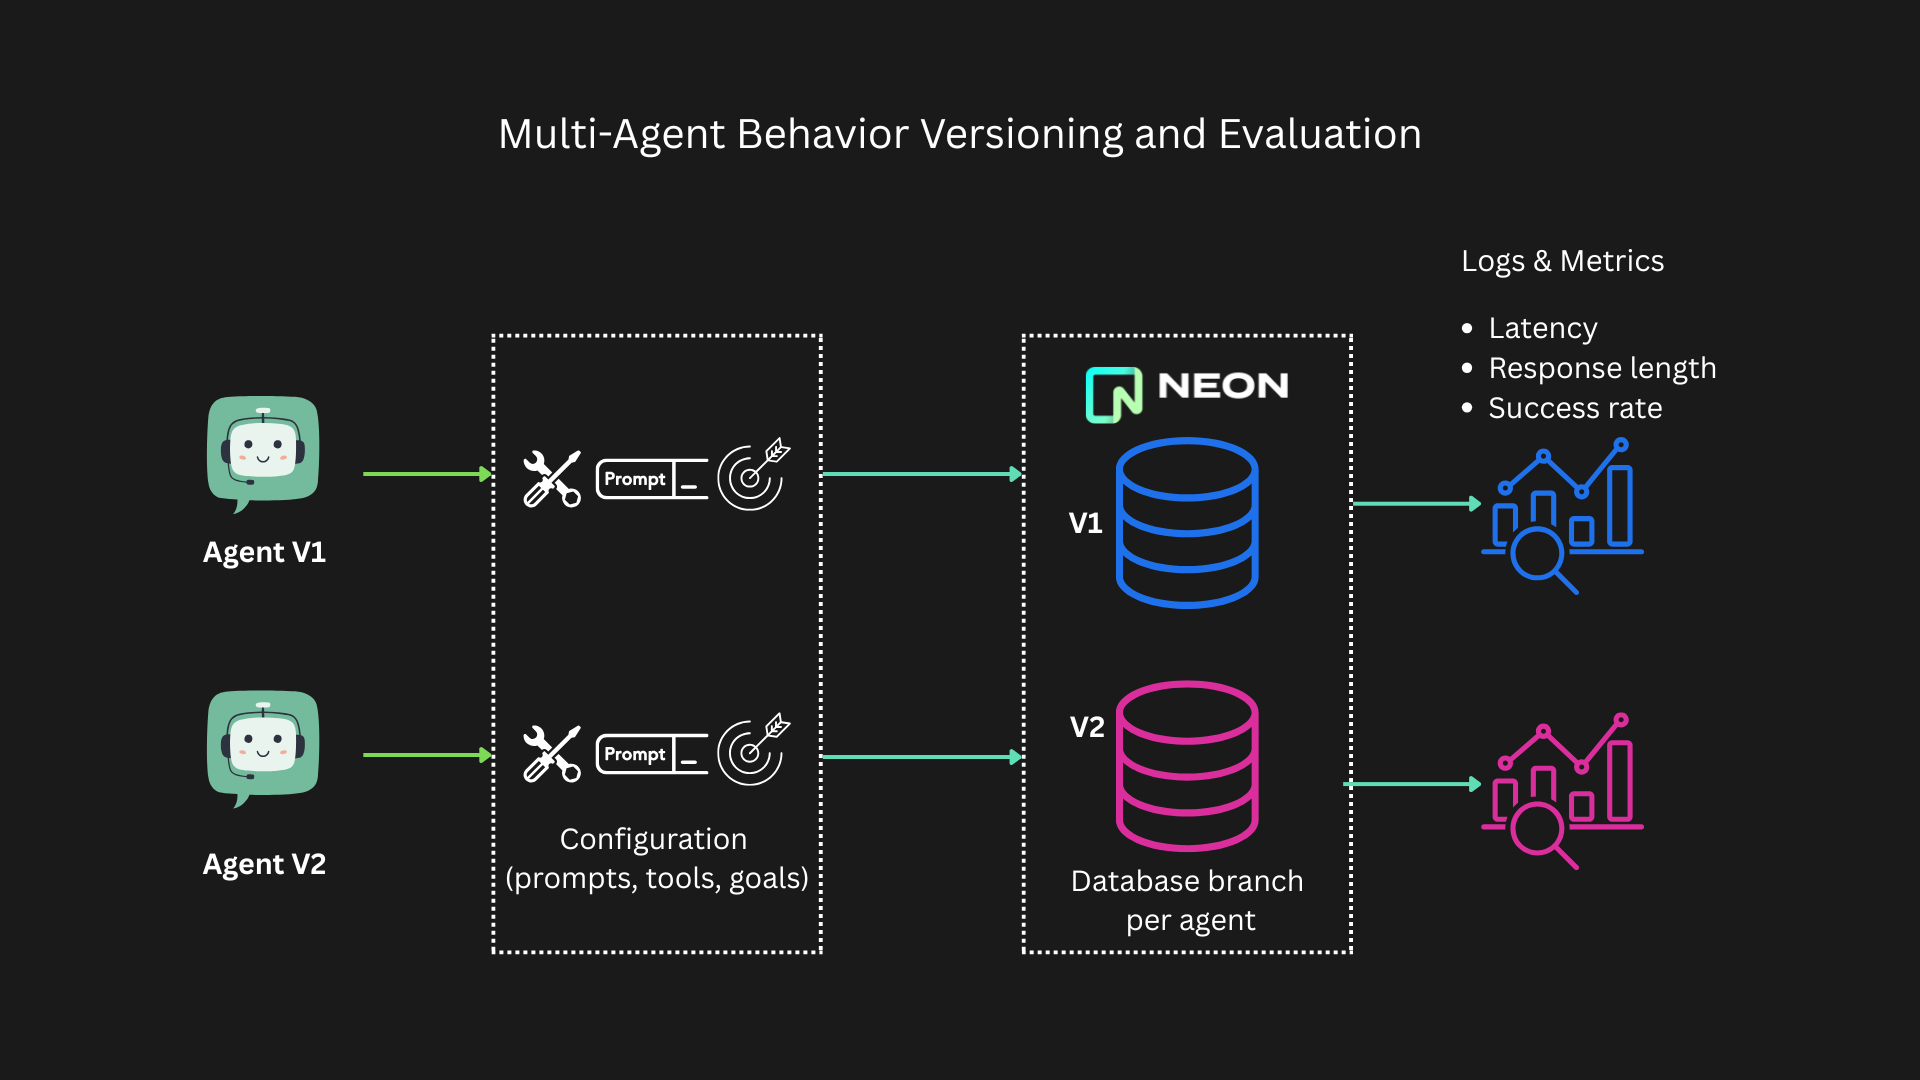
Here’s how it works using separate database branches in Neon Serverless Postgres for each version makes experimentation safe, testable, and reversible. We create our AI Agents using the Azure AI Agent Service. Explore the source code on https://github.com/neondatabase-labs/neon-azure-multi-agent-evaluation.
Multi-agent Versioning Setup Instructions
Prerequisites
Before you start, make sure you have:
- Python 3.9+
- An Azure subscription (create one for free)
- Azure AI Developer RBAC role (assign it)
Step 1: Create Neon Postgres on Azure
- Visit the Neon resource creation page on Azure Marketplace.
- Fill in the resource details and deploy it.
- After the resource is created, go to the Neon Serverless Postgres Organization service and click on the Portal URL. This brings you to the Neon Console.
- Click "New Project".
- Choose your region and project name
(e.g., “Multiversion AI Agents”).
Step 2: Create Two Branches for Versioning
In the Neon Console:
- Go to your project > Branches
- Create branch
v1fromproduction - Create branch
v2fromproduction
After both branches are created successfully, copy the Neon connection strings for each branch and note them down. You can find the connection details in the Connection Details widget on the Neon Dashboard.
NEON_DB_CONNECTION_STRING_V1=postgresql://[user]:[password]@[hostname]/[dbname]?sslmode=require
NEON_DB_CONNECTION_STRING_V2=postgresql://[user]:[password]@[hostname]/[dbname]?sslmode=require
Step 3: Create Database Schemas
Create database schemas to store agent configs and metric logs. Each branch will log data separately for each agent version. Run the following two SQL scripts for each branch using SQL Editor in the Neon Console.
- Agent configs table stores agent configurations where each agent version has a unique set of parameters:
- Prompt template
- List of tools
- Agent goal (e.g. summarization, classification)
CREATE TABLE agent_configs (
  id SERIAL PRIMARY KEY,
  agent_name TEXT,
  version TEXT,
  prompt_template TEXT,
  tools TEXT[],
  goal TEXT,
  created_at TIMESTAMP DEFAULT now()
);- Agent logs table stores interactions with QA metrics, where every response from an agent is logged with detailed information, including:
- How long the response took
- Number of words returned
- Whether important keywords were mentioned
- Whether the behavior met a heuristic definition of success
CREATE TABLE agent_logs (
  id SERIAL PRIMARY KEY,
  config_id INT REFERENCES agent_configs(id),
  user_input TEXT,
  agent_response TEXT,
  tool_used TEXT,
  success BOOLEAN,
  response_length INT,
  latency FLOAT,
  keyword_hit BOOLEAN,
  heuristic_success BOOLEAN,
  created_at TIMESTAMP DEFAULT now()
);
Step 3: Set Up Azure AI Agent Project
Create a new hub and project in the Azure AI Foundry portal by following the guide in the Microsoft docs. You also need to deploy a model like GPT-4o.
You only need the Project connection string and Model Deployment Name from the Azure AI Foundry portal. You can also find your connection string in the overview for your project in the Azure AI Foundry portal, under Project details > Project connection string.
Once you have all three values on hand: Neon connection strings, Project connection string, and Model Deployment Name, you are ready to set up the Python project to create an Agent from Python SDK.
Step 4: Clone Python Project and Install Dependencies
git clone https://github.com/neondatabase-labs/neon-azure-multi-agent-evaluation.git
cd neon-azure-multi-agent-evaluation
python -m venv .venv
source .venv/bin/activate  # or .venv\Scripts\activate on Windows
pip install -r requirements.txt
Step 5: Set Up Environment Variables
Create a .env file in the root directory:
AGENT_VERSION=v1
NEON_DB_CONNECTION_STRING_V1=your_neon_connection_string_branch_v1
NEON_DB_CONNECTION_STRING_V2=your_neon_connection_string_branch_v2
PROJECT_CONNECTION_STRING=your_azure_project_connection_string
AZURE_OPENAI_DEPLOYMENT_NAME=your_azure_openai_model
Step 6: Run Python script to generate agent metric logs
The script agents.py defines different behaviors for two agent versions: one generates concise summaries, the other provides detailed outputs using an external tool. It selects the Neon branches dynamically based on version. This setup lets teams compare how prompt engineering and tool usage affect the quality and relevance of AI responses. Also, this keeps logs clean, avoids accidental overlap, and allows rollback or re-analysis of specific runs.
...

project_client = AIProjectClient.from_connection_string(
    credential=DefaultAzureCredential(),
    conn_str=os.environ["PROJECT_CONNECTION_STRING"],
)

NEON_DB_URL = os.getenv(
    f"NEON_DB_CONNECTION_STRING_{os.getenv('AGENT_VERSION').upper()}"
)
conn = psycopg2.connect(NEON_DB_URL)
cursor = conn.cursor(cursor_factory=RealDictCursor)

...

tools = FunctionTool([search_ibm_news])
toolset = ToolSet()
toolset.add(tools)

agent_version = os.getenv("AGENT_VERSION", "v1").lower()

if agent_version == "v1":
    prompt_template = "Summarize input in 2–3 sentences with only key insights."
    tools_used = []
    goal = "Concise summarization"
    toolset_used = toolset
else:
    prompt_template = "Summarize content with full detail using the available tools."
    tools_used = ["query_summaries"]
    goal = "Detailed summarization with tools"
    toolset_used = toolset

agent = project_client.agents.create_agent(
    model=os.getenv("AZURE_OPENAI_DEPLOYMENT_NAME"),
    name=f"summarizer-{agent_version}-{datetime.now().strftime('%H%M%S')}",
    description=f"{goal} agent",
    instructions=prompt_template,
    toolset=toolset_used,
)

print(f"🤖 Agent '{agent.name}' created.")
...
After you run agents.py script, you will see in the console the similar output:
🛢️ Connected to Neon branch for version 'v1'.
🛠️ Tools initialized and registered.
🧠 Agent behavior configured for version 'v1'.
🤖 Agent 'summarizer-v1-194440' created.
📥 Agent config logged with ID 1.
🧾 Agent response retrieved.
📐 QA Stats:/n
   - ⏱️ Agent run completed in 3.71 seconds.
   - 🔤 Response length: 22 words
   - 🔍 Contains key terms: ✅
   - 🧰 Tool used in response: None
   - 🎯 Success heuristics passed: ✅
✅ Agent 'summarizer-v1-194440' response logged under version 'v1'
Step 7: Compare Versions Using SQL
Once Agent responses are logged, you can use simple queries to answer questions like:
- Which version is fastest on average?
- Which version generates the most complete or informative responses?
- Which version passes quality checks most consistently?
Example:
SELECT version,
       COUNT(*) AS total_runs,
       AVG(response_length) AS avg_words,
       AVG(latency) AS avg_response_time,
       AVG(CASE WHEN heuristic_success THEN 1 ELSE 0 END) * 100 AS success_rate
FROM agent_logs
JOIN agent_configs ON agent_logs.config_id = agent_configs.id
GROUP BY version;
You can run this SQL script for each database branch to compare two agents.
Benefits of This Approach
- Clean testing environments: Each version’s behavior is isolated and easy to audit.
- Structured QA: No more vague "feels better" judgments — you get concrete metrics per run.
- Faster iteration: Developers can deploy, test, and compare changes with clear feedback.
- Safe experimentation: Riskier prompt or tool changes can be tested without disrupting existing production agents.
Who This Is For
This workflow is especially useful for:
- AI/ML developers testing variations of prompt-engineered agents
- QA engineers tasked with validating the safety and accuracy of agent responses
- Product teams looking to ship new agent behavior confidently and with supporting evidence
Final Thoughts
Testing AI agents requires more than just manual review. By separating agent versions using database branches and logging structured QA data, teams gain visibility into behavior differences. This makes experimentation safe, comparisons measurable, and releases more confident.
Start small with two branches, test your agent changes independently, and grow from there as your AI agent ecosystem evolves.
