
This article is a supplement to "Analysis of Key Technical Principles for a Visual Drag-and-Drop Component Library". The previous article mainly explained the following functional points:
- Editor
- Custom Components
- Drag and Drop
- Deleting Components, Adjusting Layer Hierarchy
- Zoom In and Out
- Undo, Redo
- Component Property Settings
- Snapping
- Preview, Save Code
- Binding Events
- Binding Animations
- Importing PSD
- Mobile Mode
This article will supplement 4 more functional points based on the previous ones:
- Drag Rotation
- Copy, Paste, Cut
- Data Interaction
- Publishing
Like the previous article, I have updated the new features to GitHub:
Friendly reminder: It is recommended to read this alongside the source code for better results (this DEMO uses the Vue technology stack).
14. Drag Rotation
When writing the previous article, the original DEMO already supported rotation functionality. However, this rotation function still had many imperfections:
- It did not support drag rotation.
- The zoom in and out after rotation was incorrect.
- The automatic snapping after rotation was incorrect.
- The cursor for the eight resizable points after rotation was incorrect.
In this section, we will solve these four problems one by one.
Drag Rotation
Drag rotation requires the use of the Math.atan2() function.
Math.atan2() returns the angle in the plane (in radians) between the positive x-axis and the ray from the origin (0,0) to the point (x,y), i.e., Math.atan2(y,x). The y and x in Math.atan2(y,x) are both distances relative to the center point (0,0).
Simply put, we set the component's center point as the origin (centerX,centerY), the coordinates when the user presses the mouse down as (startX,startY), and the coordinates when the mouse moves as (curX,curY). The rotation angle can be calculated using (startX,startY) and (curX,curY).
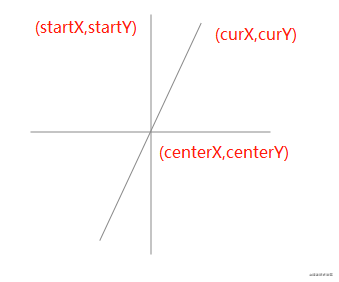
So how do we obtain the rotation angle from point (startX,startY) to point (curX,curY)?
Step one, set the coordinates when the mouse is clicked as (startX,startY):
const startY = e.clientY
const startX = e.clientX
Step two, calculate the component's center point:
// Get the position of the component's center point
const rect = this.$el.getBoundingClientRect()
const centerX = rect.left + rect.width / 2
const centerY = rect.top + rect.height / 2
Step three, set the coordinates when holding the mouse and moving as (curX,curY):
const curX = moveEvent.clientX
const curY = moveEvent.clientY
Step four, calculate the angles corresponding to (startX,startY) and (curX,curY) respectively, then subtract them to get the rotation angle. Additionally, it should be noted that the return value of the Math.atan2() method is a radian, so it needs to be converted to degrees. So the complete code is:
// Angle before rotation
const rotateDegreeBefore = Math.atan2(startY - centerY, startX - centerX) / (Math.PI / 180)
// Angle after rotation
const rotateDegreeAfter = Math.atan2(curY - centerY, curX - centerX) / (Math.PI / 180)
// Get the rotation angle value, startRotate is the initial angle value
pos.rotate = startRotate + rotateDegreeAfter - rotateDegreeBefore
Zoom In and Out
There is a bug with zoom in and out after the component has been rotated.

From the above image, you can see that displacement occurs when zooming in and out. Also, the direction of stretching does not match our dragging direction. The cause of this bug is: when initially designing the zoom functionality, rotation scenarios were not considered. So regardless of the rotation angle, the zoom calculations are still based on the unrotated state.
Let's look at a specific example:
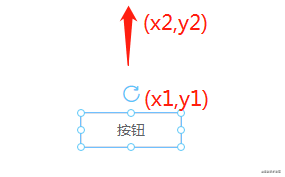
From the above image, you can see that without rotation, when holding a vertex and dragging upward, you only need to use y2 - y1 to get the drag distance s. At this point, adding s to the original height of the component will give the new height, while also updating the component's top and left properties.
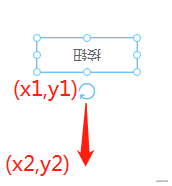
Now rotate 180 degrees, if you hold the vertex and drag downward, we expect the result to be an increase in the component's height. But the calculation method is the same as when there was no rotation, so the result is opposite to what we expect, the component's height will decrease (if you don't understand this phenomenon, imagine the unrotated image and holding the vertex dragging downward).

How to solve this problem? I found a solution from a GitHub project snapping-demo: associate the zoom with the rotation angle.
Solution
Below is a rectangle that has been rotated by a certain angle. Suppose now we drag the point at its top left to stretch it.
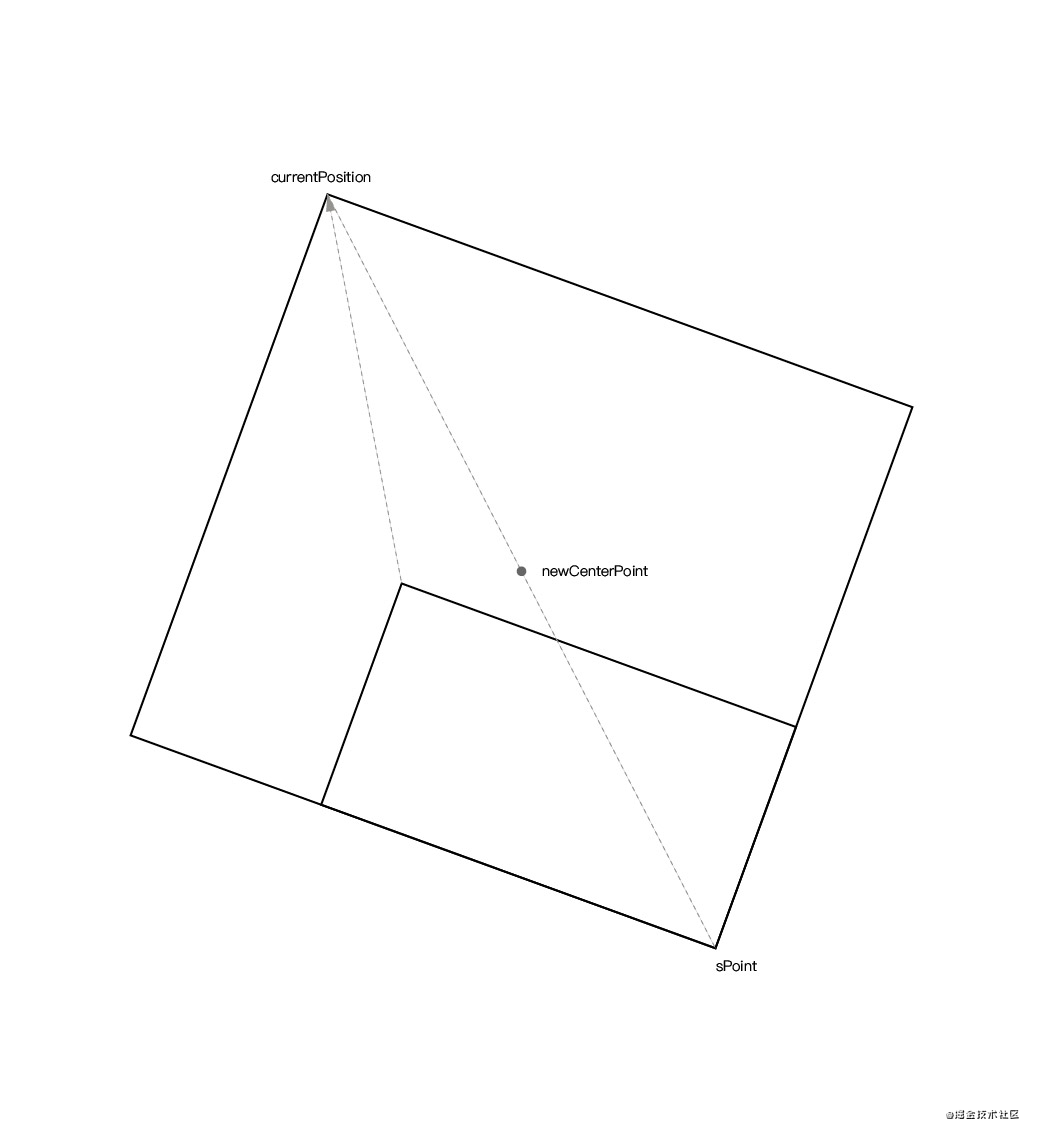
Now we will step by step analyze how to derive the correct size and displacement of the component after stretching.
Step one, when the mouse is pressed, calculate the center point of the component using the component's coordinates (regardless of the rotation angle, the component's top left properties don't change) and size:
const center = {
    x: style.left + style.width / 2,
    y: style.top + style.height / 2,
}
Step two, use the current click coordinates and the component's center point to calculate the symmetric point coordinates of the current click coordinates:
// Get canvas displacement information
const editorRectInfo = document.querySelector('#editor').getBoundingClientRect()

// Current click coordinates
const curPoint = {
    x: e.clientX - editorRectInfo.left,
    y: e.clientY - editorRectInfo.top,
}

// Get the coordinates of the symmetric point
const symmetricPoint = {
    x: center.x - (curPoint.x - center.x),
    y: center.y - (curPoint.y - center.y),
}
Step three, when stretching by holding the top left corner of the component, calculate the new component center point using the current mouse real-time coordinates and the symmetric point:
const curPositon = {
    x: moveEvent.clientX - editorRectInfo.left,
    y: moveEvent.clientY - editorRectInfo.top,
}

const newCenterPoint = getCenterPoint(curPositon, symmetricPoint)

// Calculate the coordinates of the midpoint between two points
function getCenterPoint(p1, p2) {
    return {
        x: p1.x + ((p2.x - p1.x) / 2),
        y: p1.y + ((p2.y - p1.y) / 2),
    }
}
Since the component is in a rotated state, even if you know the xy distance moved during stretching, you cannot directly calculate on the component. Otherwise, bugs will occur, such as displacement or incorrect zoom direction. Therefore, we need to calculate it when the component is not rotated.
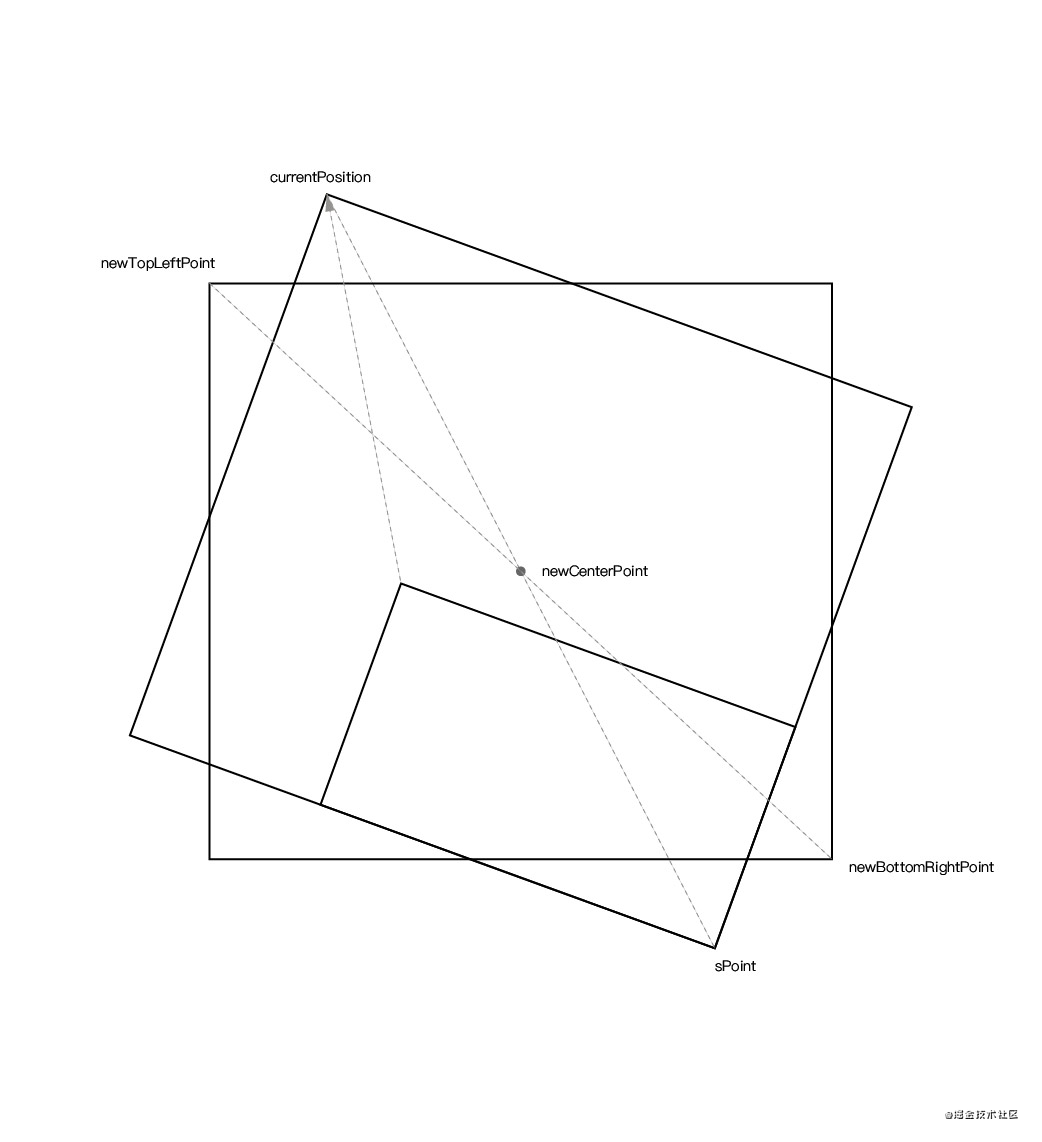
Step four, based on the known rotation angle, new component center point, and current mouse real-time coordinates, we can calculate the coordinates newTopLeftPoint of the current mouse real-time coordinates currentPosition when not rotated. Similarly, we can also calculate the coordinates newBottomRightPoint of the component's symmetric point sPoint when not rotated based on the known rotation angle, new component center point, and symmetric point.
The corresponding calculation formula is as follows:
/**
* Calculate the coordinates of a point after rotation around a center
* @param {Object} point The point coordinates before rotation
* @param {Object} center Rotation center
* @param {Number} rotate Angle of rotation
* @return {Object} Coordinates after rotation
* https://www.zhihu.com/question/67425734/answer/252724399 Rotation matrix formula
*/
export function calculateRotatedPointCoordinate(point, center, rotate) {
/**
* Rotation formula:
* Point a(x, y)
* Rotation center c(x, y)
* Point after rotation n(x, y)
* Rotation angle θ tan ??
* nx = cosθ * (ax - cx) - sinθ * (ay - cy) + cx
* ny = sinθ * (ax - cx) + cosθ * (ay - cy) + cy
*/
return {
x: (point.x - center.x) * Math.cos(angleToRadian(rotate)) - (point.y - center.y) * Math.sin(angleToRadian(rotate)) + center.x,
y: (point.x - center.x) * Math.sin(angleToRadian(rotate)) + (point.y - center.y) * Math.cos(angleToRadian(rotate)) + center.y,
}
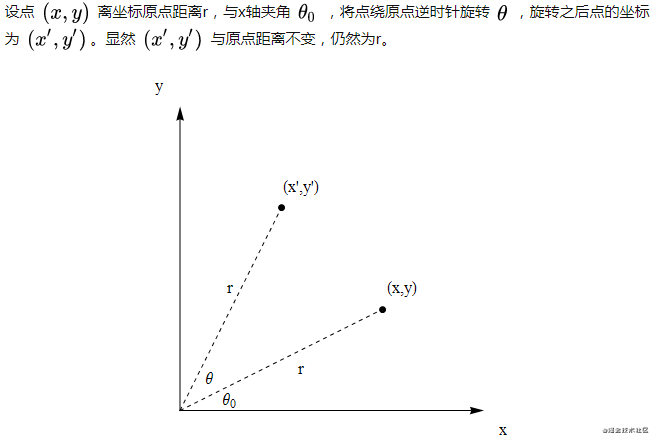
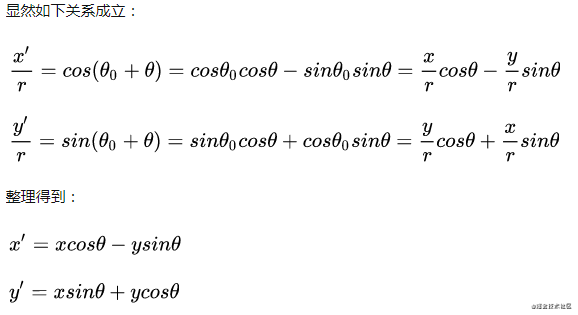
}The above formula involves knowledge of rotation matrices in linear algebra, which is really difficult for someone who hasn't gone to college. Fortunately, I found the reasoning process of this formula from an answer on Zhihu, here is the original text of the answer:
Through the calculations above, you can get the component's new displacement values top left and the new component size. The corresponding complete code is as follows:
function calculateLeftTop(style, curPositon, pointInfo) {
    const { symmetricPoint } = pointInfo
    const newCenterPoint = getCenterPoint(curPositon, symmetricPoint)
    const newTopLeftPoint = calculateRotatedPointCoordinate(curPositon, newCenterPoint, -style.rotate)
    const newBottomRightPoint = calculateRotatedPointCoordinate(symmetricPoint, newCenterPoint, -style.rotate)

    const newWidth = newBottomRightPoint.x - newTopLeftPoint.x
    const newHeight = newBottomRightPoint.y - newTopLeftPoint.y
    if (newWidth > 0 && newHeight > 0) {
        style.width = Math.round(newWidth)
        style.height = Math.round(newHeight)
        style.left = Math.round(newTopLeftPoint.x)
        style.top = Math.round(newTopLeftPoint.y)
    }
}
Now let's look at the zoom in and out after rotation:
Automatic Snapping
Automatic snapping is calculated based on the component's four properties top left width height. After rotating the component, these property values do not change. So no matter how many degrees the component rotates, the snapping is still calculated as if it were not rotated. This poses a problem: although the component's top left width height properties have not changed in actuality, they have changed in appearance. Below are two identical components: one not rotated, one rotated 45 degrees.
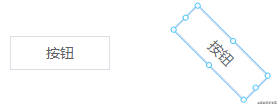
You can see that after rotation, the button's height property is different from the height we see in appearance, so in this case, the snapping incorrectly bug occurs.
Solution
How to solve this problem? We need to use the size and displacement of the component after rotation for snapping comparison. That is, don't compare the actual properties of the component, but compare the size and displacement we see.
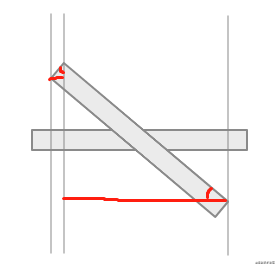
From the above image, you can see that the projection length of the rotated component on the x-axis is the sum of the lengths of the two red lines. The lengths of these two red lines can be calculated using sine and cosine, the left red line using sine and the right red line using cosine:
const newWidth = style.width * cos(style.rotate) + style.height * sin(style.rotate)Similarly, the height is also calculated:
const newHeight = style.height * cos(style.rotate) + style.width * sin(style.rotate)With the new width and height, and based on the component's original top left properties, we can derive the component's new top left properties after rotation. Here is the complete code:
translateComponentStyle(style) {
    style = { ...style }
    if (style.rotate != 0) {
        const newWidth = style.width * cos(style.rotate) + style.height * sin(style.rotate)
        const diffX = (style.width - newWidth) / 2
        style.left += diffX
        style.right = style.left + newWidth

        const newHeight = style.height * cos(style.rotate) + style.width * sin(style.rotate)
        const diffY = (newHeight - style.height) / 2
        style.top -= diffY
        style.bottom = style.top + newHeight

        style.width = newWidth
        style.height = newHeight
    } else {
        style.bottom = style.top + style.height
        style.right = style.left + style.width
    }

    return style
}
After the fix, the snapping also displays correctly.
Cursor
The cursor and the draggable direction are mismatched because the cursors of the eight points are fixed settings, not changing with the angle.

Solution
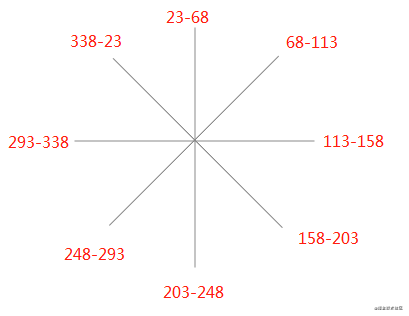
Since 360 / 8 = 45, we can allocate a range of 45 degrees for each direction, with each range corresponding to a cursor. At the same time, set an initial angle for each direction, which is the angle corresponding to each direction of the component when not rotated.
pointList: ['lt', 't', 'rt', 'r', 'rb', 'b', 'lb', 'l'], // Eight directions
initialAngle: { // Initial angle corresponding to each point
    lt: 0,
    t: 45,
    rt: 90,
    r: 135,
    rb: 180,
    b: 225,
    lb: 270,
    l: 315,
},
angleToCursor: [ // Cursor corresponding to each angle range
    { start: 338, end: 23, cursor: 'nw' },
    { start: 23, end: 68, cursor: 'n' },
    { start: 68, end: 113, cursor: 'ne' },
    { start: 113, end: 158, cursor: 'e' },
    { start: 158, end: 203, cursor: 'se' },
    { start: 203, end: 248, cursor: 's' },
    { start: 248, end: 293, cursor: 'sw' },
    { start: 293, end: 338, cursor: 'w' },
],
cursors: {},
The calculation method is also simple:
- Suppose the component has now rotated a certain angle a.
- Iterate through the eight directions, add a to the initial angle of each direction to get the current angle b.
- Iterate through the
angleToCursorarray to see in which range b falls, then return the corresponding cursor.
After the above three steps, you can calculate the correct cursor direction after the component has rotated. The specific code is as follows:
getCursor() {
    const { angleToCursor, initialAngle, pointList, curComponent } = this
    const rotate = (curComponent.style.rotate + 360) % 360 // Prevent negative angles, so + 360
    const result = {}
    let lastMatchIndex = -1 // Start matching the next one from the index of the last hit, reducing time complexity
    pointList.forEach(point => {
        const angle = (initialAngle[point] + rotate) % 360
        const len = angleToCursor.length
        while (true) {
            lastMatchIndex = (lastMatchIndex + 1) % len
            const angleLimit = angleToCursor[lastMatchIndex]
            if (angle < 23 || angle >= 338) {
                result[point] = 'nw-resize'
                return
            }

            if (angleLimit.start <= angle && angle < angleLimit.end) {
                result[point] = angleLimit.cursor + '-resize'
                return
            }
        }
    })

    return result
},
From the above GIF, you can see that the cursor on all eight directions now displays correctly.
15. Copy, Paste, Cut
Compared to the drag rotation function, copy and paste are simpler.
const ctrlKey = 17, vKey = 86, cKey = 67, xKey = 88
let isCtrlDown = false

window.onkeydown = (e) => {
    if (e.keyCode == ctrlKey) {
        isCtrlDown = true
    } else if (isCtrlDown && e.keyCode == cKey) {
        this.$store.commit('copy')
    } else if (isCtrlDown && e.keyCode == vKey) {
        this.$store.commit('paste')
    } else if (isCtrlDown && e.keyCode == xKey) {
        this.$store.commit('cut')
    }
}

window.onkeyup = (e) => {
    if (e.keyCode == ctrlKey) {
        isCtrlDown = false
    }
}
Monitor the user's key operations and trigger the corresponding operation when specific keys are pressed.
Copy Operation
In vuex, copyData is used to represent the copied data. When the user presses ctrl + c, deep copy the current component data to copyData.
copy(state) {
    state.copyData = {
        data: deepCopy(state.curComponent),
        index: state.curComponentIndex,
    }
},
At the same time, the index of the current component in the component data needs to be recorded, which will be used in the cut operation.
Paste Operation
paste(state, isMouse) {
    if (!state.copyData) {
        toast('Please select a component')
        return
    }

    const data = state.copyData.data

    if (isMouse) {
        data.style.top = state.menuTop
        data.style.left = state.menuLeft
    } else {
        data.style.top += 10
        data.style.left += 10
    }

    data.id = generateID()
    store.commit('addComponent', { component: data })
    store.commit('recordSnapshot')
    state.copyData = null
},
When pasting, if it's a key operation ctrl+v, add 10 to the component's top left properties to avoid overlapping with the original component. If using the right mouse button to execute the paste operation, place the copied component at the mouse click location.
Cut Operation
cut(state) {
    if (!state.curComponent) {
        toast('Please select a component')
        return
    }

    if (state.copyData) {
        store.commit('addComponent', { component: state.copyData.data, index: state.copyData.index })
        if (state.curComponentIndex >= state.copyData.index) {
            // If the current component index is greater than or equal to the insertion index, it needs to be incremented by one, because the current component has moved back one position
            state.curComponentIndex++
        }
    }

    store.commit('copy')
    store.commit('deleteComponent')
},
The cut operation is essentially still a copy, but after executing the copy, the current component needs to be deleted. To avoid the situation where the user executes a cut operation and then, instead of executing a paste operation, continues to execute cut, we need to restore the previously cut data. This is where the index recorded in the copy data comes into play, allowing us to restore the original data to its original position through the index.
Right-Click Operation
The right-click operation is the same as the key operation, one function with two triggering paths.
@click="copy" v-show="curComponent">Copy
 @click="paste">Paste
 @click="cut" v-show="curComponent">Cut

cut() {
    this.$store.commit('cut')
},

copy() {
    this.$store.commit('copy')
},

paste() {
    this.$store.commit('paste', true)
},
16. Data Interaction
Method One
Prepare a series of ajax request APIs in advance, select the API as needed when clicking on a component, and then fill in the parameters after selecting the API. For example, the following component shows how to use ajax requests to interact with the backend:
{{ propValue.data }}


export default {
    // propValue: {
    //     api: {
    //             request: a,
    //             params,
    //      },
    //     data: null
    // }
    props: {
        propValue: {
            type: Object,
            default: () => {},
        },
    },
    created() {
        this.propValue.api.request(this.propValue.api.params).then(res => {
            this.propValue.data = res.data
        })
    },
}
Method Two
Method two is suitable for purely display components. For example, there is an alarm component that can display the corresponding color based on data from the backend. In the editing page, you can request the websocket data available to the page through ajax:
const data = ['status', 'text'...]Then add different properties for different components. For example, there is a component a, whose bound property is status.
// Data that the component can receive
props: {
    propValue: {
        type: String,
    },
    element: {
        type: Object,
    },
    wsKey: {
        type: String,
        default: '',
    },
},
In the component, get this bound property through wsKey. After the page is published or previewed, request global data through websocket and place it on vuex. Then the component can access the data through wsKey.
{{ wsData[wsKey] }}


import { mapState } from 'vuex'

export default {
    props: {
        propValue: {
            type: String,
        },
        element: {
            type: Object,
        },
        wsKey: {
            type: String,
            default: '',
        },
    },
    computed: mapState([
        'wsData',
    ]),
There are many ways to interact with the backend, not just the two methods above. I'm just providing some ideas here for reference.
17. Publishing
There are two ways to publish a page: one is to render the component data as a separate HTML page; the other is to extract a minimum runtime from this project as a separate project.
Let me talk about the second method. The minimum runtime in this project is actually the preview page plus custom components. Extract this code as a project and package it separately. When publishing a page, pass the component data to the server in JSON format, and generate a unique ID for each page.
Suppose there are now three pages, the IDs generated for the published pages are a, b, c. When accessing a page, you just need to bring the ID, so you can get the component data corresponding to each page based on the ID.
www.test.com/?id=a
www.test.com/?id=c
www.test.com/?id=b
Lazy Loading
If there are too many custom components, for example, dozens or even hundreds. At this time, custom components can be imported using the import method to achieve lazy loading, reducing the first screen rendering time:
import Vue from 'vue'

const components = [
    'Picture',
    'VText',
    'VButton',
]

components.forEach(key => {
    Vue.component(key, () => import(`@/custom-component/${key}`))
})
Publish by Version
Custom components may have updates. For example, the original components have been used for half a year, and now there are functional changes. In order not to affect the original pages, it is recommended to bring the version number of the component when publishing:
- v-text
  - v1.vue
  - v2.vue
For example, the v-text component has two versions, when using it in the left component list area, you can bring the version number:
{
  component: 'v-text',
  version: 'v1'
  ...
}
This way, when importing components, you can import them according to the component version number:
import Vue from 'vue'
import componentList from '@/custom-component/component-list`

componentList.forEach(component => {
    Vue.component(component.name, () => import(`@/custom-component/${component.name}/${component.version}`))
})