
“Today, we step into Act Two — where Vagrant doesn’t just spin up machines, but lays the foundation for something greater: Ansible.”
In a world where infrastructure tools often compete with complexity, Ansible sets itself apart by keeping things refreshingly simple. It’s like that developer who shows up early, fixes half the issues before standup, and does it all with nothing more than YAML, SSH, and quiet confidence.
Ansible uses simple, human-readable scripts written in YAML, called playbooks, to automate tasks. You declare the desired state of a local or remote system, and Ansible ensures it stays that way. It’s agentless, relying on SSH for communication and Python on the target machines to execute tasks — no daemons, no fuss.

Why Build a Local Lab?
Before you deploy Ansible in production or try to tame a horde of cloud VMs, you need a safe space to test, break, and experiment.
Enter Vagrant.
With it, we can spin up a lightweight lab on your laptop:
- 🖥️ 1x Control Node (where Ansible is installed)
- 🌐 2x Managed Nodes (target servers for playbooks)
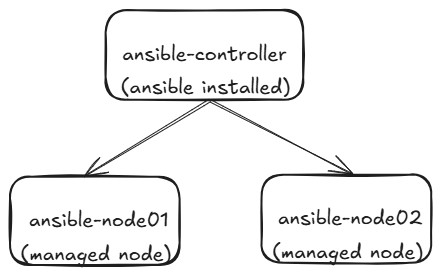
All of it on your machine. No cloud bills. No billing alarms.
The Vagrantfile: Defining Our Lab
Here’s the entire Vagrantfile we’ll use to build the lab:
# script to install and configure ansible on controller node
$ansibleSetup = <<-'SCRIPT'

sudo dnf install epel-release -y
sudo dnf install ansible -y

sudo tee -a /etc/ansible/ansible.cfg > /dev/null <SCRIPT


Vagrant.configure("2") do |config|

  # 'vagrant-hostmanager' plugin manages the '/etc/hosts' file on all the VMs, allowing them to resolve each other by hostname
  config.hostmanager.enabled = true
  config.hostmanager.manage_host = true

  ### Ansible Control Node ###
  config.vm.define "controller" do |controller|
      controller.vm.box = "geerlingguy/rockylinux8"
      controller.vm.hostname = "ansible-controller"
      controller.vm.network "private_network", ip: "192.168.56.10"

      controller.vm.provider "virtualbox" do |vb|
          vb.name = "ansible-controller"
          vb.memory = "1024"
          vb.cpus = "1"
      end

      # executing `ansibleSetup` on the controller node
      controller.vm.provision "shell", inline: $ansibleSetup

  end

  ### Ansible Node 01 ###
  config.vm.define "node01" do |node01|
      node01.vm.box = "geerlingguy/rockylinux8"
      node01.vm.hostname = "ansible-node01"
      node01.vm.network "private_network", ip: "192.168.56.11"

      node01.vm.provider "virtualbox" do |vb|
          vb.name = "ansible-node01"
          vb.memory = "512"
          vb.cpus = "1"
      end
  end

  ### Ansible Node 02 ###
  config.vm.define "node02" do |node02|
      node02.vm.box = "geerlingguy/rockylinux8"
      node02.vm.hostname = "ansible-node02"
      node02.vm.network "private_network", ip: "192.168.56.12"

      node02.vm.provider "virtualbox" do |vb|
          vb.name = "ansible-node02"
          vb.memory = "512"
          vb.cpus = "1"
      end
  end

end
📝 Let’s Break It Down
🧠 $ansibleSetup Script
This block provisions the controller node:
- Installs EPEL and Ansible
- Adds a minimal
ansible.cfgto disable host key checking (avoids SSH prompts)
🏗️ config.vm.define
We create three virtual machines:
- Controller: 1 GB RAM, with Ansible installed
- Node01 and Node02: 512 MB RAM each, act as Ansible targets
Each machine has a private static IP and uses the geerlingguy/rockylinux8 Vagrant box — a community favorite for Ansible labs.
🧾 Host Management
vagrant-hostmanager plugin keeps /etc/hosts files in sync, so machines can refer to each other by hostname.
Boot the Lab
Step 1: Install the Vagrant Hostmanager Plugin
Before running the Vagrantfile, you’ll need to install the vagrant-hostmanager plugin. This handy tool manages the /etc/hosts file on both your host machine and the VMs, allowing them to resolve each other by hostname (like ansible-controller, ansible-node01, etc.).
vagrant plugin install vagrant-hostmanager📝 Note: You might need admin/root privileges depending on your system. On Linux/macOS, run with
sudoif needed.
Once installed, the plugin will automatically update host entries during vagrant up and vagrant halt.
Step 2: Bring up the VMs
vagrant upStep 3: Create Your Inventory
Once the machines are running, SSH into the controller and create an inventory file:
vagrant ssh controller# /vagrant/inventory.ini
[all]
192.168.56.10
192.168.56.11
192.168.56.12
[controller]
192.168.56.10
[nodes]
192.168.56.11
192.168.56.12
[all:vars]
ansible_connection=ssh
ansible_user=vagrant
ansible_ssh_pass=vagrantThis is how Ansible knows where to connect, and who’s who in your infrastructure. The vagrant user with vagrant password is preconfigured on all Vagrant boxes — easy and perfect for learning.
🚀 Test It!
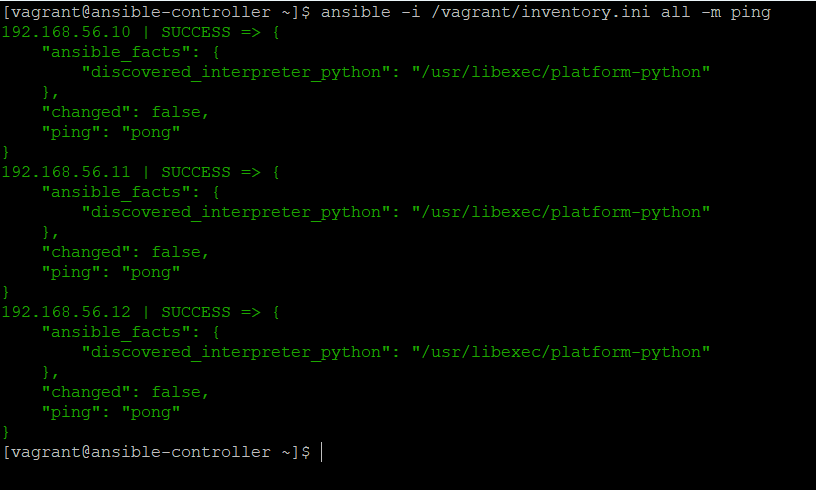
From the controller node:
ansible -i /vagrant/inventory.ini all -m pingIf all goes well, you’ll get a “pong” from every host. Congratulations. You’ve built your first functioning Ansible lab.
🎯 Final Thoughts
This lab is simple — but simplicity is underrated. Especially in automation.
In under 10 minutes, you’ve created a test environment that mirrors real-world infrastructure. You can now:
- Write and test Ansible playbooks
- Practice role-based automation
- Experiment fearlessly, with no risk to production
So the next time you hear someone say “just SSH in and fix it,” politely smile, open your laptop, and say: “Or maybe I’ll write a playbook.”
Because automation isn’t just faster — it’s smarter.
{
    "author"   :  "Kartik Dudeja",
    "email"    :  "[email protected]",
    "linkedin" :  "https://linkedin.com/in/kartik-dudeja",
    "github"   :  "https://github.com/Kartikdudeja"
}