
Authentication is like the lock on your app’s front door—It decides who gets in and keeps the bad guys out. Let’s say you’re embedding an e-signature workflow in your app where people sign contracts digitally without leaving your application. Should you use a simple API key, like a basic house key, or go with OAuth, which is more like a smart lock with extra security? Picking the wrong one could leave your app vulnerable.
In this guide, we’ll simplify the definitions of API keys and OAuth, compare them, and use the BoldSign e-signature platform as an example to show how they work in action. Whether you’re a developer setting things up or a business protecting important documents, we’ll help you choose the best option for your app—without the techy headache!
API keys explained – Simple authentication for requests
An API key is a single, secret string (e.g., xyz123abc456) that you send with every API request to prove you’re allowed to use the service.
Think of an API key as a key for the lock on your door. It opens the door easily, but if someone steals it, they can walk right in.
How it works
- Get the key: The service you’re connecting to generates the key for you.
- Send it: You add the key to your request, usually in the header or URL.
- Check for access: The server verifies the key and either lets you in or blocks you.
Why use API keys?
They’re simple and fast, making them ideal for:
- Low-security tasks (e.g., pulling public weather data).
- Quick testing or prototyping integration.
Strengthening API key security – Best practices
You can overcome the downsides of using an API key by adding extra layers of protection. For instance, setting the key to expire after a certain amount of time, adding a rate limit, or allowlisting IP addresses to restrict where the key can be used are effective measures. Another option is to use scoped permissions, ensuring the key only unlocks specific functions rather than granting full access. These steps make it harder for unauthorized users to exploit the key while keeping it convenient for legitimate users.
When to use API keys
API keys work best when security isn’t a top concern—like accessing open data or kicking off a small project. For anything sensitive, you’ll want something stronger (like OAuth). Perfect for lightweight jobs, but handle with care.
OAuth explained – Secure authentication for sensitive access
OAuth is a more sophisticated system. Instead of relying on a master key, like a password, it gives apps temporary tokens with specific permissions, approved by the user, for users to access only what’s needed.
You’re checking into a hotel. A keycard gives you access to your room, but not the penthouse or staff areas. It expires when you check out, and if you lose it, it’s useless to anyone else. OAuth works the same way: precise, temporary, and secure.
How it works
- User logs in: The user signs in to their account (e.g., via Google, Facebook, etc.).
- Consent given: They approve what the app can do, like reading emails or making posts.
- Token issued: The app gets a temporary access token (not the user’s password).
- Limited access granted: The token unlocks only the features that the user is allowed to use, nothing more.
Why use OAuth?
Think of it as a security upgrade over API keys. It’s perfect when:
- You’re dealing with sensitive data (e.g., e-signatures, private profiles).
- You want to control what your users access.
- You want to limit risks—no passwords are shared, and tokens expire or can be revoked.
Best practices for security, scalability, and user experience
By following these best practices, you can implement OAuth authentication that balances security, scalability, and user experience:
- Use the appropriate flow (e.g., authorization code with PKCE (Proof Key for Code Exchange) for public clients or client credentials for machine-to-machine communication), enforce HTTPS, and keep access tokens short-lived while securing refresh tokens.
- Define granular scopes to limit access, preregister and validate redirect URIs, and use state parameters to prevent CSRF attacks.
- Store secrets securely, use trusted providers, and ensure tokens aren’t exposed in logs or URLs.
When to use OAuth
OAuth is essential when security is critical, like integrating with a customer’s private account or managing confidential data. It’s overkill for simple, public API calls but essential for anything user-specific.
API keys vs. OAuth – A side-by-side comparison
API keys are quick and easy, while OAuth offers robust security at the cost of complexity. Here’s a side-by-side breakdown:
| Feature | API keys | OAuth |
|---|---|---|
| Ease of Use | Simple setup, plug and play | More steps, steeper learning curve |
| Security | Basic, vulnerable if leaked | Strong, with short-lived tokens |
| Best For | 1.Insensitive data handling 2.Internal tools 3.Testing |
1.User-facing apps 2.Sensitive data |
| Scalability | Lack of fine-grained control because they’re static, which may become a liability under high traffic | Fine-tuned permissions |
| Pros | 1.Simplicity 2.Ease of use |
1.Enhanced security 2.User authentication 3.Granular scopes 4.Scalability |
| Cons | 1.Limited security 2.No user context 3.No granular permissions 4.Key management |
1.Complexity 2.Overhead for simple use cases 3.Maintenance |
| Use Cases | Fetching public stats | Secure document signing |
API keys or OAuth? Two scenarios to help you choose.
Struggling to decide between using API keys and OAuth? Let’s break it down with real-world examples:
- API keys – Internal dashboard You’re building a simple dashboard to monitor BoldSign document statuses. It’s internal, sitting safely behind your firewall, and speed is the priority. An API key lets you hit the ground running—simple setup, no fuss, done in minutes.
- OAuth – Customer portal You’re designing a portal where customers sign contracts via BoldSign. Security is non-negotiable—each user needs their own access, locked to their actions. OAuth delivers short-lived tokens and granular control, keeping sensitive data safe.
Takeaway: Use API keys for fast, low-risk internal tools. Choose OAuth for user-facing apps where security and scalability matter.
API keys with BoldSign – Simple integration for developers
BoldSign API key authentication is a simple, fast way to connect your app to the eSignature service. It’s perfect for developers who want an easy setup without the complexity of OAuth.
Imagine you’re building a simple platform that helps users hire a freelancer for their project. When the user hires a freelancer, they need the freelancer to sign a contract quickly. Here’s how BoldSign API key authentication fits in:
- Setup: In BoldSign, go to the API section, click Generate API Key , and copy the key (e.g., xyz123-api-key). For more details, refer to the BoldSign API key documentation.
- Your app: In your platform’s back end (say, Node.js), you use this key to send a contract to the freelancer.
const axios = require('axios');
const fs = require('fs');

//Create the payload object
const payload = {
      title: ‘Freelance Gig Agreement',
      files: ["data:application/{{fileType}};base64,{{base64FileContent}}”], // Your file in base64 format,
      signers: [{
        name: 'Customer Name',
        emailAddress: '[email protected]',
        signerOrder: 1,
         formFields: [{
            id: 'signature1',
            fieldType: 'Signature',
            pageNumber: 1,
            bounds: { x: 100, y: 100, width: 200, height: 50 },
            isRequired: true,
        }]
     }],
  };

     // function to send contract
async function sendContract() {
 const response = await axios.post(
  'https://api.boldsign.com/v1/document/send',
   payload,
   {
       headers: {
           'Content-Type': 'application/json',
           'accept': 'application/json',
           'X-API-KEY': '{your BoldSign API key}'
       }
   }
 );
 console.log('Contract sent! Document ID:', response.data.documentId);
}

sendContract();3.Result: The freelancer receives an email with a link to sign the contract electronically. Once signed, your app is notified (via webhooks, if you set them up).
Try it: Generate an API key in BoldSign and fetch a document list in under 5 minutes.
OAuth with BoldSign – Secure access for your apps
If you’re building an app that integrates with BoldSign for e-signatures or document management, you’ll need a secure way to access user data. That’s where OAuth comes in. OAuth support in BoldSign lets your app get permission from users to do things like sign documents or fetch files, all without compromising security.
What is OAuth in BoldSign?
With OAuth in BoldSign , users sign into their BoldSign account and allow your app to do certain things, like send or view documents. After they agree to allow certain actions, your app gets a special token to use those features. BoldSign provides various OAuth scopes for secure authentication. See the BoldSign OAuth scopes documentation for more details.
Why it’s secure
- The token stops working after it expires.
- It only lets your app do specific things, not everything.
- It keeps the user’s password and login details safe, so they’re never shared with your app.
BoldSign supports three main OAuth flows, each with a unique purpose:
- Authorization code flow
- Implicit flow
- Client credentials flow
Here’s how they work, with use cases to make them stick:
Comparison between OAuth flows
| OAuth flow | How it works | Use case | Security strength | BoldSign example | Pros | Cons |
|---|---|---|---|---|---|---|
| Authorization code flow | 1. User logs into app 2. App redirects to auth server 3. Auth server approves user 4. App gets code from auth server 5. App swaps code for token |
Web apps or mobile apps that need user authentication | High (code swap adds security) | Secure customer signature portal | Most secure, versatile | Setup takes longer |
| Implicit flow | 1. User logs into app 2. Auth server sends token to app directly via URL 3. App uses it immediately |
Single-page apps (SPAs), browser-based | Medium (token in URL can be exposed—this is a security risk) | Quick signature widget | Simple, fast for browser apps | Less secure, token exposure risk |
| Client credentials flow | App asks auth server for token using its ID/secret, no user involvement | Machine-to-machine, back-end services | High (no user involvement, server-to-server) | Automated document processing | Simple, secure for app-only use | No user context, limited scope |
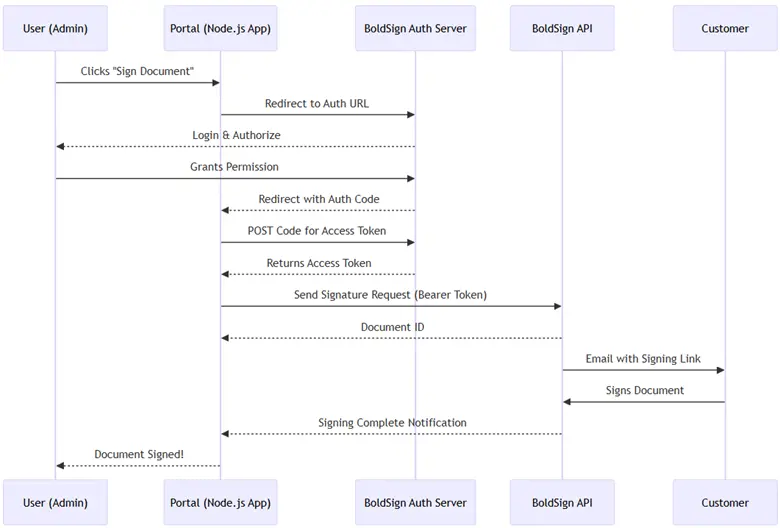
Authorization code flow in BoldSign
- How it works : Users log into BoldSign through a browser, grant your app permission, and your app receives an authorization code. This code is exchanged for an access token to use BoldSign API features.
- Use case : Ideal for web or mobile apps where the user needs to use BoldSign (e.g., signing documents).
- Security level : High. This flow uses a two-step process (code exchange) and supports PKCE for added security in public clients like mobile apps.
Security essentials for authorization code flow
To best secure authorization code flow, use PKCE to prevent code theft, enforce HTTPS for all communications, and validate redirect URIs to ensure codes are sent only to trusted locations. Include a unique state parameter to stop CSRF attacks, keep authorization codes short-lived, and store tokens securely on the server. These steps protect against common threats like interception and unauthorized access, keeping your app and users safe.
Imagine you’re building a web app for a small business. Customers log in, view their pending documents, and sign them via BoldSign. Authorization code flow fits this scenario perfectly because it’s secure (tokens stay on the server side), user-focused (customers authorize access), and scales for a full-featured portal.
How the use case works:
- The user clicks Sign Documents and is redirected to the BoldSign login form.
- The user approves the app, and BoldSign sends an authorization code to your server.
- Your server swaps the code for a token and uses it to fetch or sign documents.
Code sample
const express = require('express');
const axios = require('axios');
const qs = require('querystring');
require('dotenv').config();
 const crypto = require('crypto');
function generatePkcePair() {
    // Generate a code verifier
    const codeVerifier = crypto.randomBytes(32).toString('base64url');
    // Create a code challenge based on codeVerifier
    let codeChallenge = crypto.createHash('sha256').update(codeVerifier).digest('base64url');
    // Return both the code verifier and the code challenge
    return { codeVerifier, codeChallenge };
}
const app = express();
const PORT = process.env.PORT || 3000;

// BoldSign OAuth credentials (stored in .env)
const CLIENT_ID = process.env.BOLDSIGN_CLIENT_ID;
const CLIENT_SECRET = process.env.BOLDSIGN_CLIENT_SECRET;
const REDIRECT_URI = 'http://localhost:3000/callback';
const AUTH_URL = 'https://account.boldsign.com/connect/authorize';
const TOKEN_URL = 'https://account.boldsign.com/connect/token';
const API_URL = 'https://api.boldsign.com/v1/document/send';
const { codeVerifier, codeChallenge } = generatePkcePair();


// Middleware to parse URL-encoded bodies
app.use(express.urlencoded({ extended: true }));

// Step 1: Redirect to BoldSign Authorization URL
app.get('/login', (req, res) => {
 const authUrl = `${AUTH_URL}?response_type=code&client_id=${CLIENT_ID}&redirect_uri=${REDIRECT_URI}&scope=openid profile email offline_access BoldSign.Documents.All`&code_challenge=${codeChallenge}&code_challenge_method=S256`;
res.redirect(authUrl);
});

// Step 2: Handle Callback and Exchange Code for Token
app.get('/callback', async (req, res) => {
 const { code } = req.query;
 if (!code) {
   return res.status(400).send('Authorization code not provided');
 }
 try {
   const response = await axios.post(
     TOKEN_URL,
    qs.stringify({
       grant_type: 'authorization_code',
       code,
      redirect_uri: REDIRECT_URI,
       client_id: CLIENT_ID,
      client_secret: CLIENT_SECRET,
       code_verifier: CodeVerifier,
     }),
     { headers: { 'Content-Type': 'application/x-www-form-urlencoded' } });
   const { access_token } = response.data;

   // Step 3: Use the access token to send a signature request
   const signatureRequest = await sendSignatureRequest(access_token);
  res.send(`Document sent for signature! Request ID: ${signatureRequest.documentId}`);
 } catch (error) {
  console.error(error.response?.data || error.message);
  res.status(500).send('Error during authorization');
 }});

// Function to send a signature request using BoldSign API
async function sendSignatureRequest(accessToken) {
 const documentData = {
   title: 'Customer Agreement',
   files: ["data:application/{{fileType}};base64,{{base64FileContent}}”], // Your file in base64 format
   signers: [{
       name: 'Customer Name',
      emailAddress: '[email protected]',
      signerOrder: 1,
       formFields: [{
           id: 'signature1',
          fieldType: 'Signature',
          pageNumber: 1,
           bounds: { x: 100, y: 100, width: 200, height: 50 },
          isRequired: true,
         }]
     }],
 };

 const response = await axios.post(API_URL, documentData, {
   headers: { Authorization: `Bearer ${accessToken}`, 'Content-Type': 'application/json' }
 });
 return response.data;
}

// Start the server
app.listen(PORT, () => { console.log(`Server running on http://localhost:${PORT}`); });
How authorization code flow fits this use case:
- Security : The OAuth 2.0 authorization code flow ensures secure authentication without exposing credentials.
- Customer experience : Customers sign documents seamlessly via email links, all managed within the portal’s ecosystem.
See the BoldSign authorization code flow documentation for more details.
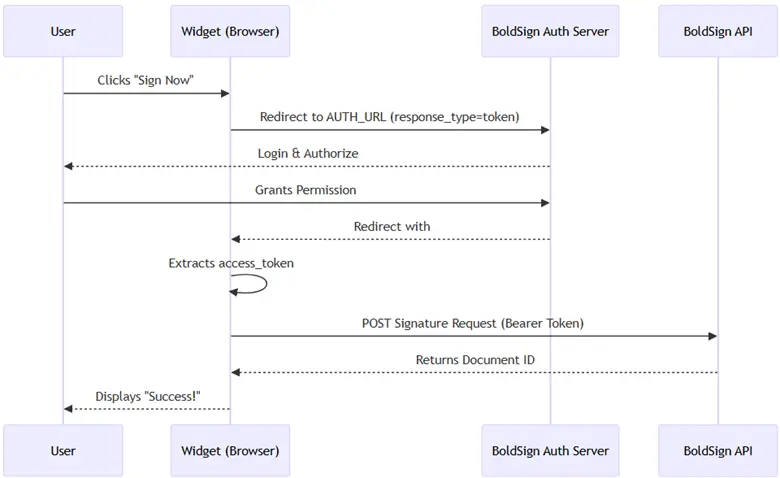
Implicit flow in BoldSign
- How it works: The user logs into BoldSign via a browser and grants your app permission. Your app directly receives an access token delivered in the URL fragment (e.g., after a redirect). Your app extracts the token from the URL and uses it to access BoldSign API features. No server-side code exchange is involved—everything happens in the browser.
- Use case: Perfect for single-page web apps (SPAs) or client-side apps (e.g., JavaScript-based apps) where there’s no secure back end to handle token exchanges, like a simple web tool that lets users sign documents without server interaction.
- Security level: Moderate. Tokens are exposed in the browser’s URL, which can be less secure than authorization code flow. It does not support PKCE (unlike authorization code flow), so it’s less ideal for public clients like mobile apps. It is best for trusted environments where token exposure risks are low.
Securing implicit flow – Best practices and why authorization code flow with PKCE wins
For better security in implicit flow, use HTTPS to encrypt data, short-lived tokens to reduce risk, and a state parameter to block CSRF attacks. Its key downside—tokens exposed in the browser URL—can’t be fully avoided, so switch to authorization code flow with PKCE if you can. This keeps tokens secure by avoiding browser exposure entirely.
Consider a quick signature widget: a small, JavaScript-based component embedded in a webpage. It allows users to quickly sign a document by using BoldSign and is secured via implicit flow, which delivers an access token directly in the URL fragment, avoiding server-side token exchange. This authorization flow is perfect for this scenario because speed and simplicity are key.
Code sample
<!DOCTYPE html>
<html lang="en">
<head>
   <meta charset="UTF-8">
   <meta name="viewport" content="width=device-width, initial-scale=1.0">
   <title>BoldSign Quick Signature Widget - OAuth Implicit Flow</title>
   <style>
      #signature-widget { width: 100%; height: 400px; border: none; }
      button { padding: 10px 20px; margin: 10px 0; }
   </style>
</head>
<body>
   <h2>Quick Signature Widget with BoldSign</h2>
   <button onclick="startOAuthFlow()">Sign Document</button>
   <iframe id="signature-widget" style="display: none;"></iframe>

   <script>
       // BoldSign OAuth settings
       const clientId = 'YOUR_CLIENT_ID'; // Replace with your BoldSign OAuth client ID
       const redirectUri = 'https://yourapp.com/callback'; // Replace with your registered redirect URI
       const scope = 'BoldSign.Documents.Create'; // Scope for creating documents
       const authorizeUrl = 'https://account.boldsign.com/connect/authorize';
       const documentId = 'YOUR_DOCUMENT_ID'; // Replace with your document ID.

       // Step 1: Start OAuth Implicit Flow
       function startOAuthFlow() {
           const authUrl = `${authorizeUrl}?response_type=token&client_id=${clientId}&redirect_uri=${redirectUri}&scope=${scope}&state=xyz123&nonce=abc456`;
           window.location.href = authUrl; // Redirect to BoldSign for user consent
       }

       // Step 2: Handle the redirect and extract access token from URL fragment
       function handleCallback() {
           const hash = window.location.hash.substring(1); // Remove the '#' from URL fragment
           const params = new URLSearchParams(hash);
           const accessToken = params.get('access_token');

           if (accessToken) {
               openSignatureWidget(accessToken);
           } else {
               console.error('No access token found in URL');
           }
       }

       // Step 3: Open the BoldSign Signature Widget in a new tab with the access token
       function openSignatureWidget(accessToken) {
           const widgetUrl = `https://app.boldsign.com/document/sign?access_token=${accessToken}&documentId=${documentId}`;
           window.open(widgetUrl, '_blank');
       }

       // Check if this is the callback page
       if (window.location.hash) {
           handleCallback();
       }
   </script>
</body>
</html>
How implicit flow fits this use case
- Quick : Implicit flow delivers the token directly, minimizing steps and avoiding server-side logic.
- Widget-friendly : Ideal for embedding in SPAs or static pages where all logic runs in the browser.
- Secure enough : While less secure than authorization code flow (due to token exposure in the URL), it’s suitable for low-risk, quick-sign scenarios with short-lived tokens.
See the BoldSign implicit flow documentation for more details.
Client credentials flow in BoldSign
- How it works: No user login or browser interaction is needed. Your app (e.g., a server or service) directly sends its client ID and client secret to the BoldSign token endpoint. BoldSign verifies these credentials and returns an access token immediately. Your app uses this token to call BoldSign API features on its own behalf (not a user’s).
- Use case: Ideal for machine-to-machine communication, like a back-end service or script that interacts with BoldSign (e.g., automating document creation or fetching reports)—for example, a server that periodically syncs data with BoldSign without user involvement.
- Security level: High. Relies on a securely stored client secret, which only trusted servers should handle. No user interaction means no browser-based risks, but the secret must be protected, making it unsuitable for public clients like mobile apps.
Securing client credentials flow: Best practices for server-to-server authentication
To secure client credentials flow, always use HTTPS to encrypt data between servers. Keep client secrets safe in a secure vault and avoid hardcoding them. Use short-lived tokens and rotate credentials often to limit damage if they’re leaked. This flow is ideal for server-to-server communication, ensuring simplicity and security without user involvement.
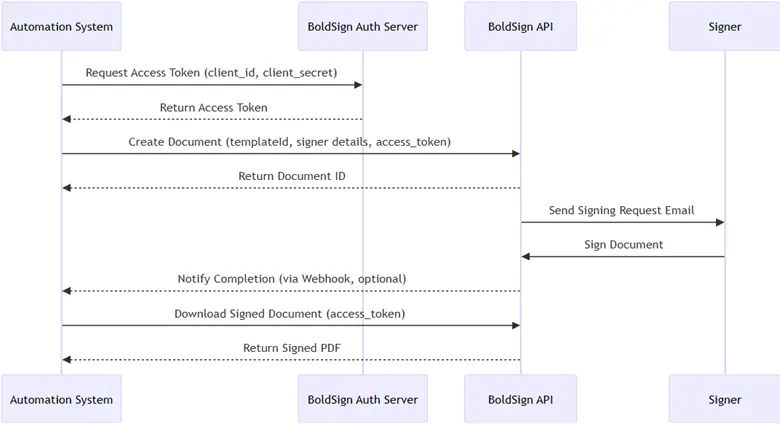
BoldSign use case – Automated document processing
Imagine a company that automates contract generation and signing for its clients. The system:
- Authenticates with BoldSign by using client credentials flow to obtain an access token.
- Generates a document from a predefined template.
- Sends the document to a recipient for signing.
- Tracks the document’s status and downloads the signed version once completed.
Client credentials flow This is ideal for scenarios where no user interaction is required, such as back-end systems that process bulk contracts.
Code sample
const axios = require('axios');

// Configuration
const clientId = 'your-client-id'; // Replace with your BoldSign Client ID
const clientSecret = 'your-client-secret'; // Replace with your BoldSign Client Secret
const tokenUrl = 'https://account.boldsign.com/connect/token';
const apiUrl = 'https://api.boldsign.com/v1/document/send’;

// Function to get access token using Client Credentials flow
async function getAccessToken() {
 try {
   const authString = Buffer.from(`${clientId}:${clientSecret}`).toString('base64');
   const response = await axios.post(
     tokenUrl,
     new URLSearchParams({ grant_type: 'client_credentials', scope: 'BoldSign.Documents.All BoldSign.Templates.All', client_id: clientId, client_secret: clientSecret }),
     { headers: { Authorization: `Basic ${authString}`, 'Content-Type': 'application/x-www-form-urlencoded', }, }
   );
   return response.data.access_token;
 } catch (error) {
  console.error('Error fetching access token:', error.response?.data || error.message);
   throw error;
 }}

// Function to create and send a document
async function createAndSendDocument(accessToken) {
 try {
   const response = await axios.post(
     apiUrl,
  {
      title: 'Customer Agreement',
      files: ["data:application/{{fileType}};base64,{{base64FileContent}}”], // Your file in base64 format,
      signers: [{
        name: 'Customer Name',
        emailAddress: '[email protected]',
        signerOrder: 1,
         formFields: [{
            id: 'signature1',
            fieldType: 'Signature',
            pageNumber: 1,
            bounds: { x: 100, y: 100, width: 200, height: 50 },
            isRequired: true,
        }]
     }],
  },
     { headers: { Authorization: `Bearer ${accessToken}`, 'Content-Type': 'application/json', }}
   );
  console.log('Document created successfully:', response.data.documentId);
   return response.data.documentId;
 } catch (error) {
  console.error('Error creating document:', error.response?.data || error.message);
   throw error;
 }}

// Main function to execute the flow
async function automateDocumentProcessing() {
 try {
   // Step 1: Get access token
   const accessToken = await getAccessToken();
   // Step 2: Create and send document
   const documentId = await createAndSendDocument(accessToken);
  console.log('Document processing initiated. Document ID:', documentId);
 } catch (error) {
  console.error('Automation failed:', error);
 }
}
// Run the automation
automateDocumentProcessing();
How client credentials flow fits this use case
- Automation : Client credentials flow is perfect for server-to-server communication because it eliminates user interaction.
- Scalability : This scenario’s setup can be extended to process multiple documents in bulk by iterating over a list of recipients or templates.
- Real-time processing : Webhooks could be added to handle document completion events, making the system fully automated.
See the BoldSign client credentials flow documentation for more details.
Quick-decision guide
- Use authorization code flow if you’re building a secure, server-based app where users log in and interact with BoldSign (e.g., a full-featured signature portal).
- Use implicit flow if you need a fast, browser-based solution for a lightweight feature (e.g., a one-off signature widget).
- Use client credentials flow if your app needs to automate BoldSign tasks without user input (e.g., bulk document processing).
See the BoldSign OAuth documentation for full setup details.
Key takeaways – API keys vs. OAuth
- Use API keys when you need speed and simplicity for low-risk, internal projects.
- Use OAuth when security and user permissions matter—like customer-facing apps or situations with sensitive data.
Conclusion
Choosing between an API keys and OAuth doesn’t need to be tricky. Use an API key for scenarios that require fast, simple access—like internal tools or public data pulls. Choose OAuth when you need top-notch security and user-specific access, and pick the flow that fits your project, like the authorization code flow for web apps or the client credentials flow for server-to-server automation. With BoldSign, you can test both effortlessly—start a free trial, set up an API key or OAuth flow, and see what works best for you. Ready to dive in? Visit our website and sign up today.