This article will discuss the practice of deployment using GitLab Pipeline with a Continuous Integration/Continuous Deployment (CI/CD) approach. My goal in creating this article is to facilitate indie hackers and organizations in implementing CI/CD in their applications, as well as to share what I use and apply in the applications I create.
To facilitate the delivery of the material, I will provide a perspective where we are part of a team with a messy deployment and development flow. The team currently faces several problems:
Deployment Process Takes Too Long: The deployment process takes more than 10 minutes due to manual steps performed by engineers or DevOps. For example, DevOps needs to manually deploy your code using FTP or similar server synchronization tools.
Discrepancies Between the Production and Other Environments: The application running in the production environment significantly differs from what is in the local or staging environment. Sometimes, issues that occur in the production application do not happen when the application is running in the local or staging environment.
Making Bug Fixing and Testing Processes Very Difficult: There are limitations in the involvement of engineers in the deployment process. This results in a heavy reliance on the DevOps team, leading to a single point of failure when DevOps is unavailable for deployment.
Difficulty in Performing Rollbacks: When errors occur in the newly deployed application, the rollback process takes a considerable amount of time and is prone to human errors.
Roughly, if we were to visualize it, the deployment process flowchart within the team would look something like this:
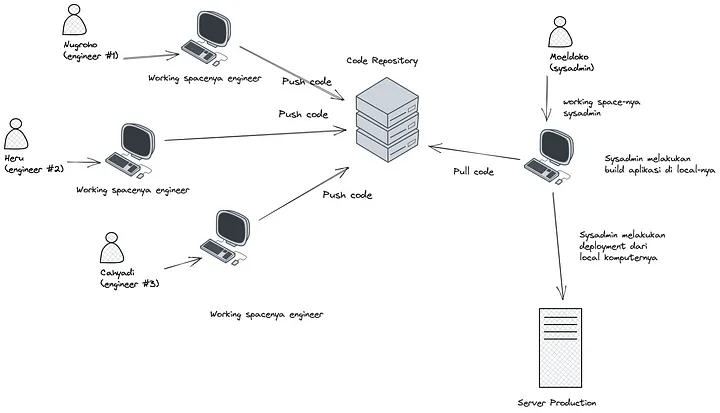
In the graph above, we can see that each engineer performs development locally and merges their code into a code repository with good version control. Afterward, the responsibility for deployment falls entirely on the DevOps or sysadmin team. The deployment process also involves using FTP to transfer all files to the server, and sysadmins manually check the code one by one without knowing whether the code is suitable for deployment or not.
From the graph, what can be improved? Imagine if the deployment process could be made easy, with just a click of a button triggering automatic testing for all changes made by engineers, and the deployment process no longer required DevOps because the application synchronization on the server was also automated.
Then, we wouldn’t have to waste time worrying about deployment. DevOps would have more time to focus on comprehensive system improvements without sacrificing their time to deploy code whose significance they may not fully understand. Engineers could also directly participate in the deployment process, broadening their knowledge base and fostering a strong sense of ownership over the code they create.
From these identified issues, these are the four actions we will take:
Automate the Deployment Process: We will automate the deployment process, eliminating the need for DevOps intervention and reducing deployment time to less than 10 minutes.
Automated Application Testing (Self-Test Application): We will enable the application to test itself and perform automated quality checks.
Utilize Containers: To minimize code drift, we will use Docker containers.
Efficient Rollback System: In case of deployment errors, we will implement an efficient rollback mechanism for quick mitigation.
These steps will help streamline the deployment process, enhance application quality, and provide a more efficient and reliable deployment pipeline.
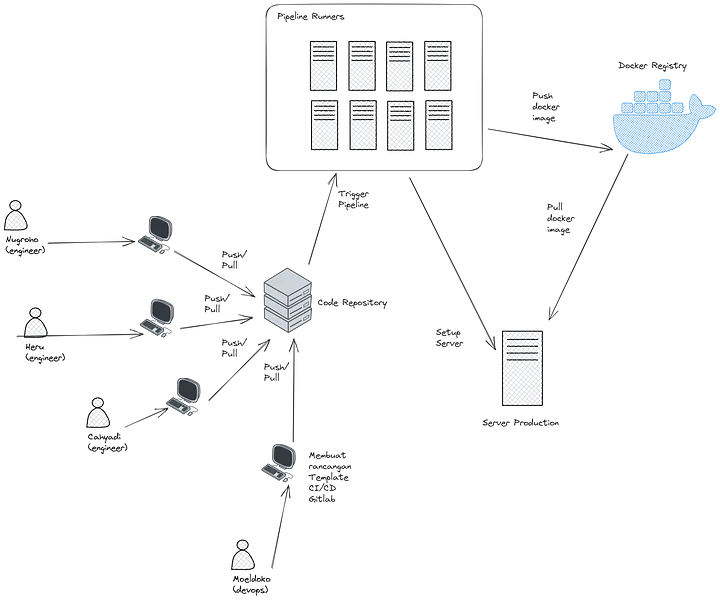
Well, more or less, what we are going to create is as shown in the above diagram. With the new flow, we have eliminated Moeldoko’s (DevOps) sole responsibility as the application deployer to production, and the deployment process is now fully automated by GitLab Pipeline.
Things you need before proceeding
To follow the practices in this article, make sure you have the following tools in your local environment:
Here’s the translation of your requirements:
- git: We will use this as our version control tool.
- docker: We will use Docker to build our containers locally.
- go: In this article, we use Go as an example application, so you need to install Go.
- wsl2 (if using Windows): If you are using Windows, you should use WSL2 and install all your dependencies within WSL.
- Gitlab: To follow the next steps, make sure you have an account on GitLab.com.
- VM: Of course, you need to prepare a VM, whether it’s on your local machine or with a cloud provider. I personally recommend trying it on a cloud VM to get a more realistic use case experience.
By the way, a disclaimer before we proceed further. The step-by-step tutorial I’ve written in this article uses Ubuntu within the WSL system, and I will also be using commands that are available within that operating system. If you are using a different operating system, please adjust accordingly to your needs.
Step 1: Create a Golang Application
In the first step, we will create a Golang application. The application we are going to create is a simple one with one endpoint and includes unit tests. If you already have your own Golang application and you want to use it for this example, you can skip to the second step.
First, run the script below to create a new directory and create the main.go file.
mkdir golang-cicd && cd golang-cicd
echo 'package main\\n\\nfunc main() {\\n\\n}' > main.go
After that, initialize the Golang package by running the following command, don’t forget to replace ‘alianarib’ with your GitLab username:
go mod init gitlab.com/alianarib/gocicd
go mod tidy
Initialize the Git repository with ‘main’ as your main branch using the following command:
git init
git checkout -b main
Create a new folder inside the project folder named ‘handler’.
mkdir handlerThen create a file named ‘handler.go’ inside the ‘handler/’ folder.
package handler

import (
 "fmt"
 "net/http"
 "os"
)

func Hello(w http.ResponseWriter, r \*http.Request) {
 fmt.Fprintln(w, "Hello, World! My name is:", os.Getenv("MYNAME"))
}

func Goodbye(w http.ResponseWriter, r \*http.Request) {
 fmt.Fprintln(w, "Goodbye, World! My name is:", os.Getenv("MYNAME"))
}
The ‘handler’ package is used to store all the HTTP handlers we will use. In this file, we also utilize an environment variable called ‘MYNAME,’ which will be automatically filled with the value we declare in our respective environment variables.
Next, create unit tests in the ‘handler_test.go’ file inside the ‘handler/’ folder.
package handler

import (
 "fmt"
 "net/http"
 "net/http/httptest"
 "os"
 "testing"
)

func TestHelloHandler(t \*testing.T) {
 os.Setenv("MYNAME", "the hash slinging slasher")
 req, err := http.NewRequest("GET", "/hello", nil)
 if err != nil {
  t.Fatal(err)
 }

 recorder := httptest.NewRecorder()
 handler := http.HandlerFunc(Hello)

 handler.ServeHTTP(recorder, req)

 if status := recorder.Code; status != http.StatusOK {
  t.Errorf("handler returned wrong status code: got %v want %v", status, http.StatusOK)
 }

 expected := fmt.Sprintf("Hello, World! My name is: %s\\n", os.Getenv("MYNAME"))
 if recorder.Body.String() != expected {
  t.Errorf("handler returned unexpected body: got %v want %v", recorder.Body.String(), expected)
 }
}

func TestGoodbyeHandler(t \*testing.T) {
 os.Setenv("MYNAME", "the hash slinging slasher")

 req, err := http.NewRequest("GET", "/goodbye", nil)
 if err != nil {
  t.Fatal(err)
 }

 recorder := httptest.NewRecorder()
 handler := http.HandlerFunc(Goodbye)

 handler.ServeHTTP(recorder, req)

 if status := recorder.Code; status != http.StatusOK {
  t.Errorf("handler returned wrong status code: got %v want %v", status, http.StatusOK)
 }

 expected := fmt.Sprintf("Goodbye, World! My name is: %s\\n", os.Getenv("MYNAME"))
 if recorder.Body.String() != expected {
  t.Errorf("handler returned unexpected body: got %v want %v", recorder.Body.String(), expected)
 }
}
These unit tests will be used as part of continuous integration, specifically as a component to make our application a self-test application. Next, modify your ‘main.go’ file to look like the following:
package main

import (
 "fmt"
 "net/http"
 "time"

 "gitlab.com/alianarib/gocicd/handler"
)

func main() {
 http.HandleFunc("/hello", handler.Hello)
 http.HandleFunc("/goodbye", handler.Goodbye)

 server := &http.Server{
  Addr:         ":8080",
  Handler:      http.DefaultServeMux,
  ReadTimeout:  10 \* time.Second, // Set a reasonable read timeout
  WriteTimeout: 10 \* time.Second, // Set a reasonable write timeout
 }

 fmt.Println("Server started at :8080")
 if err := server.ListenAndServe(); err != nil {
  panic(err) // Handle the error appropriately
 }
}
In the main function, several operations are performed, including registering the 'Hello' and 'Goodbye' handlers we created earlier and running an HTTP server on port 8080. If you have successfully followed all the instructions above, your folder and file structure will look like this:
.
├── go.mod
├── handler
│   ├── handler.go
│   └── handler\_test.go
└── main.go

1 directory, 4 files
After that, try running the application using the command MYNAME=arib go run main.go. The application will then run on port 8080.
If everything is running smoothly, go ahead and commit to your current ‘main’ branch.
Step 2: Create a Dockerfile and docker-compose.yaml
In this step, we will create a Dockerfile and docker-compose.yaml as part of the deployment to production using Docker. The aim is to reduce code drift, which is what we want to achieve.
First, what you need to do is create a Dockerfile in the root directory of your project. Generally, here is the common configuration used for Golang applications:
\# We will use the official Golang Docker image
FROM golang:1.20-alpine AS builder

\# Set the /app folder as the working directory
\# All subsequent commands will be executed in this folder
WORKDIR /app

\# Copy all files from the current directory
\# where we run the docker build command
\# into the /app folder in the Docker image
COPY . /app/

\# Build the application within the Docker image
RUN GOOS=linux GOARCH=amd64 CGO\_ENABLED=0 go build -o gocicd main.go

\# Declare the final step
\# Still use the official Golang Docker image
FROM golang:1.20-alpine

\# Copy the build result from the previous step
\# into the /usr/local/bin directory
COPY --from=builder ./app/ /usr/local/bin

\# Declare the command to be executed when
\# we run the 'docker run' command
ENTRYPOINT \["gocicd"\]
In this file, we declare two steps: the builder step and the final step. The builder step is used to build the Golang application, and the second step copies the build output into the Docker image. (If you have any questions related to Docker, please comment in the comments section.)
If you are using your own application, you will need to make adjustments according to what your application requires.
Next, we will try to build a Docker image locally to ensure that the Dockerfile specification we created is correct. Run the following command to build it:
docker build -t gocicd:latest .If successful, the output should look like this:
Next, we will create a docker-compose.yaml file in the deployment/production folder. If you have more than one environment, you can define them as follows, for example: deployment/staging. The content of the docker-compose.yaml file is as follows:
version: '3'
services:
  gocicd:
    container\_name: gocicd
    image: registry.gitlab.com/alianarib/gocicd:${TAG}
    env\_file: .env
    logging:
      driver: "json-file"
      options:
        max-size: "200k"
        max-file: "10"
        mode: non-blocking
    restart: always

  nginx-proxy:
    image: nginx:1.25.1
    container\_name: nginx-proxy
    ports:
      - "80:80"
    volumes:
      - ./nginx.conf:/etc/nginx/nginx.conf
    depends\_on:
      - gocicd
    logging:
      driver: "json-file"
      options:
        max-size: "200k"
        max-file: "10"
        mode: non-blocking
You can replace the ‘alianarib’ value with your GitLab username. In the docker-compose.yaml file above, we define two containers to run:
- Our application
- Nginx as the web server
Since we are using Nginx, we will define the nginx.conf file according to our needs. To do this, we need to create a new file in deployment/production/nginx.conf, and the content should look like this:
events {
  worker\_connections 1024;
}

http {
  include /etc/nginx/mime.types;
  default\_type application/octet-stream;

  log\_format main '$remote\_addr - $remote\_user \[$time\_local\] "$request" '
  '$status $body\_bytes\_sent "$http\_referer" '
  '"$http\_user\_agent" "$http\_x\_forwarded\_for"';

  access\_log /var/log/nginx/access.log main;
  error\_log /var/log/nginx/error.log;
  sendfile on;

  keepalive\_timeout 65;
  gzip on;

  server {
    listen 80;

    location / {
      proxy\_pass http://gocicd:8080;
      proxy\_set\_header X-Forwarded-For $remote\_addr;
      proxy\_set\_header Host $http\_host;
    }
  }
}
After writing the above files, make sure your folder and file structure is the same as the one below:
.
├── Dockerfile
├── deployment
│   └── production
│       ├── docker-compose.yaml
│       └── nginx.conf
├── go.mod
├── handler
│   ├── handler.go
│   └── handler\_test.go
└── main.go

3 directories, 7 files
Don’t forget to commit your changes before moving on to the next step.
Step 3: GitLab CI/CD
The next step is to create a GitLab pipeline definition according to your needs. The GitLab pipeline we create should follow CI/CD best practices. Whenever there is a code change, the application should be able to perform self-testing, and when a new version of the application is released, the pipeline should automatically deploy to production.
In this article, I won’t delve into GitLab CI/CD extensively. You can use ChatGPT if you want to know the code I will write below. But in broad strokes, we will make the application perform checks every time there is a merge request and code merged into the master branch. Then, we will automate deployment whenever there are new tags for our application releases.
\# Stages definition
stages:
  - test
  - build
  - before\_deployment
  - deployment

\# Common settings for jobs
.deploy\_template:
  image: ubuntu
  only:
    - tags
    - /^v.\*$/
    - /^rc.\*$/
  stage: before\_deployment
  before\_script:
    - apt update && apt install openssh-client -y
    - mkdir -p ~/.ssh/
    - echo "$SSH\_PRIVATE\_KEY" >> ~/.ssh/id\_rsa
    - echo "$SSH\_PUBLIC\_KEY" >> ~/.ssh/id\_rsa.pub
    - ssh-keyscan -H $SERVER\_HOST >> ~/.ssh/known\_hosts
    - VERSION=$(echo "$CI\_COMMIT\_REF\_NAME" | sed 's/^v//')
    - chmod 600 ~/.ssh/id\_rsa
    - chmod 600 ~/.ssh/id\_rsa.pub
    - echo "$ENV\_PRODUCTION" >> env-production

\# Jobs
unit-test:
  image: golang:1.20-alpine
  stage: test
  script:
    - go test ./...

sast-check:
  image: golang:1.20-alpine
  stage: test
  before\_script:
    - go install github.com/securego/gosec/v2/cmd/gosec@latest
  script:
    - gosec ./...

build-merge:
  image: docker:20.10.16
  services:
    - docker:20.10.16-dind
  only:
    - main
  stage: build
  before\_script:
    - echo $CI\_REGISTRY\_PASSWORD | docker login -u $CI\_REGISTRY\_USER $CI\_REGISTRY --password-stdin
  script:
    - docker build -t registry.gitlab.com/alianarib/gocicd:latest .
    - docker push registry.gitlab.com/alianarib/gocicd:latest

build:
  image: docker:20.10.16
  services:
    - docker:20.10.16-dind
  only:
    - tags
  stage: build
  before\_script:
    - echo $CI\_REGISTRY\_PASSWORD | docker login -u $CI\_REGISTRY\_USER $CI\_REGISTRY --password-stdin
    - VERSION=$(echo "$CI\_COMMIT\_REF\_NAME" | sed 's/^v//')
  script:
    - docker build -t registry.gitlab.com/alianarib/gocicd:$VERSION .
    - docker push registry.gitlab.com/alianarib/gocicd:$VERSION

update\_docker\_compose:
  extends: .deploy\_template
  script:
    - sed -i "s/^TAG=.\*$/TAG=$VERSION/" env-production
    - scp env-production $SERVER\_USER@$SERVER\_HOST:/$SERVER\_USER/production/.env
    - scp -r $CI\_PROJECT\_DIR/deployment/production/ $SERVER\_USER@$SERVER\_HOST:/$SERVER\_USER/

deploy\_api:
  extends: .deploy\_template
  stage: deployment
  script:
    - ssh $SERVER\_USER@$SERVER\_HOST "cd production && docker compose up -d"
In the GitLab CI/CD configuration above, there are several things we automate, including:
- Running unit tests for every merge request, merge, and deployment event.
- Running security tests for every merge request, merge, and deployment event.
- Building Docker images when merging and deploying.
- Automatically synchronizing with the server during the deployment process.
These four points are the bare minimum for a project to have a good CI/CD pipeline. In the future, there are many improvements that can be made, such as adding linting checks to the code we write, deploying to multiple environments (e.g., staging), automating tests for every application deployed to the staging environment, and testing database migrations (if applicable).
Next, after creating the .gitlab-ci.yml file, we will create a new repository in GitLab. However, do not push your code yet. There are some setup steps we need to follow to ensure our pipeline runs smoothly. If you look at the pipeline definition file, you will see several environment variables, such as $CI_REGISTRY_PASSWORD and $CI_REGISTRY_USER. I will try to explain these variables one by one, and then we will define them in the CI/CD repository settings.
- $CI_REGISTRY_USER: Your GitLab username.
- $CI_REGISTRY_PASSWORD: GitLab personal access token. You can learn how to obtain this here → GitLab Personal Access Tokens.
- $ENV_PRODUCTION: The environment variable you want to define for the production environment.
- $SERVER_HOST: The IP address of the VM host.
- $SERVER_USER: The user of the VM host that you will use.
- $SSH_PRIVATE_KEY: The private SSH key you will use to connect to the server.
- $SSH_PUBLIC_KEY: The public SSH key.
For points 4 and 5, I will explain them in the next step, which is the VM Preparation. So, we will prepare for points 6 and 7 first. If you are using macOS or Linux, you can use the following commands:
ssh-keygen -t rsa -f ssh\_deploymentThere will be an interactive terminal where you are asked to enter the passphrase for the RSA key; for now, leave it empty. After running the above command, there should be two files in your current directory, like this:
The content of the ‘ssh_deployment’ file will be assigned to SSH_PRIVATE_KEY, and the content of the ‘ssh_deployment.pub’ file will be assigned to SSH_PUBLIC_KEY.
Next, we will define environment variables for the production server in the CI/CD configuration as follows:
These values will be used by your application as environment variables on the production server. You can define all of these variables in the Settings > CI/CD > Variables menu in your GitLab repository.
After defining all the variables, the next step is to create protected tags. You can do this in the Settings > Repository > Protected Tags menu. Protected tags are used to ensure that certain tags can only be created by specific roles.
After everything is done, we will push to the remote repository. If you have followed everything correctly, there should be one pipeline currently running. You can view it in the ‘Pipeline’ menu.
The pipeline in the ‘build-merge’ job will build your application into a Docker image and automatically store it in the GitLab container registry. Once it’s done, you can see the container image you successfully built in the ‘Deploy > Container Registry’ menu.
Alright, at this stage, we’ve implemented the continuous integration part of CI/CD. Get ready for the next step!
Step 4: VM Preparation
In this step, we will prepare the VM that will be used as the production environment for our application. Some of the things we will do include:
- Installing Docker and the Docker Compose plugin.
- Creating a new user for deployment purposes.
- Adding the previously generated public key to the authorized_keys list.
- Creating a ‘deployment’ folder.
There are additional steps that are generally good practice but are not included here to keep this article concise:
- Creating a new non-root user for deployment.
- Disabling password-based login on the VM.
Disclaimer: This is not a promotion, but for the VM, I will choose to use Vultr because it is affordable and straightforward. However, if you feel uncomfortable with Vultr, please use another VM provider, but make sure the VM can be accessed for SSH login (consider providers like GCP and Azure).
Next, if you have already provisioned the VM, we will log in to the VM using:
After logging into the VM, you need to install all the required dependencies, which are:
- Docker
- Docker Compose
To install Docker on the VM, you can follow this guide: Docker Installation on Ubuntu. I haven’t provided the installation steps here because the method of installing Docker may change over time.
After successfully installing Docker, the next step is to create a ‘deployment’ folder. You can do this with the following command:
cd
mkdir production
cd production
By using that command, you will create a new ‘production’ folder in the /root/ directory.
After everything is set up, don’t forget to add the SERVER_HOST and SERVER_USER variables in your CI/CD config variables with the host and user you want to use for deployment.
If you’re done, then we’re moving on to the next step, which is deployment!
Step 5: Deployment
Now that everything is set up, the final step is deployment. Because we have a CI/CD pipeline in place, the deployment process can be done easily by simply creating a GitLab tag. This is the continuous delivery stage that we will try to apply to the application we created earlier. You can create a GitLab tag in the ‘Code > Tags’ menu.
When you create a GitLab tag, an automatic pipeline will run and perform the deployment to your server.
If the pipeline is all green, then check your server to ensure everything is running as it should using the ‘docker ps’ command to see all running containers.
docker psIf your application is running smoothly, the output should look like this.
The image above shows that there are 2 containers running. Next, we will try to access the application using the public IP.
Well, if the output appears as shown above, you can be sure that your application is running fine. Now, let’s pretend there is a code change in our application and see the changes live. First, open the ‘handler.go’ file and change the word ‘world’ to ‘Indonesia’.
package handler

import (
 "fmt"
 "net/http"
 "os"
)

func Hello(w http.ResponseWriter, r \*http.Request) {
 fmt.Fprintln(w, "Hello, Indonesia! My name is:", os.Getenv("MYNAME"))
}

func Goodbye(w http.ResponseWriter, r \*http.Request) {
 fmt.Fprintln(w, "Goodbye, Indonesia! My name is:", os.Getenv("MYNAME"))
}
Don’t forget to change the test as well. After that, we will push our code and create a new tag:
Next, we will try to access the API that we modified earlier.
Up to this point, the deployment pipeline is working well. But what if in the next deployment there is an error, and we need to mitigate that error quickly? We will discuss that in the next step.
Step 6: Rollback
In this part, we will discuss what we will do if there is an error in the latest deployment and we need to mitigate it quickly.
To simulate an error, we will use the ‘panic’ function in Golang in the ‘handler.go’ file. You can add it as follows:
What the code above does is trigger a panic when there is a ‘test’ query parameter in the URL ‘/hello’. After that, we will create a new deployment tag and see the result directly in production.
Well, it turns out that after the new deployment, an unwanted error occurred. Let’s pretend that fixing it will take a very long time, and many users have been affected by this error. So, how do we mitigate it? The mitigation is to trigger the deployment pipeline of the previous version again.
And when we check again, our application will return to the previous version, where there was no error or panic.
Conclusion
Before I write the conclusion, I want to express my gratitude and congratulations for following the step-by-step instructions in this article. I hope you’ve gained a broad understanding of how CI/CD can be implemented. Of course, this application is not perfect, and there are areas that can be improved, such as:
- Storing environment variables in the GitLab file can be risky for companies with a relatively large number of employees and challenging access control. Therefore, safer alternatives like using HashiCorp’s Vault or similar technologies are recommended.
- Implementing a secure VM practice is highly recommended. You should set it up in a way that is far more secure than what was depicted in this article.
- For more secure implementation, you can use your own gitlab runner.
- Adding SSL certificates.
In essence, CI/CD aims to make the software development lifecycle better and faster through automation. All repetitive and time-consuming tasks should be automated, and engineers should be involved in all development layers to become more aware of the applications they build.
What’s Next?
So what’s next after this? You can further expand your CI/CD setup, for example, by moving to Kubernetes instead of VMs. You can also explore creating your dedicated GitLab runners. Happy development, happy deployment!
If you have any topics you’d like me to discuss, please leave a comment below. Thank you for reading this until the end. The article creation process took a bit longer because I made revisions here and there to make it easy to read.
Please follow me, and don’t forget to give it a clap! Thanks!!
Links
The GitLab repository related to this project: https://gitlab.com/alianarib/gocicd