
During these Easter holidays, I found myself debating whether to experiment with my self-hosted home lab setup. Spoiler alert: I did.
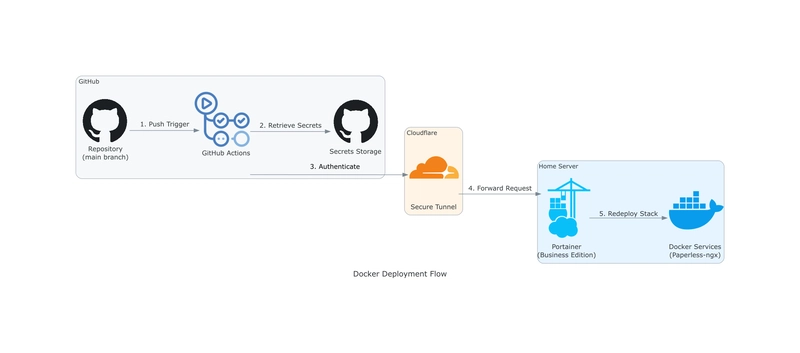
When I started this journey years ago, the possibilities seemed endless—even without top-tier hardware. But as my Docker services multiplied, managing them became messy. Without proper version control, backups, and orchestration, things spiraled quickly. Enter webhook-driven deployments—a flexible approach using GitHub Actions, Cloudflare Tunnels, and Portainer. Let’s dive in!
⚠️ Disclaimers
- Cloudflare Tunnels: This guide assumes you’ve already set up Cloudflare Tunnels to expose services remotely.
- Portainer Business Edition: Required for GitOps/webhook features. You can get a free license for small setups (up to 3 nodes).
Step 1: Setting Up the GitHub Repository
Start by creating a GitHub repository (private or public—sensitive data will use secrets). Clone it locally or use GitHub Codespaces for editing.
Example docker-compose.yml (Paperless-ngx)
services:
  broker:
    image: redis:7
    restart: unless-stopped
    volumes:
      - redisdata:/data

  db:
    image: postgres:15
    restart: unless-stopped
    volumes:
      - /mnt/sdb1/paperless-new/db:/var/lib/postgresql/data
    environment:
      POSTGRES_DB: paperless
      POSTGRES_USER: paperless
      POSTGRES_PASSWORD: paperless

  webserver:
    image: ghcr.io/paperless-ngx/paperless-ngx:latest
    restart: unless-stopped
    depends_on:
      - db
      - broker
    ports:
      - "8000:8000"
    healthcheck:
      test: ["CMD", "curl", "-fs", "-S", "--max-time", "2", "http://localhost:8000"]
      interval: 30s
      timeout: 10s
      retries: 5
    volumes:
      - /mnt/sdb1/paperless-new/data:/usr/src/paperless/data
      - /mnt/sdb1/paperless-new/media:/usr/src/paperless/media
      - /mnt/sdb1/export:/usr/src/paperless/export
    env_file: stack.env
    environment:
      PAPERLESS_REDIS: redis://broker:6379
      PAPERLESS_DBHOST: db

volumes:
  redisdata:
Step 2: GitHub Authentication for Portainer
Create a GitHub Personal Access Token
- Navigate to GitHub Tokens.
- Name the token (e.g.,
Portainer-GitOps) and set expiration. - Grant repo permissions (read/write for private repos).
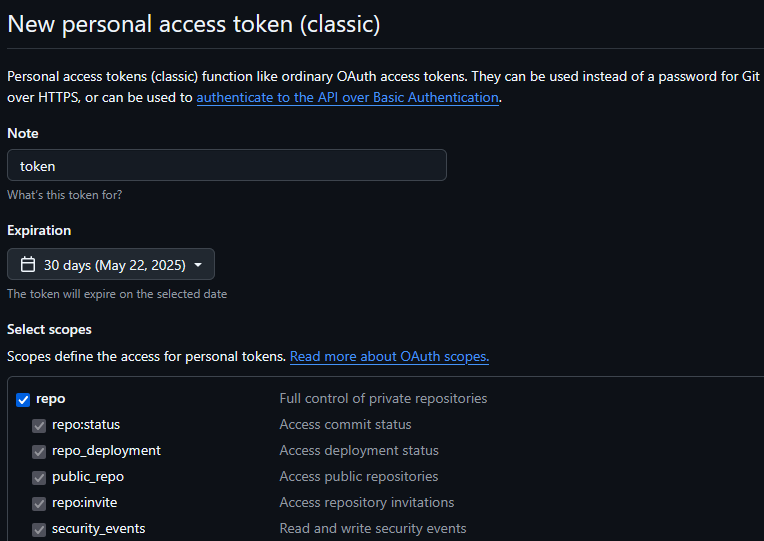
- Copy the token—you’ll need it for Portainer.
Step 3: Configuring Portainer Stack
- In Portainer, navigate to Stacks > Add Stack.
- Under Build Method, select Repository.
- Enable authentication and input:
- Username: Your GitHub handle
- Password: The token from Step 2
- Configure GitOps:
-
Repository URL:
https://github.com/your-username/repo-name -
Compose Path:
docker-compose.yml(adjust if needed) - Enable Automatic Updates: Toggle Webhook
- Enable Re-pull image and Redeploy when changes are pulled
-
Repository URL:
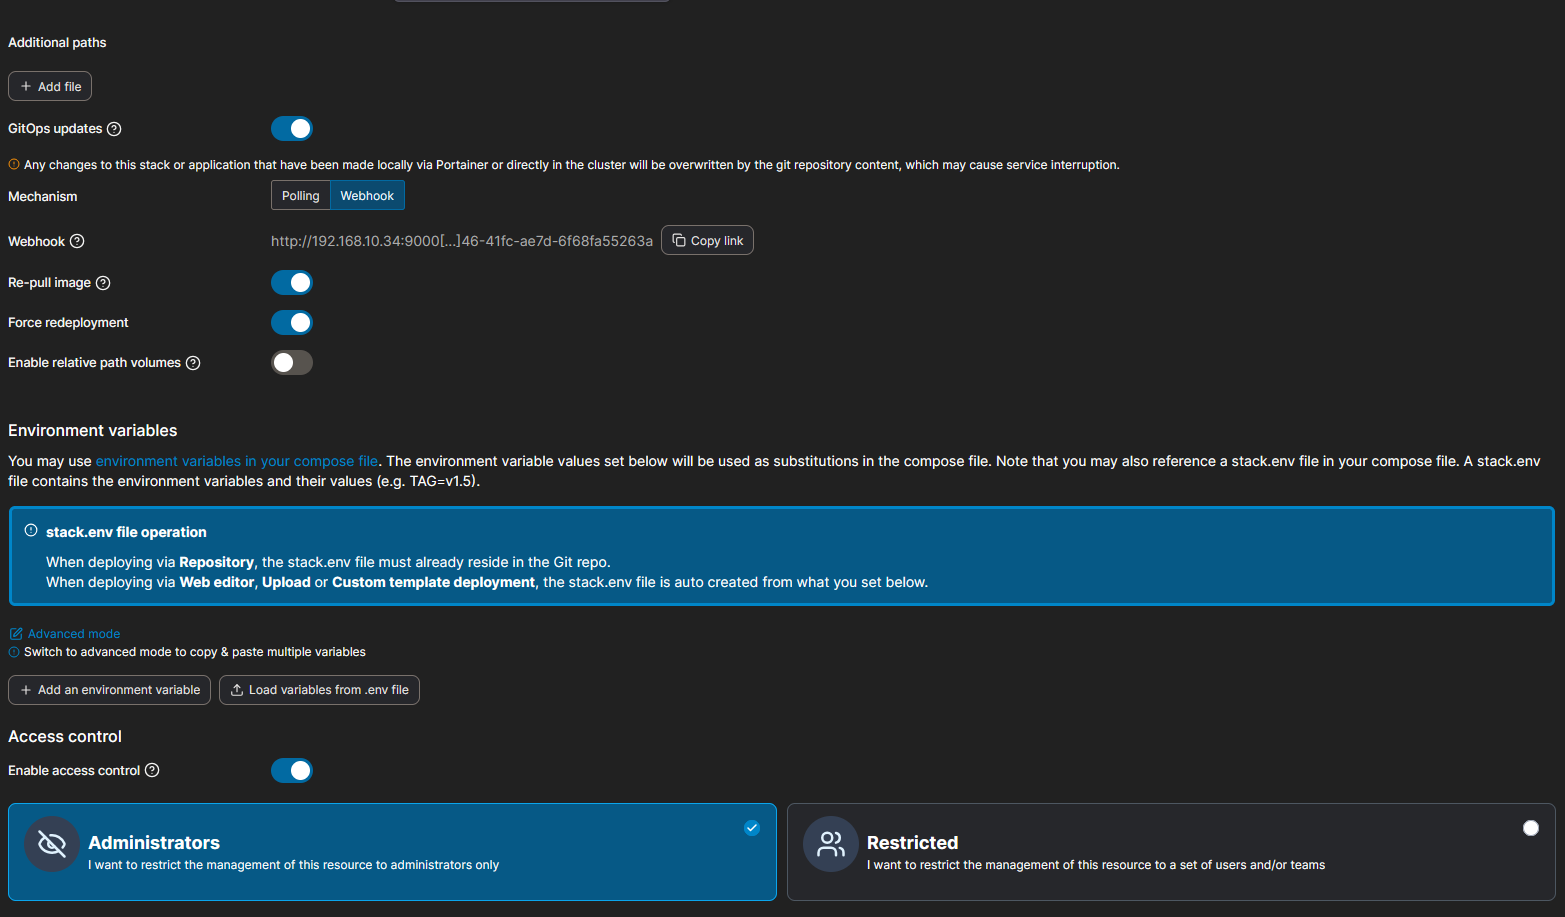
- Add environment variables (e.g., worker counts):
PAPERLESS_WEBSERVER_WORKERS=1
PAPERLESS_TASK_WORKERS=1- Deploy the stack!
Step 4: Cloudflare Tunnel Service Token
- In Cloudflare Zero Trust, go to Access > Service Auth.
- Create a new Service Token. Note the Client ID and Secret.
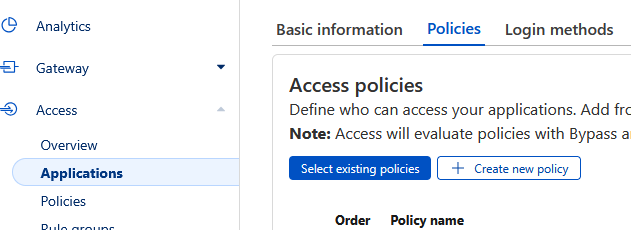
- Edit your Portainer application under Applications:
- Add a Bypass policy tied to the service token.
- Add a Bypass policy tied to the service token.
Step 5: GitHub Actions Workflow
Configure Secrets in GitHub
Under repo Settings > Secrets > Actions, add:
-
PORTAINER_WEBHOOK_URL: From Portainer’s webhook setup -
CF_ACCESS_CLIENT_ID: Cloudflare Service Token Client ID -
CF_ACCESS_CLIENT_SECRET: Cloudflare Service Token Secret
Create the Workflow File
Add .github/workflows/deploy.yml:
name: Update Portainer Stack

on:
  push:
    branches: [main]
  workflow_dispatch:  # Manual trigger

jobs:
  update-stack:
    # Only run if commit message contains [deploy]
    if: contains(github.event.head_commit.message, '[deploy]')
    runs-on: ubuntu-latest

    steps:
      - name: Trigger Portainer Webhook
        env:
          PORTAINER_WEBHOOK_URL: ${{ secrets.PORTAINER_WEBHOOK_URL }}
          CF_ACCESS_CLIENT_ID: ${{ secrets.CF_ACCESS_CLIENT_ID }}
          CF_ACCESS_CLIENT_SECRET: ${{ secrets.CF_ACCESS_CLIENT_SECRET }}
        run: |
          curl -X POST "$PORTAINER_WEBHOOK_URL" \
            -H "CF-Access-Client-Id: $CF_ACCESS_CLIENT_ID" \
            -H "CF-Access-Client-Secret: $CF_ACCESS_CLIENT_SECRET"
Step 6: Testing the Pipeline
- Commit changes with
[deploy]in the message:
git commit -m "chore: update compose [deploy]"- Push to trigger the action:

Portainer will now redeploy your stack automatically! Failed deployments roll back gracefully, and you can reuse the repo as a template for future projects.
Final Thoughts
This setup brings GitOps practices to self-hosting—version control, CI/CD, and secure access. Suggestions? Let me know! 🚀