Hi there! I'm Shrijith Venkatrama, founder of Hexmos. Right now, I’m building LiveAPI, a tool that makes generating API docs from your code ridiculously easy.
GitHub Copilot in Visual Studio Code is a powerful tool for developers, and Model Context Protocol (MCP) servers make it even more capable by connecting it to external tools, APIs, and data sources.
MCP enables Copilot to perform tasks beyond code suggestions, such as file operations or API calls, through a standardized interface.
This guide dives into what MCP is, how to set it up in VS Code, and how to use it to enhance coding workflows.
Note: MCP support in VS Code’s agent mode is, as of writing, in preview, so features may evolve.
Understanding MCP and Its Role
Model Context Protocol (MCP) is an open standard that allows AI models like Copilot to interact with external tools via a unified interface.
It acts as a bridge between Copilot and various services—file systems, databases, or GitHub repositories—without requiring custom integrations. MCP follows a client-server model:
- MCP clients (e.g., VS Code) send requests to MCP servers on behalf of Copilot.
- MCP servers provide tools (e.g., file operations, issue management) through a defined interface.
- MCP standardizes communication, handling tool discovery and execution.
For instance, an MCP server might enable Copilot to read files, query databases, or create pull requests from a single chat prompt. Servers can run locally or remotely, and VS Code supports both setups. The MCP specification provides full details on the protocol.
| Feature | Description |
|---|---|
| Transport | Supports stdio (local) and sse (server-sent events for remote). |
| Primitives | Currently supports tools (e.g., file ops, APIs). prompts and resources are planned. |
| Dynamic Tools | Tools can update via list changed events. |
| Workspace | VS Code shares workspace folders with servers using roots. |
Exploring Available MCP Servers
The MCP ecosystem is expanding, with a range of official and community-built servers available. The official MCP server repository hosts examples, including servers for:
- File system operations (e.g., reading/writing files).
- Database interactions.
- Web services like GitHub or Perplexity.
As MCP is a newer standard, the repository is a key resource for discovering what’s available, with more servers expected as adoption grows.
Enabling MCP in VS Code
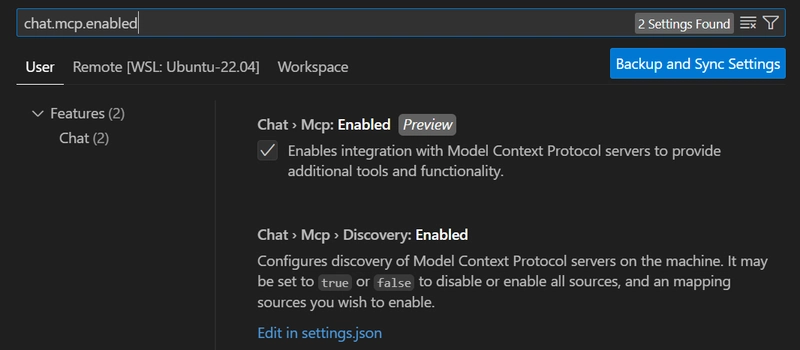
MCP support requires VS Code 1.99 or later and is enabled by default through the chat.mcp.enabled setting. To verify it’s active:
- Open VS Code settings (
Ctrl+,orCmd+,). - Search for
chat.mcp.enabled. - Confirm it’s enabled (default setting).

If using an older VS Code version, update to access MCP functionality.
Setting Up an MCP Server in a Workspace
MCP servers can be configured via workspace settings, user settings, or automatic discovery.
The most common method is adding a server to a workspace using a .vscode/mcp.json file, which is shareable across teams.
Configuration Steps
- Create a
.vscode/mcp.jsonfile in the project folder. - Define the server configuration, leveraging VS Code’s IntelliSense for the JSON schema.
- Use input variables to securely handle sensitive data like API keys.
Below is an example for a Perplexity MCP server:
{
  "inputs": [
    {
      "type": "promptString",
      "id": "perplexity-key",
      "description": "Perplexity API Key",
      "password": true
    }
  ],
  "servers": {
    "Perplexity": {
      "type": "stdio",
      "command": "npx",
      "args": [
        "-y",
        "@modelcontextprotocol/server-perplexity-ask"
      ],
      "env": {
        "PERPLEXITY_API_KEY": "${input:perplexity-key}"
      }
    }
  }
}Details:
- The
inputssection prompts for the Perplexity API key on first run, storing it securely. - The
serverssection configures a Perplexity server usingnpx. - The
envfield passes the API key to the server.
Output: On opening VS Code, a prompt appears for the API key (hidden as a password). The server starts, ready for tool usage.
Caution: MCP servers can execute arbitrary code. Only use trusted sources and review configurations carefully.
MCP Server Configuration Format
The .vscode/mcp.json file or user settings follow a specific JSON structure. Key fields for stdio and sse connections are:
| Field | Description | Example |
|---|---|---|
type |
Connection type. |
"stdio" or "sse"
|
command |
Executable for the server (for stdio). |
"npx", "docker"
|
args |
Command arguments. | ["-y", "@modelcontextprotocol/server"] |
env |
Environment variables. | {"API_KEY": "${input:api-key}"} |
url |
Server URL (for sse). |
"http://localhost:3000" |
headers |
HTTP headers (for sse). |
{"Authorization": "Bearer token"} |
Here’s a multi-server example:
{
  "inputs": [
    {
      "type": "promptString",
      "id": "perplexity-key",
      "description": "Perplexity API Key",
      "password": true
    }
  ],
  "servers": {
    "Perplexity": {
      "type": "stdio",
      "command": "docker",
      "args": [
        "run",
        "-i",
        "--rm",
        "-e",
        "PERPLEXITY_API_KEY",
        "mcp/perplexity-ask"
      ],
      "env": {
        "PERPLEXITY_API_KEY": "${input:perplexity-key}"
      }
    },
    "Fetch": {
      "type": "stdio",
      "command": "uvx",
      "args": ["mcp-server-fetch"]
    },
    "RemoteAPI": {
      "type": "sse",
      "url": "http://api.example.com/sse",
      "headers": { "VERSION": "1.2" }
    }
  }
}Output: This configures three servers:
- Perplexity via Docker.
- Fetch via
uvx. - A remote server using
sse.
VS Code prompts for the API key once, then starts all servers when the workspace opens.
Leveraging MCP Tools in Agent Mode
With a server running, its tools become available in Agent Mode (Copilot’s chat interface). To use them:
- Open the Chat view (
Ctrl+Shift+P, thenChat: Open). - Select Agent Mode from the dropdown.
- Click the Tools button to view available tools.
- Enter a prompt, and Copilot invokes tools as needed.
For example, with a Perplexity server, a prompt like “Search for MCP tutorials” triggers the Perplexity tool to fetch results.
Sample Prompt and Tool Use:
#perplexity_search Search for VS Code MCP tutorialsOutput: Copilot queries the Perplexity server, returning a list of tutorials. A confirmation prompt appears before execution to prevent unintended actions. Auto-approve tools for the session or workspace using the Continue button.
Tip: Directly invoke a tool by typing
#tool_namein the prompt.
Managing and Troubleshooting MCP Servers
To manage servers, use the MCP: List Servers command in the Command Palette. This displays configured servers with options to:
- Start, stop, or restart.
- View logs for debugging.
- Check the server configuration.
If a server fails, an error appears in the Chat view. Select Show Output to view logs. Common issues include:
- Missing dependencies (e.g.,
npxordocker). - Invalid API keys.
- Docker containers in detached mode (avoid
-d).
Example log for a Perplexity server failure:
Error: PERPLEXITY_API_KEY is undefinedFix: Verify the API key is set in the env field or input prompt.
Creating a Custom MCP Server
Building a custom MCP server is straightforward with the right tools. While servers can be written in any language supporting stdout, official SDKs simplify the process. The TypeScript SDK is a great starting point.
Here’s a basic TypeScript server with a greet tool:
import { createServer } from '@modelcontextprotocol/typescript-sdk';

const server = createServer({
  tools: [
    {
      name: 'greet',
      description: 'Greets a user by name',
      parameters: {
        type: 'object',
        properties: {
          name: { type: 'string' }
        },
        required: ['name']
      },
      execute: async ({ name }) => {
        return `Hello, ${name}!`;
      }
    }
  ]
});

server.start();Output: Invoking #greet with { "name": "Alice" } returns Hello, Alice!.
Running the Server:
- Save as
server.ts. - Install the SDK:
npm install @modelcontextprotocol/typescript-sdk. - Compile and run:
tsc server.ts && node server.js. - Add to
.vscode/mcp.jsonwith"command": "node", "args": ["server.js"].
Explore the SDK documentation for advanced features like dynamic tools or error handling.
Next Steps with MCP in VS Code
MCP servers unlock a wide range of possibilities for enhancing Copilot’s capabilities in VS Code.
By integrating tools for file operations, API calls, or custom workflows, developers can streamline tasks and boost productivity.
Start by experimenting with existing servers from the official repository, then consider building custom servers to address specific project needs.
As the MCP ecosystem grows, expect more tools and integrations to emerge, making it easier to tailor Copilot to unique workflows. Dive into the provided examples, review server configurations carefully, and leverage the official SDKs to create robust, reusable solutions.
