A complete guide for developers who want to create intelligent, structured AI systems
1. Introduction
Building AI agents often feels more complicated than it should be. Between managing state, controlling flow, handling retries, and avoiding infinite loops, even simple projects can turn messy fast.
LangGraph offers a structured alternative: it lets you design AI agents using graphs the same principles that power everything from network routing to game AI. Instead of stitching together prompts and logic manually, you define nodes (steps) and edges (connections) that form intelligent workflows. Your agents can now make decisions, recover from failures, remember context, and grow more complex without becoming unmanageable.
In this guide, we’ll walk through building a working AI agent using LangGraph. You’ll set up your environment, create your first nodes, connect them into a graph, and deploy a simple but functional agent. Along the way, we’ll keep the explanations practical, include real code examples, and highlight pitfalls to avoid.
By the end, you’ll not only have a running AI agent, you’ll understand how to extend it into something far more powerful.
2. What is LangGraph and Why Should You Care?
At its core, LangGraph is a framework that lets you build AI agents as stateful graphs.
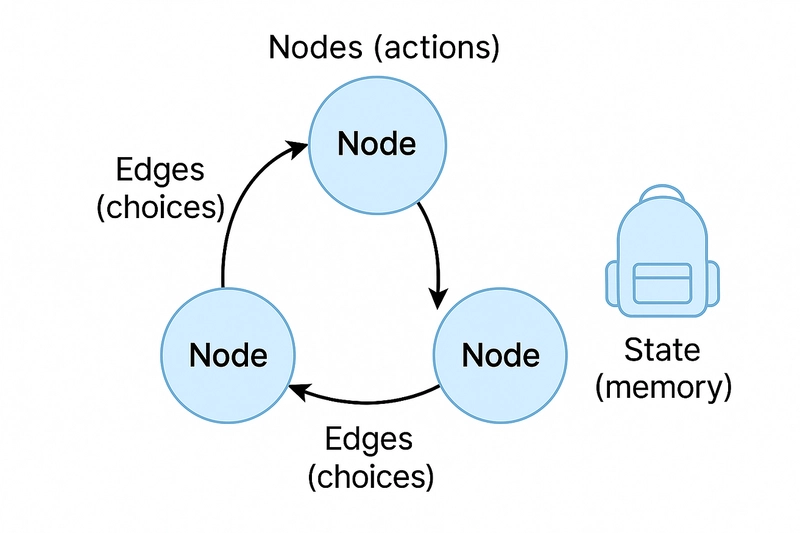
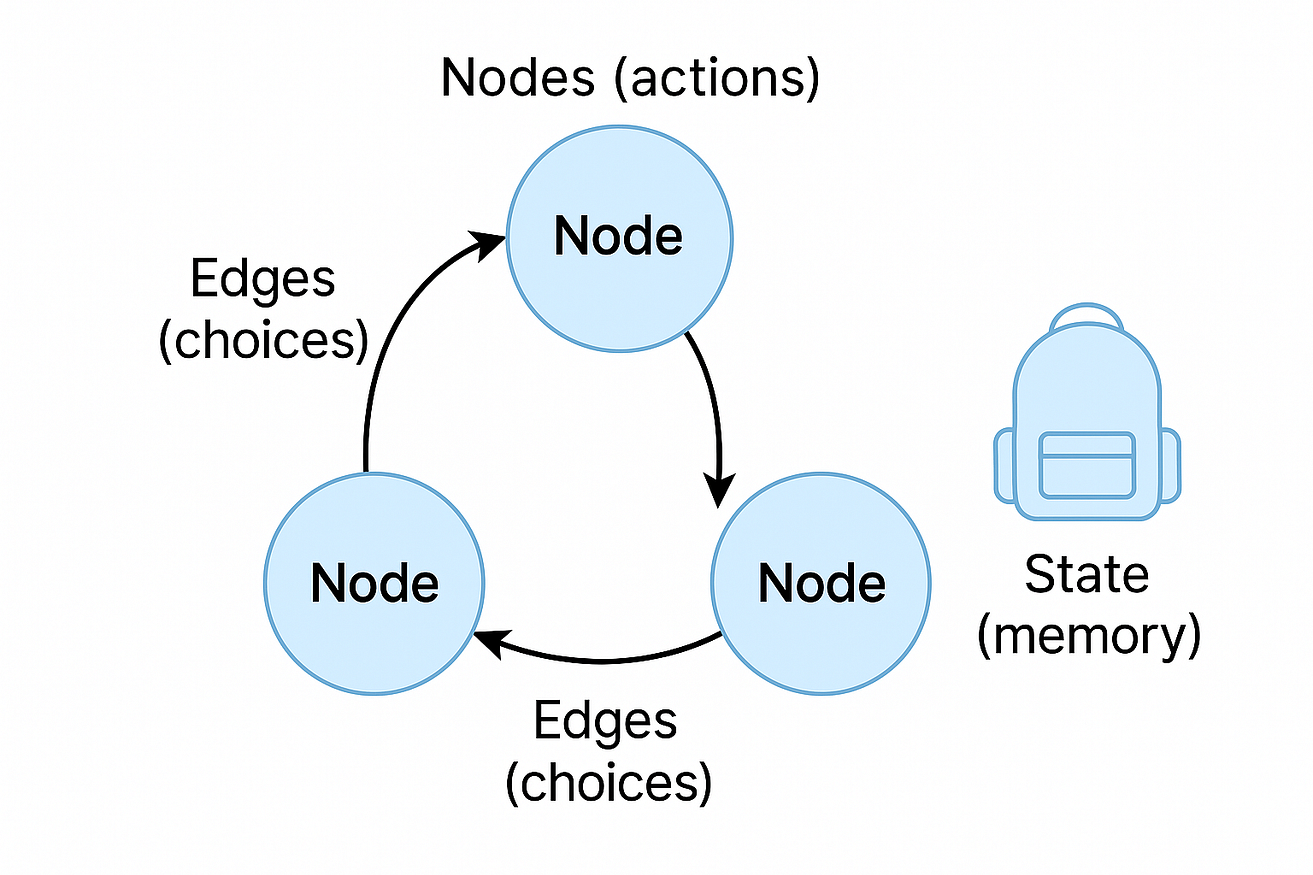
Instead of thinking in terms of simple chains like “prompt → response → next prompt” you design your agent like a graph: a collection of nodes (actions, decisions, or prompts) and edges (the paths between them).
Each node processes the agent’s current state (memory, user input, intermediate results) and decides what happens next. That could be moving to another node, looping back, making multiple calls, or even terminating the conversation entirely.
In simple terms:
- Chains = single-track conversations.
- Graphs = smart, branching, decision-driven conversations.
Why Not Just Use Basic Prompt Chains?
Prompt chains work when your use case is very simple like asking a few questions and giving an answer.
But as soon as you want:
- Memory that persists across steps
- Dynamic decision-making
- Error handling and retries
- Branching conversations or workflows
…prompt chains fall apart. You end up hacking together solutions manually, and every change risks breaking the entire flow.
LangGraph, on the other hand, was built for complexity from the start. It treats the agent’s brain like a flowchart predictable, testable, and extendable.
Real-World Use Cases of LangGraph
Here’s where LangGraph shines:
- Multi-step customer support agents deciding when to escalate, when to ask for clarification, when to offer solutions.
- AI project managers planning tasks based on goals and deadlines, adjusting based on feedback.
- Game NPCs characters that make dynamic decisions rather than following a fixed script.
- Data analysis pipelines collecting inputs, running models, summarizing results, and taking different actions based on outputs.
👉Official Example Repo:
LangGraph Examples GitHub
LangGraph isn’t just a new way of wiring AI together; it’s a smarter foundation to build on as your systems grow more complex.
3. Setting Up Your Dev Environment
Before writing any fancy agent logic, let’s get a clean environment ready.
No magic, no surprises just the basics.
Prerequisites
You’ll need a few things installed:
- Python 3.10 or higher (Yes, 3.10+. LangGraph uses newer typing features that older versions don’t support.)
- pip for installing Python packages
- A code editor VS Code is a solid choice
Optional but helpful:
- virtualenv to isolate your project dependencies
- basic familiarity with async/await in Python (we’ll keep examples beginner-friendly)
Install LangGraph
Let’s install the core tools you’ll need.
In your terminal, run:
pip install langgraph langchain openaiThis pulls in:
-
langgraph: the main graph library -
langchain: useful utilities like memory, agents, and tools -
openai: if you want to connect to LLMs like GPT-4, Claude, etc.
(You don’t have to use OpenAI specifically — LangGraph is model-agnostic.)
Project Setup
Now let’s scaffold a clean project directory:
mkdir langgraph_agent
cd langgraph_agent
python -m venv venv
source venv/bin/activate  # On Windows: venv\Scripts\activate
pip install langgraph langchain openai
touch agent.py
Your folder should now look like:
langgraph_agent/
├── venv/
└── agent.py
Open agent.py this is where all the magic happens.
Quick Note About API Keys
If you plan to use LLMs like OpenAI or Anthropic, you’ll need API keys.
A good practice is to store them in an environment variable:
export OPENAI_API_KEY="your-openai-key"Or use a .env file with python-dotenv if you want to stay organized. (Optional but recommended for anything serious.)
First Sanity Check
Let’s verify everything’s wired up.
Inagent.py, put:
import langgraph

print(f"LangGraph version: {langgraph.version}")
Run:
python agent.pyYou should see the version number printed out without errors.
If you get an ImportError, double-check that your virtual environment is activated.
Now you’re fully set.
Next, we’ll dive into the actual brains of LangGraph: nodes, edges, and state.
(Hint: it’s less scary than it sounds.)
4. Understanding the Basics: Nodes, Edges, and State
Before we start writing the actual agent logic, it’s important to understand how LangGraph thinks.
If you imagine your AI agent as a game character navigating a dungeon, then:
- Nodes are the rooms
- Edges are the hallways connecting rooms
- State is the backpack the character carries (memory, inputs, outputs, context)
The agent moves from node to node, following edges, while updating its state along the way.
Simple, but incredibly powerful.
What is a Node?
A Node is just a Python function that does one thing:
- It takes the current state (a dictionary by default),
- Processes it,
- Returns the updated state.
That’s it.
Nodes can call APIs, generate text, check conditions, modify memory — whatever your agent needs at that point.
Example:
async def greet_node(state):
    user_name = state.get('user_name', 'there')
    state['message'] = f"Hello, {user_name}!"
    return state
What is an Edge?
An Edge connects one node to another.
After a node finishes its work, LangGraph checks which edge to follow nextbased on your setup.
Edges can be simple (always go to Node B) or dynamic (if condition X, go to Node B; else Node C).
You’re essentially programming the conversation flow by connecting nodes with smart edges.
Example edge mapping:
edges = {
    "start": "greet",
    "greet": "ask_question",
    "ask_question": "end",
}
What is the State?
The State is a dictionary that travels with your agent through the graph.
Each node can:
- Read from the state
- Update the state
- Pass it along to the next node.
Example state:
{
    "user_name": "Alice",
    "message": "Hello, Alice!",
    "questions_asked": 1,
}
State is the reason LangGraph agents can have memory, retry intelligently, and stay context-aware across complex flows.
Why Does This Matter?
Without clear node/edge/state design, your agent quickly turns into a “spaghetti monster” hard to debug, harder to extend.
LangGraph forces you to think structurally, making agents modular, testable, and smarter over time.
Once you internalize this model, building complex AI behavior feels much more like building a game quest or a clean API not like duct-taping prompts together.
5. Building Your First Node (with Code)
Now that you understand nodes, edges, and state, let’s actually write one.
We’ll start simple: a greeting node that takes a user’s name from the state and generates a welcome message.
Creating a Simple Node
In agent.py, add:
async def greet_node(state: dict) -> dict:
    user_name = state.get("user_name", "friend")
    greeting = f"Hello, {user_name}! Welcome aboard."
    state["greeting"] = greeting
    return state
What’s happening here:
- We read
"user_name"from the state dictionary. - If no name is provided, we default to
"friend". - We create a greeting message.
- We update the state with a new
"greeting"key.
The node is asynchronous (async) because real-world nodes often involve waiting like calling an API or accessing a database.
Best Practices for Writing Nodes
- Always accept and return the
statedictionary. - Keep each node focused on one task (e.g., generate a greeting, not generate and verify in one go).
- Write nodes to be stateless internally use only what’s in the
stateinput. - Handle missing values gracefully (default values, try/except if needed).
Quick Local Test
Let’s manually run this node to check:
import asyncioasync def test():
    state = {"user_name": "Alex"}
    updated_state = await greet_node(state)
    print(updated_state)asyncio.run(test())
✅ You should see:
{'user_name': 'Alex', 'greeting': 'Hello, Alex! Welcome aboard.'}If this works, congratulations, you’ve just created your first working LangGraph node.
Recap:
- Nodes are async functions.
- They take a
statedictionary, modify it, and return it. - Keep each node small and easy to reason about.
6. Connecting Nodes: Building a Graph
One node alone doesn’t do much.
The real power of LangGraph comes from connecting multiple nodes into a flexible, intelligent graph.
Let’s wire up a basic two-node agent:
- Node 1: Greet the user
- Node 2: Ask a question
Writing the Second Node
In agent.py, add:
async def ask_question_node(state: dict) -> dict:
    question = "What can I help you with today?"
    state["question"] = question
    return state
This node just adds a polite question to the state.
Defining the Graph
Now let’s connect both nodes.
Import the needed LangGraph pieces first:
from langgraph.graph import StateGraph, ENDThen build the graph:
# Step 1: Define the state structure
class AgentState(dict):
    pass  # For simple cases, you can inherit from dict

# Step 2: Create the graph
graph = StateGraph(AgentState)

# Step 3: Add nodes
graph.add_node("greet", greet_node)
graph.add_node("ask", ask_question_node)

# Step 4: Connect nodes
graph.set_entry_point("greet")
graph.add_edge("greet", "ask")
graph.add_edge("ask", END)

# Step 5: Compile the graph
app = graph.compile()
What This Graph Does:
- Starts at the
greetnode. - Automatically moves to the
asknode. - Ends the conversation after the question is asked.
This is the smallest possible working agent: greet → ask → done.
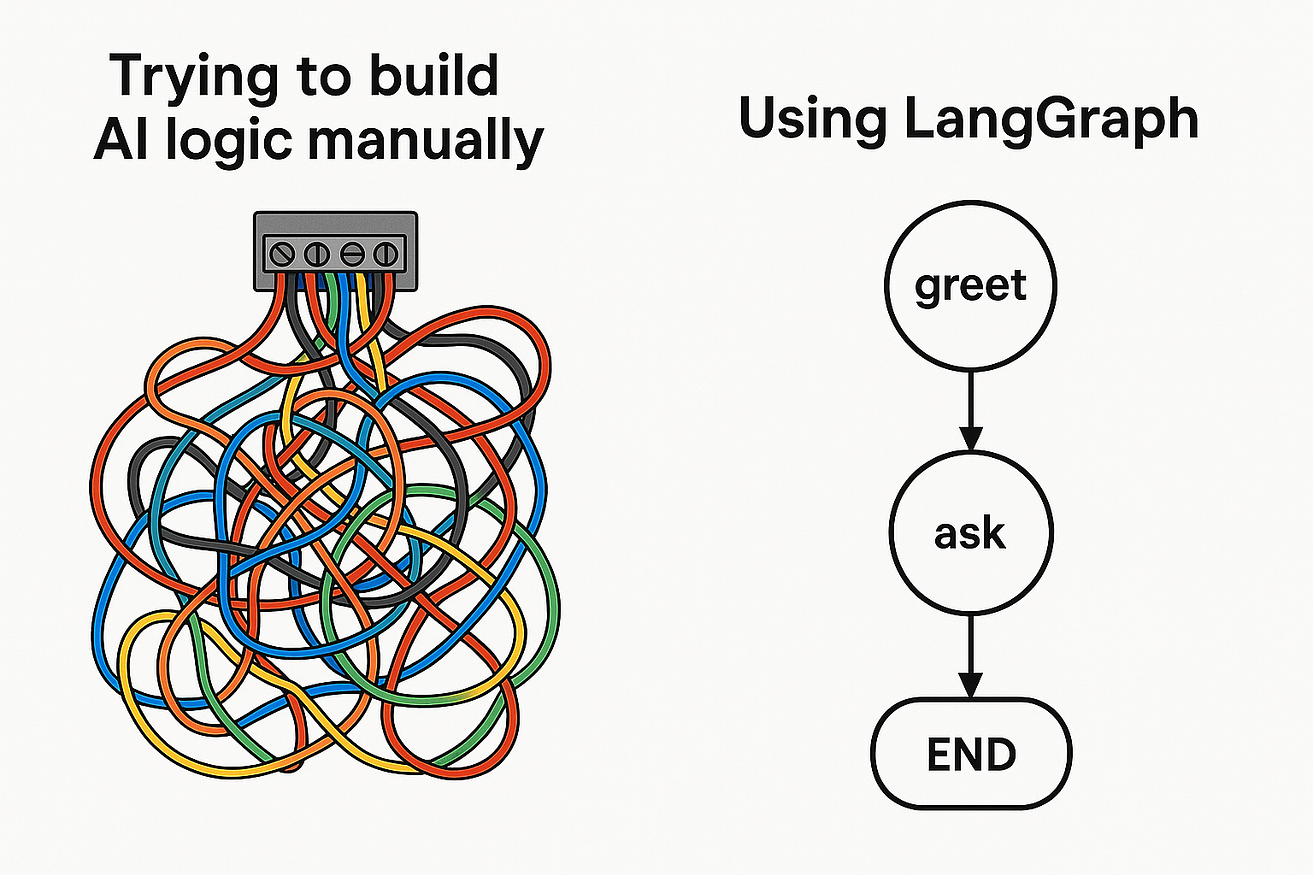
Visual Overview
If we drew this simple graph, it would look like:
[greet] --> [ask] --> [END]Every real-world AI agent, no matter how complex, is just a scaled-up version of this pattern.
Now that we have a graph structure, it’s time to run it and test the full agent flow.
7. Running and Testing Your Agent
Now that we’ve defined the nodes and connected them with edges, it’s time to run the graph and see the agent in action.
Running a LangGraph agent is straightforward:
You invoke the compiled graph object and pass the initial state.
Running the Graph
At the bottom of your agent.pyfile, add:
import asyncio

async def main():
    initial_state = {"user_name": "Alex"}
    final_state = await app.invoke(initial_state)
    print(final_state)

if name == "main":
    asyncio.run(main())
Here’s the breakdown:
-
initial_stateis the first backpack your agent carries. -
app.invoke()starts at the entry node and moves through the graph following your edges. - Each node updates the state step-by-step.
- At the end, you get the final state after all nodes have finished running.
Expected Output
Running the script should print something like:
{
    'user_name': 'Alex',
    'greeting': 'Hello, Alex! Welcome aboard.',
    'question': 'What can I help you with today?'
}
If you see this, congratulations, your first LangGraph-powered AI agent is live!
Debugging Tips
- If nothing happens, make sure you compiled your graph (
graph.compile()). - If your agent crashes, check for typos in node names or missing async in your functions.
- Always start simple one node at a time and expand gradually.
LangGraph’s clean structure makes it much easier to debug compared to traditional prompt chains or messy toolkits.
8. Real-World Agent Example: Smarter Question-Answer Bot
Now that you’ve got a basic graph working, let’s level up a little.
We’ll build a slightly smarter agent that greets the user, asks a question, and intelligently answers based on input.
This moves closer to how real-world agents behave.
What This Agent Will Do
- Node 1: Greet the user.
- Node 2: Ask what they need help with.
- Node 3: Analyze the user’s response and answer appropriately.
Updated Nodes
First, modify your agent.py to add a new node:
async def answer_node(state: dict) -> dict:
    user_input = state.get("user_input", "").lower()

    if "weather" in user_input:
        state["response"] = "The weather today is sunny with a slight breeze."
    elif "time" in user_input:
        state["response"] = "It’s 2:00 PM your local time."
    else:
        state["response"] = "I'm not sure about that, but I can find out for you!"

    return state
Updated Graph Structure
Update your graph definition:
# Add new node
graph.add_node("answer", answer_node)

# Update connections
graph.add_edge("greet", "ask")
graph.add_edge("ask", "answer")
graph.add_edge("answer", END)
Now the agent flow is:
[greet] → [ask] → [answer] → [END]Handling User Input
We’ll modify the main() function to simulate user input too:
async def main():
    initial_state = {
        "user_name": "Alex",
        "user_input": "Can you tell me the weather?"
    }
    final_state = await app.invoke(initial_state)
    print(final_state)

if name == "main":
    asyncio.run(main())
When you run it, you should get:
{
    'user_name': 'Alex',
    'user_input': 'Can you tell me the weather?',
    'greeting': 'Hello, Alex! Welcome aboard.',
    'question': 'What can I help you with today?',
    'response': 'The weather today is sunny with a slight breeze.'
}
Why This Example Matters
This tiny agent already shows key principles used in real AI systems:
- State management (passing user inputs cleanly between steps)
- Decision making (analyzing user input to choose a response)
- Clear flow structure (easy to add more nodes later).
And because it’s graph-based, extending it to support more topics or fallback behaviors would only take a few extra nodes — without rewriting everything.
Quick Thought: Scaling Up
In real systems, instead of simple if statements:
- You could call a knowledge base,
- Query a search API.
- Or use LLMs to dynamically generate answers based on context.
LangGraph doesn’t limit you it gives you the clean structure to build smart, scalable agents on top.
Your agent is no longer just responding it’s thinking in small ways.
That’s exactly how real-world assistant systems are designed.
9. Common Pitfalls and How to Avoid Them
Even though LangGraph gives you a clean structure to build on, there are a few common mistakes developers tend to make — especially early on.
Here’s a quick list to save you hours of frustration:
1. Forgetting Async Everywhere
Mistake:
Mixing synchronous and asynchronous functions inside nodes.
Why it matters:
LangGraph expects all node functions to be async. If you miss an async or forget to await a coroutine, your agent will either crash or behave unpredictably.
Fix:
Always define your node functions as async def, even if they're doing simple tasks for now.
2. Breaking the State Contract
Mistake:
Mutating state in unexpected ways (changing types, deleting keys without warning).
Why it matters:
Downstream nodes expect the state to stay consistent.
If your greet_node returns a string instead of a dictionary, everything breaks quietly.
Fix:
Always take a dict as input, and always return a dict as output.
Update values, don't replace the whole structure unless you're sure.
3. Overcomplicating Early Graphs
Mistake:
Trying to model a full AI assistant with memory, tools, retries, parallel nodes, and dynamic routing all in the first graph.
Why it matters:
It’s easy to get lost in complexity before understanding how simple flows work.
Fix:
Start with 2–3 nodes. Test.
Expand gradually once each piece is solid.
4. Missing Error Handling
Mistake:
Assuming everything will work perfectly — APIs will respond, user input will always be clean, nothing will fail.
Why it matters:
Real-world systems fail.
Without error handling, one bad call can crash your entire graph execution.
Fix:
Wrap risky logic inside try/except blocks inside your nodes.
Optionally, use retry mechanisms (LangGraph supports retries easily).
5. Not Visualizing the Flow
Mistake:
Trying to “remember” graph structure mentally once it grows past 5 nodes.
Why it matters:
Human brains are terrible at tracking more than 5–7 moving parts without visuals.
Fix:
Sketch your nodes and edges, even if it’s a napkin diagram or a simple draw.io chart.
It helps you debug and expand without surprises later.
Mastering these early will make you not just faster, but dangerously good at building powerful, maintainable AI agents.
10. Helpful Resources to Level Up
Building one agent is just the beginning.
LangGraph was designed to scale from simple flows to full production-grade AI systems.
If you want to get serious, here are some real, battle-tested resources to dig deeper:
Official Documentation
The best place to start understanding more advanced concepts like retries, parallel execution, memory modules, and dynamic branching.
Example Projects
A treasure trove of real working examples — from simple demos to advanced workflows.
LangChain + LangGraph Integration
If you want to combine LangGraph’s structure with LangChain’s memory, agents, and tools, here’s how they fit together.
Learn About LLM Agents
Understanding how modern LLM-based agents work under the hood is crucial if you plan to build production systems.
👉 Agents in LangChain (Core Concepts)
Community and Updates
New features in LangGraph roll out fast.
To stay updated, follow official announcements and discussions:
👉 LangGraph Discussions on GitHub
Bonus Tip
If you want even more experimental builds, check GitHub issues and discussions. Many features land there before they hit stable documentation.
These links cover everything from beginner to production-level setups. Bookmark them you’ll need them when your agent ideas start getting ambitious.
Enjoyed this story?
If you liked it, please leave a comment sharing what topic you’d like to see next!
Feel free to like, share it with your friends, and subscribe to get updates when new posts go live. 🚀
