Big shout out to the AWS Community Builder Program for empowering cloud builders around the world!
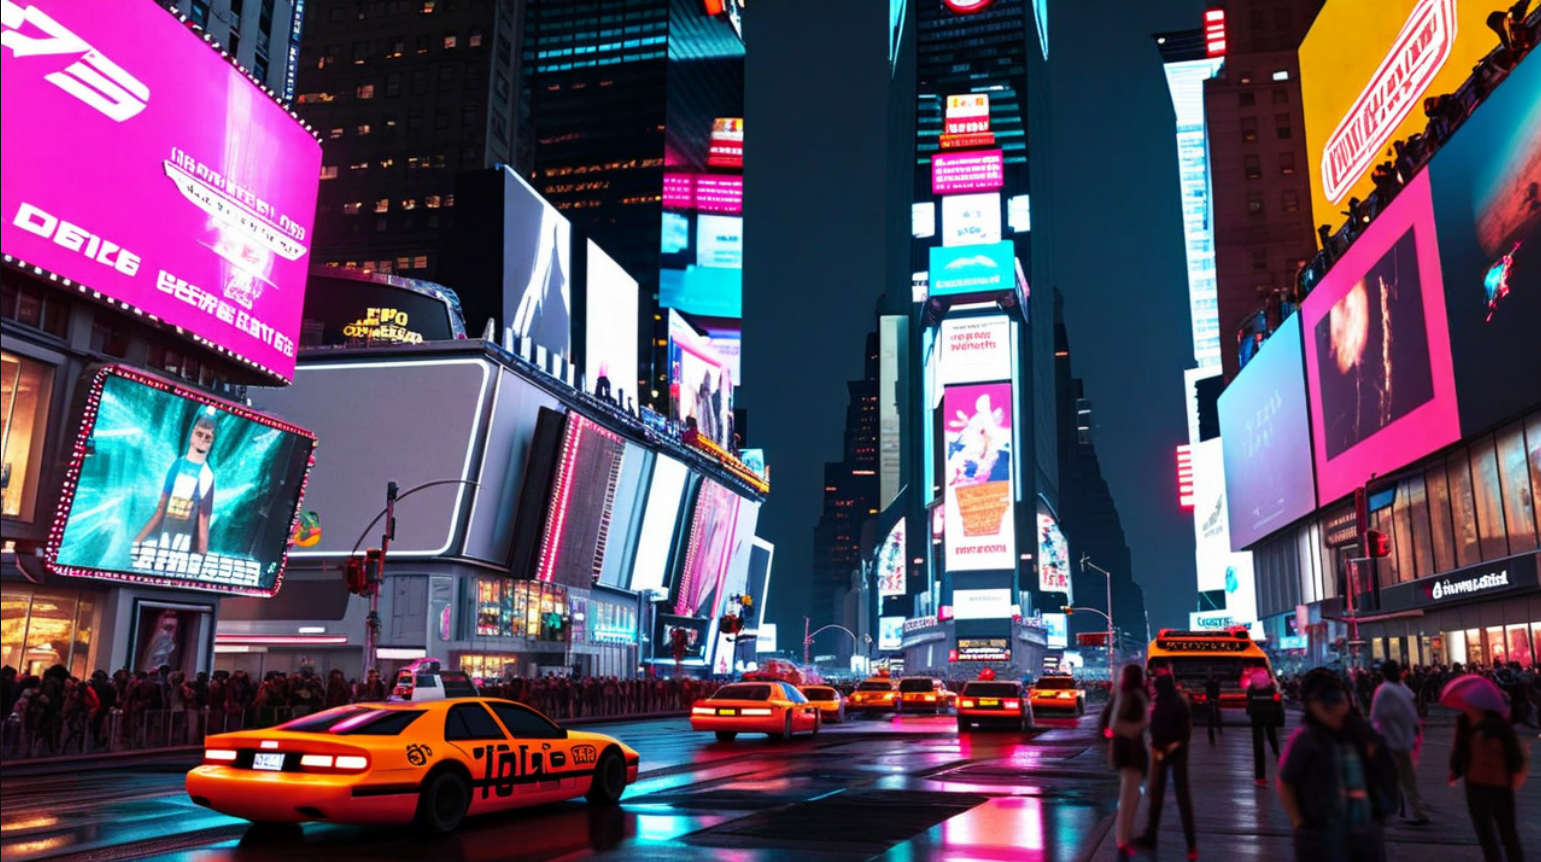
🤫 Spoiler: The article cover image was generated using this tutorial. ✨
🎁 $𝟮𝟬 𝗔𝗪𝗦 𝗖𝗥𝗘𝗗𝗜𝗧 𝗚𝗜𝗩𝗘𝗔𝗪𝗔𝗬! 🎁 Follow this Post
👋 Hey there! I’m Sarvar, a Cloud Architect passionate about cutting-edge technologies. With years of experience in Cloud Operations (Azure and AWS), Data Operations, Data Analytics, DevOps, and GenAI I've had the privilege of working with clients around the globe, delivering top-notch results. I’m always exploring the latest tech trends and love sharing what I learn along the way. Let’s dive into the world of cloud and tech together! 🚀
In this article, we’ll explore how you can build your own AI-powered image generation website using Amazon Bedrock, AWS Lambda, API Gateway, and a static website hosted on Amazon S3. We'll leverage Amazon Nova Canvas as the foundation model to generate high-quality images based on your specific requirements as a prompt.
This guide is designed for IT professionals, AWS Community Builders, and Generative AI enthusiasts who want to understand how to integrate AI-powered image generation into real-world applications. Whether you're looking to enhance your projects, create AI-driven tools, or explore the capabilities of Amazon Bedrock, this article will help you get started. The best part? This tutorial will cost you very little, making it an affordable way to experiment with Generative AI without breaking the bank!
Use Case:
Helping Digital Marketing Companies Create Images Faster
Before Generative AI, digital marketing companies had to rely on graphic designers or stock images to create visuals for their clients. This process involved brainstorming ideas, searching for suitable stock photos, or hiring designers to create custom graphics. Once an image was designed, it often required multiple revisions and approvals before it was ready for publishing. This entire workflow took time and effort, especially when clients needed quick images for holidays, festivals, or important announcements. With Amazon Bedrock image generation foundation model, digital marketers can instantly create high quality images by simply describing what they need. Instead of waiting for designers or manually searching for stock photos, they can generate custom visuals in seconds. This not only saves time but also reduces costs and allows businesses to post timely and relevant content without delays.
Real-Time Use Case
Real-World Implementation in Indian Digital Marketing Campaigns
Let’s look at a real-world use case to understand the value of this implementation. I chose the digital marketing domain because here in India, businesses across industries whether it's food, automobile, or real estate actively engage in promotional campaigns during festivals. From small-scale enterprises to large corporations, every client typically shares festive greetings along with their trademark and business logo on social media platforms.
Usually, the digital marketing team creates these images using tools like Canva or searches online, then manually adds the client’s branding. This process can be time-consuming. However, with the help of GenAI-powered image generation, this workflow becomes drastically easier. You simply input a prompt describing the client’s background and the festival theme, and within seconds, you get a ready-to-use image. All that’s left is to add the trademark and logo. What used to take hours now takes minutes. And this is where Amazon Nova really shines. Compared to traditional tools, Nova is not only efficient but also cost-effective.
There are countless potential applications, but this is a real use case based on my personal experience. At the end of this implementation, we’ll revisit this same use case and explore how Amazon Nova can deliver powerful, high-quality results. So let’s dive in.
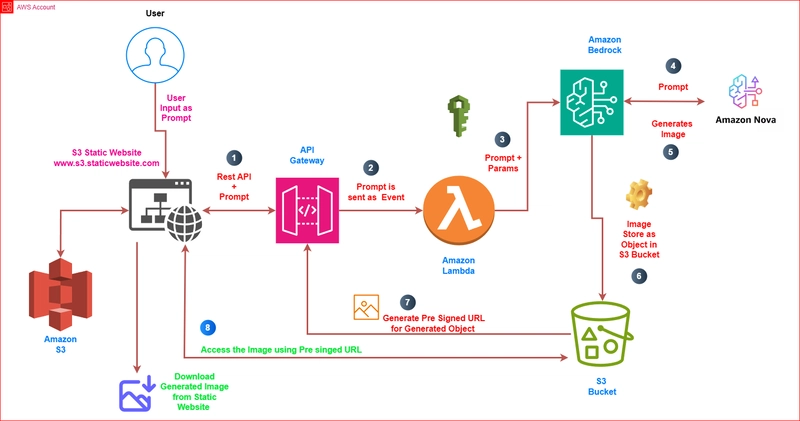
Let's understand the Architecture:
So here users interact with a static website hosted on S3, where they can input creative prompts to generate customized images. The prompt gets routed through API Gateway to trigger a Lambda function, which enriches the request with pre-defined inference parameters to ensure optimal image generation. The Lambda function seamlessly communicates with AWS Bedrock, leveraging the powerful Amazon Nova canvas foundation model to transform the text prompt into high-quality images. Once generated, the image is securely stored in an S3 bucket, and the Lambda function creates a pre-signed URL with a specific expiration time for secure access control. This pre-signed URL is then returned through API Gateway to the user, enabling them to view and download the generated image directly from the website. This architecture ensures both ease of use and security, as all access is controlled through the time-limited pre-signed URL mechanism, providing a professional and reliable image generation service.

How Amazon Nova Pricing Works?
Amazon Nova offers flexible and transparent pricing for its image generation models under the Creative Content Generation category. Here’s a breakdown of the costs involved:
On-Demand Image Generation
Pricing is based on image resolution and quality:
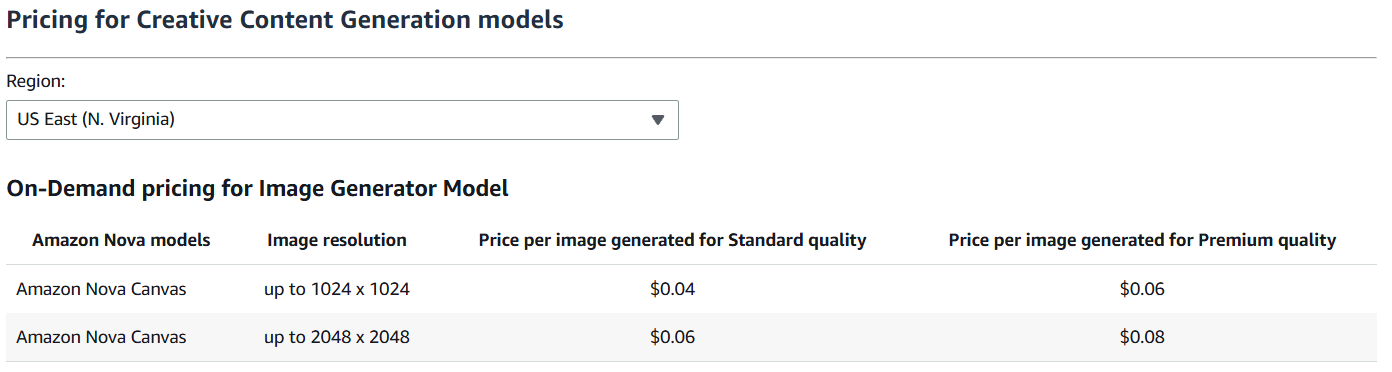
This pricing structure allows creators to balance between cost and quality whether you need quick, budget-friendly outputs or high-quality visuals for professional use.
In this tutorial, we’re using Amazon Nova Canvas:
- Image Resolution: up to 1024 × 1024
- Standard Quality Price: $0.04 per image
Prices are subject to change. It’s highly recommended to verify the latest details from the official AWS Bedrock Pricing page.
Prerequisites for the Setup
- AWS Account with admin/IAM access
- IAM Roles/Policies for Lambda, S3, API Gateway, Bedrock
- S3 Bucket set up for static website hosting
- Lambda & API Gateway integrated and configured
- AWS Bedrock enabled in region
- Basic AWS Console navigation skills
- Awareness of costs for Lambda, API Gateway, S3, Bedrock
GitHub Repository: Code for GenAI Image Generator
Let's Get Access Amazon Nova Foundation Model via Amazon Bedrock:
In this section, we'll walk through how to request access to the Amazon Nova Foundation Model an advanced large language model (LLM) available through Amazon Bedrock. This model is designed for a range of generative AI use cases, including content generation, text summarization, and conversational interfaces. Amazon Bedrock enables seamless access to these models via API, eliminating the need to manage underlying infrastructure. We'll also explore how to obtain the necessary API access details, which we’ll later integrate into our AWS Lambda function to interact with the Nova Foundation Model through Bedrock.
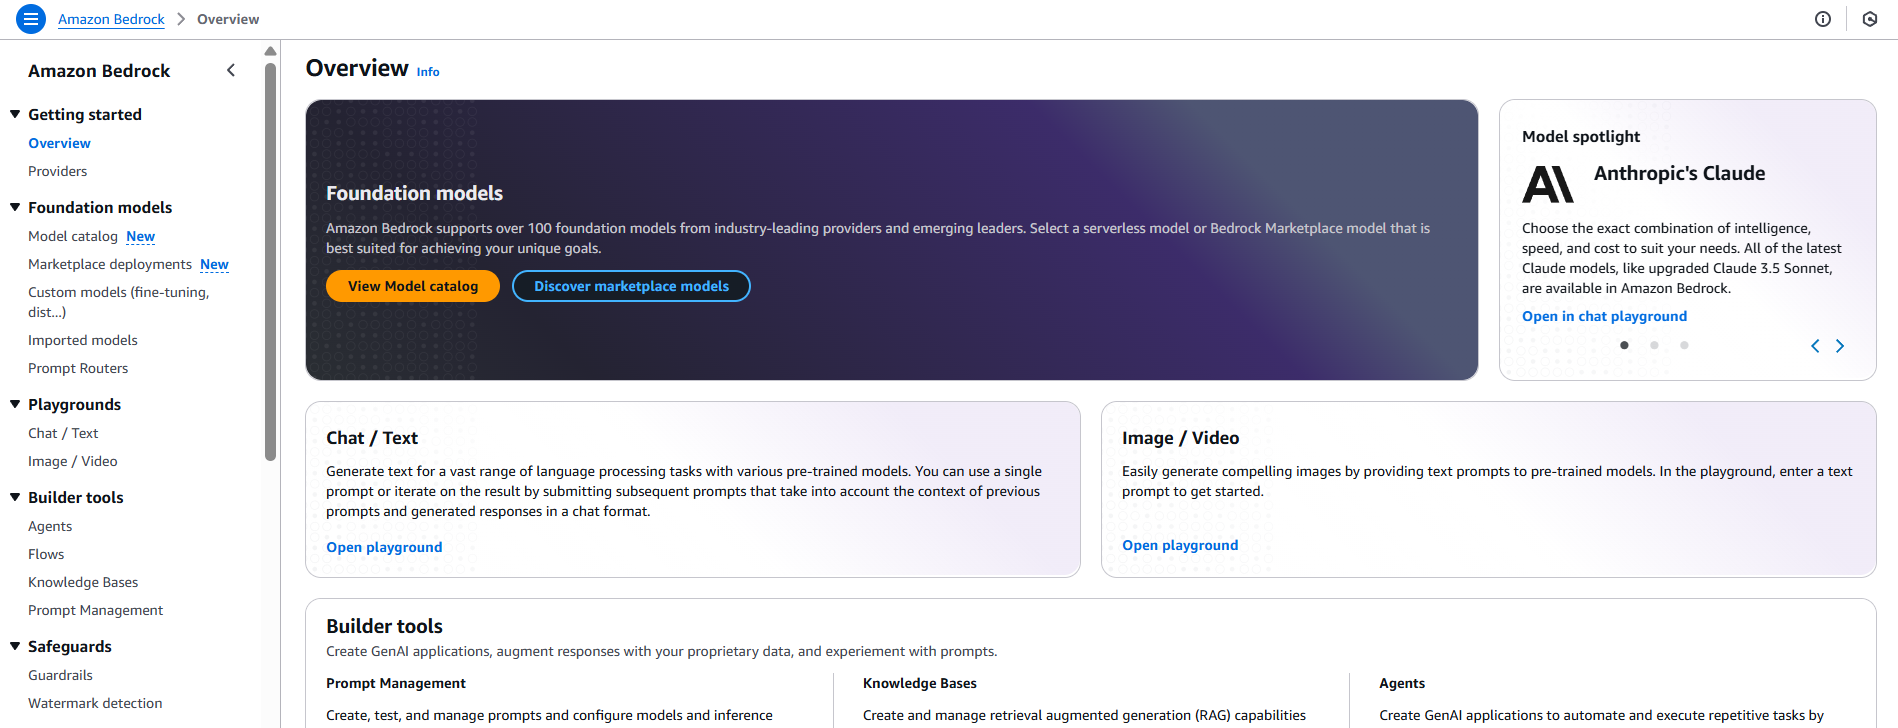
Step 1: Get Access to Amazon Bedrock
- Go to AWS Console
- Navigate to Amazon Bedrock service.
- If it's your first time, request access if required (especially if you're in a region where it's in limited preview).
- Make sure you're in a supported AWS region (like I'm using
us-east-1now).
Note: To use Bedrock serverless models, account users with the correct IAM Permissions must enable access to available Bedrock foundation models (FMs).
Step 2: Enable Bedrock in Your Account
- Open the Bedrock console → Select "Model access".

- Under "Manage model access", request access to Amazon Nova Foundation Model. I already have access to some of the Foundation Models.

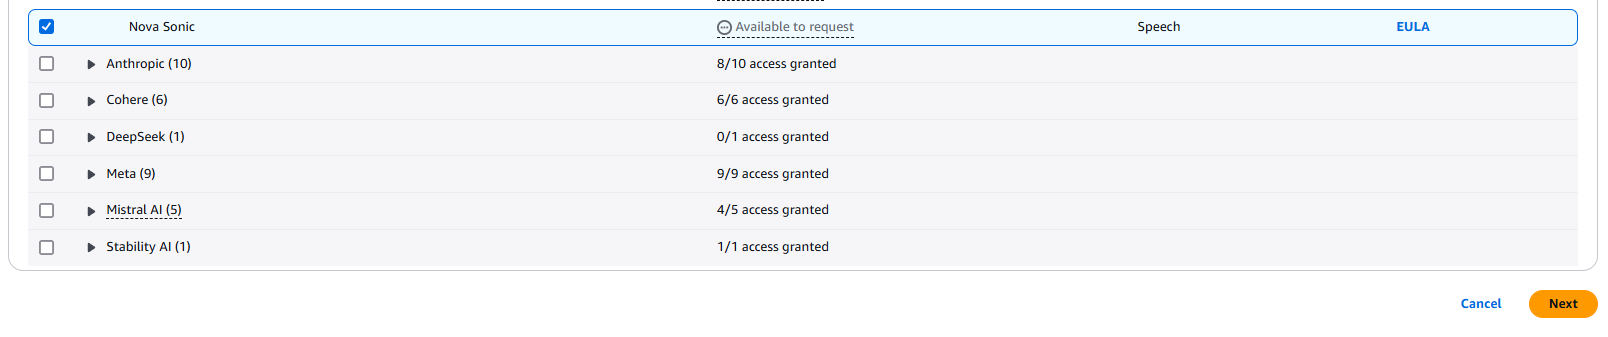

- Wait for approval (can take minutes to hours depending on your AWS account).
Step 3: Get API Details
- Click on "Foundation models" in the left menu.
- In the list of available models, search or filter by Provider = Amazon and Model = Nova.
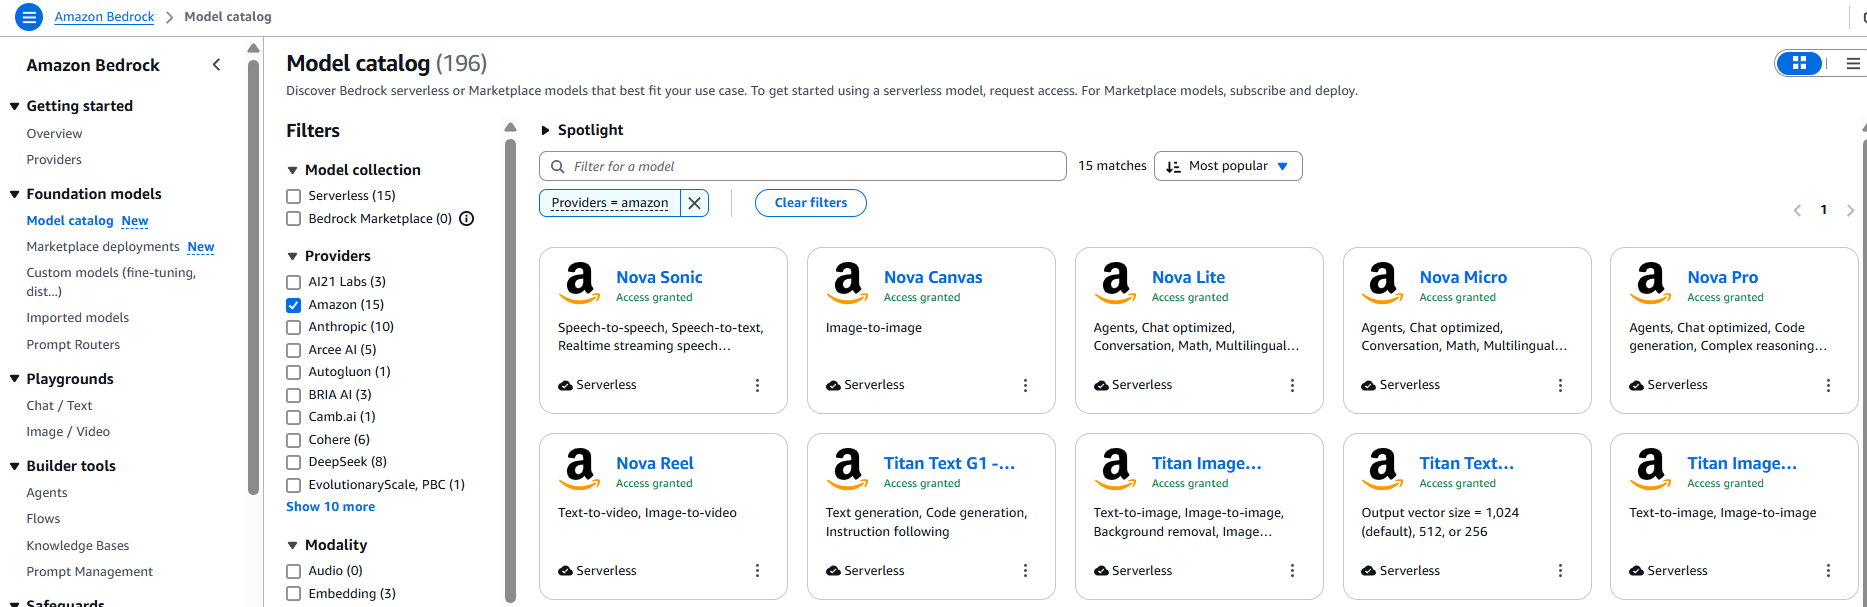
- Click on the model name (e.g.,
amazon.nova-canvas-foundation-v1).
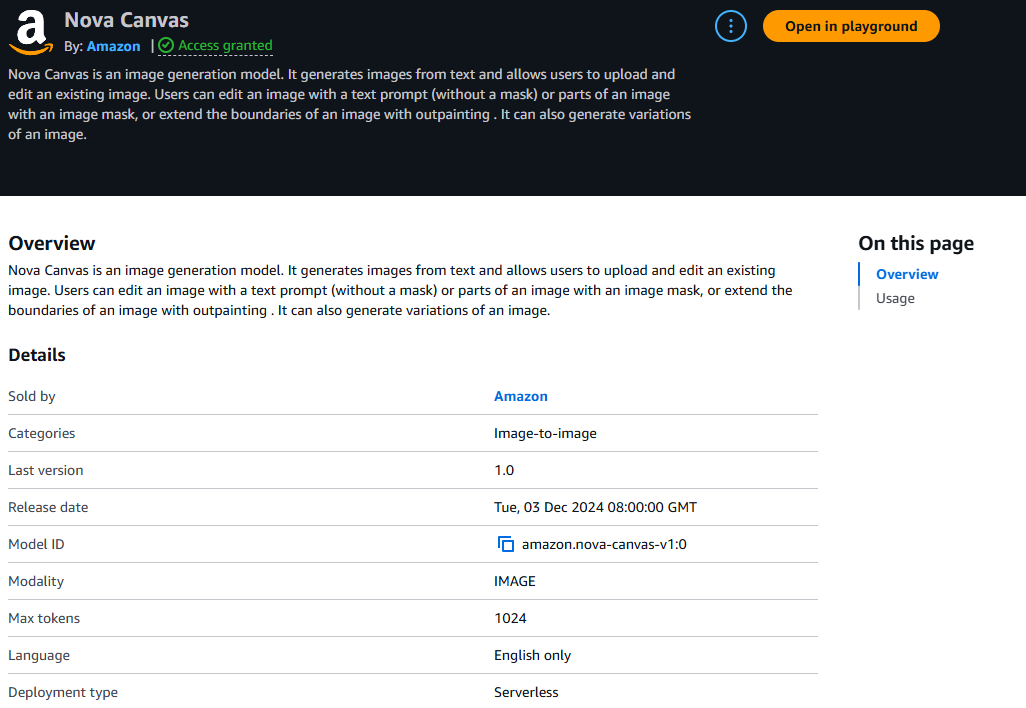
This opens the model details page, where you can view:
-
Model ID:
amazon.nova-canvas-v1:0(required for API calls) - Supported modalities: IMAGE (image-to-image generation)
- Input/Output formats: Accepts and returns image data (API specifics available in the console)
- Maximum token limits: 1024
- Customizations support: Currently no support for fine-tuning or RAG (as it's an image model)
- Language: English only
- Deployment type: Serverless
- Version: 1.0
- Release date: Tue, 03 Dec 2024 08:00:00 GMT
We need this details for our lambda foundation to access Amazon Nova foundation model.

Let's Understand the Lambda Code:
In this section, we’ll walk through how a Lambda function generates an image from a text prompt using Amazon Bedrock, then stores it in Amazon S3, and finally returns a temporary shareable link to the image in .png format. Let’s break it down step by step.
1. Import Required Libraries and Initialize S3
import json
import boto3
import base64
from datetime import datetime

s3 = boto3.client("s3")
BUCKET_NAME = "your-s3-bucket-name"  # Replace with your S3 bucket name
What it does:
We import necessary libraries and initialize the S3 client. Replace "your-s3-bucket-name" with the actual name of your bucket where images will be stored.
2. Define the Lambda Handler and Read the Prompt
def lambda_handler(event, context):
    input_prompt = event.get('prompt', 'The cat on beach')
    print(f"Input Prompt: {input_prompt}")
What it does:
The function looks for a prompt in the incoming request. If no prompt is provided, it uses a default one. This prompt will be used to generate the image.
3. Prepare Bedrock API Call for Image Generation
bedrock_rtime = boto3.client("bedrock-runtime", region_name="us-east-1")

    kwargs = {
        "modelId": "amazon.nova-canvas-v1:0",
        "contentType": "application/json",
        "accept": "application/json",
        "body": json.dumps({
            "textToImageParams": {"text": input_prompt},
            "taskType": "TEXT_IMAGE",
            "imageGenerationConfig": {
                "cfgScale": 8,
                "seed": int(datetime.now().timestamp()) % 100000,
                "quality": "standard",
                "width": 1280,
                "height": 720,
                "numberOfImages": 1
            }
        })
    }
What it does:
Here we configure the call to Amazon Bedrock using the Nova Canvas model. We pass the prompt and specify settings like image size, quality, and number of images.
4. Decode the Image Data
response = bedrock_rtime.invoke_model(**kwargs)
    response_body = json.loads(response.get('body').read())

    image_data = response_body["images"][0]
    image_bytes = base64.b64decode(image_data)
What it does:
The Bedrock API returns the image in base64 format. This section decodes it so we can store it as an actual image file.
5. Create a Unique Filename
timestamp = datetime.now().strftime("%Y%m%d_%H%M%S")
    sanitized_prompt = input_prompt.replace(" ", "_").replace(":", "").replace("/", "").replace("\\", "")[:50]
    image_key = f"generated_images/{sanitized_prompt}_{timestamp}.png"
What it does:
We generate a unique filename using the prompt and the current timestamp to avoid overwriting any images.
6. Upload the Image to Amazon S3
s3.put_object(
        Bucket=BUCKET_NAME,
        Key=image_key,
        Body=image_bytes,
        ContentType="image/png"
    )
What it does:
Uploads the generated image to the specified S3 bucket. You’ll need to make sure the bucket exists and your Lambda role has permission to write to it.
7. Return a Pre-Signed URL
presigned_url = s3.generate_presigned_url(
        "get_object",
        Params={"Bucket": BUCKET_NAME, "Key": image_key},
        ExpiresIn=3600
    )

    return {
        "statusCode": 200,
        "body": json.dumps(presigned_url)
    }
What it does:
Generates a temporary shareable URL to the image. This link is valid for 1 hour (3600 seconds), so users can preview or download the image easily.
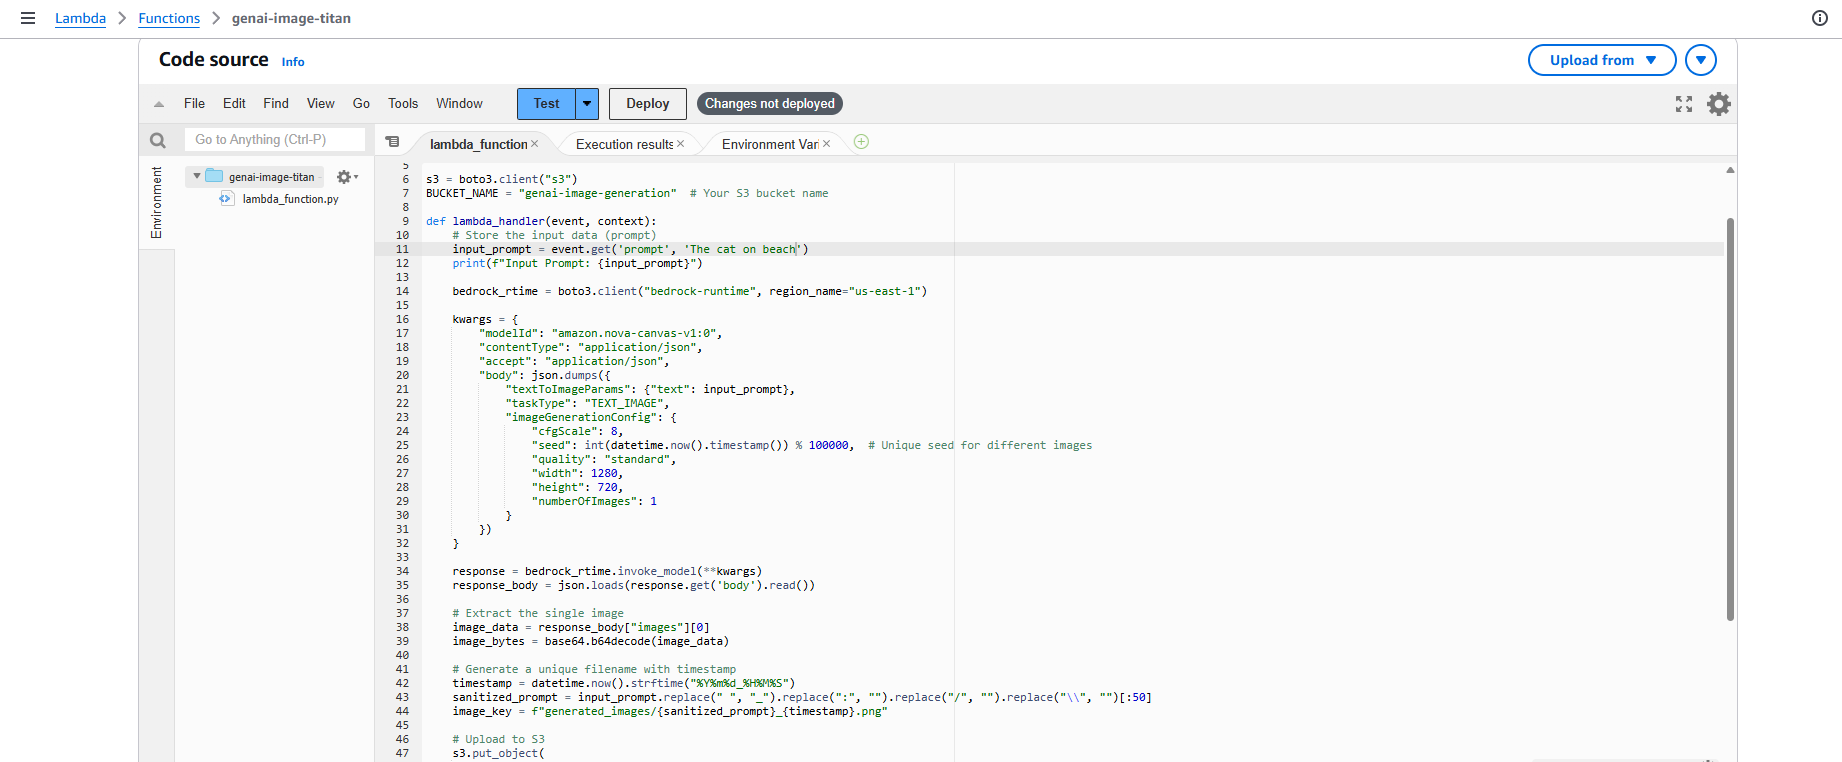
Full Lambda Code
Here’s the complete code, ready to deploy (just don’t forget to replace the bucket name):
import json
import boto3
import base64
from datetime import datetime

s3 = boto3.client("s3")
BUCKET_NAME = "your-s3-bucket-name"  # Replace with your S3 bucket name

def lambda_handler(event, context):
    # Store the input data (prompt)
    input_prompt = event.get('prompt', 'The cat on beach')
    print(f"Input Prompt: {input_prompt}")

    bedrock_rtime = boto3.client("bedrock-runtime", region_name="us-east-1")

    kwargs = {
        "modelId": "amazon.nova-canvas-v1:0",
        "contentType": "application/json",
        "accept": "application/json",
        "body": json.dumps({
            "textToImageParams": {"text": input_prompt},
            "taskType": "TEXT_IMAGE",
            "imageGenerationConfig": {
                "cfgScale": 8,
                "seed": int(datetime.now().timestamp()) % 100000,
                "quality": "standard",
                "width": 1280,
                "height": 720,
                "numberOfImages": 1
            }
        })
    }

    response = bedrock_rtime.invoke_model(**kwargs)
    response_body = json.loads(response.get('body').read())

    # Extract the single image
    image_data = response_body["images"][0]
    image_bytes = base64.b64decode(image_data)

    # Generate a unique filename with timestamp
    timestamp = datetime.now().strftime("%Y%m%d_%H%M%S")
    sanitized_prompt = input_prompt.replace(" ", "_").replace(":", "").replace("/", "").replace("\\", "")[:50]
    image_key = f"generated_images/{sanitized_prompt}_{timestamp}.png"

    # Upload to S3
    s3.put_object(
        Bucket=BUCKET_NAME,
        Key=image_key,
        Body=image_bytes,
        ContentType="image/png"
    )

    # Generate a pre-signed URL (valid for 1 hour)
    presigned_url = s3.generate_presigned_url(
        "get_object",
        Params={"Bucket": BUCKET_NAME, "Key": image_key},
        ExpiresIn=3600
    )

    return {
        "statusCode": 200,
        "body": json.dumps(presigned_url)
    }
Let's Configure Lambda Function:
Before diving into Lambda function development, we first need to establish our storage foundation. Create an S3 bucket that will serve as the repository for all AI-generated images. This bucket will be a crucial component of our architecture where all generated images from AWS Bedrock will be stored securely. After creating your S3 bucket, you'll need to replace the placeholder 'your-s3-bucket-name' in the Lambda function code with your actual bucket name. This ensures that when the Lambda function executes, it knows exactly where to store the generated images and from where to generate the pre-signed URLs.
Now you can follow below steps to configuring your Lambda function, knowing that your storage infrastructure is properly set up and integrated into your code.
Step 1: Create the Lambda Function
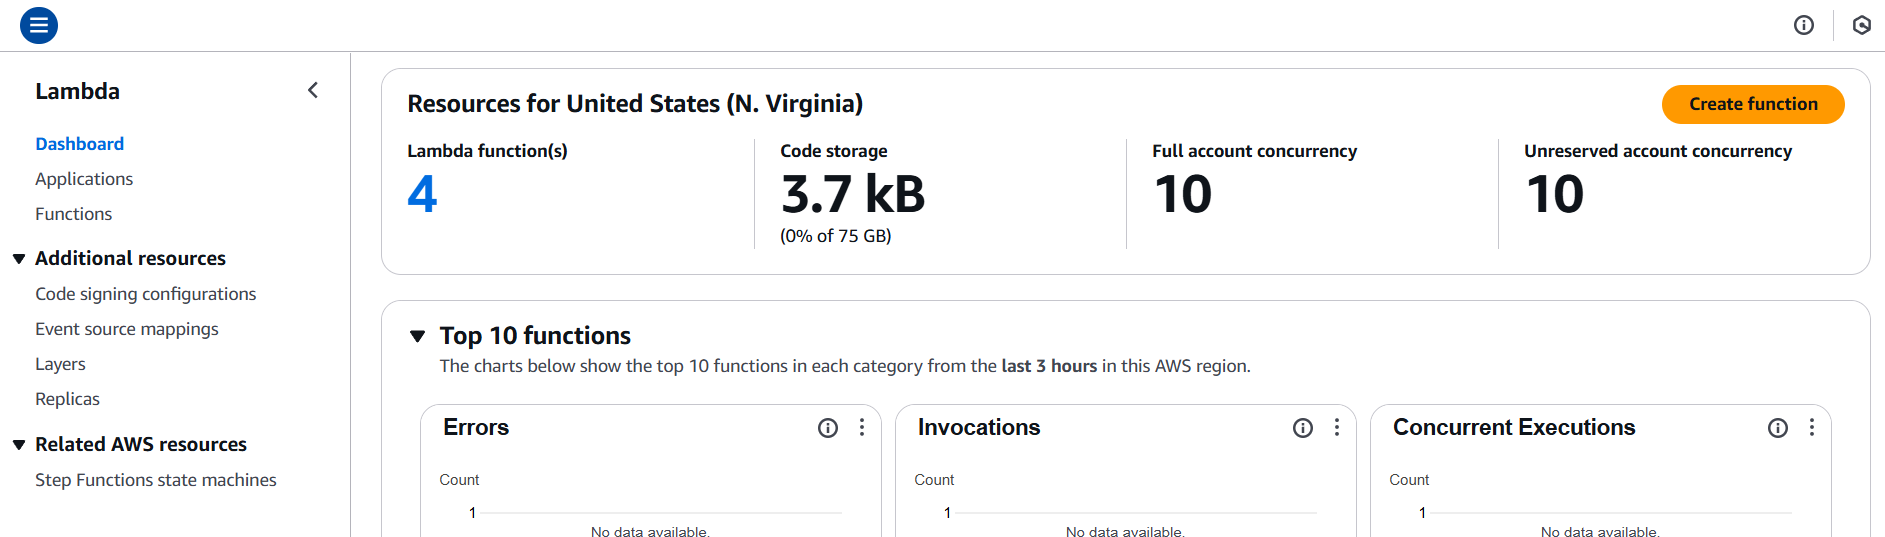
➊ Go to the AWS Lambda Console.
➋ Click Create function.
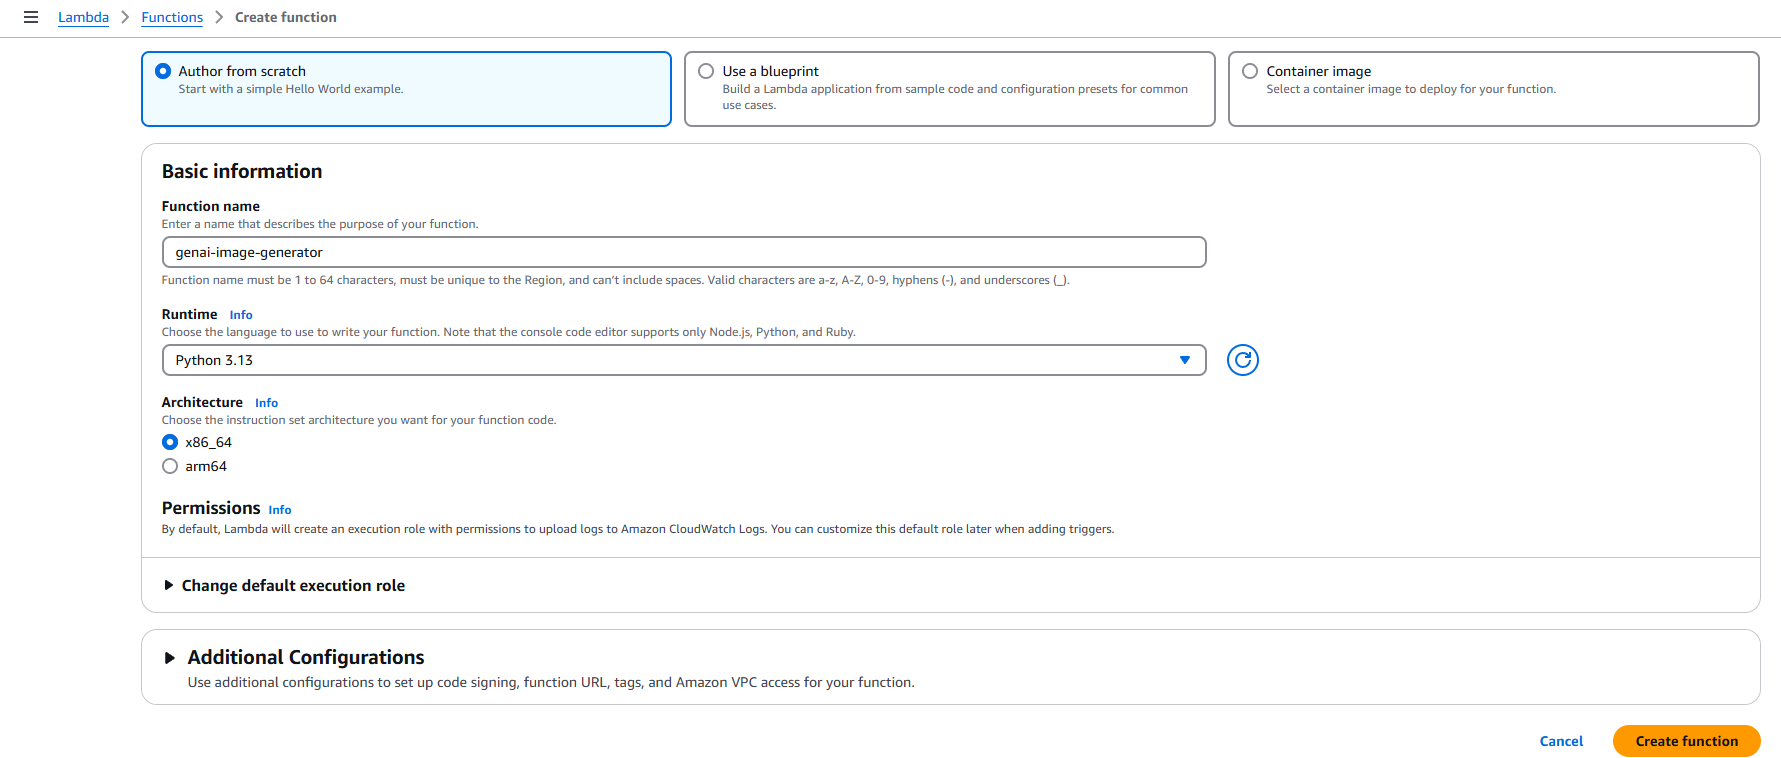
Choose:
- Author from scratch
- Function name:
genai-image-generator - Runtime: Python 3.12 (Always choose the latest version)
➍ Click Create function.
Step 2: Upload the Code
➊ Scroll down to the Function code section.
➋ In the Code source editor, paste the full Python code (provided earlier).
➌ Click Deploy.
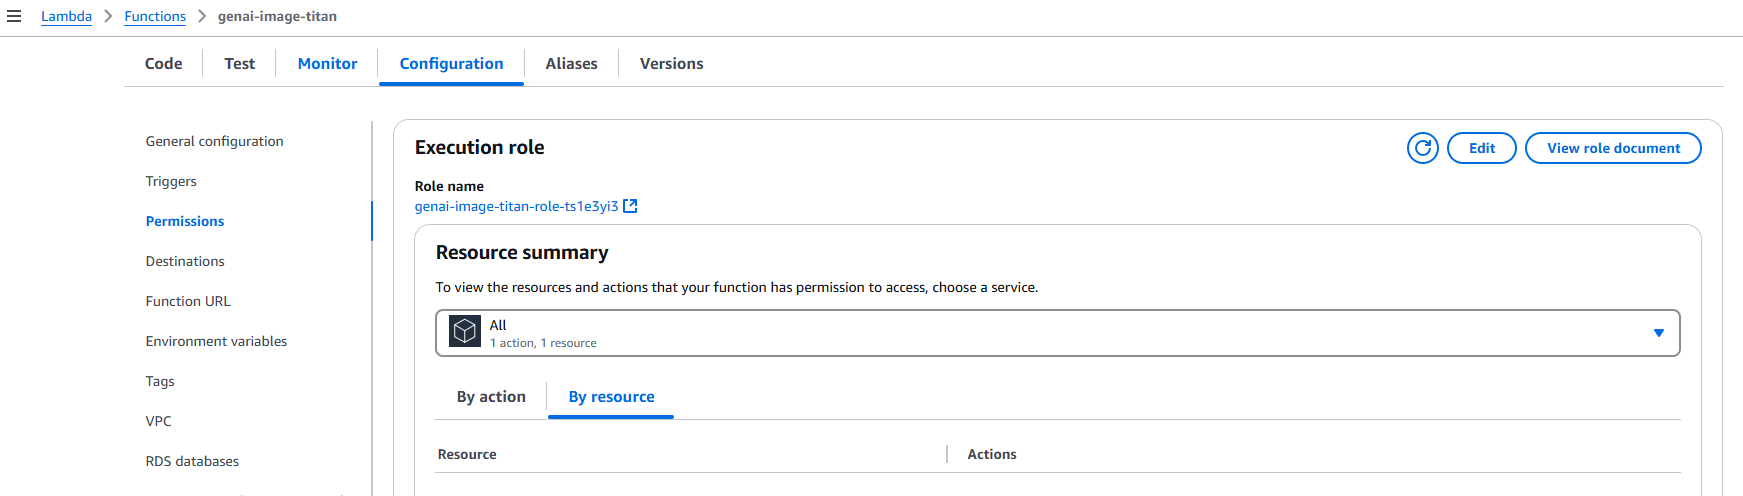
Step 3: Set Up IAM Permissions
➊ Go to the Configuration tab → Permissions section.
➋ Click on the role name under “Execution role”.
➌ In the IAM role screen:
- Click Add permissions → Attach policies.
- Attach the following AWS managed policies:
-
AmazonS3FullAccess– to upload and access images -
AmazonBedrockFullAccess– to generate images using Bedrock
-
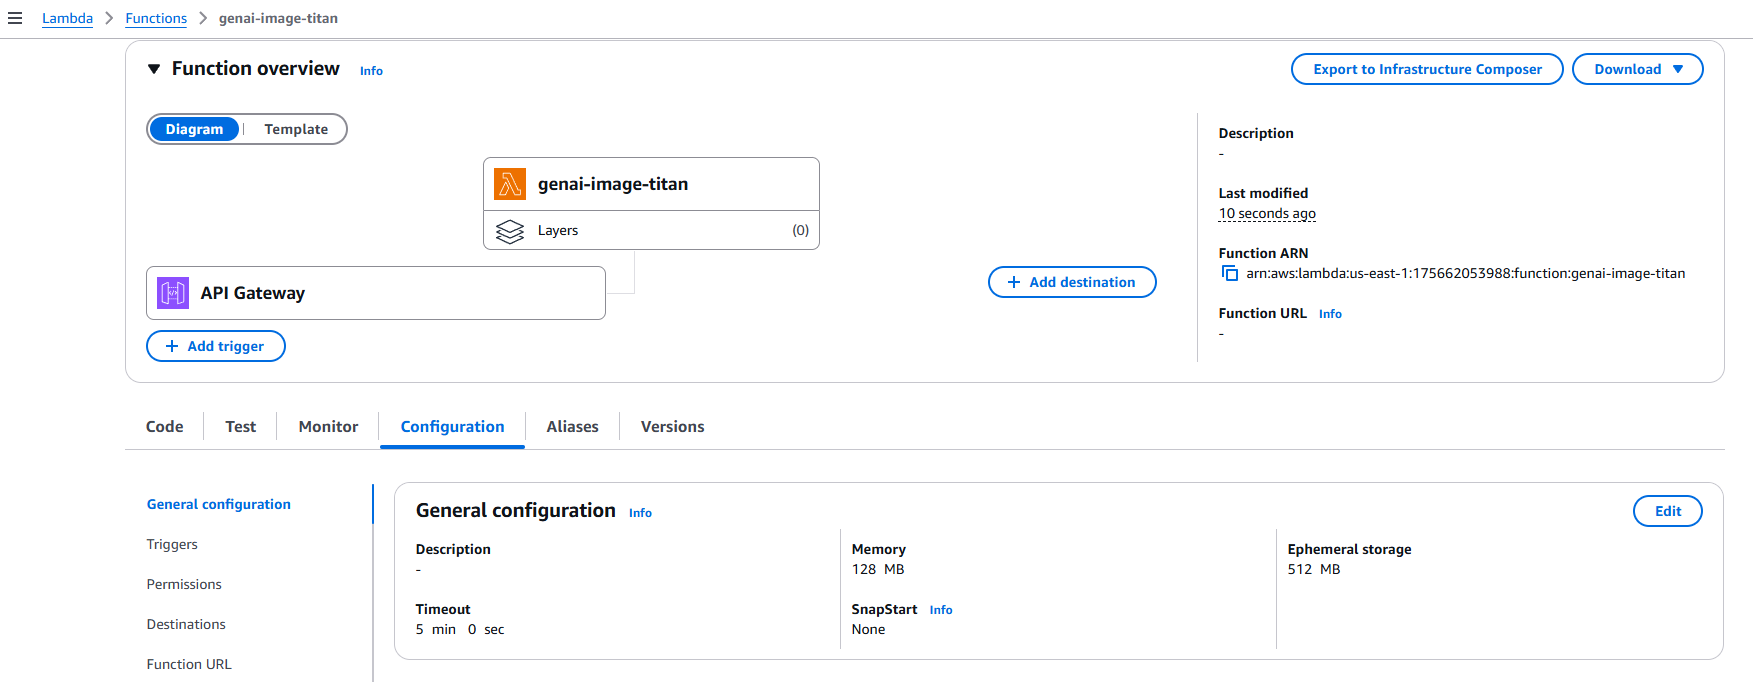
Step 4: Increase Lambda Timeout
➊ Back in the Lambda function page → Go to Configuration → General configuration.
➋ Click Edit.
➌ Set Timeout to 5 minutes (00:05:00) – this gives Bedrock enough time to generate high-quality images.
➍ Click Save.
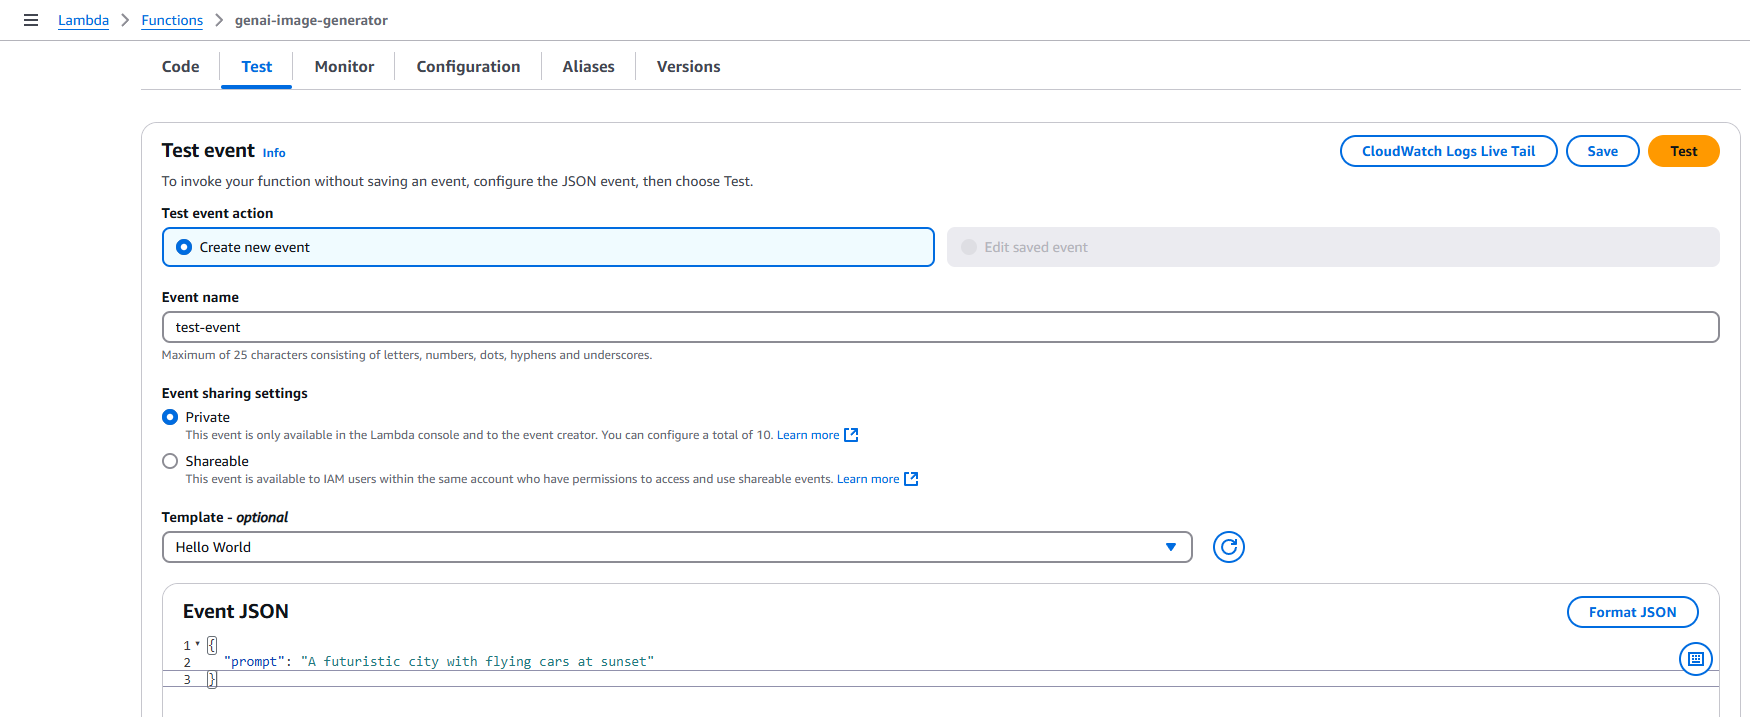
Step 5: Test Your Function
➊ Click the Test button in the Lambda UI.
➋ Create a new test event with the following input:
{
  "prompt": "A futuristic city with flying cars at sunset"
}
➌ Click Test again.
➍ If everything runs fine, you'll see a success notification with "statusCode": 200.
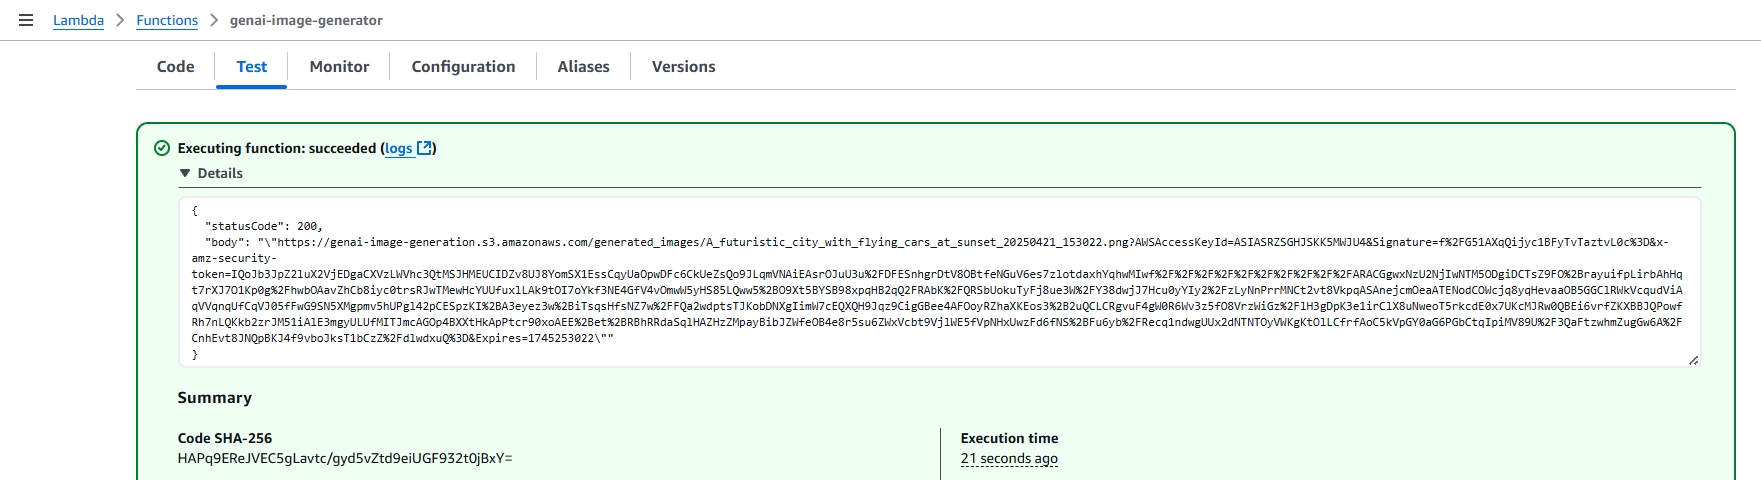
The response will also include a pre-signed S3 URL – simply copy that URL and paste it into a new browser tab to view your generated image.
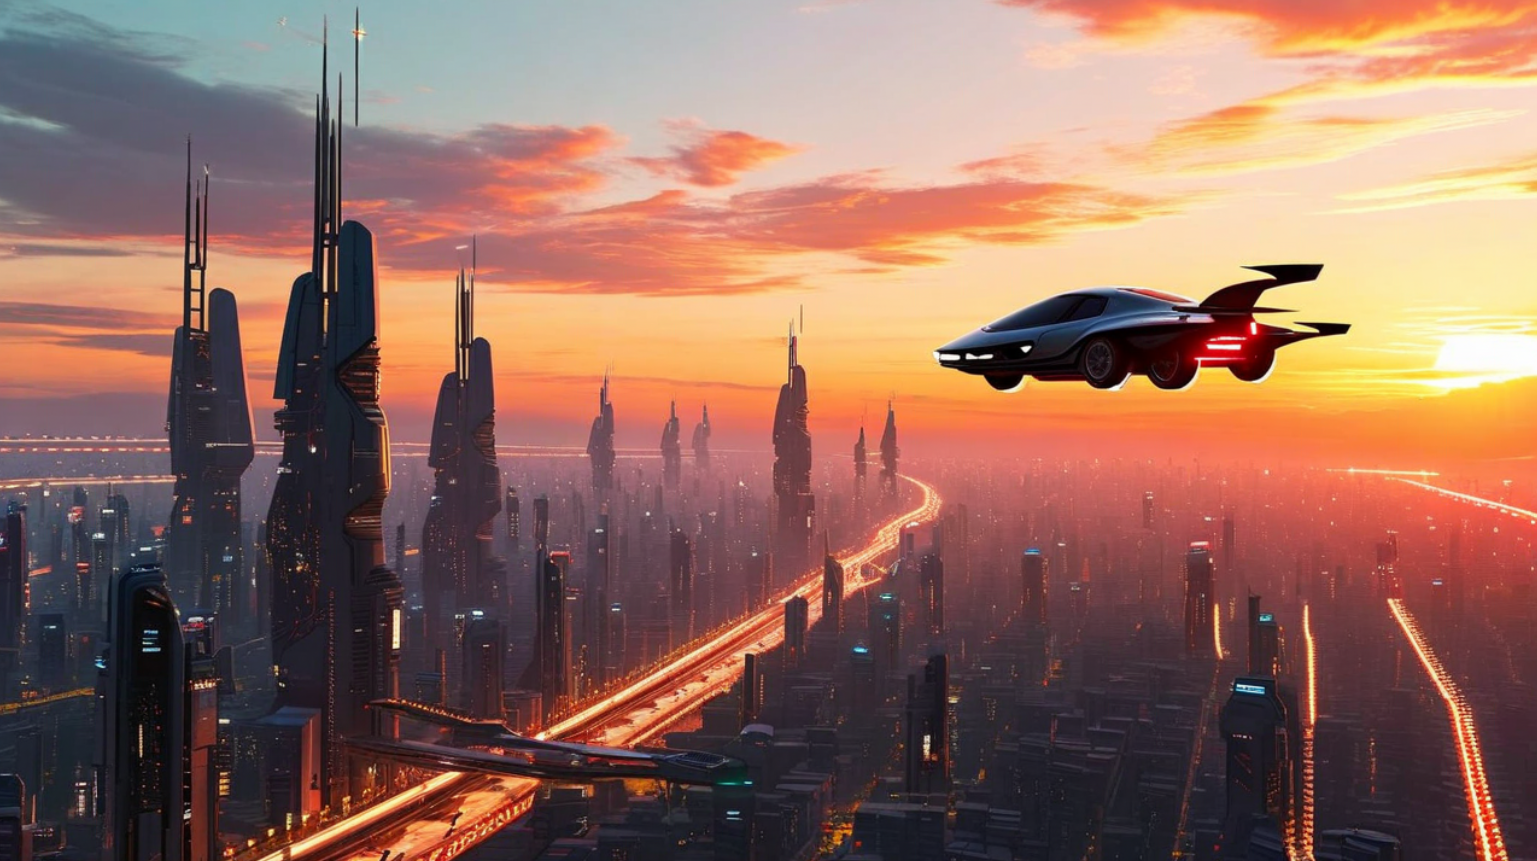
Just look at this image generated from the prompt "A futuristic city with flying cars at sunset" isn’t it amazing? 😍
Note
If you get an Access Denied error while opening the image:
- Make sure the entire pre-signed URL is copied correctly (it’s usually long).
- Double-check that your Lambda role has S3 permissions.
Let's Integrate Lambda Function with API Getaway:
In this section, we’ll create a REST API using Amazon API Gateway, connect it to a Lambda function, and ensure that the input is passed as a query parameter (prompt) to the Lambda function.
Step 1: Create the REST API in API Gateway
➊ Open API Gateway from the AWS Console.
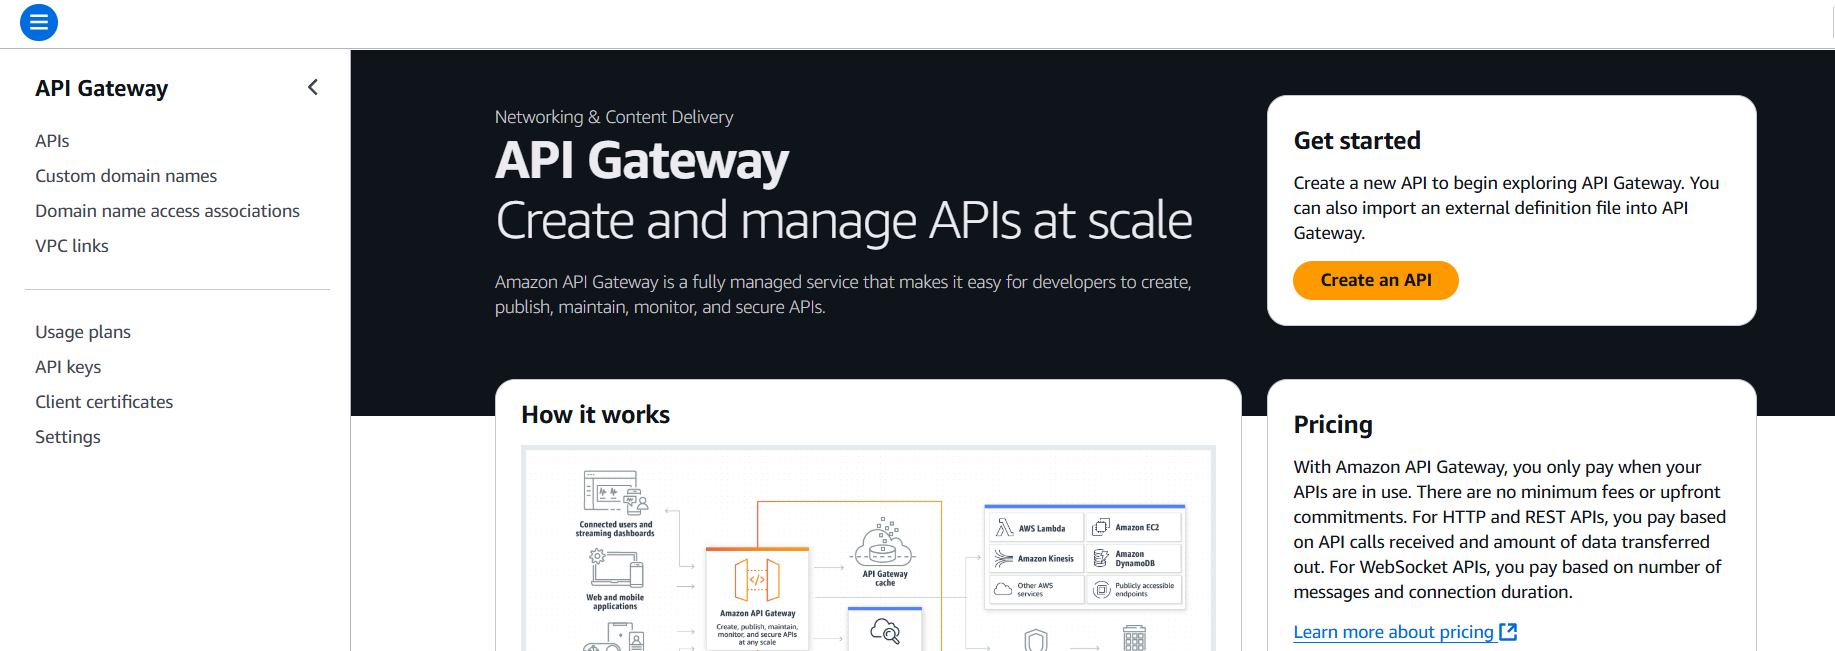
➋ Click Create API → Select REST API (not private) → Click Build.

➌ Enter a name (e.g., ImageGeneration) and keep other defaults → Click Create API.

Step 2: Create a Resource & Method
➊ Under your API, click Actions → Create Resource.
➋ Name your resource (e.g., /amazon-nova-image-generation), enable CORS, and click Create Resource.

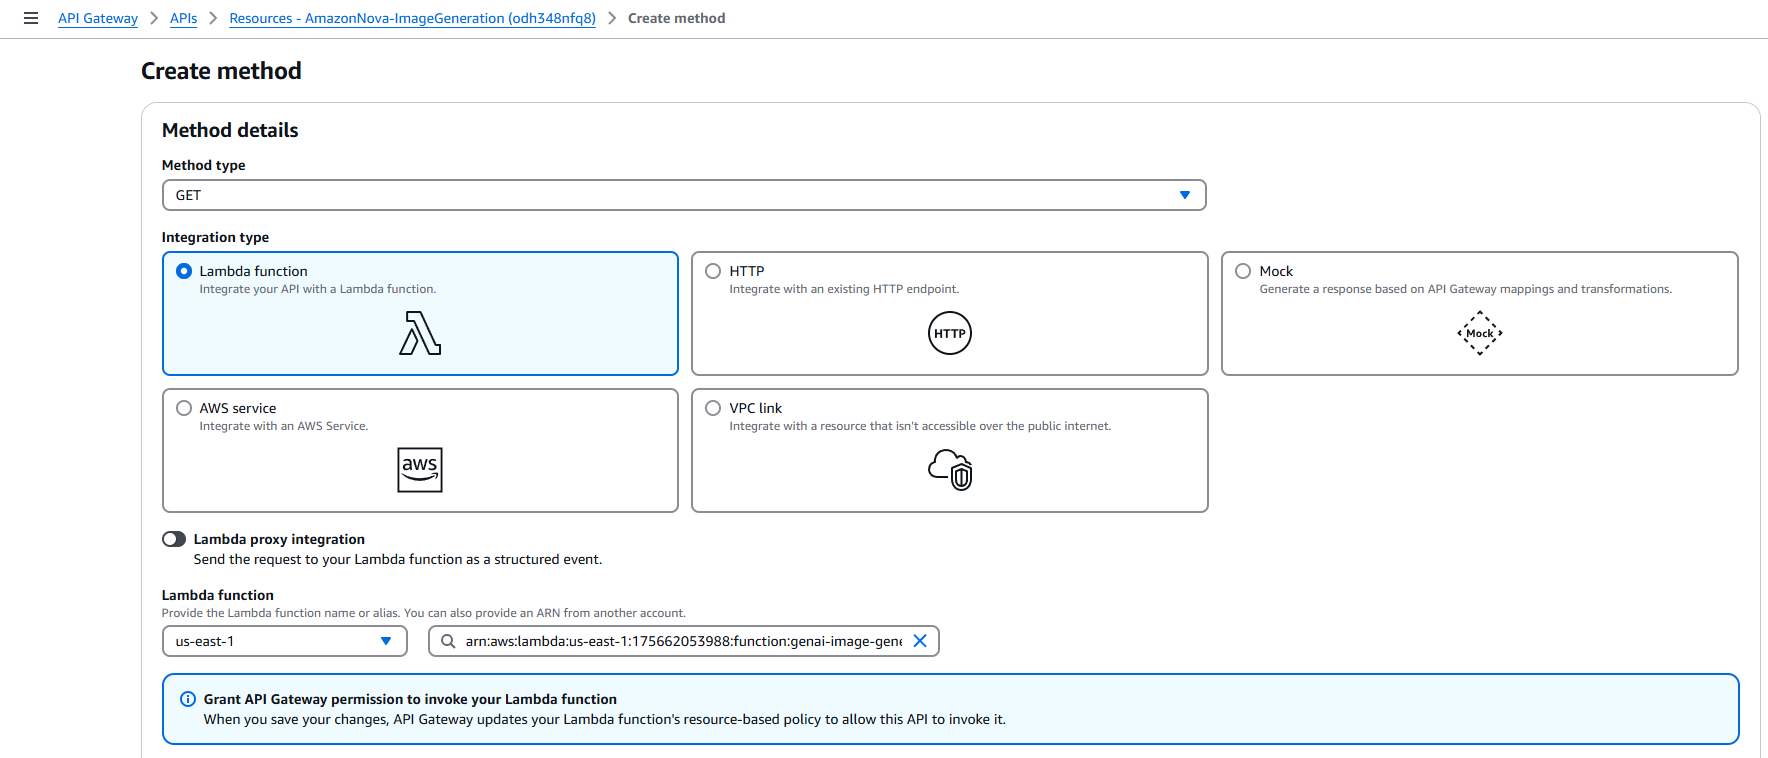
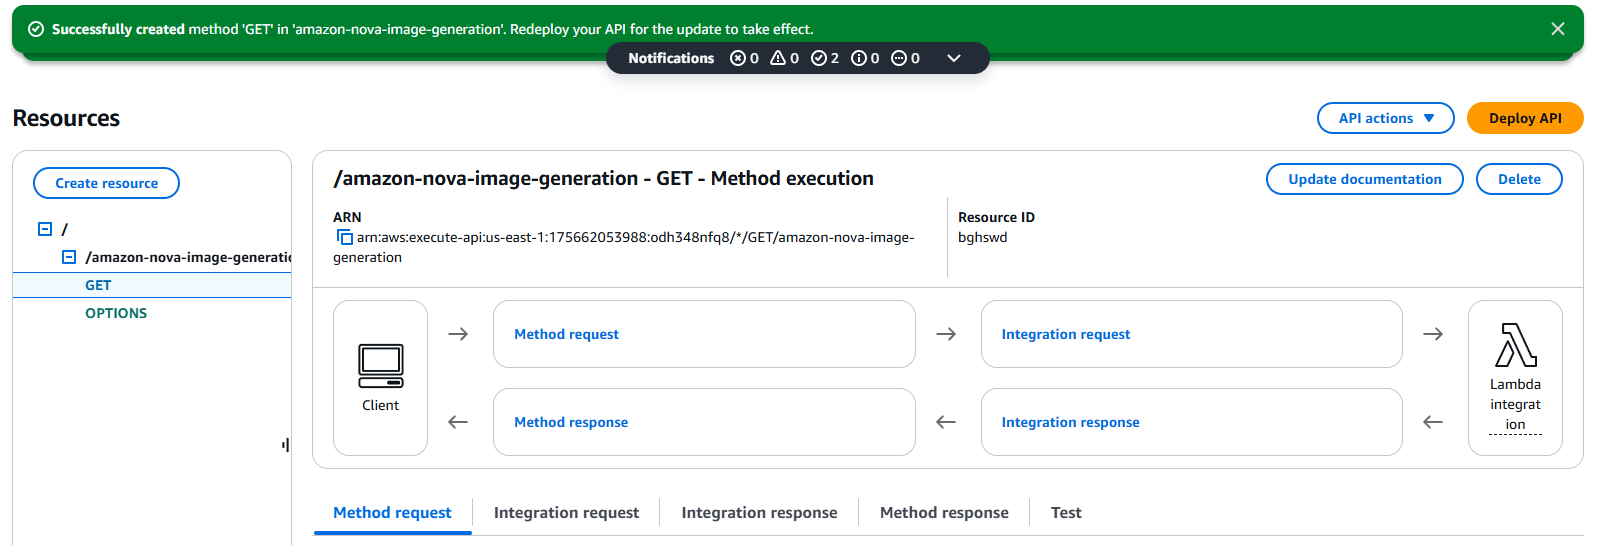
➌ With the resource selected, click Create Method → Choose GET → Click the checkmark.
➍ Choose Lambda Function as the integration type.
➎ Select the region and your Lambda function name → Click Save.
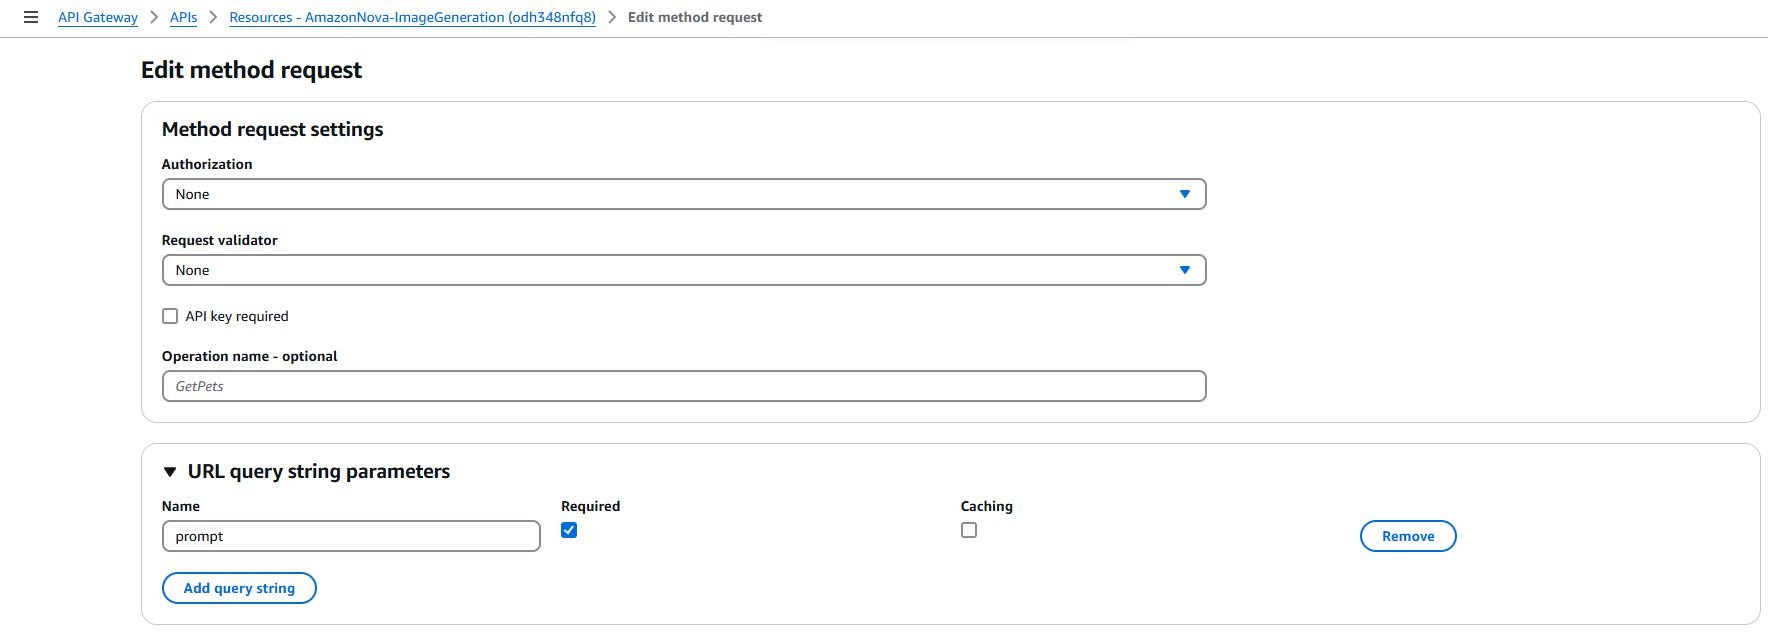
Step 3: Configure Method Request
➊ Click on the newly created GET method → Go to Method Request.
➋ Under URL Query String Parameters, click Add query string:
- Name it
prompt, and check Required.
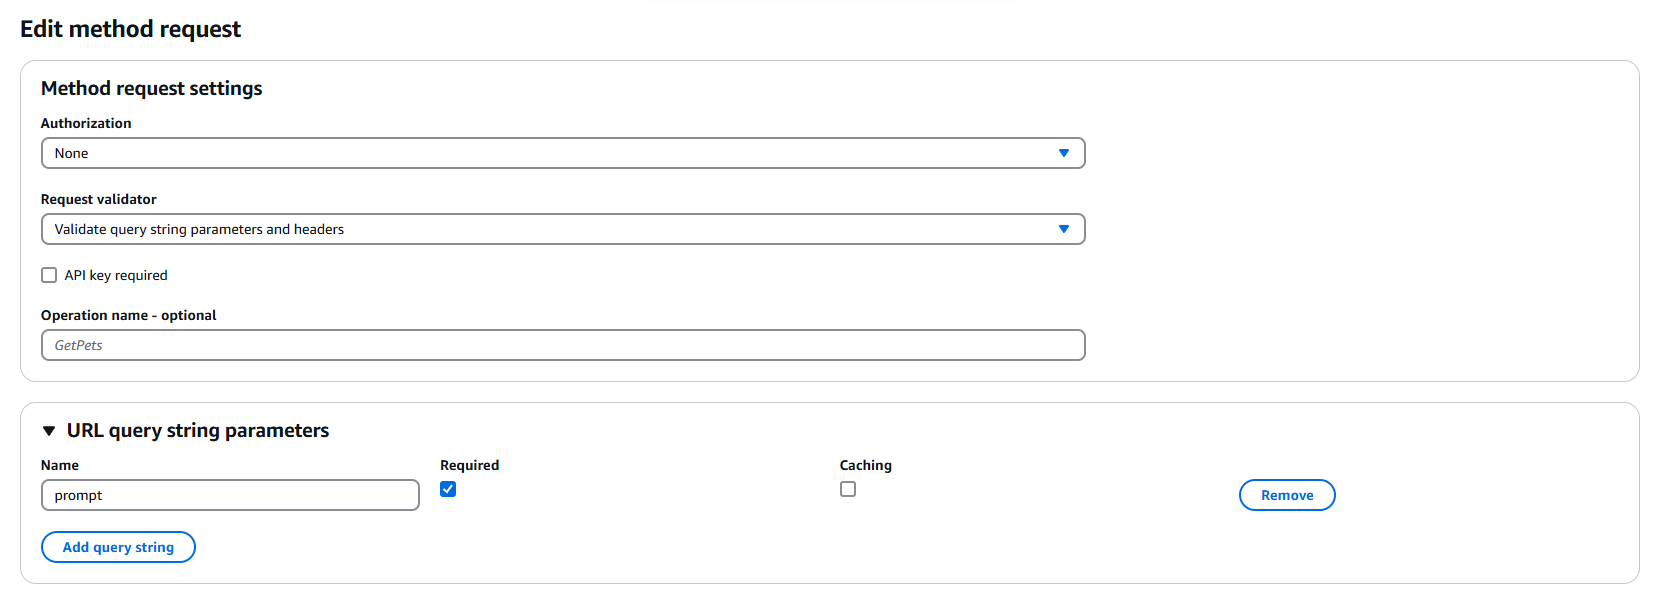
➌ Under Request Validator, select:
Validate query string parameters and headers → Click Save.
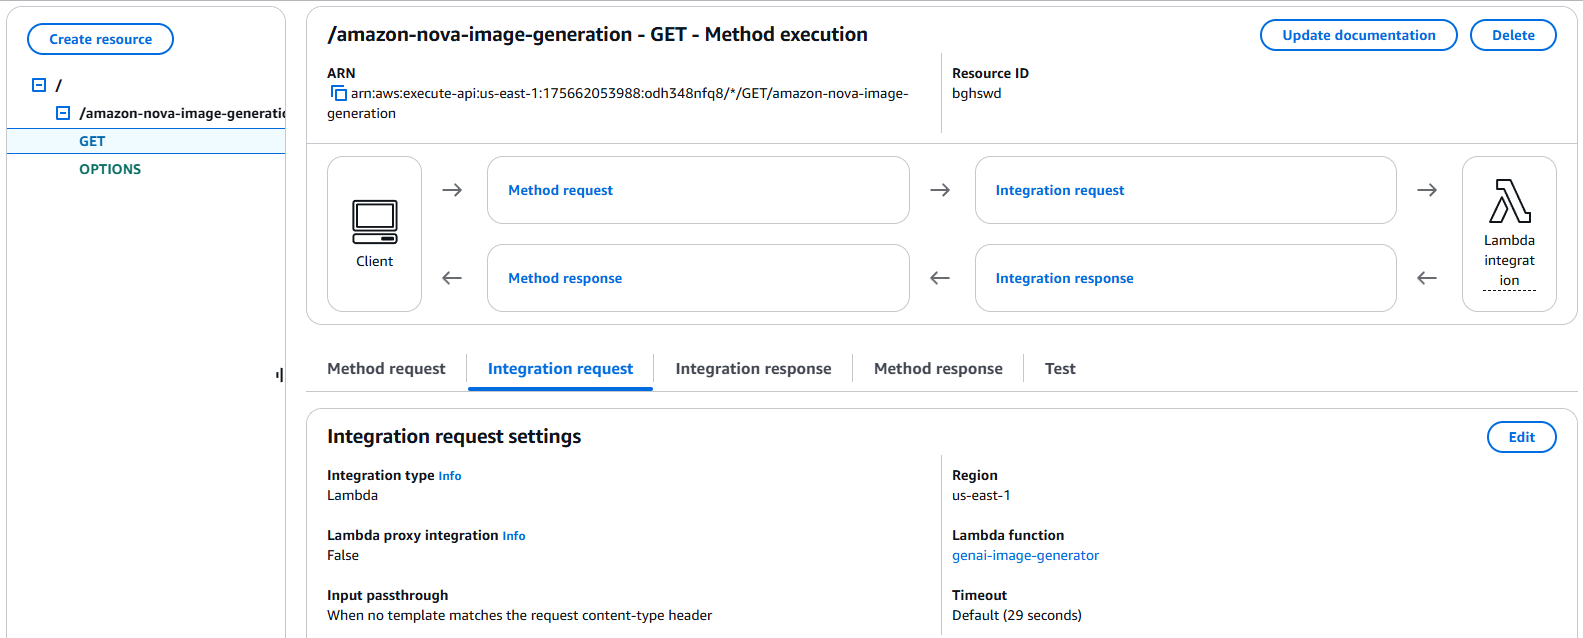
Step 4: Set Integration Request Mapping Template
➊ Go to Integration Request → Click Edit.
➋ Scroll to Mapping Templates → Click Add mapping template.
➌ Enter Content Type: application/json.
➍ Paste the following Template Body:
{
     "prompt": "$input.params('prompt')"
   }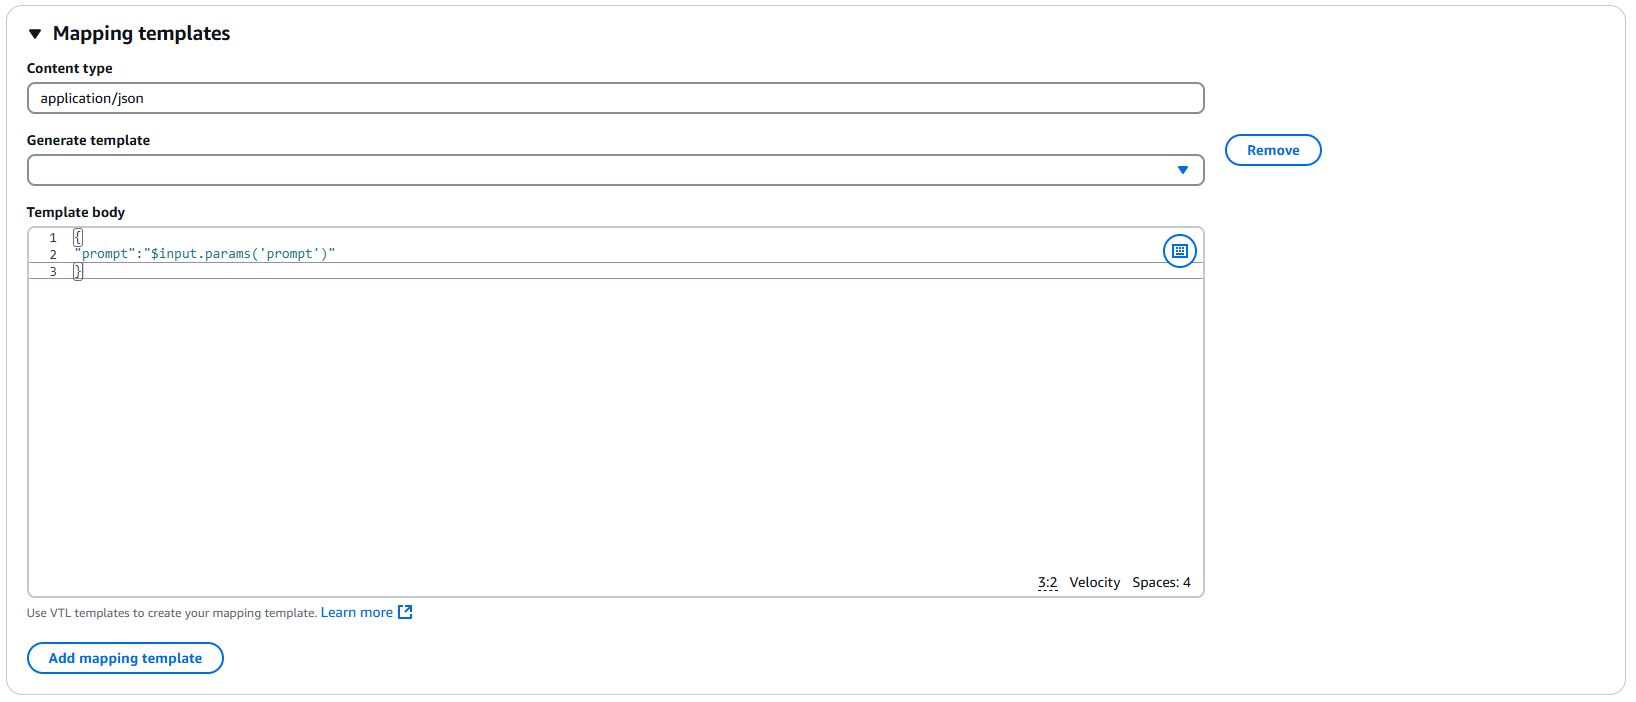
Note: Avoid copy-pasting directly – type it manually if you face formatting issues.
Step 5: Deploy the API
➊ Click Actions → Deploy API.
➋ Choose New Stage → Enter stage name (e.g., dev) → Click Deploy.
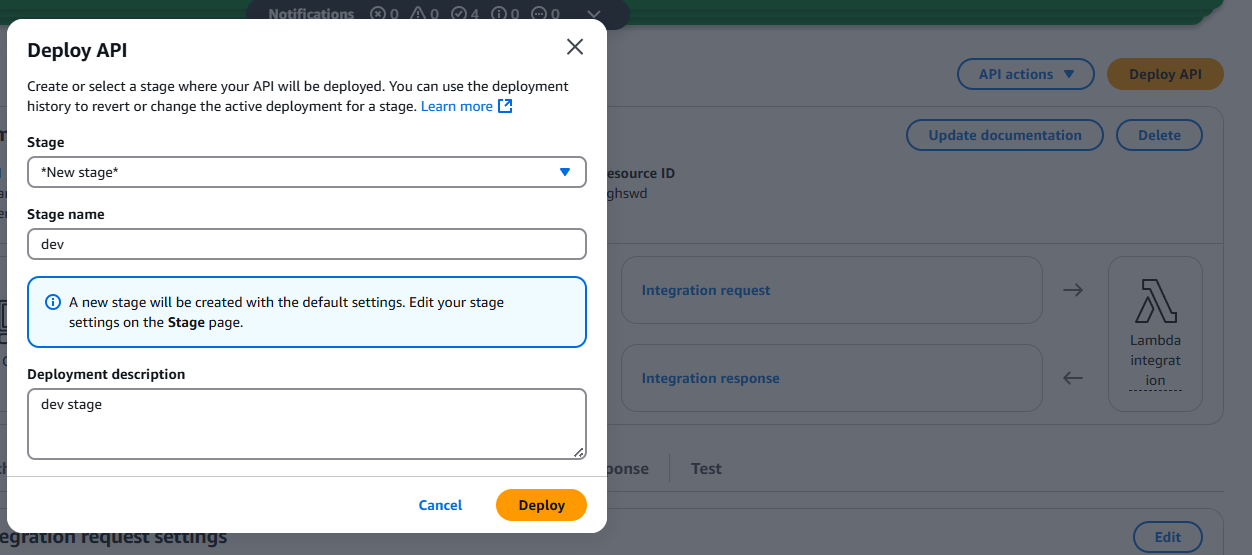
Note: Every time you make changes to your API configuration, remember to re-deploy to the stage!
Step 6: Test the API in Console
➊ Go to your /GET method → Click Test.
➋ Enter query string parameter:
-
Key:
prompt -
Value:
image of a cat
➌ Click Test.
You should get a 200 OK response with a pre-signed S3 URL in the response body.
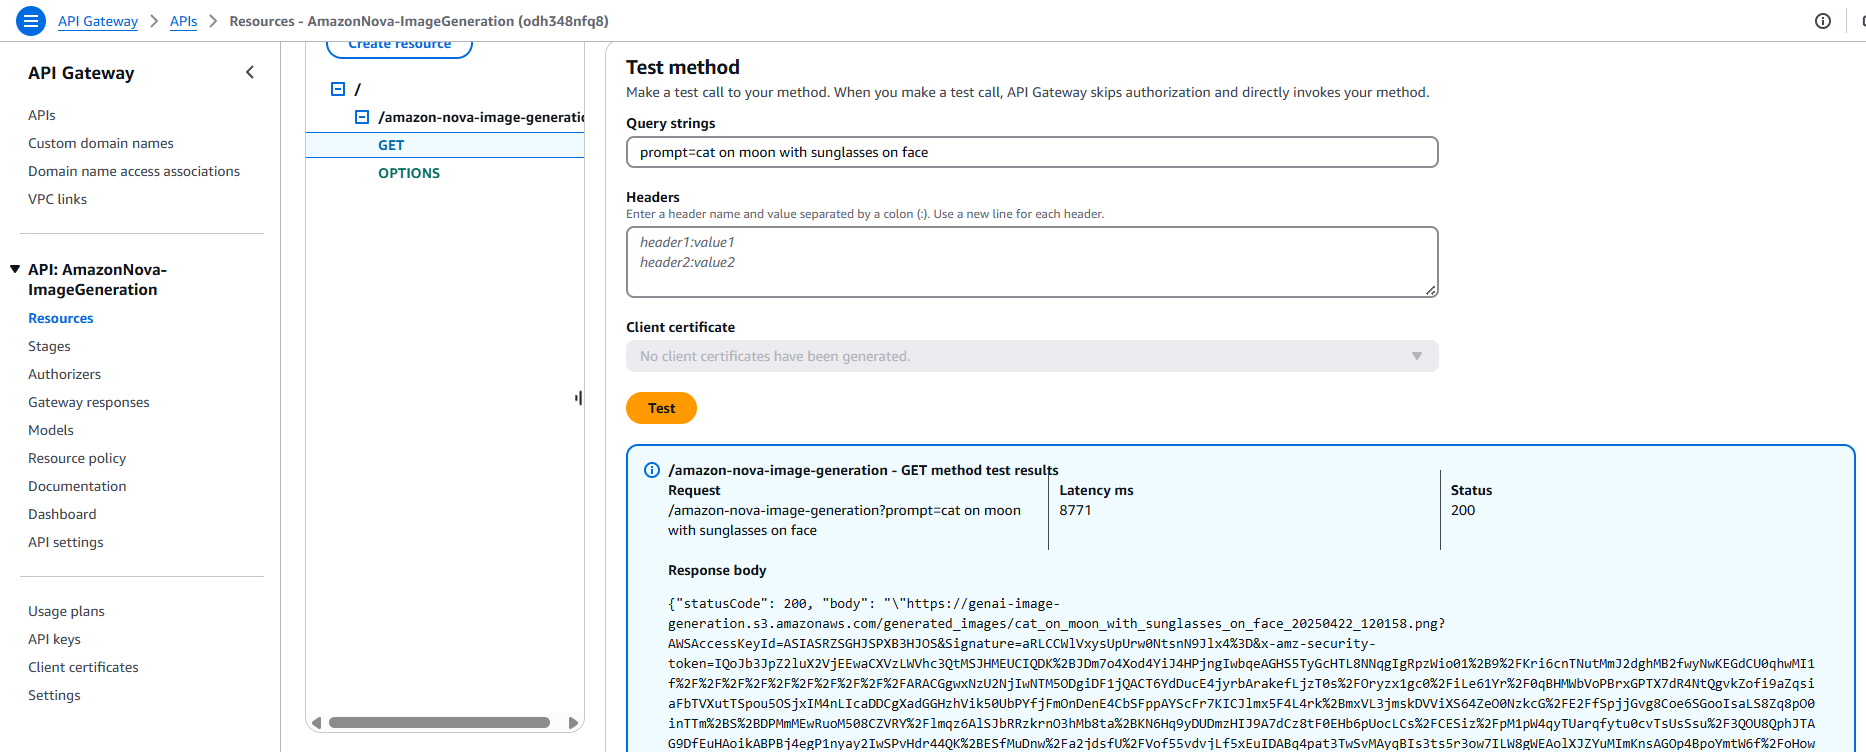
Open the URL to view the generated image based on your input prompt.
Get Invoke URL & Test with Postman (Optional)
Step 1: Get the Invoke URL
➊ Open API Gateway in AWS Console.
➋ In the left panel, select your API → Click on Stages.
➌ Expand the stage (e.g., dev) → Copy the Invoke URL at the top.

➍ Append your resource path.
Example:
https://odh348nfq8.execute-api.us-east-1.amazonaws.com/dev/amazon-nova-image-generationStep 2: Test in Postman
➊ Open Postman. Set the method to GET and paste the full Invoke URL.
➋ Click on the Params tab.
➌ Add a query parameter:
-
Key:
prompt -
Value:
A futuristic Times Square at night with neon lights, holographic ads, and flying cars.
➍ Click Send.
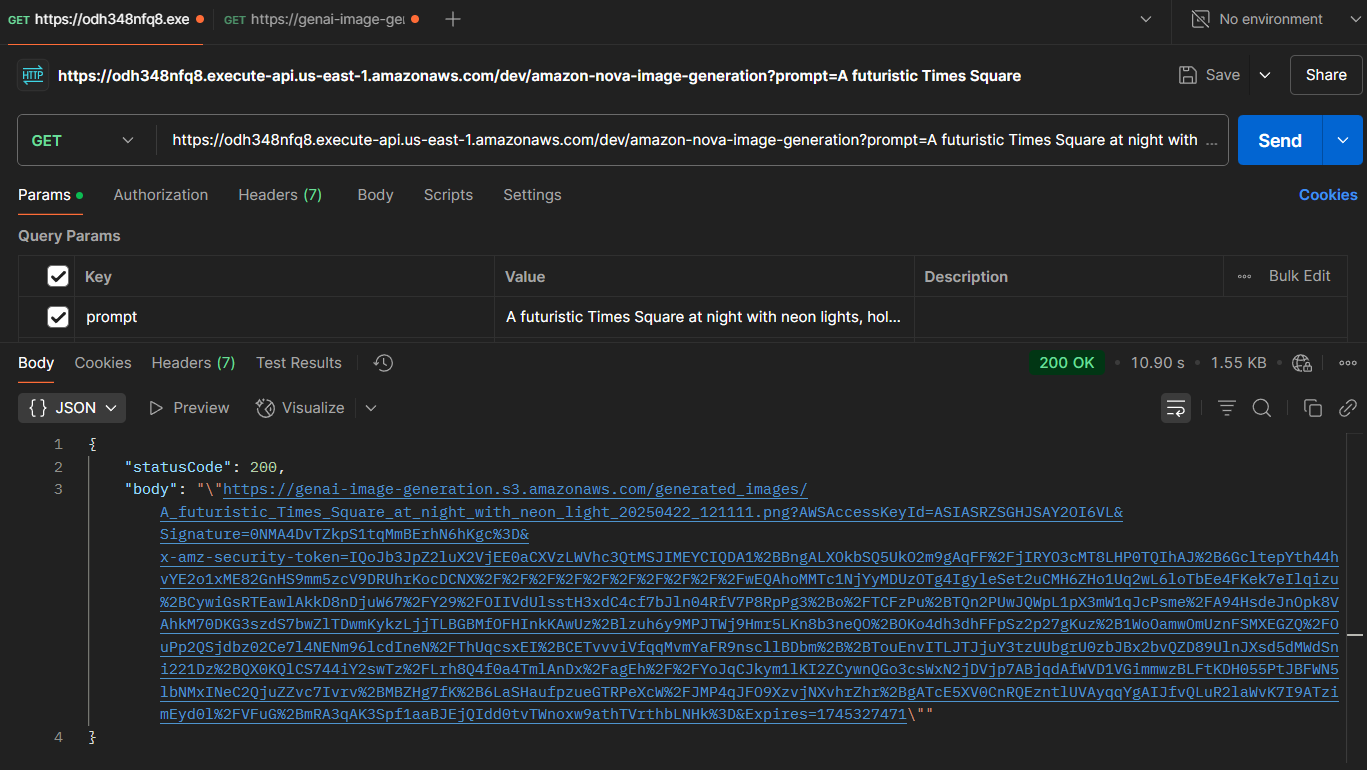
If successful, you’ll receive:
-
Status:
200 OK - Response Body: JSON containing a pre-signed S3 URL
Copy and paste the URL into a browser to view or download the generated image.
Here is my Response Image:
Let's Build Static Website:
This index.html file is a static web page that allows users to generate AI images by entering a prompt. It connects to a backend image generation API (in our case Amazon Nova Canvas) and displays the image on the same page and we can download the image from website. The interface is styled with HTML and CSS, and the logic is handled through a simple JavaScript function. Ideal for showcasing GenAI capabilities in a lightweight, deployable frontend.
</span>
 lang="en">

     charset="UTF-8">
     name="viewport" content="width=device-width, initial-scale=1.0">
    Gen AI Image Generator

        body {
            margin: 0;
            padding: 0;
            display: flex;
            flex-direction: column;
            justify-content: center;
            align-items: center;
            height: 100vh;
            background: linear-gradient(135deg, #000, #444);
            color: white;
            font-family: Arial, sans-serif;
            text-align: center;
        }
        .header {
            margin-bottom: 20px;
        }
        .header h1 {
            font-size: 36px;
            margin: 0;
        }
        .header h2 {
            font-size: 20px;
            font-weight: normal;
            margin: 5px 0;
            color: #ccc;
        }
        .shoutout {
            margin-top: 10px;
            font-size: 16px;
            color: #ffd700;
        }
        .container {
            width: 80%;
            max-width: 600px;
            background: rgba(0, 0, 0, 0.8);
            padding: 20px;
            border-radius: 10px;
            box-shadow: 0px 0px 15px rgba(255, 255, 255, 0.2);
        }
        h3 {
            font-size: 24px;
            margin-bottom: 10px;
        }
        input, select {
            width: 90%;
            padding: 10px;
            margin: 10px 0;
            border: none;
            border-radius: 5px;
            font-size: 16px;
            text-align: center;
        }
        button {
            padding: 10px 20px;
            border: none;
            border-radius: 5px;
            background: #888;
            color: white;
            cursor: pointer;
            font-size: 16px;
            transition: 0.3s;
        }
        button:hover {
            background: #bbb;
            transform: scale(1.1);
        }
        .image-container {
            margin-top: 20px;
        }
        img {
            max-width: 100%;
            border-radius: 10px;
            box-shadow: 0px 0px 10px rgba(255, 255, 255, 0.3);
            transition: 0.3s;
        }
        img:hover {
            transform: scale(1.05);
        }
        .loader {
            border: 5px solid rgba(255, 255, 255, 0.3);
            border-top: 5px solid white;
            border-radius: 50%;
            width: 40px;
            height: 40px;
            animation: spin 1s linear infinite;
            display: none;
            margin: 10px auto;
        }
        @keyframes spin {
            0% { transform: rotate(0deg); }
            100% { transform: rotate(360deg); }
        }


     class="header">
        Sarvar's Tech
        Architecting the Future of Cloud Solutions
         class="shoutout">🚀 Big shout out to the AWS Community Builder Program for empowering cloud builders around the world! 💪

     class="container">
        Generate GenAI Image
         type="text" id="prompt" placeholder="Enter your prompt...">
         id="model">
             value="amazon_nova">Amazon Nova Canvas

         onclick="generateImage()">Generate
         class="loader" id="loader">
         class="image-container" id="imageContainer">


        async function generateImage() {
            const prompt = document.getElementById('prompt').value;
            const model = document.getElementById('model').value;
            if (!prompt) {
                alert('Please enter a prompt');
                return;
            }

            const loader = document.getElementById('loader');
            const imageContainer = document.getElementById('imageContainer');
            loader.style.display = 'block';
            imageContainer.innerHTML = '';

            let apiUrl = '';
            if (model === 'amazon_nova') {
                apiUrl = `https://odh348nfq8.execute-api.us-east-1.amazonaws.com/dev/amazon-nova-image-generation?prompt=${encodeURIComponent(prompt)}`;
            }

            try {
                const response = await fetch(apiUrl);
                const data = await response.json();
                const imageUrl = JSON.parse(data.body).replace(/(^"|"$)/g, '');

                if (imageUrl) {
                    loader.style.display = 'none';
                    imageContainer.innerHTML = `
                        ${imageUrl}" alt="Generated Image">
                        ${imageUrl}')">Download
                    `;
                } else {
                    throw new Error('Image URL not found');
                }
            } catch (error) {
                loader.style.display = 'none';
                imageContainer.innerHTML = `Error generating image. Please try again.`;
                console.error('Error:', error);
            }
        }

        function downloadImage(url) {
            const a = document.createElement('a');
            a.href = url;
            a.download = 'generated_image.png';
            a.click();
        }


    Enter fullscreen mode


    Exit fullscreen mode


  Sections/Lines to Update for New Users


  1. Header Branding

Sarvar's Tech
Architecting the Future of Cloud Solutions


    Enter fullscreen mode


    Exit fullscreen mode


Update to: Your own name, brand, or website title.

Purpose: Personalize the interface.


  2. Image Generation API Endpoint

apiUrl = `https://odh348nfq8.execute-api.us-east-1.amazonaws.com/dev/amazon-nova-image-generation?prompt=${encodeURIComponent(prompt)}`;


    Enter fullscreen mode


    Exit fullscreen mode


Update to: Your own API Gateway or backend URL if you’re hosting the image generation service yourself.

Purpose: This is the actual API that fetches the GenAI image based on the prompt.

Note: Make sure your endpoint returns the image URL in the same structure (body containing a stringified URL).


  Final Step: Hosting Static Website on S3:
Now we’re at the final step hosting your static website that generates images using Amazon’s Nova Foundation Model. To do this, simply copy the code provided above into a new file named index.html and save it locally.Next, create an S3 bucket and upload the index.html file to it. The required permissions and static website hosting configuration steps are already covered in detail in this guide:
👉 Host a Static Website on AWS S3 – Step-by-Step Guide for BeginnersOnce you complete the steps from the article, you’ll be able to access your hosted static website as shown below. You’ll see a sleek interface where you can simply enter any text prompt and generate a stunning image using the power of Amazon Nova.


  Website Final Look:


  Let's Test Our Website with Real Use Cases
Now it’s time to put our implementation to the test!
We’ll run a few prompts based on real-world scenarios to see how our static website generates images using the Amazon Nova Canvas Foundation Model.We'll simulate use cases from the digital marketing space like festival greetings for different businesses and observe how quickly and effectively the model produces high quality images.Let’s dive in and see the power of GenAI in action!


  Diwali


Restaurant Table Setup:


“Restaurant table setup with Indian sweets, golden lighting, and diyas. Include: ‘Wishing You a Delicious Diwali – Join Us for a Celebration of Taste & Togetherness.’”


SUV Promotion:


“white new sedan with marigold garlands and diyas in a showroom setting. Include: ‘This Diwali, Drive Home Prosperity - Wishing You Joyous Festivities from Volkswagen.’”


  Independence Day:


Patriotic-Themed Car Showroom:


“Indian flag cover whole sky, patriotic themed decals, and fireworks. Add: ‘Accelerate Towards Freedom - Happy 15th August from Skoda!’”


  Christmas


Restaurant Setup:


“Cozy restaurant with festive decor, red-and-green color palette, and traditional Christmas dishes. Add: ‘Feast the Season! Merry Christmas.’”


  Eid


Restaurant Ramadan offer


“Restaurant interiors with golden lights, Arabic calligraphy, and tables full of biryani, kebabs, and sweet sevai—Eid Mubarak from your favorite festive food destination!"


  Festive Online Shopping Banner


Elegant Online Shopping:


“An elegant online shopping banner showing festive clothing, watches, perfumes, and electronics with a night sky and crescent moon in the background.”


  Holi


Restaurant Serving Festive Dishes:


“Restaurant serving colorful festive dishes like gujiya, thandai, and snacks with people enjoying Holi outside. Add: ‘Feast on Flavors, Splash into Fun Happy Holi!’”


Car Showroom Promotion:


“Car showroom promotion showing a premium white vehicle with subtle colorful Holi powder effects in air, professional lighting, luxury atmosphere.”


Referance:
If you're interested in learning how to generate accurate images and exploring prompt engineering, check out this article. In it, I explain how prompts work and how you can leverage them effectively: Unlocking the Power of Prompt Engineering with Amazon Bedrock's Foundation Model.If you're interested in diving deeper into Amazon's foundation models and exploring the full range of capabilities offered by the Nova model, be sure to check out this insightful article: Amazon Nova: AWS’s New Foundation Model for GenAI.🎉 Congratulations! You did it! 🎉
You’ve successfully implemented and hosted a website that generates GenAI images using the power of the Amazon Nova Foundation Model. 🚀If you run into any issues or have questions, feel free to reach out — just drop a comment here or DM me directly on LinkedIn. I’m always happy to help! 🙌
Conclusion: This guide offers a practical roadmap for creating an AI-powered image generation website using Amazon Bedrock's Nova model. By integrating services like AWS Lambda, API Gateway, and Amazon S3, it enables users to generate high-quality images based on textual prompts. The tutorial emphasizes real-world applications, particularly in the digital marketing sector, showcasing how businesses can expedite content creation during festive seasons. By leveraging Generative AI, companies can produce customized visuals swiftly, reducing reliance on traditional design processes and enhancing operational efficiency.
— — — — — — — —
Here is the End!✨ Thank you for reading! ✨ I hope this article helped simplify the process and gave you valuable insights. As I continue to explore the ever-evolving world of technology, I’m excited to share more guides, tips, and updates with you. 🚀 Stay tuned for more content that breaks down complex concepts and makes them easier to grasp. Let’s keep learning and growing together! 💡