This Article was co-authored by @jamesm
Introduction
Ready to challenge your brain and have fun while doing it? In this guide, we'll show you how to build a quiz app using React Native! We'll dive into managing screen navigation and adding fun animations to make your quiz more engaging. By the end of this tutorial, you'll have a fully functional quiz app that you can further customize and take to the next level.
Prerequisites
- Basic understanding of React Native and Javascript
- Development environment setup for React Native
- Familiarity with component-based architecture in React Native
- Basic knowledge of handling state and props in React Native
Development Environment Disclaimer
This tutorial was created using:
- Windows 11 OS (some CLI commands may differ on macOS/Linux)
- Android physical device with Expo Go (iOS may require Xcode setup)
- TypeScript template (vanilla JS users may need to adjust type annotations)
- Expo SDK 49 (newer versions might have minor behavior changes)
Your experience may vary slightly depending on your setup.
Setting up Development Environment
1. Install Node.js
For windows and MacOS
- Go to Node.js.
- Download the Long-Term Support (LTS) version. (recommended for most users)
- Run the installer
- Follow the installation wizard:
- Click "Next"
- Accept the license agreement.
- Use default installation settings unless you have specific reasons to change them.
- Click "Install" and wait for it to complete.
For Linux based systems
- Open a terminal and run:
sudo apt update
  sudo apt install nodejs npm
To verify installation:
- Open terminal and run
node -v
  npm -v
Common Issues:
If you get 'node' is not recognized, add Node.js to your PATH:
- Windows: Re-run installer and check "Add to PATH"
- Mac/Linux: Add export PATH=$PATH:/usr/local/bin to ~/.bashrc or ~/.zshrc
2. Install Expo Go on your Device
Before running the app, install Expo Go on your Android/iOS device:
Android: Download on Google Play
iOS: Download on App Store
Why?
- Expo Go lets you:
- Test your app instantly (no builds required)
- Live reload changes during development
- Debug with React Native tools
Note: Ensure your phone and computer are on the same WiFi for connectivity.
Now that your environment is ready, let’s dive into building the quiz app. Follow these steps to create the core screens and implement functionality:
Step 1: Set up your Project
1.1 Navigate to your folder
Move terminal context into your project folder for all subsequent commands.
Example: C:\Windows\System32>CD "Your Folder"
C:\Windows\System32>cd "C:\Users\Dave Christian Royo\React-Native-Quiz-App"1.2 Create New Project (After CD to parent dir)
Generate new project folder ReactNativeQuizApp (in our case)
C:directory>npx create-expo-app ReactNativeQuizAppNote:These npm warn deprecated messages are harmless (Expo handles updates).
1.3 Navigate to your actual project
After creating the projects folder, use the cd command once again to your named folder (which is ReactNativeQuizApp).
C:directory cd "ReactNativeQuizApp"1.4 Install manual dependencies
Reinstall dependencies if previous install was interrupted or corrupted.
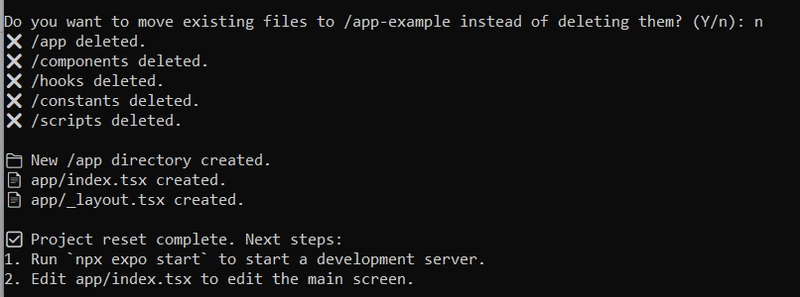
C:directory>npm install1.5 Reset the project to have a fresh start
We need to wipe custom files and revert to Expo's default structure.
C:directory>npm run reset-project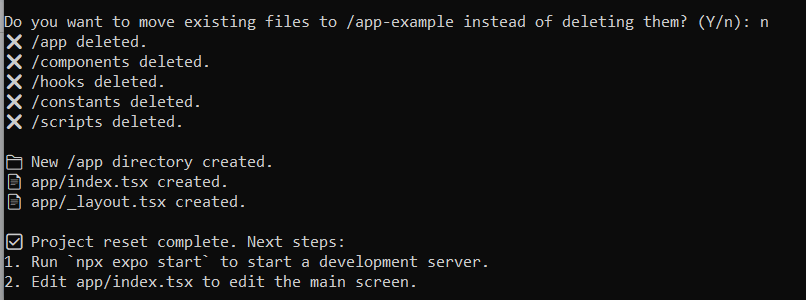
1.6 Finally Start the Development Server
Launch the Metro bundler and Generates a QR code for device testing. This enables live-reloading during development and hosts your app locally at localhost:19002
C:\directory>npx expo startYou should be able to see the QR Code and then you are ready to connect it to your Expo Go on your phone.

Step 2: Set up your Project
2.1 File Structure
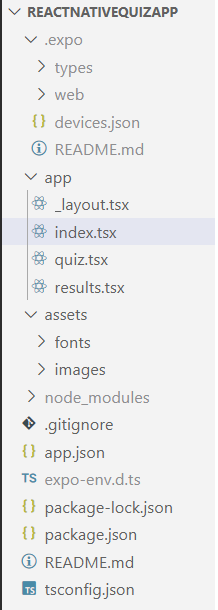
After installing the dependencies and resetting the project. We will automatically get the necessary files and folders on their proper locations needed to create our quiz app.
Now, on our project, we need to make a separate TypeScript file (.tsx) for our Home Screen, Quiz Screen, and Result Screen in the same folder which is in our case, the app.
2.2 Home Screen (index.tsx)
import { Link } from "expo-router";
import { StyleSheet, Text, View, TouchableOpacity } from "react-native";

// Main home screen component that serves as the entry point of the app
export default function HomeScreen() {
  return (
    // Main container view that centers all its children
    <View style={styles.container}>
      {/* App title displayed at the top */}
      <Text style={styles.title}>General Knowledge QuizText>

      {/* Subtitle describing what the app does */}
      <Text style={styles.subtitle}>Test your knowledge with 10 questionsText>

      {/*
        Link component from expo-router that navigates to the quiz screen
        asChild prop allows using custom TouchableOpacity as the link trigger
      */}
      <Link href="/quiz" asChild>
        {/*
          Touchable button that starts the quiz
          Pressing this will navigate to the quiz screen
        */}
        <TouchableOpacity style={styles.button}>
          {/* Button label text */}
          <Text style={styles.buttonText}>Start QuizText>
        TouchableOpacity>
      Link>
    View>
  );
}

//
2.3 Quiz Screen (quiz.tsx)
import { useState } from "react";
import { StyleSheet, Text, View, TouchableOpacity } from "react-native";
import { useRouter } from "expo-router";

const questions = [
  // Array of quiz questions, each with a question, options, and the correct answer
  {
    question: "What is the capital of France?",
    options: ["London", "Berlin", "Paris", "Madrid"],
    answer: "Paris",
  },
  // ...other questions
];

export default function QuizScreen() {
  const router = useRouter(); // Used for navigation between screens
  const [currentQuestion, setCurrentQuestion] = useState(0); // Tracks the current question index
  const [score, setScore] = useState(0); // Tracks the user's score
  const [selectedAnswer, setSelectedAnswer] = useState<string | null>(null); // Tracks the currently selected answer
  const [userAnswers, setUserAnswers] = useState<{question: string, correct: boolean}[]>([]); // Stores user's answers and correctness

  const handleSelect = (answer: string) => {
    // Called when a user selects an answer
    setSelectedAnswer(answer);
  };

  const handleSubmit = () => {
    // Checks if the selected answer is correct
    const isCorrect = selectedAnswer === questions[currentQuestion].answer;

    // Save the current answer result
    setUserAnswers([...userAnswers, {
      question: questions[currentQuestion].question,
      correct: isCorrect
    }]);

    // Update score if answer is correct
    if (isCorrect) {
      setScore(score + 1);
    }

    // Reset selected answer for the next question
    setSelectedAnswer(null);

    if (currentQuestion < questions.length - 1) {
      // Move to the next question
      setCurrentQuestion(currentQuestion + 1);
    } else {
      // Navigate to the results screen with final score and answers
      router.push({
        pathname: "/results",
        params: {
          score: isCorrect ? score + 1 : score,
          answers: JSON.stringify(userAnswers.concat([{
            question: questions[currentQuestion].question,
            correct: isCorrect
          }]))
        },
      });
    }
  };

  return (
    <View style={styles.container}>
      <Text style={styles.questionCount}>
        {/* Displays current question number out of total */}
        Question {currentQuestion + 1}/{questions.length}
      Text>
      <Text style={styles.question}>
        {/* Displays the current question */}
        {questions[currentQuestion].question}
      Text>

      {/* Renders answer options as buttons */}
      {questions[currentQuestion].options.map((option, index) => (
        <TouchableOpacity
          key={index}
          style={[
            styles.option,
            selectedAnswer === option && styles.selectedOption // Highlights selected option
          ]}
          onPress={() => handleSelect(option)}
        >
          <Text style={styles.optionText}>{option}Text>
        TouchableOpacity>
      ))}

      {/* Submit button is disabled until an answer is selected */}
      <TouchableOpacity
        style={[
          styles.submitButton,
          !selectedAnswer && styles.disabledButton
        ]}
        onPress={handleSubmit}
        disabled={!selectedAnswer}
      >
        <Text style={styles.submitButtonText}>
          {currentQuestion < questions.length - 1 ? "Submit & Next" : "Submit & Finish"}
        Text>
      TouchableOpacity>
    View>
  );
}
2.4 Result Screen (results.tsx)
import { StyleSheet, Text, View, TouchableOpacity, ScrollView } from "react-native";
import { useLocalSearchParams, useRouter } from "expo-router";

interface AnswerItem {
  question: string;
  correct: boolean;
}

export default function ResultsScreen() {
  const router = useRouter();
  const { score, answers } = useLocalSearchParams();
  const totalQuestions = 10;
  const percentage = Math.round((Number(score) / totalQuestions) * 100);
  const answerData: AnswerItem[] = JSON.parse(answers as string);

  let message = "";
  if (percentage >= 80) message = "Excellent! 🎉";
  else if (percentage >= 60) message = "Good job! 👍";
  else if (percentage >= 40) message = "Not bad! 😊";
  else message = "Keep practicing! 💪";

  return (
    <View style={styles.container}>
      <Text style={styles.title}>Quiz Completed!Text>
      <Text style={styles.score}>
        {score}/{totalQuestions}
      Text>
      <Text style={styles.percentage}>{percentage}%Text>
      <Text style={styles.message}>{message}Text>

      <ScrollView style={styles.answersContainer}>
        <Text style={styles.answersTitle}>Your Answers:Text>
        {answerData.map((item, index) => (
          <View
            key={index}
            style={[
              styles.answerItem,
              item.correct ? styles.correctAnswer : styles.incorrectAnswer
            ]}
          >
            <Text style={styles.answerText}>
              Q{index + 1}: {item.question}
            Text>
            <Text style={styles.answerStatus}>
              {item.correct ? "✓ Correct" : "✗ Incorrect"}
            Text>
          View>
        ))}
      ScrollView>

      <TouchableOpacity
        style={styles.button}
        onPress={() => router.push("/quiz")}
      >
        <Text style={styles.buttonText}>Try AgainText>
      TouchableOpacity>

      <TouchableOpacity
        style={[styles.button, styles.homeButton]}
        onPress={() => router.push("/")}
      >
        <Text style={styles.buttonText}>Back to HomeText>
      TouchableOpacity>
    View>
  );
}
Step 3: Style the App
After building the core functionality of your quiz, simply add the following styles below the code to apply the visual design to your screen.
3.1 Home Screen (index.tsx)
const styles = StyleSheet.create({
  container: {
    flex: 1,
    justifyContent: "center",
    alignItems: "center",
    padding: 20,
    backgroundColor: "#f5f5f5",
  },
  title: {
    fontSize: 28,
    fontWeight: "bold",
    marginBottom: 10,
  },
  subtitle: {
    fontSize: 18,
    color: "#666",
    marginBottom: 40,
  },
  button: {
    backgroundColor: "#3498db",
    paddingHorizontal: 30,
    paddingVertical: 15,
    borderRadius: 30,
  },
  buttonText: {
    color: "white",
    fontSize: 18,
    fontWeight: "600",
  },
});
3.2 Quiz Screen (quiz.tsx)
const styles = StyleSheet.create({
    container: {
      flex: 1,
      padding: 20,
      backgroundColor: "#fff",
    },
    questionCount: {
      fontSize: 18,
      color: "#666",
      marginBottom: 20,
    },
    question: {
      fontSize: 24,
      fontWeight: "bold",
      marginBottom: 30,
    },
    option: {
      backgroundColor: "#f0f0f0",
      padding: 15,
      borderRadius: 10,
      marginBottom: 15,
    },
    selectedOption: {
      backgroundColor: "#d4e6ff",
      borderWidth: 1,
      borderColor: "#3498db",
    },
    optionText: {
      fontSize: 18,
    },
    submitButton: {
      backgroundColor: "#3498db",
      padding: 15,
      borderRadius: 10,
      marginTop: 20,
      alignItems: "center",
    },
    disabledButton: {
      backgroundColor: "#cccccc",
    },
    submitButtonText: {
      color: "white",
      fontSize: 18,
      fontWeight: "600",
    },
  });
3.3 Results Screen (results.tsx)
const styles = StyleSheet.create({
  container: {
    flex: 1,
    padding: 20,
    backgroundColor: "#f5f5f5",
  },
  title: {
    fontSize: 28,
    fontWeight: "bold",
    marginBottom: 20,
    textAlign: "center",
  },
  score: {
    fontSize: 24,
    color: "#3498db",
    fontWeight: "bold",
    marginBottom: 10,
    textAlign: "center",
  },
  percentage: {
    fontSize: 36,
    color: "#2ecc71",
    fontWeight: "bold",
    marginBottom: 20,
    textAlign: "center",
  },
  message: {
    fontSize: 20,
    marginBottom: 20,
    textAlign: "center",
  },
  answersContainer: {
    flex: 1,
    marginBottom: 20,
    width: "100%",
  },
  answersTitle: {
    fontSize: 20,
    fontWeight: "bold",
    marginBottom: 10,
  },
  answerItem: {
    padding: 15,
    borderRadius: 8,
    marginBottom: 10,
  },
  correctAnswer: {
    backgroundColor: "#e8f5e9",
    borderLeftWidth: 5,
    borderLeftColor: "#2ecc71",
  },
  incorrectAnswer: {
    backgroundColor: "#ffebee",
    borderLeftWidth: 5,
    borderLeftColor: "#e74c3c",
  },
  answerText: {
    fontSize: 16,
    marginBottom: 5,
  },
  answerStatus: {
    fontWeight: "bold",
  },
  button: {
    backgroundColor: "#3498db",
    padding: 15,
    borderRadius: 10,
    width: "100%",
    marginBottom: 15,
  },
  homeButton: {
    backgroundColor: "#e74c3c",
  },
  buttonText: {
    color: "white",
    textAlign: "center",
    fontSize: 18,
    fontWeight: "600",
  },
});
Step 4: Test on your Phone
Install Expo Go on your phone:
- Android: Google Play Store - Expo Go
- iOS: App Store - Expo Go
The Screens should look like this

Make It Your Own: This app is designed as a starting point—feel free to customize it! Change the styling, add new features like a timer or score tracker, or modify the quiz logic to suit your needs. The clean component structure makes it easy to experiment. Want a dark mode? Different question types? Go for it! The code is yours to tweak and expand.
Troubleshooting
- General Issues
| Issue | Solution |
|---|---|
| Metro Bundler not starting | 1. Kill port: npx kill-port 19000 190012. Restart: npx expo start -c
|
| "Unable to resolve module" | 1. Delete node_modules & package-lock.json2. npm install
|
| App crashes on launch | 1. Clear Expo Go cache (App Settings → Storage → Clear Cache) 2. expo upgrade
|
- Phone Connection Problems
| Symptom | Fix |
|---|---|
| QR code not scanning | 1. Use manual IP: exp://YOUR_LOCAL_IP:190002. Disable VPN/firewall |
| "Couldn't connect to server" | 1. Ensure same WiFi network 2. Try hotspot if office/school WiFi blocks |
| Blank white screen | 1. Shake phone → "Reload" 2. Check terminal for Metro bundler errors |
- Emergency Reset When all else fails:
-
Delete these folders:
node_modules.expodist
Fresh install:
npm install
   npx expo start -c
Additional Resources
- Expo Documentation – Official guides and API references
- React Navigation – Advanced navigation patterns
- React Native Styling – UI design tips
Get the Complete Code
Want to explore the full implementation or use it as a starter template? All source code for this quiz app is available on GitHub:
🔗 https://github.com/deybcoding/ReactNativeQuizApp.git
Conclusion
Congratulations🎉! You’ve just created a fully functional quiz app with React Native and Expo. Here’s what you accomplished:
- Set up a cross-platform project with Expo Router
- Built core screens (Home, Quiz, Results) with TypeScript
- Added interactive features like answer submission and score tracking
- Styled the app for a polished user experience
- Tested live on your device using Expo Go
This project covers the essentials of mobile development:
- Navigation between screens
- State management for user progress
- Responsive UI design
- Real-time debugging
Want to Go Further?
Try adding these advanced features:
- ⏱️ A timer - Add countdown functionality for each question
- 📚 Multiple quiz categories - Organize questions by topics
- 🔥 Firebase integration - For score tracking and leaderboards
What will you build next?
