Hi builders!
I think this has been the shortest time intervals between any of my post (lol).
Well, today, I'm excited to share a project I've been working on (HNG thingy): building a container system from scratch!
Maybe when you hear of "container", Docker comes right to mind, yeah? Well, if you've ever wondered what's happening under the hood when you run docker run, this post is for you. I'll demystify containers by creating my own lightweight implementation that captures the core functionality of Docker.
🔍 Introduction: Why Build Your Own Container System?
Containers have transformed how we deploy and run applications, but they can seem like magic. By building our own container system, we can:
Gain a deep understanding of the core Linux technologies that power containers
Learn about isolation, resource control, and namespace concepts firsthand
Appreciate the engineering decisions behind production container systems
Build a foundation for more advanced container orchestration concepts
By the end of this guide, you'll have a functional container system capable of running processes in isolation with resource limits, networking, and other essential features.
📋 Prerequisites
Before diving in, ensure you have:
- A Linux system (Ubuntu 20.04 or similar)
- Root or sudo access
- Basic knowledge of Python and Bash
- Understanding of Linux processes and networking concepts
- Necessary packages installed: python3, cgroups-tools, iptables
Btw, you can access all the scripts written for this project in my git GitHub repo here
🏗️ The Architecture: Understanding Our Container System
Our container implementation relies on these core components:
- Python CLI Manager: Handles user commands and orchestrates container lifecycle
2. Bash Container Script: Implements the low-level container functionality
3. Linux Namespaces: For process, network, and filesystem isolation
4. Cgroups: To implement resource limits (CPU, memory)
5. Chroot: For filesystem isolation
┌─────────────────────────────────────────────────────────────┐
│                       User Commands                         │
│                                                             │
│  simple_container.py start|stop|list|logs                   │
└────────────────────────────┬────────────────────────────────┘
                             │
                             ▼
┌─────────────────────────────────────────────────────────────┐
│                 Python Container Manager                    │
│                                                             │
│  • Parses command line arguments                            │
│  • Manages container lifecycle                              │
│  • Tracks running containers                                │
│  • Sets up resource limits (cgroups)                        │
└────────────────────────────┬────────────────────────────────┘
                             │
                             ▼
┌─────────────────────────────────────────────────────────────┐
│                    container.sh Script                      │
│                                                             │
│  • Creates namespaces (process, network, mount)             │
│  • Sets up filesystem isolation (chroot)                    │
│  • Configures networking & port forwarding                  │
│  • Implements volume mounts                                 │
│  • Handles user isolation                                   │
└────────────────────────────┬────────────────────────────────┘
                             │
                             ▼
┌─────────────────────────────────────────────────────────────┐
│                      Linux Kernel                           │
│                                                             │
│  • Namespaces   • Cgroups     • Network Stack               │
│  • Filesystem   • Devices     • Process Management          │
└─────────────────────────────────────────────────────────────┘
🧠 Understanding Container Technologies: What Powers Our System
Let's demystify the key technologies that make containers possible:
(I'll be talking and elaborating on some of my code snippets in those scripts. so you can open the repo by the side, so you'll get the most of my explanations)
Namespaces: The Isolation Foundation
Linux namespaces are the cornerstone of container isolation, providing separate views of system resources:
PID Namespace: Gives containers their own process IDs, starting with PID 1
Network Namespace: Creates isolated network stacks with separate interfaces and routing tables
Mount Namespace: Isolates filesystem mount points between containers and host
UTS Namespace: Allows containers to have their own hostname and domain name
IPC Namespace: Isolates inter-process communication mechanisms
User Namespace: Maps user IDs between container and host, improving security
Our implementation uses unshare to create these namespaces, achieving process isolation:
unshare --mount --uts --ipc --pid --fork chroot "$ROOT_FS" bash -c "$WRAPPED_CMD"
Cgroups: Resource Control Made Simple
Control groups (cgroups) limit and account for resource usage:
CPU Limits: Prevent containers from hogging CPU resources
Memory Constraints: Protect the host from memory-hungry containers
Disk I/O Controls: Limit disk activity for fair resource sharing
Our implementation sets these limits using the cgroup filesystem:
def set_cpu_limit(container_name, cpu_limit):
    """Limit CPU usage for a container (percentage)"""
    # Create cgroup and set CPU limit
    # ...
Chroot: Filesystem Isolation
The chroot command changes the root directory for a process, creating filesystem isolation:
chroot "$ROOT_FS" bash -c "$WRAPPED_CMD"This simple yet powerful mechanism ensures containers can't access files outside their designated root filesystem.
🚀 Part 1: Building the Container Manager (Python CLI)
Let's start by creating our Python CLI for managing containers:
#!/usr/bin/env python3
import argparse
import os
import subprocess
import sys
import json
import signal
import time

class SimpleContainer:
    def __init__(self):
        self.container_dir = "/var/run/simple-container"
        os.makedirs(self.container_dir, exist_ok=True)

    def start(self, name, command, cpu_limit=None, memory_limit=None,
              network=True, volume=None, port=None, detach=True, use_userns=False):
        """Start a new container"""
        # Implementation details...
Our CLI supports these commands:
start: Launch a new container with specified resources
stop: Gracefully terminate a running container
list: Show all running containers and their details
logs: Display container logs for troubleshooting
🌐 Part 2: Creating Network Isolation
Networking is crucial for container functionality. Our implementation creates:
- A network namespace for the container
2. Virtual Ethernet (veth) pairs to connect container and host
3. NAT rules for internet access
4. Port forwarding for service exposure
# Setup network namespace
ip netns add "$CONTAINER_NETNS"

# Create veth pair
ip link add "$VETH_HOST" type veth peer name "$VETH_CONTAINER"

# Move container end to namespace
ip link set "$VETH_CONTAINER" netns "$CONTAINER_NETNS"

# Configure interfaces and routing
# ...
This gives each container its own isolated network stack while maintaining connectivity to the outside world.
📦 Part 3: Implementing Filesystem Isolation and Volumes
Our container system supports both filesystem isolation and volume mounts:
- Base filesystem: Using chroot with a minimal root filesystem
2. Overlay filesystem: For non-destructive modifications
3. Volume mounts: For sharing directories between host and container
# Mount essential filesystems
mount -t proc proc "$ROOT_FS/proc"
mount -t sysfs sysfs "$ROOT_FS/sys"

# Setup volume mounts
for volume in "${VOLUMES[@]}"; do
    host_path=$(echo "$volume" | cut -d: -f1)
    container_path=$(echo "$volume" | cut -d: -f2)
    mount -o bind "$host_path" "$ROOT_FS$container_path"
done
🔒 Part 4: User Isolation and Security
Security is essential for containers. Our implementation:
- Creates a non-root container user (UID 1000)
2. Runs commands as this user inside the container
3. Sets up a minimal /dev environment
4. Manages permissions for mounted volumes
# Setup user isolation
cat > "$ROOT_FS/etc/passwd" <<EOF
root:x:0:0:root:/root:/bin/bash
container:x:1000:1000:container:/home/container:/bin/bash
nobody:x:65534:65534:nobody:/nonexistent:/usr/sbin/nologin
EOF

# Run command as container user
su - container -c "$COMMAND"
⚙️ Part 5: Resource Limiting with Cgroups
To prevent containers from consuming excessive resources, we implement cgroup-based limits:
def set_memory_limit(container_name, memory_limit):
    """Limit memory usage for a container (in bytes)"""
    cgroup_path = f"/sys/fs/cgroup/memory/simple-container-{container_name}"
    os.makedirs(cgroup_path, exist_ok=True)

    # Set memory limit
    with open(f"{cgroup_path}/memory.limit_in_bytes", "w") as f:
        f.write(str(memory_limit))

    return cgroup_path
This prevents "noisy neighbor" problems and protects your host system from container resource abuse.
🔍 Part 6: Testing Container Isolation
Let's verify our container implementation works correctly:
- Process Isolation: Container processes can't see host processes
./simple_container.py start --name test1 --command "ps aux"2. Network Isolation: Container has its own network stack
./simple_container.py start --name test2 --command "ip addr && ping -c 1 8.8.8.8"3. Filesystem Isolation: Container can't access host files
./simple_container.py start --name test3 --command "ls -la / && cat /etc/hostname"4. Resource Limits: Container respects CPU and memory constraints
./simple_container.py start --name test4 --cpu 50 --memory 256M --command "stress --cpu 4"🚀 Part 7: Real-World Application - Deploying a Todo App in Our Container
Let's put our container system to the test with a real-world application! We'll deploy a simple Flask Todo application inside our custom container, demonstrating how the concepts we've explored can be applied to practical use cases.
Setting Up a Fresh Environment
Starting with a fresh Ubuntu server, here's how to deploy a simple web application in our container system:
# First, update the system
sudo apt update && sudo apt upgrade -y

# Install required dependencies
sudo apt install -y python3 python3-pip python3-venv git

# Clone our container system repository
git clone https://github.com/NonsoEchendu/container-system
cd container-system

# Make the scripts executable
sudo chmod +x container.sh simple_container.py cgroups.sh
Preparing the Container Root Filesystem
Our container system needs a proper root filesystem. Let's prepare one.
But before then, we need to install a very important tool, debootstrap. Debootstrap is what will install a Debian base system into our root filesystem's directory.
sudo apt install debootstrapNow we can continue with setting up our root filesystem.
# Create a directory for our container's root filesystem
sudo mkdir -p /home/ubuntu/todo-rootfs

# Prepare the root filesystem
sudo ./simple_container.py prepare-rootfs --target /home/ubuntu/todo-rootfs
Setting Up the Container Root Filesystem Repository Sources
We need to ensure the container has proper repository sources configured:
# Configure proper repository sources in the container
sudo bash -c 'cat > /home/ubuntu/odo-rootfs/etc/apt/sources.list << EOF
deb http://archive.ubuntu.com/ubuntu focal main restricted universe multiverse
deb http://archive.ubuntu.com/ubuntu focal-updates main restricted universe multiverse
deb http://archive.ubuntu.com/ubuntu focal-security main restricted universe multiverse
EOF'

# Update package lists with the new repositories
sudo chroot /home/ubuntu/todo-rootfs/ apt-get update

# Install Python and Flask in the existing root filesystem
sudo chroot /home/ubuntu/todo-rootfs apt-get install -y python3 python3-pip
sudo chroot /home/ubuntu/todo-rootfs pip3 install flask
Getting the Todo Application
Now let's get the Todo application:
# Clone the Todo app repository
git clone https://github.com/NonsoEchendu/simple-flask-todo
Creating and Starting the Container
With our root filesystem and application ready, let's create and start the container:
# Start the container with the Todo app
cd container-system
sudo ./simple_container.py create --name todo-container --rootfs /home/ubuntu/todo-rootfs
sudo ./simple_container.py start \
--name todo-container \
--volume $(pwd)/../simple-flask-todo:/app \
--port 8080:8080 \
--command "cd /app && python3 app.py" \
--cpu 50 \
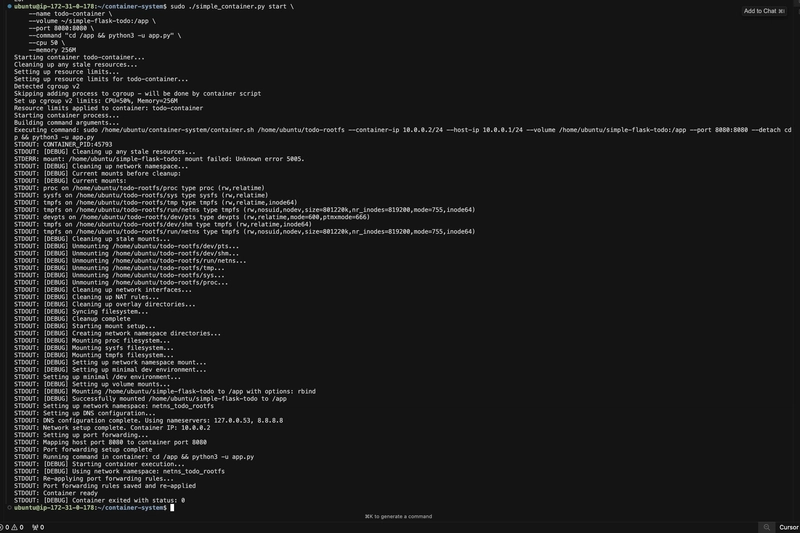
--memory 256MA successful run should look like this on your terminal:

Accessing the Todo Application
Once the container is running, you can access the Todo app in your browser by going to http://your-server-ip:8080.
It should look like this:

Managing the Container
After successfully deploying the application, you can manage the container:
# Check the container status
sudo ./simple_container.py list

# View the application logs
sudo ./simple_container.py logs --name todo-container

# Stop the container when done
sudo ./simple_container.py stop --name todo-container

# Remove the container
sudo ./simple_container.py remove --name todo-container
🔥 Part 8: Challenges Faced and Overcome
I'll be very honest, building a container system from scratch wasn't without challenges. Let me tell you some of them:
Problem: Permission Problems with User Namespaces
One of the trickiest issues was handling permissions correctly when combining user namespaces with chroot:
unshare --user --map-root-user --mount chroot "$ROOT_FS" /bin/bash(The above command will fail with "Permission denied")
Solution: I separated the concerns - using chroot as root but then switching to the container user afterward using su:
chroot "$ROOT_FS" su - container -c "$COMMAND"Problem: Network Namespace Communication
Setting up proper communication between host and container network namespaces was challenging. My initial approach that caused connectivity issues was:
ip netns exec "$CONTAINER_NETNS" ip route add default via "$GATEWAY_IP"Solution: I implemented a complete solution with:
Proper veth pair setup
Correct IP and routing configuration
NAT rules for outbound connections
Careful DNS configuration
Problem: Volume Mount Permission
Volume mounts created complex permission issues, particularly with nested directories:
mount -o bind "$HOST_PATH" "$ROOT_FS$CONTAINER_PATH"Using the above command, volume permissions wouldn't match user expectations. Files that were created would have root ownership, not container user
Solution: I implemented special handling for volume permissions, ensuring volumes have appropriate permissions for container user:
if [ "$USE_USER_NS" == "true" ]; then
    # Make mount point accessible to container user
    chown -R 1000:1000 "$ROOT_FS$container_path"
    # Mount with specific options
    mount -o "$mount_opts" "$host_path" "$ROOT_FS$container_path"
fi
Problem: DNS Resolution Failures
DNS resolution inside containers was initially broken, preventing network connections. Container couldn't resolve external hostnames.
A command like, ping google.com would return "Unknown host".
Solution: I properly configured DNS by copying host resolver settings and ensuring proper access, like this:
setup_dns() {
    # Get host's DNS servers
    HOST_DNS=$(grep nameserver /etc/resolv.conf | awk '{print $2}' | head -n 1)
    if [ -z "$HOST_DNS" ]; then
        HOST_DNS="8.8.8.8"
    fi

    # Create resolv.conf with host's DNS
    cat > "$ROOT_FS/etc/resolv.conf" <<EOF
nameserver $HOST_DNS
nameserver 8.8.8.8
nameserver 8.8.4.4
EOF

    # Add DNS server IP to container's routing table
    ip netns exec "$CONTAINER_NETNS" ip route add $HOST_DNS via $(echo $HOST_IP | cut -d'/' -f1)
}
And some other problems i can't remember atm.
💡 Part 9: Lessons Learned
Building this container system taught me some valuable lessons:
Lesson 1: The power of of Linux fundamentals and building blocks
Lesson 2: Importance of Security Layering
Namespaces for isolation
Capability restrictions
User separation
Resource limits
Filesystem restrictions
Lesson 3: Abstractions Have Real Value
After implementing containers from scratch, I have newfound appreciation for the abstractions Docker provides. What seems like "magic" is actually careful engineering to hide complexity.
Lesson 4: Resource Management is Crucial
Containers without resource limits can easily disrupt host systems. Proper cgroup configuration is not optional but essential for production use.
🔮 Conclusion: From Understanding to Innovation
Congratulations! You've successfully built a container system that implements all the key features of production container runtimes:
✅ Process isolation with namespaces
✅ Network isolation and port forwarding
✅ Filesystem isolation and volume mounts
✅ Resource limits with cgroups
✅ User isolation for security
This journey has given you deep insights into how containers actually work, demystifying what often seems like magic.
Now you can:
Better understand Docker and Kubernetes internals
Debug container issues more effectively
Make informed decisions about container deployment
Potentially extend your implementation with more advanced features
Remember, while Docker and other production container systems are much more sophisticated, they're built on these same fundamental Linux primitives we've explored. By building our own implementation, we've peeled back the layers of abstraction to reveal the elegant simplicity at the core of container technology.
Till next time, happy building!