Now let’s work on one of the core parts of any dapp — accounts. Accounts allow you to interact with the dapp, sign transactions, hold assets, send and receive tokens, and so on. So we need to add the ability to create accounts in our dapp, and for that we’ll use the FT4 library — it simplifies integration and takes care of everything I just mentioned.
FT4 supports multiple account strategies. We’ll use two of them:
-
For development — the
open strategy. This one allows anyone to create accounts without restrictions, which will make our life easier during development. -
For production —
open strategyisn’t a great idea, since someone could spam the chain. So we’ll use at least the transfer open strategy. With this one, the user needs to make a transfer (e.g., 10 CHR) to create an account (we can configure the amount). Later, the user can use those tokens to create an event, for example. More details about FT4 strategies you can find here.
So, the first thing we do is go to the src directory and rename main.rell to development.rell. This helps us separate development and production environments — so we can use some functions and operations only during development to speed up the process. Then we create a new directory called oddly. Inside it, we create a file module.rell with a single line:
module;This file declares the entire directory as a module, so we don’t need to add module; in every other file inside it. We’ll also keep all the imports here.
Next, let’s update the chromia.yml file. We’ll rename the blockchain and point it to the new main module. Later we’ll add a separate production blockchain with its own module.
blockchains:
  oddly_development:
    module: development
compile:
  rellVersion: 0.14.5
database:
  schema: schema_oddly
test:
  modules:
    - test
Now let’s install the FT4 library. To do that, we add the libs section to our config file:
blockchains:
  oddly_development:
    module: development
compile:
  rellVersion: 0.14.5
database:
  schema: schema_oddly
test:
  modules:
    - test
libs:
  ft4:
    registry: https://gitlab.com/chromaway/ft4-lib.git
    path: rell/src/lib/ft4
    tagOrBranch: v1.1.0r
    rid: x"FEEB0633698E7650D29DCCFE2996AD57CDC70AA3BDF770365C3D442D9DFC2A5E"
    insecure: false
  iccf:
    registry: https://gitlab.com/chromaway/core/directory-chain
    path: src/lib/iccf
    tagOrBranch: 1.87.0
    rid: x"9C359787B75927733034EA1CEE74EEC8829D2907E4FC94790B5E9ABE4396575D"
    insecure: false
And then we run:
chr installThe output looks something like this:
remote: Enumerating objects: 1776
remote: Counting objects: 100% (1776/1776)
remote: Compressing objects: 100% (1356/1356)
Receiving objects: 100% (1776/1776)
Resolving deltas: 100% (861/861)
Checking out files: 100% (614/614)
remote: Enumerating objects: 6445
remote: Counting objects: 100% (6445/6445)
remote: Compressing objects: 100% (2879/2879)
Receiving objects: 100% (6445/6445)
Resolving deltas: 100% (4797/4797)
Checking out files: 100% (464/464)
Boom — the library is installed. Now to complete the integration for the open strategy, all we need to do is import it. Let’s add the imports to development.rell and also import the whole oddly module for now. The file should look like this:
module;

import oddly;
import open_strategy: lib.ft4.core.accounts.strategies.open;
import strategies: lib.ft4.external.accounts.strategies;
That’s it. Time to test. First, rename the test folder to tests, and inside it, create a folder called development_tests. Inside that, create a module.rell file with this content:
@test module;

import development.*;

import lib.ft4.test.core.{ create_auth_descriptor };
import lib.ft4.external.accounts.{ get_account_by_id };
@test module; - declares the entire directory as a test module.
import lib.ft4.test.core.{ create_auth_descriptor }; - we need this import to create an auth descriptor for testing. Auth descriptors are a mechanism that defines the authorized key pairs and their associated permissions for interacting with accounts on the blockchain. More details you can find here.
import lib.ft4.external.accounts.{ get_account_by_id }; - query to check if the account exists after registration.
import development.*; - imports everything from the dev environment. This isn’t very safe, and it’s better to avoid such imports. We’ll fix it later.
Now let’s write a basic test case to check that account registration works. In src/tests/development_tests, create a file called account_test.rell and write next:
function test_account_creation() {
    val alice = rell.test.keypairs.alice;

    val auth_descriptor = create_auth_descriptor(alice.pub, ["A", "T"], null.to_gtv());
    rell.test.tx()
        .op(open_strategy.ras_open(auth_descriptor))
        .op(strategies.register_account()).sign(alice)
        .run();

    val alice_account_id = alice.pub.hash();
    val alice_account = get_account_by_id(alice_account_id);

    assert_not_null(alice_account);
}
Here we create a test keypair and auth descriptor for Alice’s account. Then we call two operations:
-
ras_open— an operation that initializes the open strategy. -
register_account— an operation that registers the account.
Since the account ID is a hash of the public key (or EVM address, but we’ll get to that later), we use get_account_by_id to fetch the account and verify it with assert_not_null.
One more thing, we need to add an admin public key to chromia.yml. Even though we don’t need it for this test, FT4 requires it to run tests properly.
Let's open terminal and generate a keypair with:
chr keygen --file=".admin_keypair"Copy the public key and paste it into the config like this:
blockchains:
oddly_development:
module: development
compile:
rellVersion: 0.14.5
database:
schema: schema_oddly
test:
modules:
- tests
moduleArgs:
lib.ft4.core.admin:
admin_pubkey: x"03D57B4ED50601A3E331BA97D6CB9035D7FF90F016831FD15D450596BB4EFE78B1"
libs:
ft4:
registry: https://gitlab.com/chromaway/ft4-lib.git
path: rell/src/lib/ft4
tagOrBranch: v1.1.0r
rid: x"FEEB0633698E7650D29DCCFE2996AD57CDC70AA3BDF770365C3D442D9DFC2A5E"
insecure: false
iccf:
registry: https://gitlab.com/chromaway/core/directory-chain
path: src/lib/iccf
tagOrBranch: 1.87.0
rid: x"9C359787B75927733034EA1CEE74EEC8829D2907E4FC94790B5E9ABE4396575D"
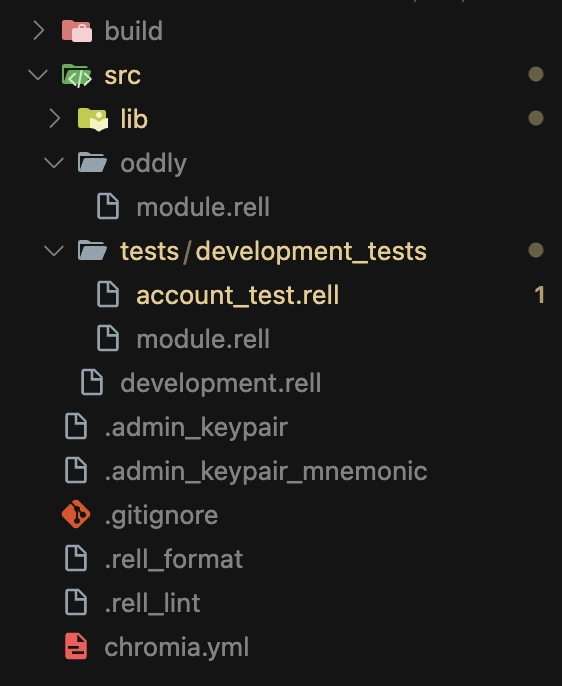
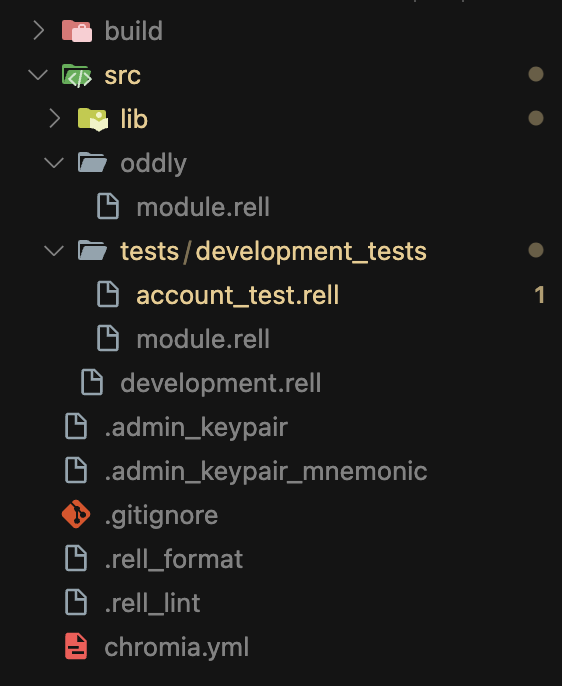
insecure: falseLet’s also check that the structure of our project looks correct:
And now we can run the test:
chr testAnd boom - everything works! The account was created successfully 🎉 You should see something like this:
====================Running unit tests====================
TEST: tests.development_tests:test_account_creation
OK: tests.development_tests:test_account_creation (0.871s)

------------------------------------------------------------------------
TEST RESULTS:

OK tests.development_tests:test_account_creation (0.871s)

SUMMARY: 0 FAILED / 1 PASSED / 1 TOTAL (0.871s)

***** OK *****
Accounts are up and running! Next, we’ll start shaping the core of our prediction market — building entities and operations one by one. Let’s keep pushing forward! 🔥