
Introduction
Ever wanted to build a contact form without bootstrapping a server, installing packages, or managing infrastructure?
That was my idea also — so I proceeded to try and create a contact form solely using AWS serverless offerings.
In this post, I'll walk you through how I did it using Lambda, API Gateway, and DynamoDB under the AWS Free Tier.
Whether you're just starting out with AWS or attempting serverless for the first time, this guide is for you — no prior experience with AWS required.
What We'll Build
A simple contact form backend that:
- Accepts form submissions via HTTP POST
- Triggers an AWS Lambda function
- Stores the data in a DynamoDB table
No EC2, no servers, no headaches.
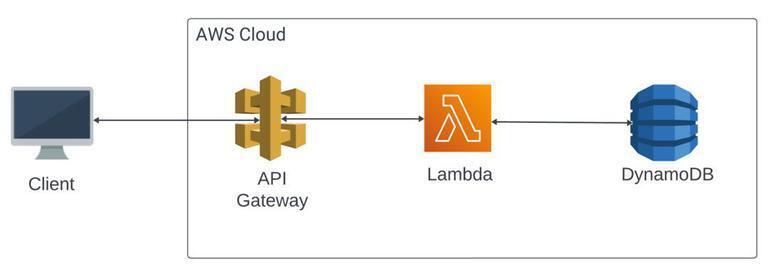
Architecture Overview
Here’s how the architecture works:
- The frontend form sends a POST request to the API Gateway endpoint
- The API Gateway triggers a Lambda function
- The Lambda function writes the form data into a DynamoDB table.
Frontend → API Gateway → Lambda → DynamoDB
Step 1: IAM Role for Lambda
Before creating the Lambda, let’s give it permission to access DynamoDB.
- Go to IAM > Roles
- Click Create role
- Choose Lambda as the use case
- Attach this policy:
- AmazonDynamoDBFullAccess (for learning—in production, always use least privilege.
- Name the role something like lambda-dynamo-role
- We’ll attach this to our function in the next step.
Step 2: Create the DynamoDB Table
- Go to DynamoDB > Tables
- Click Create table
- Table name: ContactForm
- Partition key: id (type: String)
- Leave the rest default and click Create
We’ll store ID, name, email, and message.
Step 3: Write the Lambda Function
- Go to Lambda > Create function
- Name: handleContactForm
- Runtime: Node.js 18.x
- Role: Use existing role → lambda-dynamo-role
- Paste this code in the editor:
const { v4: uuidv4 } = require('uuid');
const AWS = require('aws-sdk');
const dynamo = new AWS.DynamoDB.DocumentClient();

exports.handler = async (event) => {
    const data = JSON.parse(event.body);

    const params = {
        TableName: 'ContactForm',
        Item: {
            id: uuidv4(),
            name: data.name,
            email: data.email,
            message: data.message,
            submittedAt: new Date().toISOString(),
        },
    };

    try {
        await dynamo.put(params).promise();
        return {
            statusCode: 200,
            body: JSON.stringify({ message: 'Form submitted successfully!' }),
        };
    } catch (err) {
        return {
            statusCode: 500,
            body: JSON.stringify({ error: 'Failed to save data' }),
        };
    }
};
Click Deploy when done.
Step 4: Create the API Gateway
- Go to API Gateway > Create API
- Choose HTTP API
- Create a new API
- Add an Integration → choose your Lambda-Funktion
- Add a route: -Method: POST -Path: /contact
- Deploy the API and note the endpoint URL.
Step 5: Test It!
You can use Postman or CURL to test:
curl -X POST https://your-api-id.execute-api.region.amazonaws.com/contact \
  -H "Content-Type: application/json" \
  -d '{
        "name": "Samir",
        "email": "[email protected]",
        "message": "Hello from the serverless world!"
      }'
Go to DynamoDB → check your table → you should see the new item.
Final Touches
You can now integrate this API with your frontend contact form. Just make sure to enable CORS in API Gateway if you’re calling from a browser.
Learnings
- Got hands-on with Lambda, API Gateway, and DynamoDB
- Learned how to wire everything together with IAM
- All done under AWS Free Tier — no billing surprises
Outro
And that’s it — you’ve just built a fully functional, fully serverless contact form!
This project helped me understand key AWS services like IAM roles, Lambda functions, and API Gateway routing. Plus, it gave me the confidence to explore more serverless patterns.
If you’re also learning AWS or working toward certifications, I highly recommend building mini-projects like this. They teach you way more than just reading docs.
I’d love to hear your thoughts or improvements! You can also find more of my AWS and DevOps content on GitHub, LinkedIn, and dev.to.
Happy building!