
This article is co-authored by @zcalifornia
The Pulse of Real-Time Communication
Picture this: you're playing a multiplayer game, sending a message to a friend, or watching live election results come in—all happening in real time. In today's world, speed isn't just a luxury—it’s a necessity. That’s where real-time communication apps come in. These apps allow instantaneous interactions between users and systems, creating seamless digital experiences we now expect in everything from social media to online customer service.
So, what powers this magic behind the scenes? Enter: Socket.IO, a robust JavaScript library that bridges the gap between client and server in real time.
Real-Time Communication Overview
Real-time communication (RTC) allows real-time, interactive exchange of information among systems or users. WebSockets and the Socket.IO protocol offer long-lived connections, enabling direct message transmission with little delay.
Use Cases of Real-Time Apps:
- Chat apps like WhatsApp or Messenger
- Collaborative tools like Google Docs
- Live tracking and feeds such as stock tickers and delivery apps
- Online games that demand split-second communication
In this tutorial, we’ll walk you through building a basic real-time chat app using Node.js and Socket.IO—a hands-on guide to understanding how instant messaging apps are born, byte by byte.
📂 Want to explore or copy the full source code? You can find it all here: Realtime Chat App on GitHub
1. Prerequisites
Before we begin building the real-time chat app, ensure you have the following installed:
- Node.js: This is required to run the server-side JavaScript and install the necessary dependencies. You can download and install the latest LTS version of Node.js from here.
To verify that Node.js is installed correctly, open your terminal/command prompt and run the following commands:
node -v
npm -v
If the above commands return version numbers (e.g., v16.13.0 for Node.js), you're good to go!”
- Code editor: You'll need a text editor like VS Code or Sublime Text to edit your code.
2. Project Setup: Lean and Efficient
Our minimalist structure keeps everything organized without unnecessary complexity:
chat-app/
├── index.html
├── script.js
├── server.js
├── package.json
└── package-lock.json
This folder will contain your entire project!
Create a file called index.html and paste this code into it:
Chat App
* {
box-sizing: border-box;
}
body {
margin: 0;
font-family: 'Segoe UI', Tahoma, Geneva, Verdana, sans-serif;
background-color: #f4f6f8;
display: flex;
flex-direction: column;
align-items: center;
height: 100vh;
}
#message-container {
width: 100%;
max-width: 800px;
flex-grow: 1;
overflow-y: auto;
padding: 1rem;
display: flex;
flex-direction: column;
}
#message-container .received,
#message-container .sent {
margin-bottom: 10px;
padding: 10px 15px;
border-radius: 15px;
max-width: 70%;
word-wrap: break-word;
font-size: 1rem;
display: inline-block;
position: relative;
}
#message-container .received {
align-self: flex-start;
background-color: #e7d692;
color: #504941;
margin: 15px;
}
#message-container .sent {
align-self: flex-end;
background-color: #007bff;
color: white;
margin: 15px;
}
.timestamp {
font-size: 0.75rem;
color: #3c3c3c;
position: absolute;
bottom: -18px;
right: 5px;
}
.system-message {
text-align: center;
color: #000;
font-weight: bold;
font-size: 1rem;
margin: 10px 0;
}
#send-container {
width: 100%;
max-width: 800px;
display: flex;
padding: 10px;
background-color: #ffffff;
border-top: 1px solid #ccc;
position: sticky;
bottom: 0;
}
#message-input {
flex-grow: 1;
padding: 10px;
font-size: 1rem;
border: 1px solid #ccc;
border-radius: 5px;
margin-right: 10px;
}
#send-button {
padding: 10px 20px;
background-color: #007bff;
color: white;
font-size: 1rem;
border: none;
border-radius: 5px;
cursor: pointer;
}
#send-button:hover {
background-color: #0056b3;
}
Send
Enter fullscreen mode
Exit fullscreen mode
3. Powering Up with Dependencies
To set up the project, execute these commands:npm init -y
npm install socket.io
npm install --save-dev nodemonWhat Do These Commands Do?When setting up your chat app, you’ll run three commands in the terminal. Think of these like setting up your tools before you build a LEGO project.
npm init -y
What it does:This creates a file called package.json. It’s like a notebook that keeps track of what your app needs and how to run it.What you’ll see:
npm install socket.io
What it does:This installs Socket.IO, the special tool that helps different users chat in real-time by connecting browsers and the server like walkie-talkies.What you’ll see:
npm install --save-dev nodemon
What it does:This adds nodemon, a helper tool that watches your code and automatically restarts the server every time you make a change. Like having a robot that refreshes your work without you doing it manually.What you’ll see:What Happens Next?
Once you’ve run the necessary commands, your folder will be fully set up and ready to power the chat app. From there, you can move on to the next steps: build the server, open two browser tabs, and watch messages sync instantly between them—real-time chatting in action, just like magic!
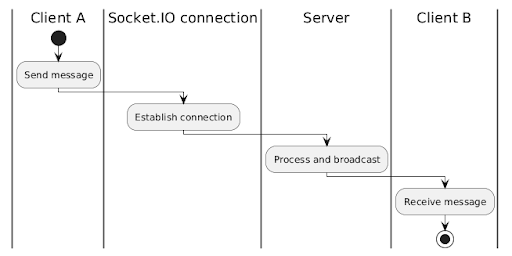
The diagram above illustrates the message flow in a Socket.IO chat application. The corresponding code implementation will be discussed in the following sections.
4. Server Setup: Real-Time Core
The following code is like the brain of a chat room. It runs on a computer (the "server") and helps people talk to each other instantly.Here’s what it does, in chronological order:
Starts a server so people can connect to it.
Keeps track of who's online by remembering their names.
When someone joins, it tells everyone else, “Hey, a new person just came in!”
When someone sends a message, it grabs the message, adds the time, and shares it with the others.
When someone leaves, it lets everyone know that person has gone.
Basically, it's like the host of a group chat—it watches who comes and goes and makes sure everyone sees the messages in real time. See the implementation below!server.js - Our Socket.IO-powered backend:
// Import and initialize Socket.IO on port 3000
const io = require('socket.io')(3000);
// Create an object to store connected users
const users = {};
// Listen for new client connections
io.on('connection', socket => {
// When a new user joins, store their name using their socket ID
socket.on('new-user', name => {
users[socket.id] = name;
// Notify all other clients that a new user has connected
socket.broadcast.emit('user-connected', name);
});
// When a user sends a chat message
socket.on('send-chat-message', message => {
// Get the current time as a readable timestamp (e.g. "09:45 AM")
const timestamp = new Date().toLocaleTimeString([], { hour: '2-digit', minute: '2-digit' });
// Broadcast the message to all other users along with the sender's name and timestamp
socket.broadcast.emit('chat-message', {
message: message,
name: users[socket.id],
time: timestamp
});
});
// When a user disconnects
socket.on('disconnect', () => {
// Notify others that the user has left
socket.broadcast.emit('user-disconnected', users[socket.id]);
// Remove the user from the users object
delete users[socket.id];
});
});
Enter fullscreen mode
Exit fullscreen mode
5. Handling Client-Side Connections
To enable real-time communication, connect to the server using Socket.IO in the client-side JavaScript (script.js). In the current implementation, the connection URL for the WebSocket server is hardcoded in the script.js file as:
const socket = io('http://localhost:3000');
Enter fullscreen mode
Exit fullscreen mode
We add the DOM elements:
const messageContainer = document.getElementById('message-container');
const messageForm = document.getElementById('send-container');
const messageInput = document.getElementById('message-input');
Enter fullscreen mode
Exit fullscreen mode
User name prompt
Before connecting to the server, the user is prompted to enter their name. Here's how this works:
// Prompt user for their name and notify server
const name = prompt('What is your name?');
socket.emit('new-user', name);
Enter fullscreen mode
Exit fullscreen mode
This line triggers a prompt asking for the user's name. Then, we set up listeners to receive and log messages:
// Receive a chat message from another user
socket.on('chat-message', data => {
appendMessage(`${data.name}: ${data.message}`, 'received', data.time);
});
// Notify when a user connects to the chat
socket.on('user-connected', name => {
appendSystemMessage(`${getTime()} - ${name} joined`);
});
// Notify when a user disconnects from the chat
socket.on('user-disconnected', name => {
appendSystemMessage(`${getTime()} - ${name} disconnected`);
});
Enter fullscreen mode
Exit fullscreen mode
These handlers append messages and connection updates to the DOM. The script is linked in index.html with:
Enter fullscreen mode
Exit fullscreen mode
6. Sending and Receiving Messages
Users send messages via a form. This form is handled in script.js:
// Handle sending a message
messageForm.addEventListener('submit', e => {
e.preventDefault(); // Prevent form from refreshing the page
const message = messageInput.value;
// Show the message in your chat window
appendMessage(`You: ${message}`, 'sent', getTime());
// Send the message to the server
socket.emit('send-chat-message', message);
// Clear the input box
messageInput.value = '';
});
Enter fullscreen mode
Exit fullscreen mode
The server (server.js) listens for this event:
socket.on('send-chat-message', message => {
const timestamp = new Date().toLocaleTimeString([], { hour: '2-digit', minute: '2-digit' });
socket.broadcast.emit('chat-message', {
message: message,
name: users[socket.id],
time: timestamp
});
});
Enter fullscreen mode
Exit fullscreen mode
When received, the server broadcasts the message with the sender’s name and timestamp. Each client appends the message using:
function appendMessage(text, type, timestamp) {
const messageElement = document.createElement('div');
messageElement.classList.add(type); // 'sent' or 'received'
messageElement.innerText = text;
const timestampElement = document.createElement('div');
timestampElement.classList.add('timestamp');
timestampElement.innerText = timestamp;
messageElement.appendChild(timestampElement);
messageContainer.appendChild(messageElement);
}
Enter fullscreen mode
Exit fullscreen mode
7. Adding Timestamps to Messages
Timestamps are additional features to our Real-Time Chat App. Timestamps enhance context and readability in chat messages. They are generated and attached on the server using:
const timestamp = new Date().toLocaleTimeString([], { hour: '2-digit', minute: '2-digit' });
Enter fullscreen mode
Exit fullscreen mode
This formatted time (e.g., "09:45 AM") is included in the data sent from the server to clients.On the client side, we display the timestamp with each message:
appendMessage(${data.name}: ${data.message}, 'received', data.time);
Additionally, we use a helper function to get the current time for local messages:
function getTime() {
return new Date().toLocaleTimeString([], { hour: '2-digit', minute: '2-digit' });
}
Enter fullscreen mode
Exit fullscreen mode
This function uses the built-in Date object with formatting options. You may customize it to use 24-hour format or include seconds.
8. Displaying Messages in the Interface
A chat app isn't complete without a clear, readable way to display messages—and that’s where our client-side interface comes in. Using JavaScript and a touch of CSS, we dynamically render each message into the DOM to keep the conversation flowing smoothly.Structuring the Message
Messages are inserted into a container (#message-container) every time a user sends or receives a chat. Each message appears as its own block, styled based on whether it was sent by the current user or another participant. Here's how we handle that in script.js:
function appendMessage(text, type, timestamp) {
const messageElement = document.createElement('div');
messageElement.classList.add(type); // 'sent' or 'received'
messageElement.innerText = text;
const timestampElement = document.createElement('div');
timestampElement.classList.add('timestamp');
timestampElement.innerText = timestamp;
messageElement.appendChild(timestampElement);
messageContainer.appendChild(messageElement);
}
Enter fullscreen mode
Exit fullscreen mode
The type determines if the message aligns to the left (received) or right (sent).Each message includes a timestamp to provide temporal context.The messageContainer keeps stacking these messages in real time, creating a chat thread.System Notifications
To enhance user awareness, the interface also includes system messages—like when someone joins or leaves the chat:
function appendSystemMessage(text) {
const systemMessage = document.createElement('div');
systemMessage.classList.add('system-message');
systemMessage.innerText = text;
messageContainer.appendChild(systemMessage);
}
Enter fullscreen mode
Exit fullscreen mode
These notifications are styled differently to stand out and maintain clarity in the conversation.Styling the Interface
The index.html file includes CSS rules to visually separate incoming and outgoing messages using color and alignment:
#message-container .received {
align-self: flex-start;
background-color: #e7d692;
color: #504941;
margin: 15px;
}
#message-container .sent {
align-self: flex-end;
background-color: #007bff;
color: white;
margin: 15px;
}
.timestamp {
font-size: 0.75rem;
color: #3c3c3c;
position: absolute;
bottom: -18px;
right: 5px;
}
Enter fullscreen mode
Exit fullscreen mode
This gives the chat a friendly, readable design while subtly indicating message origin. System messages are bold, centered, and unintrusive:
.system-message {
text-align: center;
color: #000;
font-weight: bold;
font-size: 1rem;
margin: 10px 0;
}
Enter fullscreen mode
Exit fullscreen mode
This is how your Real-Time Chat App should appear from the perspective of two users in the chat:
The left tab is Alex’s who joined earlier and the right tab is Cody who joined at 10:20PM.
9. How do I run this app?
1. Go to the Project Folder: Open your terminal (or command prompt), and navigate to the project folder Chat-App. This is the folder that contains the app files. 2. Start the App: In the terminal, type the following command to run the app:
npm run start3. Open the App in Two Browser Tabs: Once the app starts, open the index.html file in two separate tabs in your web browser.4. Enter Different Usernames: In each browser tab, choose a different username for chatting.5. Start Chatting: Now, you can send messages! Thanks to Socket.IO, the messages you send from one tab will appear instantly in the other tab. This shows the real-time chat feature in action!
10. Understanding Socket.IO: Features, Use Cases, and Limitations
Socket.IO isn't just a fancy tool—it's the backbone of countless real-time services.Features:
Real-time bidirectional communication: Send and receive messages without refreshing.
Fallback to long-polling: Keeps working even if WebSockets aren't supported.
Room and namespace support: Helps organize users into groups or chats.
Use Cases:
Chat apps like Slack
Live collaboration (e.g., Google Docs)
Real-time games like multiplayer shooters
Dashboards for stock markets, weather, or sports scores
Limitations:
Not ideal for huge-scale apps without proper load balancing.
Depends on a persistent connection—can be affected by unstable networks.
Resource-heavy if not optimized properly.
While Socket.IO is a brilliant tool, keep in mind that with great power comes the need for smart management.
11. Conclusion and Next Steps
Congratulations! You just built a real-time chat app from the ground up.Recap:
Set up a Node.js + Express server
Integrated Socket.IO for real-time messaging
Added message timestamps and client-side DOM updates
Real-Time = Real Impact
Real-time features turn static sites into living experiences. Whether it’s a friendly “hi” or an urgent update, every message matters more when it arrives now.
What’s Next?
Take your app to the next level by exploring:
Usernames or nicknames for identity
Chat rooms or private DMs
Typing indicators
Message history storage with a database like MongoDB or PostgreSQL
Each addition brings your app one step closer to the real-world products millions use every day.
12. Resources
Want to dive deeper? Here’s a list of official documentation and helpful links:
📘 Socket.IO Documentation
🟩 Node.js Documentation
💻 GitHub Repo
Whether you’re building your own chat app or integrating real-time features into your next big idea, this tutorial is your first step into a world where now really means now.