This article targets developers who'd like to replace Team Viewer by RustDesk, a FREE and open source solution hosted on their own server/VPN:
🔐 For data privacy and security
💰 For budget
🚀 To have zero limits
✨ Compliant with most of devices (windows, android, etc.)
😎 And super easy to setup
This tutorial explains step-by-step how to setup this solution, from scratch. If you already have your VPN, just skip this part 🚀.
My opinion is that Team Viewer is great for individuals using the free version or for big companies who need to handle a huge parc of machines.
But for smaller companies, I definitely suggest RustDesk.
Prerequisites of this tutorial
- A device with a terminal and
sshandscpinstalled - A RustDesk client installed on every device (controller or to be controlled). Download from here
- This tutorial assumes you get a server under Debian
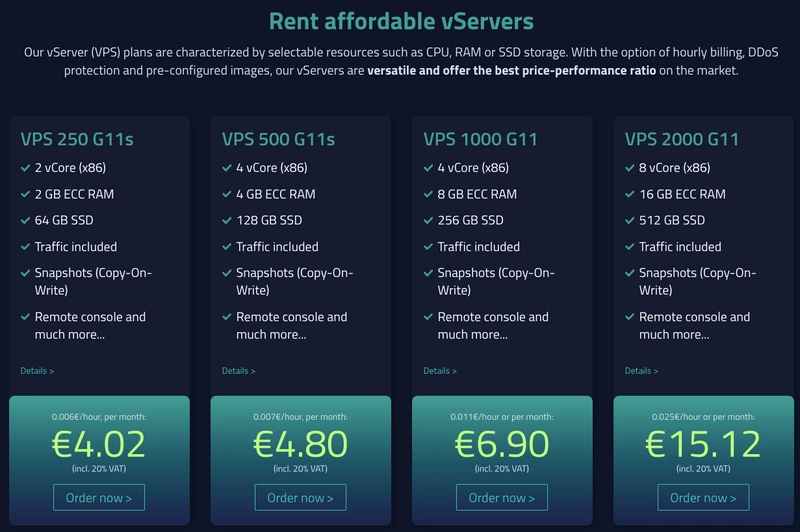
First step: subscribing a VPS plan
There are many VPS providers. I personally chose the german Netcup for its competitive prices, and for the absence of commitment (I can stop when I want).
Here is the subscription page: https://www.netcup.eu/vserver/vps.php
VPS 200 G11s is enough for most of people. It has:
- Processor: 2 vCore (x86)
- Main memory: 2 GB
- Hard disk: 64 GB SSD
- Minimum availability: 96.6%
Second step: admin access
Once the order is maid (yes, there is no payment step), a confirmation email will be sent, followed by a few more a few minutes later.
The most important mail will contain your customer number and password, to access the administration part:
we are pleased to welcome you as a customer at netcup. Enclosed you will find your access data to the netcup CCP (customer control panel).
There you have the possibility to maintain your data and products, as well as to view past invoices.
Your access data to the CCP are as follows:
Customer number: 123456
Password: blablabla
So don't forget to note:
- your customer number (only digits)
- your password
- the link to administrate Netcup VPS: https://www.customercontrolpanel.de/rechnungen.php
- the link to technically administrate the VPS: https://www.servercontrolpanel.de/SCP/Home
- the ip of your VPS
- the initial root password (to be changed in the next part)
Third step: root password configuration
First, for security reason, the root password must be changed via the admin interface. Access it via: https://www.customercontrolpanel.de/rechnungen.php
We can see our VPS listed, in the Products section:
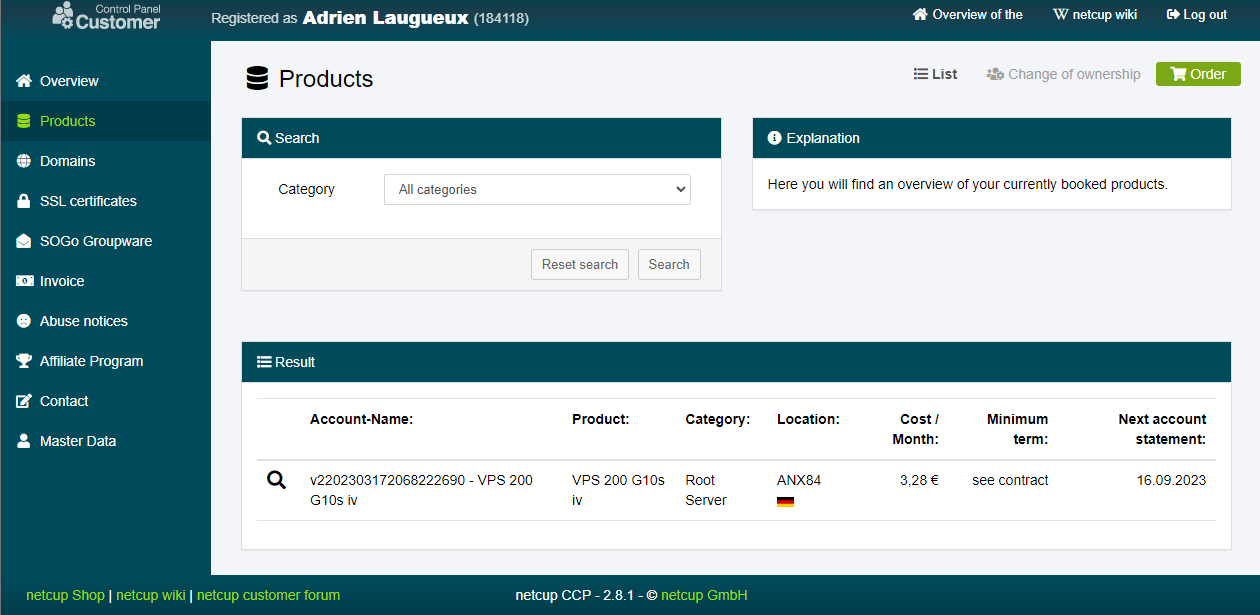
Then by clicking on the 🔎, the URL to admin panel is displayed:
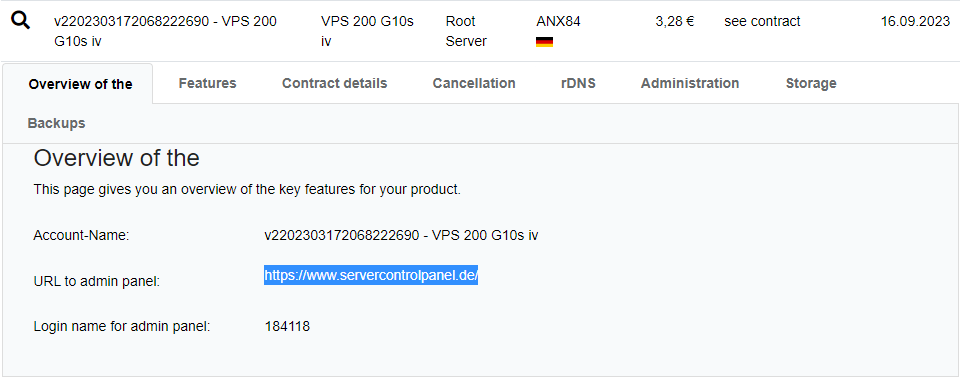
It's always https://www.servercontrolpanel.de/SCP/Home but just in case you lose it, this way you know where you can find it.
Once there, we can start the configuration of the server (it's very fast):
- General > give a nickname to your server (optional but i recommend it)

- Control > click on Shutdown (ACPI). required to set a new root password
- Access > change the root password and NOTE IT
- Control > restart the server
⚠️ Do not even try to use the terminal available on the General tab, you'll probably never be able to simply enter your password, because of the poor keymap support. To access it we'll open a real SSH terminal.
Fourth step: ssh access
Open your favorite terminal with ssh installed and run this command (of course adapt it to your server).
ssh root@YOUR_IP
# To the question "Are you sure you want to continue connecting (yes/no/[fingerprint])?", press enter
Then enter the root password you created in the "Third step"
Here we are.
Fifth step: user creation
For security reasons (if you are interested you can check here), it is recommended to run your programs as non-root user.
Here is how to create a user named "admin" (feel free to set the name of your choice of course):
# user creation
useradd admin

# password creation
passwd admin
# here create a password for admin

# set user as sudoer
usermod -aG sudo admin

# Create his home directory
mkhomedir_helper admin
Sixth step: RustDesk server installation
# use your non-root user
su - admin

# install ufw
sudo apt install ufw

# open ports
ufw allow proto tcp from YOURIP to any port 22
ufw allow 21114:21119/tcp
ufw allow 8000/tcp
ufw allow 21116/udp
sudo ufw enable

# download and run the installer
wget https://raw.githubusercontent.com/techahold/rustdeskinstall/master/install.sh
chmod +x install.sh
./install.shNote: if you had the good taste to have a domain linked to your VPS IP, you can enter it when requested.
Important: Note well the public key, you'll need it.
Seventh step: Install RustDesk on the host (computer to be controlled)

Execute the exe, it should open this window:

Click on Install in the pink button on the left.
Open the settings:

Only enter the ID Server with the IP of your VPS, or the domain name if you have one and if configured during installation.
You should now see "Ready" written in green in the bottom.
My advice: for simplicity, set a permanent password in the security settings.
Last step: Install RustDesk on the client (computer to rule them all)

Same installation, excepted that in the Network settings you'll have to fill Key with the public key I told you to save in the "Sixth step".
Now add the ID and password (the one you set if you followed my advice, otherwise the rotating one).
And you are good, now you can access your device by double-clicking on it and configure as many devices as you want!
Useful links
Netcup VPS and Contabo VPS which are my favorite ones
👋 Thanks for reading, and feel free to share your feelings!