
Introduction
Here, we’ll focus on how to create an S3 storage bucket along with budget alerts using the easiest approach. We’ll also cover the key settings you should be aware of during the process so that you can confidently create and customize your own buckets in the future based on your specific needs. So, let’s get started!
What is AWS S3
Amazon S3 (Simple Storage Service) is one of the most popular and powerful storage services offered by AWS. It allows you to store virtually any type of data such as text files, images, videos, and even static websites. In S3, data is stored as objects inside buckets, which are essentially containers that act like folders to organize your files in the cloud.
Advantages
- Scalable: S3 can automatically scale from just a few bytes to petabytes of data without any manual intervention.
- Cost Effective: It’s free for up to 5 GB of Standard storage (as part of the AWS Free Tier). Beyond that, the cost is minimal for small scale usage, but it can increase significantly with higher storage or request volumes.
There are many more advantages, but these are the most important ones and let’s be honest, they’re probably the reason you’re here in the first place. 😉
Let's start
1. Sign In to AWS Console
Signing in to AWS is obviously mandatory if you want to use any of its services.
I won’t go into the step by step process of creating an AWS account you can easily follow any tutorial on YouTube for that. Just remember, AWS does require your payment details during account setup, but don’t worry it won’t charge you unless you use a service beyond the free tier.
You can create an S3 bucket using either the root user or an IAM user just make sure the IAM user has the necessary permissions.
2. Go to S3 Service page

Click on the Services menu (located between the AWS logo and the search bar), then scroll down to the bottom. Under the Storage section, you'll find several storage-related services offered by AWS. Click on S3 to continue.
3. Create Bucket
Now, let’s begin our journey to create our very first S3 bucket.
Click on the orange “Create bucket” button. At this point, we need to be very careful, because the next few settings are extremely important for how your storage will behave.
If anything goes wrong, you might just end up like this =>
1> General configuration
This is where you’ll define the basic details of your bucket, like its name, region, etc.
AWS Region: This is the first option you'll see. It determines the geographic region where your S3 bucket will be created. If the selected region isn't what you intended, check the region dropdown in the top-right corner of the AWS Management Console. Make sure it matches the region you want to use. Once you change it there, the AWS Region setting under General Configuration will automatically update as well.
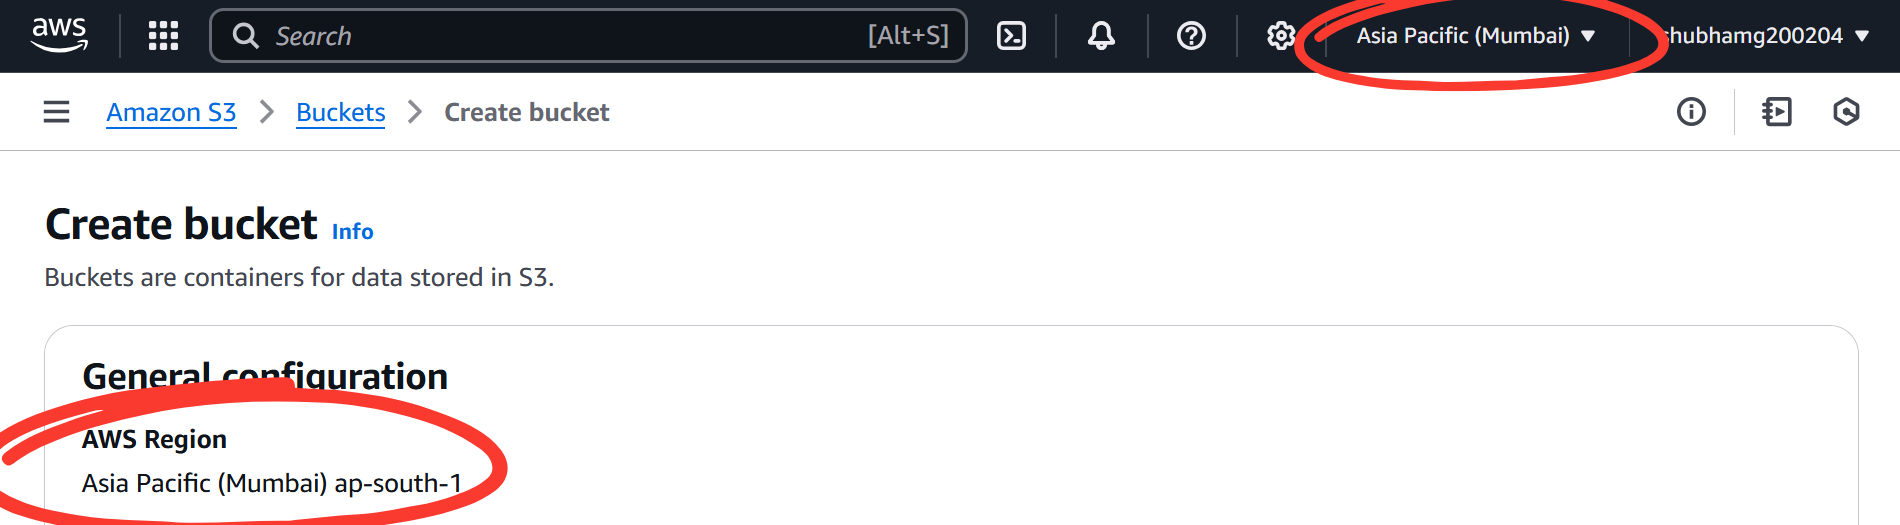
If you create an S3 bucket in a region that’s far from where your application or users are located, you may incur additional data transfer charges when accessing or moving data across regions. It can also result in higher latency. So it’s best to choose the region that’s geographically closest to where your data will be used.Bucket type:

For this tutorial let's just go with General purpose bucket.Bucket name: There are quite a few rules you need to follow when naming your bucket. Bucket names must be globally unique across all AWS accounts and all regions within a given partition. A partition is a grouping of Regions. Names can consist only of lowercase letters, numbers, periods (.), and hyphens (-). Must begin and end with a letter or number. Most importantly, avoid creating bucket names that are easily guessable. If someone is able to guess your bucket name, they can send requests to it even if they can't access your data and this could lead to unexpected and massive charges. (Seriously, go check out that YouTube video I mentioned earlier. It's eye-opening.)
Copy settings from an existing bucket (optional): You can skip this option for now. It's useful when you want to clone the configuration of an existing bucket, but it's not necessary for beginners. We'll be setting things up from scratch to better understand each step.
2> Object Ownership
This setting controls who owns the objects that are uploaded to your bucket and who has access control over them.
- ACLs Disabled (Recommended): This is the default and recommended setting. When ACLs (Access Control Lists) are disabled, ownership of all objects is automatically granted to the bucket owner, regardless of who uploads them. This simplifies permissions and makes managing access much easier using only bucket policies and IAM policies. If you're working on personal or small team projects, this is what you want it reduces confusion and risk. ✅ Use this if: you're new to S3, want simpler permission management, or you're the only one uploading data.
- ACLs Enabled: When you enable ACLs, it allows the original uploader of an object to retain ownership and permissions on that object even if they're not the bucket owner. This is useful in scenarios where multiple AWS accounts or users need fine grained control over individual objects. (We won’t go into the details of this setting here, as it falls outside the scope of this guide.)
3> Block Public Access settings for this bucket
This section controls whether your S3 bucket and its contents can be accessed publicly over the internet. By default, AWS blocks public access to everything, and that’s a good thing it keeps your files private and secure unless you explicitly say otherwise. When you create a new bucket, you’ll see four checkboxes under Block Public Access settings for this bucket:
Block all public access:
This is the master switch. If it's on (checked), your bucket and its contents are completely private. No one can access them from the outside, even if a policy or ACL tries to make them public.Block public access to buckets and objects granted through new access control lists (ACLs):
This prevents future ACLs from accidentally making files public.Block public access to buckets and objects granted through any access control lists (ACLs):
This blocks both new and existing ACLs that might expose your content.Block public access to buckets and objects granted through new public bucket or access point policies:
Stops new bucket policies or access point policies from making your bucket public.
4> Bucket Versioning
Bucket Versioning is a feature that allows Amazon S3 to keep multiple versions of the same file (object) in your bucket. Every time you upload a file with the same name, instead of replacing it, S3 stores it as a new version. This helps you recover from accidental deletes or overwrites.
But there's a catch:
Every version of the file takes up storage space—including old or deleted versions. This means you’ll be paying for each version unless you manually delete them or set up lifecycle rules. So, just avoid enabling it unless you actually need it.
5> Tags - optional
Tags are simple key-value pairs that you can attach to your S3 bucket to help you organize, search, and manage your AWS resources more effectively. Think of them like labels you stick on a folder to know what it contains. They’re super useful when you’re working on large projects, managing costs, or using automation tools. You can also use them to filter usage in AWS billing and cost reports.
6> Default encryption (Last step)
Default encryption ensures that every object (file) uploaded to your S3 bucket is automatically encrypted without you having to manually configure it each time. This adds an extra layer of protection for your data, especially if you’re storing anything sensitive—even during learning or testing phases.
When you enable default encryption, AWS will automatically encrypt all new files using the encryption method you choose. Even though enabling encryption is optional, it’s a best practice especially if your bucket ever stores personal data, logs, or anything remotely confidential. (Leave as it is)
Advanced Settings – Skip for Now
You’ll see an Advanced Settings section at the bottom, but for now, you don’t need to touch anything here. The default settings are perfectly fine for most use cases especially for beginners.
So, simply scroll down and click the orange “Create bucket” button at the bottom.
🎉 Congrats! You’ve just created your very first S3 bucket. Now it’s ready to store files, host static content, or connect with other AWS services.
🚀 Time to Explore Your Bucket
Once your bucket is created, you’ll be taken to a page listing all your S3 buckets. Just tap on the name of the newly created bucket to open it.
From here, feel free to experiment upload some files, delete them, create folders, and get a feel for how S3 works. This is your playground to explore!
Even better, your bucket is now fully set up and ready to be used programmatically through any programming language or framework like Python (Boto3), JavaScript (AWS SDK), or even directly via the AWS CLI.
💰 Set a Budget for Your Newly Created S3 Bucket
In the navigation bar’s search box, type Budgets. You’ll see Budgets appear under the “Features” section, click on it to continue. Once you're on the Budgets page, you’ll notice an orange “Create budget” button. Go ahead and click it, this marks the beginning of our next journey!🚀
Now let's complete this setup!
Budget Setup
Under the Budget Setup section, select Customize (advanced).
This gives you a more tailored way to set up your budget and configure smart alerts to protect yourself from unexpected charges. 🛡️💸
Step 1. Choose Budget Type
You’ll now see four different types of budgets you can create. Since our main goal is to track how much we’re spending and more importantly, how to stay within a small or zero cost usage we’ll go with Cost Budget.
Here’s a quick overview of all four budget types:
Cost Budget
Track your actual or forecasted AWS spending. Ideal when you want to keep your cloud usage within a specific monetary limit.Usage Budget
Monitor the amount of resources (like GBs of data or number of requests) you’re consuming, rather than how much they cost.Reservation Budget
Helps you manage reserved instances (like EC2 or RDS) and plan costs related to those long-term commitments.Savings Plans Budget
Specifically designed to track your spending and savings under AWS Savings Plans, which offer discounted rates in exchange for usage commitments.
For this tutorial, we’ll stick with Cost Budget, because it directly addresses our goal of using AWS services with minimal or no expense. Click next and head to next step.
Step 2. Set your budget
Before you move on, you might see a short guide or documentation from AWS about how to create a budget. Feel free to give it a quick read it offers helpful context, especially if you're new to AWS Budgets. But don’t worry, we’ll walk through everything step by step right here too.
A. Budget name
You can name your budget whatever you like there are no strict naming rules here. However, it’s a good idea to choose a name that’s relevant to the service or purpose it’s tracking, as this will make it easier to identify and modify in the future.
B. Set Budget Amount
This is where you define how much you're willing to spend.
Period
This defines how often your budget resets. Don't worry you’ll still receive alerts between periods as your usage increases. Avoid selecting Daily budgets because they don’t support alerts, which kind of defeats the whole purpose of setting up a budget in the first place. Instead, select Monthly, as it’s the most optimal option in our case. It aligns with AWS billing cycles and ensures you get notified if your usage starts going beyond your set limits.Budget renewal type
This setting decides whether your budget should automatically reset and start fresh after each period.
You’ll get two options:
1> Recurring
This is the default and most useful option. Your budget will renew at the beginning of every period (like monthly, if you chose that). It’s perfect if you want to consistently track usage and receive alerts without having to create a new budget every month.
2> Expiring
This means the budget is for one time use only. It won’t reset after the period ends. Use this only if you're tracking costs for a very short-term project or temporary testing.
✅ For most users, especially beginners, Recurring is the way to go. It’s a set-it-and-forget-it kind of setup.Start month
This is the month from which your budget will begin tracking and monitoring your AWS usage. Make sure to select the current month if you want the budget to start immediately. If you pick a future month, tracking will begin from then.Budgeting Method
This section lets you decide how your budget amount is calculated. You’ll see three options:
1> Fixed Budget
Set a specific amount that will remain constant every month (or your selected period). AWS will monitor your spending against this fixed value and trigger alerts as you approach or exceed it.
✅ Best for beginners or those who want strict spending limits.
2> Planned Budget
Allows you to set different budget amounts for different months. For example, you can allocate ₹100 for January and ₹300 for February. This is useful if you know certain months will have higher usage or spending.
✅ Ideal if you follow a planned project timeline with varying costs.
3> Auto-Adjusting Budget
AWS automatically calculates your budget based on your past usage trends and adjusts it each month. It’s helpful if your usage fluctuates regularly and you want your budget to stay in sync without manual changes.
✅ Recommended only if you’ve been using AWS for a while and have consistent historical usage.
👉 For this tutorial, and especially if you're just getting started, go with Fixed Budget. It gives you full control and peace of mind.Enter your budgeted amount ($)
This is the total amount you're willing to spend within the selected time period (like monthly). AWS will monitor your actual usage and compare it against this amount. If your spending reaches certain thresholds (which you'll define later), you'll receive alerts via email or other notification channels.
💡 Example: If you're just starting out or using only free-tier services like Amazon S3, you can safely set a small budget like $1 or $2 per month. This way, you’ll get notified early if something starts consuming paid resources unexpectedly.
👉 Tip: Don’t leave this blank or enter a very high value unless you know what you're doing—this is your safety net against surprise bills!
C. Budget scope
- Scope options This setting defines what your budget will apply to.
a. All AWS Services: This is the default option and applies your budget across all the AWS services you're currently using in your account. If you're not sure which services might incur charges, this is the safest choice—it ensures you're alerted no matter where the cost comes from.
b. Filter specific AWS cost dimensions: This allows you to create a more targeted budget by selecting specific services (like S3), linked accounts, tags, or other dimensions. It's useful when you only want to monitor costs for a particular project or service. For example, if you're only experimenting with Amazon S3 and want to limit the budget just for it, use this option.
✅ Tip: If you’re a beginner or just exploring AWS, go with All AWS Services to be safe. If you’re confident and know exactly what you want to track, then apply filters accordingly.
- Advanced options You can safely skip this section for now. It includes more detailed configurations like linking budgets to specific accounts or services using complex filters. Since this guide is focused on setting up a basic and effective budget, these advanced settings are out of scope for the moment.
Just click next and move to next step!
Step 3. Configure Alerts
In this step, you'll set up alerts to notify you when your spending approaches or exceeds your defined budget. This is the most important part of budgeting—it helps you stay informed and avoid unexpected charges by sending notifications based on the thresholds you set.
- Click on Add an alert threshold, if present already.
- Set the percentage threshold at which you want to receive an alert. This defines when AWS should notify you about your spending. For example, setting it to 50% means you’ll get an alert when you’ve used 50% of your total budget.
👉 Note: Leave the two side toggle buttons as they are (default), unless you know exactly what you're doing—they control actual vs. forecasted usage.
- Email Recipients Enter the email address(es) where AWS should send the alert notification once your specified budget threshold is reached. You can add multiple recipients by separating them with commas. If you'd like to set up a second alert—for a different threshold (say 90% or 100%)—you can do that too by clicking the Add alert threshold button at the bottom. 📌 Just enter your preferred email and leave the rest of the settings as they are. Click “Next” to proceed.
Step 4. Attach actions
Since we're creating a budget specifically for S3 usage, AWS doesn't support attaching automatic actions (like stopping or modifying services) for S3. This feature is more relevant for services like EC2 or RDS, where you can automate cost-control actions. So, for now, just leave everything as-is and click Next to continue.
Step 5. Review
Review all the configurations and ensure that each setting matches your intended budget and alert preferences. Double-check the budget amount, period, thresholds, and email recipients. Once everything looks good, click on Create budget.
After successful creation, you’ll be redirected to the Budgets List page, where you’ll see your newly created budget listed by its name.
🎯 Conclusion
You’ve successfully created your first S3 bucket and set up a budget to monitor costs—two key steps for using AWS safely and smartly. With this setup, you can now explore and build without the fear of surprise charges. Keep experimenting, stay curious, and let AWS work for you—without burning a hole in your pocket. 🚀
