
In this tutorial, I'll guide you through creating a simplified version of Reddit as a single-page application using Meteor 3 and Blaze. We'll focus on implementing core functionality like posts and voting without complex routing. For deployment or live demo, please visit https://dev.to/kafechew/a-mini-reddit-app-deployed-to-cloudrun-with-pulumi-esc-iac-meteor-mongodb-atlas-289b.
Initial Setup
First, let's install Meteor:
Install Meteor
curl https://install.meteor.com/ | shAfter installation, you should see a success message confirming Meteor 3.1.2 has been installed in your home directory.
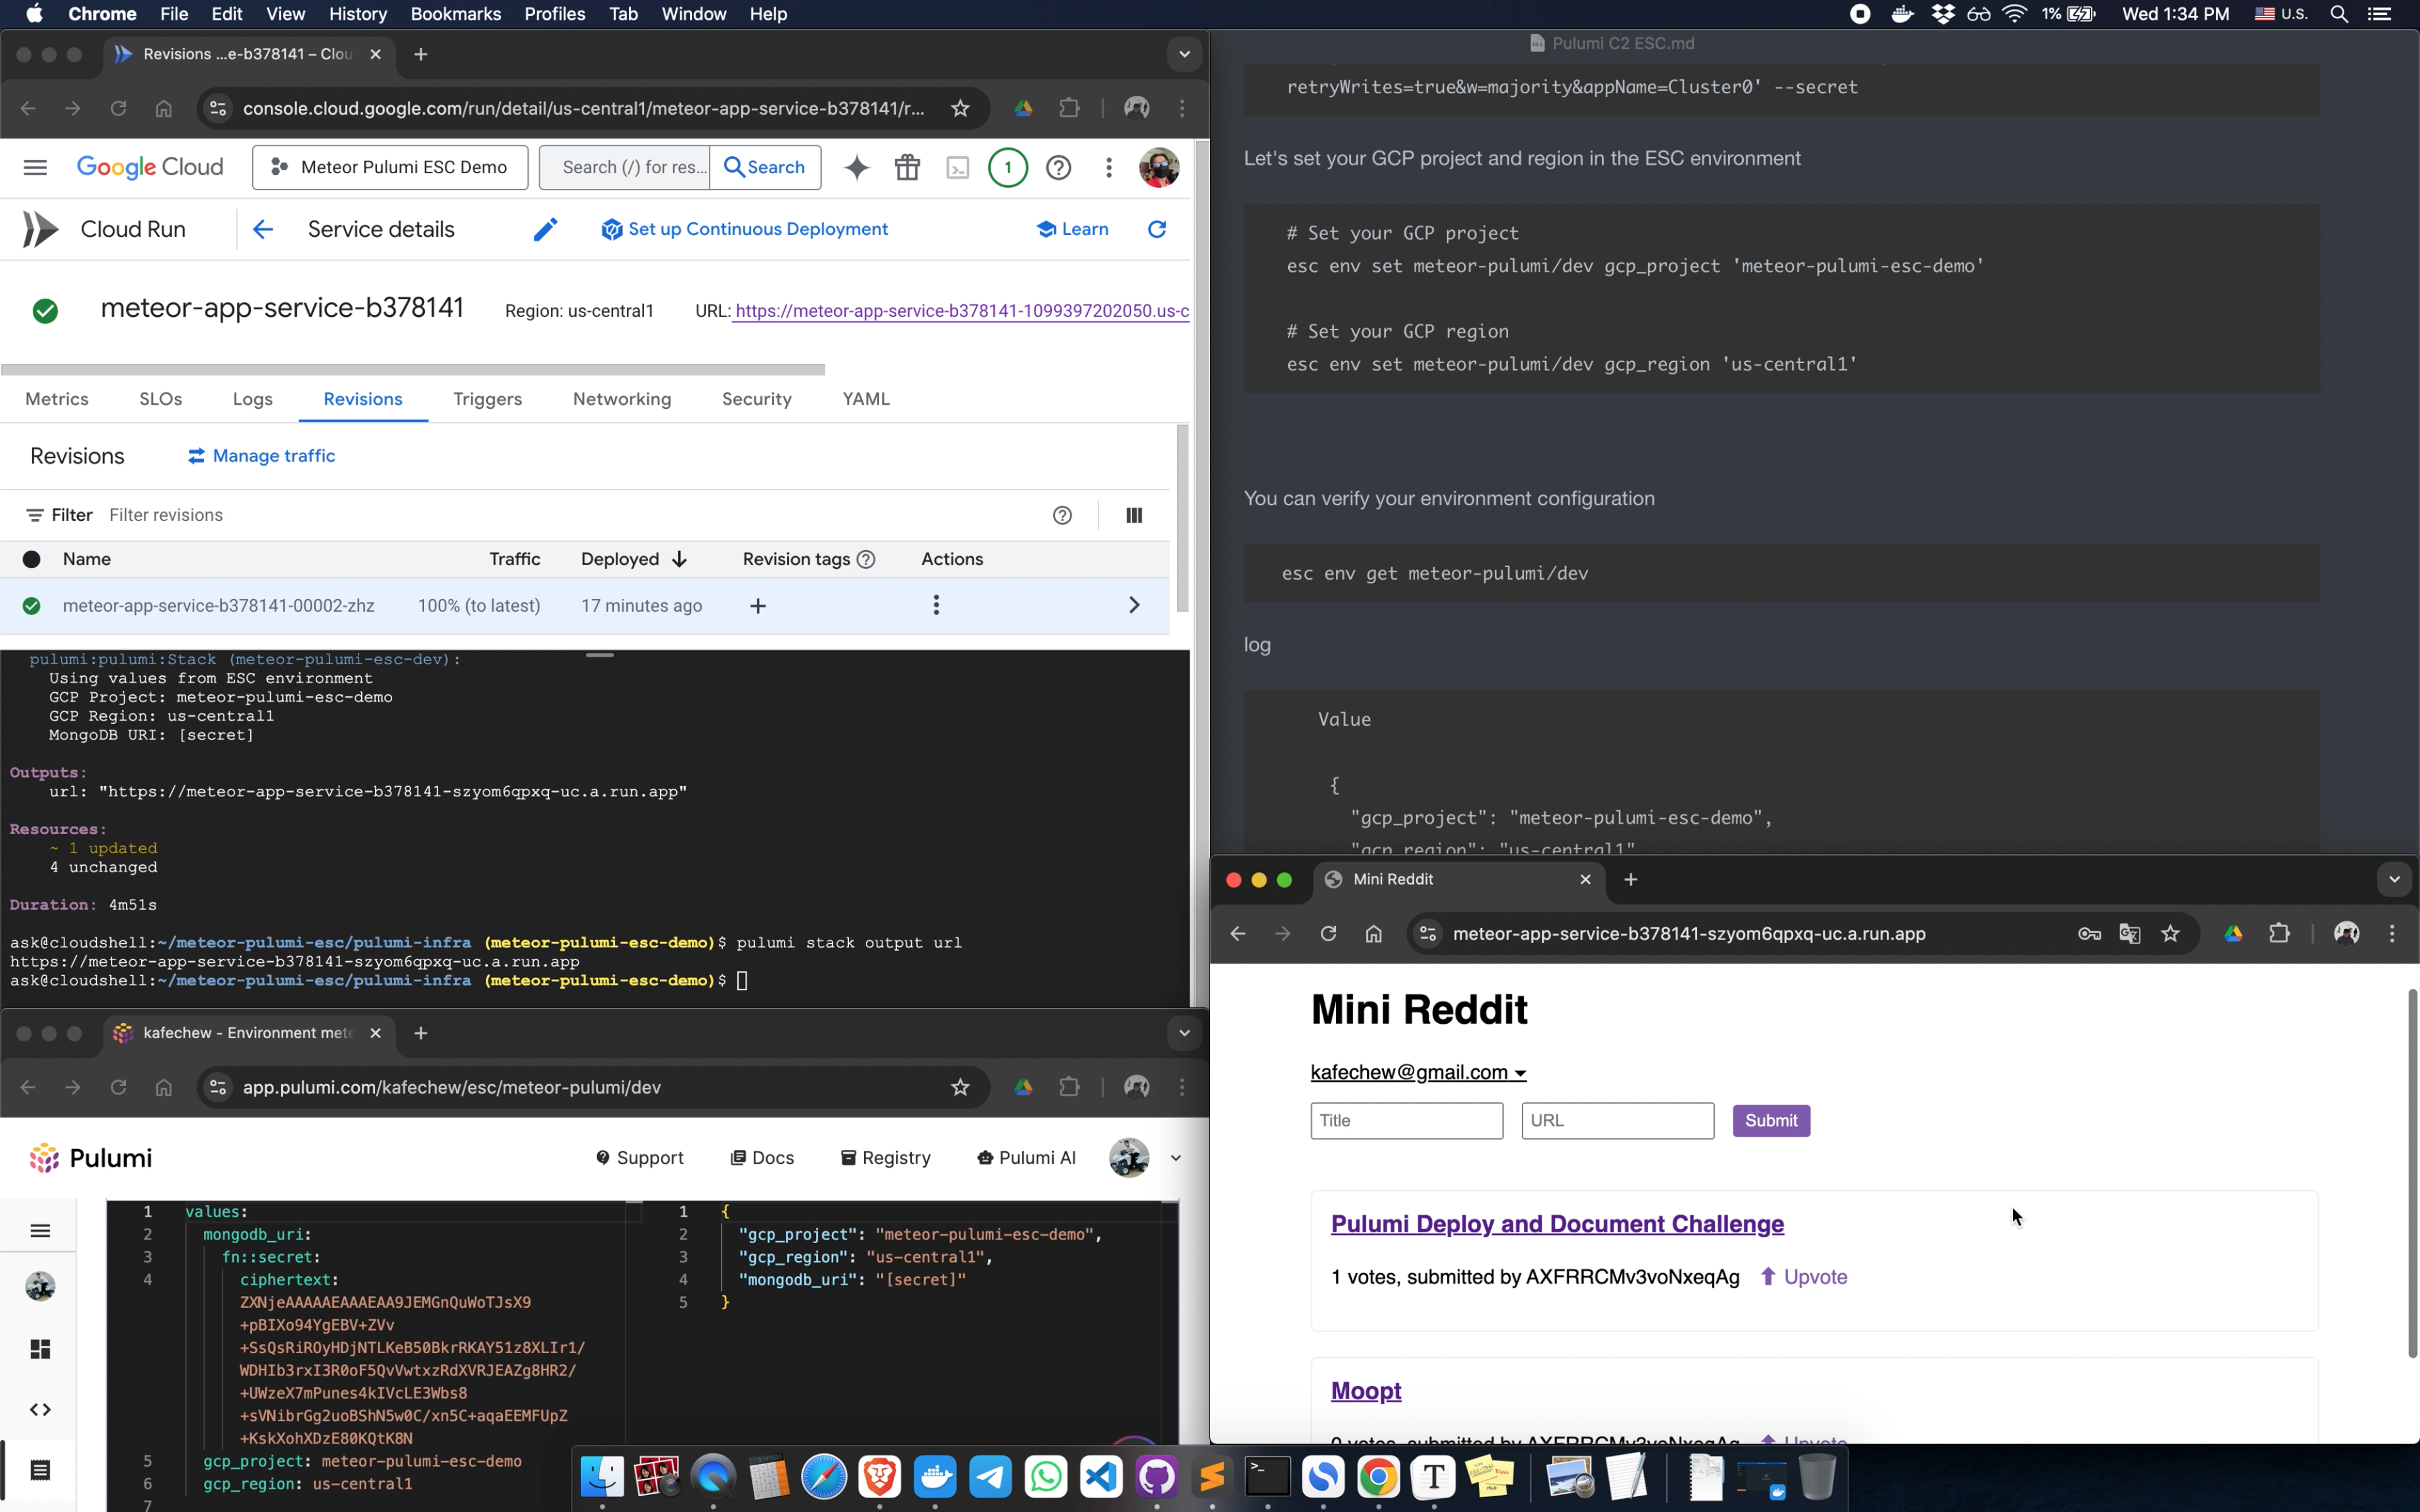
log
% Total    % Received % Xferd  Average Speed   Time    Time     Time  Current
                                 Dload  Upload   Total   Spent    Left  Speed
100  7869    0  7869    0     0   8837      0 --:--:-- --:--:-- --:--:--  8831
Downloading Meteor distribution
######################################################################## 100.0%

Meteor 3.1.2 has been installed in your home directory (~/.meteor).
Writing a launcher script to /usr/local/bin/meteor for your convenience.
This may prompt for your password.

To get started fast:

  $ meteor create ~/my_cool_app
  $ cd ~/my_cool_app
  $ meteor

Or see the docs at:

  docs.meteor.com

Deploy and host your app with Cloud:

  www.meteor.com/cloud
Next, create a new Meteor app with Blaze:
meteor create meteor-app --blaze --prototypeThe --prototype flag includes the autopublish and insecure packages, which are helpful for rapid prototyping. These packages automatically publish all data to the client and allow client-side database modifications without explicit permissions. While convenient for development, they should be removed before deploying to production for security reasons.
log
Using blaze skeleton
Created a new Meteor app in 'meteor-app'.

To run your new app:
  cd meteor-app
  meteor --port 3001

If you are new to Meteor, try some of the learning resources here:
  https://www.meteor.com/tutorials

When you’re ready to deploy and host your new Meteor application, check out Cloud:
  https://www.meteor.com/cloud
Let's test our new app
cd meteor-app
meteor --port 3001
log
[[[[[ ~/meteor-pulumi-esc/meteor-app ]]]]]

=> Started proxy.
=> Started HMR server.
=> Started MongoDB.
=> Started your app.

=> App running at: http://localhost:3001/
Your app should now be running at http://localhost:3001/
Add necessary packages
Install the necessary packages for our Reddit clone
meteor add accounts-password
meteor add accounts-ui
meteor add check
meteor npm install --save @babel/runtime
meteor npm install [email protected]
These packages provide:
- User authentication (accounts-password, accounts-ui)
- Input validation (check)
- Runtime support for ES6+ features (@babel/runtime)
- jQuery for DOM manipulation
Creating the Data Model
Let's set up our data structure. Create a new folder structure imports/api and add a file collections.js.
import { Mongo } from 'meteor/mongo';
import { Meteor } from 'meteor/meteor';
import { check } from 'meteor/check';

export const Posts = new Mongo.Collection('posts');

// Define security rules if not using autopublish
if (Meteor.isServer) {
  // Publications
  Meteor.publish('allPosts', function() {
    return Posts.find({}, {sort: {votes: -1, createdAt: -1}});
  });
}

// Methods
Meteor.methods({
  'posts.insert'(title, url) {
    check(title, String);
    check(url, String);

    if (!this.userId) {
      throw new Meteor.Error('not-authorized');
    }

    const user = Meteor.users.findOneAsync(this.userId);
    const username = user && user.username ? user.username :
                    (user && user.profile && user.profile.name ? user.profile.name :
                    (user && user.emails ? user.emails[0].address : this.userId));

    return Posts.insertAsync({
      title,
      url,
      createdAt: new Date(),
      userId: this.userId,
      author: username,
      votes: 0
    });
  },

  'posts.upvote'(postId) {
    check(postId, String);

    if (!this.userId) {
      throw new Meteor.Error('not-authorized');
    }

    Posts.updateAsync(postId, {$inc: {votes: 1}});
  },
});
This file defines our Posts collection and the methods to interact with it. We've implemented two key methods:
-
posts.insert- Creates a new post with title, URL, and author information -
posts.upvote- Increments the vote count for a specific post
Building the User Interface
Replace the content of client/main.html with:
Mini Reddit
   name="viewport" content="width=device-width, initial-scale=1.0">


  {{> main}}


 name="main">
   class="container">

      Mini Reddit
       class="login">{{> loginButtons}}
      {{#if currentUser}}
        {{> postSubmit}}
      {{/if}}


     class="posts">
      {{> postsList}}


 name="postSubmit">
   class="post-submit">
     type="text" name="title" placeholder="Title" required>
     type="url" name="url" placeholder="URL" required>
     type="submit">Submit


 name="postsList">
  {{#each posts}}
    {{> postItem}}
  {{/each}}


 name="postItem">
   class="post">
     class="post-content">
       href="{{url}}" target="_blank">{{title}}

        {{votes}} votes,
        submitted by {{author}}
        {{#if currentUser}} href="#" class="upvote">⬆ Upvote{{/if}}
Our UI consists of four templates:
-
main- The overall layout with header and content area -
postSubmit- A form for submitting new posts (only visible to logged-in users) -
postsList- Displays all posts with loading and empty states -
postItem- Individual post display with voting functionality
Adding Client-Side Logic
Replace client/main.js with:
import { Template } from 'meteor/templating';
import { Meteor } from 'meteor/meteor';
import { ReactiveVar } from 'meteor/reactive-var';
import { Posts } from '../imports/api/collections.js';
import './main.html';

// Subscribe to data
Meteor.startup(() => {
  Meteor.subscribe('allPosts');
});

// Post list template
Template.postsList.helpers({
  posts() {
    return Posts.find({}, {sort: {votes: -1, createdAt: -1}});
  }
});

// Post item template
Template.postItem.onCreated(function() {
  // Use the data context's _id, not this._id
  this.autorun(() => {
    const data = Template.currentData();
  });
});

Template.postItem.events({
  'click .upvote'(event, template) {
    event.preventDefault();
    Meteor.call('posts.upvote', this._id);
  },
});

// Post submit template
Template.postSubmit.events({
  'submit .post-submit'(event, template) {
    event.preventDefault();

    const title = event.target.title.value;
    const url = event.target.url.value;

    Meteor.call('posts.insert', title, url, (error) => {
      if (error) {
        console.error("Error adding post:", error);
      } else {
        // Clear form
        event.target.title.value = '';
        event.target.url.value = '';
      }
    });
  }
});
This JavaScript code:
- Sets up data subscriptions
- Registers a date formatting helper
- Implements the sorting of posts by votes and creation date
- Handles upvoting posts
- Processes new post submissions with validation
Styling the Application
Create client/main.css with improved styling
body {
  font-family: sans-serif;
  max-width: 800px;
  margin: 0 auto;
  padding: 20px;
}

header {
  margin-bottom: 20px;
  display: flex;
  flex-direction: column;
}

.login {
  margin-bottom: 15px;
}

.post-submit {
  margin-bottom: 20px;
}

.post-submit input {
  margin-right: 10px;
  padding: 5px;
}

.post {
  border: 1px solid #eee;
  margin-bottom: 20px;
  padding: 15px;
  border-radius: 5px;
}

.post-content h3 {
  margin-top: 0;
}

.upvote {
  margin-left: 10px;
  color: #7F58AF;
  text-decoration: none;
}

button {
  background-color: #7F58AF;
  color: white;
  border: none;
  padding: 5px 10px;
  cursor: pointer;
  border-radius: 3px;
}

button:hover {
  background-color: #6A4A94;
}
This CSS provides:
- A clean, Reddit-inspired color scheme
- Responsive layout that works on mobile devices
- Visual feedback for interactive elements
- Proper spacing and typography
Set up the server
Replace server/main.js with:
import { Meteor } from 'meteor/meteor';
import { Posts } from '../imports/api/collections.js';

Meteor.startup(() => {
  // If the Posts collection is empty, add some data
  if (Posts.find().countAsync() === 0) {
    const dummyPosts = [
      {
        title: 'Introducing Moopt',
        url: 'https://moopt.com',
        createdAt: new Date(),
        author: 'System',
        votes: 0
      },
      {
        title: 'Discover Moopt',
        url: 'https://linkedin.com/company/moopt',
        createdAt: new Date(),
        author: 'System',
        votes: 0
      }
    ];

    dummyPosts.forEach(post => Posts.insertAsync(post));
  }
});
This server code initializes our application with sample posts if the database is empty, making it easier to see how the app works right away.
Running the Application
Start your application with:
meteor --port 3001Visit http://localhost:3001/ in your browser to see your Mini Reddit clone in action!
Key Features Implemented
- User Authentication: Sign up and login functionality
- Post Creation: Logged-in users can submit new posts with titles and URLs
- Voting System: Users can upvote posts they like
- Sorting: Posts are automatically sorted by vote count and creation date
- Responsive Design: Works well on both desktop and mobile devices
Next Steps
To make this a production-ready application, consider:
- Removing the autopublish and insecure packages
- Adding downvoting functionality
- Implementing comments on posts
- Adding user profiles and post history
- Implementing categories or subreddits
- Adding pagination for large numbers of posts
This tutorial demonstrates the power and simplicity of Meteor for building interactive web applications. With just a few files, we've created a functional Reddit clone that handles real-time updates, user authentication, and data persistence.
 Mooptcom
/
meteor-pulumi-esc
Mooptcom
/
meteor-pulumi-esc
Meteor app deployed to Cloud Run with Pulumi ESC
Meteor App Deployment with Pulumi ESC
This repository demonstrates how to securely deploy a Meteor 3 application to Google Cloud Run using Pulumi ESC for secret management. The application connects to a MongoDB Atlas database, with the connection string securely stored and accessed using Pulumi ESC.
This project was created for the Pulumi Deploy and Document Challenge: Shhh, It's a Secret!
-
Real-time Demo: https://meteor-app-service-b378141-szyom6qpxq-uc.a.run.app or https://meteor-app-service-b378141-1099397202050.us-central1.run.app/
-
Demo video: https://youtu.be/V2-wESswkV8 and https://www.youtube.com/watch?v=O5kcxLiycJM
🌟 Features
- Secure Secret Management: Using Pulumi ESC to securely store and access MongoDB connection strings
- Containerized Meteor App: Multi-stage Docker build optimized for Meteor 3 applications
- Serverless Deployment: Automatic deployment to Google Cloud Run
- Infrastructure as Code: Complete infrastructure defined using Pulumi
- Voting Application: Simple Meteor application with MongoDB integration
🏗️ Architecture
The architecture consists of:
- Meteor Application: A Meteor 3 app with BlazeJS and a todos feature
- MongoDB Atlas…
Happy coding!
