Introduction
Almost all the mobile apps needs to access the internet. In Swift, you can use the URLSession API for network related tasks, such as consuming web services or downloading files (as images to be displayed in the UI).
It's very easy to perform a simple network call, but you likely won't be limited to those. In a real app, it's needed to create robust solutions to complex network logic: modularity, thread-management, error handling, cancellation and more. Creating a network layer then could be the best choice in this case. Let's see how to do without any third-part library.
What is URLSession
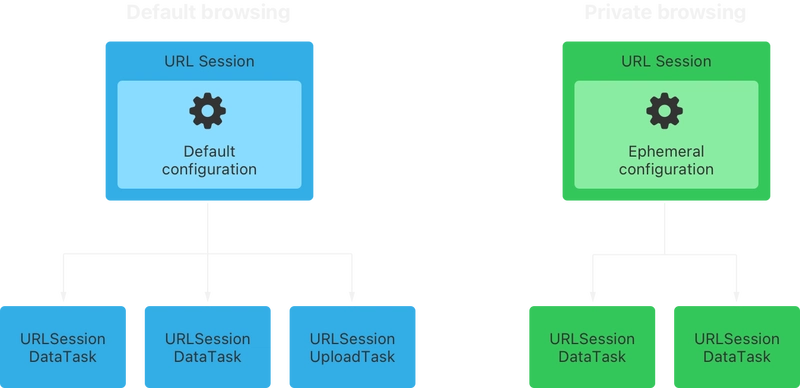
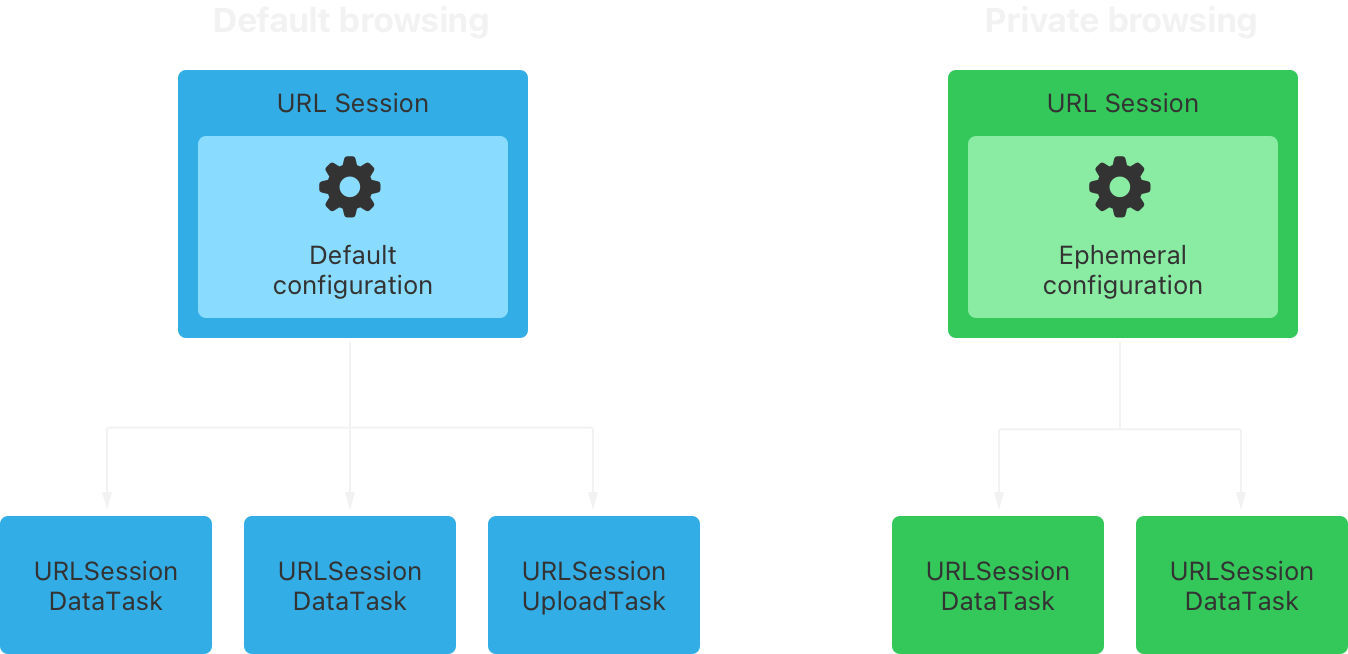
URLSession is a class, part of the URL Loading System, a collection of APIs present in Swift Foundation to interact with web servers through URLs. There are other classes in this collection, as URLSessionTask and URLSessionConfiguration that are also important when working with networking, but URLSession objects are the most fundamental structure to handle this kind of tasks.
The URLSession has a Singleton instance with a basic configuration, that can be used for simple calls, let's see an example consuming the Cat Fact API
let url = URL(string: "https://catfact.ninja/fact")

let task = URLSession.shared.dataTask(with: url!) { (data, _, _) in
    guard let data,
          let stringResponse = String(data: data, encoding: .utf8) else {
        print("Invalid response")

        return
    }

    print("The task finished with response: \(stringResponse)")
}

task.resume()

print("The task started to being executed")
Analyzing the code above:
- We create an
URLobject using the initializer from aString. This initializer creates an Optional value; - We call the
dataTask(with:)function of theURLSessionsingleton object. This method receives anURLobject and a completion handler as arguments. The later will be executed when the request is finished. The function returns an object of typeURLSessionDataTask; - With
task.resume()we are manually starting the task execution, that will be performed asynchronously, in a background thread. We can also cancel the network request at any time before its completion, by callingtask.cancel(). We're seeing more of that later in this article.
Thread management
As mentioned in the previous section at item 3, the dataTask(with) function automatically executes the network call on a background thread:
URLSession.shared.dataTask(with: url!) { (data, _, _) in
    print(Thread.isMainThread ? "Is Main Thread" : "Not Main Thread")
}.resume()
Console Output:
Not Main ThreadThat's because requests are heavy tasks, and not executing them in a background thread can lead to a bad UX, since the UI is handled in the main thread by default. Executing heavy tasks in the main thread makes the UI freeze until the task is completed. However, if you need to display a network response in the view, you'll need to manually perform that task of updating the UI in the Main Thread, otherwise you can face issues:
import UIKit

lazy var label: UILabel = {
    // ...
}()

URLSession.shared.dataTask(with: url!) { [label] (data, _, _) in
    guard let data,
          let stringResponse = String(data: data, encoding: .utf8) else {
        print("Invalid response")

        return
    }

    label.text = stringResponse // Runtime warning: ⚠️ Unable to encode UIView on a non-main thread
}.resume()
In order to make that work, you'll need some strategy to guarantee that label.text = stringResponse is executed on the Main Thread, for example:
DispatchQueue.main.async {
    label.text = stringResponse
}
Why Creating a Separate Layer
We could observe that thread management is an important subject to take care when dealing with network, that can become complex. Also, authentication, error handling and resources management are so important. Having a separate layer only to deal with networking logic is a good way to have more isolated and agnostic business logic.
Imagine a scenario where you need to store some data in your app. Initially, you decide to store it locally, but in a future version this data will be sent to a backend service. Using abstraction helps this future refactor:
let userService: UserService = LocalStorageUserService()

func save(user: User) async {
    await userService.save(user)
}
The piece of code above is about business logic. In future, if you want to create an APIUserService, you can isolate everything related to network inside the network layer, and the usage of it in your business code will be the same.
Another reason for creating a network layer is sharing logic between apps. You may have multiple apps that consumes a same service, then you can create a package with all the requirements for that specific service, and share across all apps.
Creating the Network Layer
We'll now start creating our Network Layer. This implementation above is just a suggestion, that should be adapted to the reality of your project. There's no "right way" to do it, but it's a good starting point. We are going to split our Network Layer in some steps: API Client, Authentication, Endpoint Model, Service Abstraction, Concrete Service, Error Handling and Cancellation.
We are using DummyJSON for that, that is a public API with several different endpoints, ideal for studying how to create API clients (such as mobile apps, websites and more).
API Client
The first structure we are creating is the API Client. Here, we can consider that a single app can have multiple API integrations, so we’re making it as generic as possible. The DummyJSON API is a REST service that uses JWT as authentication method, so we can start with an abstraction like that:
import Foundation

protocol JWTAPIClient {
    var baseURL: URL { get }
    var jwt: String? { get }

    func auth(with credentials: Credentials, completion: @escaping (Result<Void, Error>) -> Void) -> URLSessionTask
}

struct Credentials: Codable {
    var username: String
    var password: String
}
Here we have a protocol that holds the value of the API URL, such as the current JWT token. It also has a signature for a function that performs the API authentication.
The auth function receives as first argument the credentials object, and a completion handler as second argument. The later is an escaping closure, with a Void return type that receives a Result of Void and Error. Since the execution of the network call is an asynchronous task, that has an uncertain result (it can succeed or fail), it's important to create this completion handler with this parameter.
That's a definition for an API Client that uses JWT authentication, it can be used for different API integrations, but now we are creating the one for consuming the DummyJSON API:
import Foundation

final class DummyJSONAPIClient: JWTAPIClient {
    var baseURL: URL {
        URL(string: "https://dummyjson.com/")!
    }
    var jwt: String?

    func auth(with credentials: Credentials, completion: @escaping (Result<Void, any Error>) -> Void) -> URLSessionTask {
        // authentication logic here
    }
}
We just created a DummyJSONAPIClient class that conforms to JWTAPIClient. The idea of the auth function is to receive credentials, authenticate and store the received JWT to be used in restricted calls. We'll implement all that logic in a bit.
Authentication
Now, we're going to implement the authentication logic. Reading the DummyJSON documentation, we can notice that the auth/logic endpoint can be used to authenticate, and the auth/me endpoint is an example of a restricted service, that needs to receive a valid JWT token to work. Let's focus in the first endpoint, adding implementation to the DummyJSONAPIClient.auth function. We'll create an URLRequest object to perform this call:
func auth(with credentials: Credentials, completion: @escaping (Result<Void, any Error>) -> Void) -> URLSessionTask {
    var url = baseURL
    url.appendPathComponent("auth/login")

    var request = URLRequest(url: url)
    request.httpMethod = HTTPMethod.POST.rawValue
    request.setValue("application/json", forHTTPHeaderField: "Content-Type")

    request.httpBody = try? JSONEncoder().encode(credentials)
}

enum HTTPMethod: String {
    case GET
    case POST
    case DELETE
    case PUT
    case PATCH
}
In the piece of code above, we did the following:
- Created a copy of
baseURLand added the authentication endpoint path to it - Created an
URLRequestobject with the auth endpointURL - Set the HTTP method to
POST, following the documentation - Set the
Content-Typeheader toapplication/json - Set the request body with the credentials value. Notice that it is being encoded in
JSON
Creating the response model
Another thing that we can verify on DummyJSON documentation is the expected response for the authentication service.
{
  "id": 1,
  "username": "emilys",
  "email": "[email protected]",
  "firstName": "Emily",
  "lastName": "Johnson",
  "gender": "female",
  "image": "https://dummyjson.com/icon/emilys/128",
  "accessToken": "eyJhbGciOiJIUzI1NiIsInR5cCI6IkpXVCJ9...",
  "refreshToken": "eyJhbGciOiJIUzI1NiIsInR5cCI6IkpXVCJ9..."
}
We can now create a struct to decode the response data:
struct AuthResponse: Codable {
    let id: Int
    let username: String
    let email: String
    let firstName: String
    let lastName: String
    let gender: String
    let image: String
    let accessToken: String
    let refreshToken: String
}
Notice that conforming to the Codable protocol is important to use the decoders in future.
Now that we have a model to decode our response, we can add the code to perform the network call. We should add this piece of code just below our URLRequest creation, inside the auth function:
let task = URLSession.shared.dataTask(with: request) { [weak self] data, response, error in
    if let error {
        completion(.failure(error))

        return
    }

    guard let data else {
        // TODO: Handle this scenario in future
        print("Nil data")

        return
    }

    guard let authResponse = try? JSONDecoder().decode(AuthResponse.self, from: data) else {
        // TODO: Handle this scenario in future
        print("Failed to decode JSON")

        return
    }

    self?.jwt = authResponse.accessToken

    completion(.success(()))
}

task.resume()

return task
The dataTask(with:) function performs the network call asynchronously, with the giving URLRequest object, and return a URLSessionTask object. Inside the completion handler that is being passed, it's being executed the following actions:
- Checking if the
errorobject is notnil, and if it isn't, failing the completion result - Unwrapping the
datavariable (the error handling for when it'snilis not implemented yet) - Trying to decode the JSON response to the model we just created
- Storing the received token in the client instance to be used in future
Endpoint Model
Now that we have an working authentication method, we can start creating our Endpoints. First, we'll create a generic representation of any endpoint, then we'll create one different object for each endpoint that our app will consume. Let's see the generic one first:
protocol Endpoint {
    // The path for the endpoint. This is the part of the URL after the host of the API
    var path: String { get }
    // Headers to be sent in the request
    var headers: [String: String]? { get }
    // The HTTP method for this endpoint
    var method: HTTPMethod { get }
    // Parameters sent in the request body. It can't be used in `GET` requests
    var bodyParameters: [String: Any?]? { get }
    // Parameters sent in the URL.
    var queryParameters: [String: String]? { get }
}
This protocol defines all properties an endpoint might need. So now, we can create our concrete representation of an endpoint. Let's start with the GET auth/me one:
struct GetCurrentUserEndpoint { }

extension GetCurrentUserEndpoint: Endpoint {
    var path: String { "/auth/me" }
    var method: HTTPMethod { .GET }

    var headers: [String : String]? {
        nil
    }

    var bodyParameters: [String : Any?]? {
        nil
    }

    var queryParameters: [String : String]? {
        nil
    }
}
Observe that this endpoint doesn't require any specific value in the headers, body, neither query, so we need to implement the protocol properties returning nil. It's very common that we have several endpoints that doesn't need these properties. But the path and method are always mandatory. So we can apply an improvement to that architecture, adding default values to the protocol:
extension Endpoint {
    var headers: [String: String]? {
        nil
    }

    var bodyParameters: [String: Any?]? {
        nil
    }

    var queryParameters: [String: String]? {
        nil
    }
}
Then our specific endpoint now can be as simple as that:
struct GetCurrentUserEndpoint { }

extension GetCurrentUserEndpoint: Endpoint {
    var path: String { "/auth/me" }
    var method: HTTPMethod { .GET }
}
Service Abstraction
We are now creating a simple abstraction to services in general. It will be just a protocol that requires the service to receive an API client, we're calling it NetworkService:
protocol NetworkService {
    var apiClient: JWTAPIClient { get }
}
The next step will be adding a new function to our generic JWTAPIClient. Just below the auth(with:credentials) function, we'll add a function to perform calls to endpoints. This is the signature in the protocol:
protocol JWTAPIClient {
    // ...

    func request(from endpoint: Endpoint, completion: @escaping (Result<Data?, Error>) -> Void) -> URLSessionTask
}
Then we can adapt our concrete DummyJSONAPIClient class to implement the new required method:
final class DummyJSONAPIClient: JWTAPIClient {
    // ...
    func request(from endpoint: any Endpoint, completion: @escaping (Result<Data?, any Error>) -> Void) -> URLSessionTask {
        var url = baseURL
        url.appendPathComponent(endpoint.path)

        var request = URLRequest(url: url)
        request.httpMethod = endpoint.method.rawValue
        request.setValue("application/json", forHTTPHeaderField: "Content-Type")

        if let jwt = jwt {
            request.setValue("Bearer \(jwt)", forHTTPHeaderField: "Authorization")
        }

        let task = URLSession.shared.dataTask(with: request) { data, response, error in
            // Completion implementation here
        }

        task.resume()

        return task
    }
}
Look how similar to the auth(with:credentials) function it is, but with some more generic implementation:
- A copy of
baseURLis made - A path component is added to it, but now the
endpoint.pathinstead of a hard-coded "auth/login" string - The HTTP method is also set from what is received from the endpoint object, instead of a hard-coded value
Everything else is pretty the same, except by the Authorization header, that we are sending with the stored value from the authentication. That's what will make our restricted calls work.
Now, we are going to add the implementation to the completion handler. We should replace the // Completion implementation here with:
if let error {
    completion(.failure(error))

    return
}

completion(.success(data))
Now we have our base request function, and we are able to create the specific one.
Concrete Service
We are almost done with the creation of the logic to fetch the Get current auth user endpoint. Similar to what we did for the authentication method, we need to create a model to decode the endpoint response. We are creating this one, that doesn't support all the attributes in the response, but it is enough for our purpose today:
struct UserResponse: Codable {
    let id: Int
    let firstName: String
    let lastName: String
    let maidenName: String
    let age: Int
    let gender: String
    let email: String
    let phone: String
    let username: String
    let password: String
    let birthDate: String
    let image: String
    let bloodGroup: String
    let height: Double
    let weight: Double
    let eyeColor: String
}
Now it's time to create our concrete implementation of our service, that we're calling UserService. It should conform with our NetworkService protocol:
final class UserService: NetworkService {
    var apiClient: JWTAPIClient

    init(apiClient: JWTAPIClient = DummyJSONAPIClient()) {
        self.apiClient = apiClient
    }
}
We can create functions for each user-related endpoint we want to fetch in our API inside this class. Let's create one in an extension, for code organization purposes:
// MARK: Endpoints
extension UserService {
    func currentUser(completion: @escaping (Result<UserResponse, Error>) -> Void) -> URLSessionTask{
        let endpoint = GetCurrentUserEndpoint()

        let task = apiClient.request(from: endpoint) { [weak self] result in
            // Completion implementation here
        }

        return task
    }
}
I'll break up the code above now:
- A
GetCurrentUserEndpointobject is created - The API client
request(from:)function is called passing the desired endpoint, storing locally theURLSessionTaskthat it creates - The task is returned to be handled for who is calling it
We can create other functions inside services very similar to this one, just changing the endpoint object we are passing to the request(from:) function, to make requests to any endpoint in our API.
The request(from:) function calls the completion handler with some Data received from the web service, and we need to decode it to our UserResponse. Let's create a function to it:
// MARK: Decoding
extension UserService {
    private func decodeUser(from data: Data) -> UserResponse? {
        do {
            let decoder = JSONDecoder()

            /*
            You can add here specific rules to your decoder if needed,
            such as date/time format
            */

            return try decoder.decode(UserResponse.self, from: data)
        } catch {
            print("Failed to decode user: \(error)")
            return nil
        }
    }
}
Let's now implement the response handling of our call, just replacing // Completion implementation here in the currentUser() function with:
switch result {

case .success(let data):
    // TODO: Handle error
    guard let self else { return }

    // TODO: Handle error
    guard let data else { return }

    // TODO: Handle error
    guard let userResponse = self.decodeUser(from: data) else { return }

    completion(.success(userResponse))

case .failure(let error):
    completion(.failure(error))
}
We have now all the needed code to retrieve the data of the current authenticated user.
Error Handling
It's very important to create strategies for when requests fail. Especially in mobile apps, where connectivity can be more unstable.
Our first step will be creating a custom enum for possible errors that we may face. Let's use this one for now:
enum NetworkError: Error {
    case dataTaskError(Error)
    case systemError(String)
    case emptyData
    case decodingError(String)
    case httpError(Int)
}
Just scanning our current project and enumerating the TODOs it was possible to identify these failing situations. Note that some cases receives an argument, with details about the issue.
Let's refactor our current code to make our Network Layer throw the desired errors. First, we'll update the JWTAPIClient, changing the Result types:
protocol JWTAPIClient {
    var baseURL: URL { get }
    var jwt: String? { get }

    // Replaced here "Error" with "NetworkError"
    func auth(with credentials: Credentials, completion: @escaping (Result<Void, NetworkError>) -> Void) -> URLSessionTask

    // Replaced here "Error" with "NetworkError"
    func request(from endpoint: Endpoint, completion: @escaping (Result<Data?, NetworkError>) -> Void) -> URLSessionTask
}
Then, we'll do the same to the DummyJSONAPIClient class:
final class DummyJSONAPIClient: JWTAPIClient {
    // ...
    func auth(with credentials: Credentials, completion: @escaping (Result<Void, NetworkError>) -> Void) -> URLSessionTask {
        // ...
    }

    func request(from endpoint: any Endpoint, completion: @escaping (Result<Data?, NetworkError>) -> Void) -> URLSessionTask {
        // ...
    }
}
You should see some build errors now in the DummyJSONAPIClient class, since we are passing generic Error objects to the result completion that expects a concrete NetworkError. Let's fix that by passing a .dataTaskError in those places:
// Replace
completion(.failure(error))
// With
completion(.failure(.dataTaskError(error)))
We can now start replacing our TODOs with the properly error handling. Let's start in the DummyJSONAPIClient.auth function:
guard let data else {
    completion(.failure(.emptyData))

    return
}

guard let authResponse = try? JSONDecoder().decode(AuthResponse.self, from: data) else {
    completion(.failure(.decodingError("Failed to decode AuthResponse")))

    return
}
In the URLSession.shared.dataTask(with:) completion handler, we receive three parameters, data, response and error, but so far we used only the first and the last one. The response parameter is important to receive metadata about the network call, such as errors on server-side. If an error occur inside the API, the error attribute returns nil, so we need to check for this kind of issues in the response object. A very simple way to check it is validating the HTTP Response Code. The HTTP protocol defines that any code between 200 and 299 is considered success, so we can have a very basic error handling strategy by doing this:
guard let httpResponse = response as? HTTPURLResponse else {
    completion(.failure(.systemError("Response is not a HTTPURLResponse")))
    return
}

guard 200..<299 ~= httpResponse.statusCode else {
    completion(.failure(.httpError(httpResponse.statusCode)))
    return
}
Adding this piece of code above in both auth and request functions of the DummyJSONAPIClient class is enough for a simple validation.
We also have other 3 TODOs in the UserService.currentUser. Let's address them:
// Replaced here `Error` with `NetworkError`
func currentUser(completion: @escaping (Result<UserResponse, NetworkError>) -> Void) -> URLSessionTask{

    // ...

    guard let self else {
        completion(.failure(.systemError("Nil self in UserService.currentUser")))

        return
    }

    guard let data else {
        completion(.failure(.emptyData))

        return
    }

    guard let userResponse = self.decodeUser(from: data) else {
        completion(.failure(.decodingError("Failed to decode UserResponse")))

        return
    }

    // ...

}
Now our Network Layer responds with specific errors when it fails, allowing the client code to behave properly (display a friendly message to the user, and also log the reason of the failing, helping with debugging, for example).
Cancellation
Our Network Layer now allows us to cancel pending requests in order to save resources consumption. Imagine for example that a request starts in the Home screen, but before it finishes the user taps in a button that redirects him to the Settings screen. That network call is not needed anymore, so we can cancel it, since we receive the URLSessionTask object. This is an hypothetical piece of code doing it:
class HomeViewController: UIViewController {

    var userRequestTask: URLSessionTask? = nil

    func getUser() {
        let apiClient = DummyJSONAPIClient()
        let userService = UserService(apiClient: apiClient)

        userRequestTask = userService.currentUser { [weak self] result in
            // ...
        }
    }

    override func viewWillDisappear(_ animated: Bool) {
        super.viewWillDisappear(animated)

        // Cancelling a possible request since the user is leaving the page
        userRequestTask?.cancel()
    }
}
Testing
We can write some Unit Tests to verify that our Network Layer is properly working. Let's see an example with Swift Testing that tests our authentication logic:
import Foundation
import Testing

@testable import URLSessionNetworkLayer

@Test("Test that calling the auth endpoint stores the JWT") func testAuth() async throws {
    let apiClient = DummyJSONAPIClient()
    let credentials = Credentials(username: "emilys", password: "emilyspass")

    await withCheckedContinuation { continuation in
        let _ = apiClient.auth(with: credentials) { result in
            if case .success = result {
                #expect(apiClient.jwt != nil)
            } else {
                Issue.record("Authentication Failed")
            }

            continuation.resume()
        }
    }
}
If you're not familiar with Swift Testing, I wrote a post detailing it here: Introduction to Swift Testing: Apple's New Testing Framework
Here we create a DummyJSONAPIClient object, a Credentials object with valid values, and then we call the auth function, checking if the jwt token is stored correctly.
🚨 Note: At the moment that I write this post, there's an open issue in Swift Testing about recording test errors in detached tasks, as we're doing. There's nothing wrong with the piece of code above, but you can face crashes in CI/CD environment that runs tests if a test fail.
It's also possible test if the request that requires authentication is working as expected:
@Test("Test that fetching current user before authentication returns error") func testCurrentUserBeforeAuth() async throws {
    let apiClient = DummyJSONAPIClient()

    let userService = UserService(apiClient: apiClient)
    await withCheckedContinuation { continuation in
        // Fetching the current user before authenticating
        let _ = userService.currentUser { result in
            guard case let .failure(error) = result else {
                Issue.record("Network call unexpectedly succeeded")
                continuation.resume()
                return
            }

            guard case let .httpError(statusCode) = error else {
                Issue.record("Network call failed with an unexpected error: \(error)")
                continuation.resume()
                return
            }

            // Checking if the response is "Unauthorized"
            #expect(statusCode == 401)

            continuation.resume()
        }
    }

}

@Test("Test that fetching current user after authentication returns the user")
func testCurrentUserAfterAuth() async throws {
    let apiClient = DummyJSONAPIClient()
    let credentials = Credentials(username: "emilys", password: "emilyspass")

    // Authenticating first
    await withCheckedContinuation { continuation in
        let _ = apiClient.auth(with: credentials) { result in
            guard case .success = result else {
                Issue.record("Authentication Failed")
                continuation.resume()
                return
            }

            continuation.resume()
        }
    }

    let userService = UserService(apiClient: apiClient)
    await withCheckedContinuation { continuation in
        // Fetching the current user after being authenticated
        let _ = userService.currentUser { result in
            guard case .success(let user) = result else {
                Issue.record("Network call failed")
                continuation.resume()
                return
            }

            #expect(user.id == 1)
            #expect(user.firstName == "Emily")
            continuation.resume()
        }
    }
}
Those tests above will guarantee that our Network Layer is still working after changes that we implement, and also are a good tool to test our implementation without needing to launching the app itself.
Additional Resources
You can find the complete project we just created in this repo: url-session-network-layer. Feel free to suggest changes or contribute!
Conclusion
Building a robust network layer with URLSession in Swift is a great way to handle complex networking requirements while keeping your code modular, maintainable, and testable. By abstracting network logic into dedicated components—such as an API client, endpoint models, and service layers—we ensure that our business logic remains clean and decoupled from networking concerns.
Key takeaways from this implementation:
- Thread management – Ensuring UI updates happen on the main thread while network calls run in the background.
- Authentication handling – Storing and reusing tokens for secure API calls.
- Error handling – Providing meaningful feedback when requests fail.
- Cancellation support – Allowing pending requests to be canceled to save resources.
- Testability – Writing unit tests to verify networking logic works as expected.
While third-party libraries like Alamofire or Moya can simplify networking, understanding how to build a custom solution with URLSession gives you full control and avoids external dependencies. This approach is especially useful in performance-critical apps or when working in environments where third-party code is restricted.
You can find the complete project on GitHub: url-session-network-layer. Feel free to explore, fork, or contribute!
Have you built a custom network layer before? What challenges did you face? Let’s discuss in the comments!