This is a submission for the Pulumi Deploy and Document Challenge: Fast Static Website Deployment
What I Built
I built and deployed Ticaz Bags & Luggage, a sleek and modern static e-commerce website where users can browse and shop for stylish bags and durable luggage. The website features clean UI, responsive design, and smooth navigation, all tailored to create an enjoyable online shopping experience.
To bring this project to life, I used Pulumi to set up the entire cloud infrastructure on AWS from scratch. This includes:
- An S3 bucket for hosting the static build
- A CloudFront distribution for fast and secure global content delivery
- Proper IAM roles and bucket policies for access control and caching
- A well-structured Pulumi stack for consistent, repeatable deployments All of which are fully-managed by Pulumi
The site was developed using React, Vite, and Tailwind CSS, offering fast performance and responsive design.
This project was both a dev and DevOps learning experience, combining frontend polish with cloud-native deployment!
In this post, I’ll walk you through my journey and how you, too, can deploy a static website to AWS using Pulumi as Infrastructure as Code (IaC).
Live Demo Link
Access the live site via the CDN link below:
-> https://dyk9aqch11ytc.cloudfront.net/
Project Repo
🔗 GitHub – Ticaz Bags & Luggage
The repo includes the full frontend source code and the Pulumi configuration used to deploy it. The README includes setup instructions and deployment steps.
My Journey
Before this challenge, I already had the Ticaz Bags & Luggage website built, but it hadn’t yet been deployed to AWS. I discovered the Pulumi Static Website Template for AWS and followed the guide to get everything deployed smoothly.
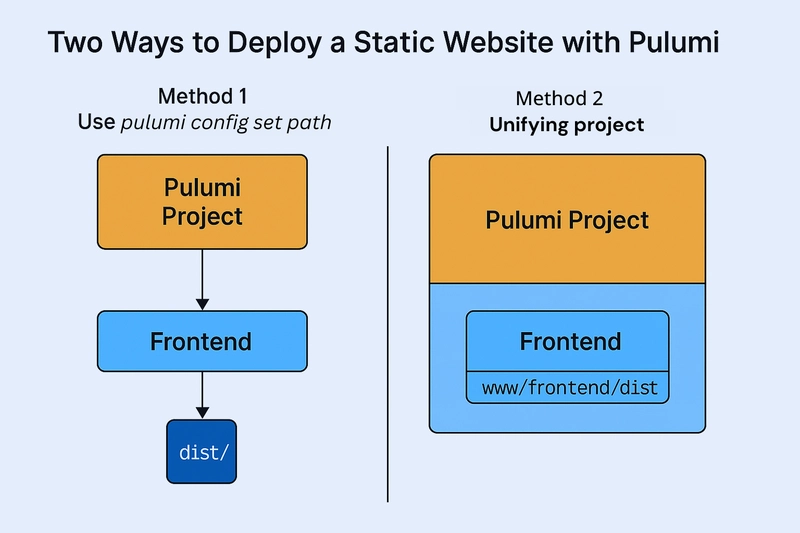
Along the way, I learned that there are two main ways to connect your static build to your Pulumi project:
✅ Option 1: Use pulumi config set path via CLI
This method lets you set the path to your static build folder (like dist/) using the CLI. For example:
pulumi config set path /home/user/Documents/codes/frontend/dist💡 In my case, I first ran
npm run buildinside the frontend project, which generated the/distfolder.
This command updates your Pulumi. file, and Pulumi uses that path when deploying to S3.
It’s quick and easy, but note that your frontend code stays outside the Pulumi project. So while your build is deployed, your local project structure remains disconnected.
✅ Option 2: Move the frontend into your Pulumi project
With this approach, I moved the built frontend folder into the Pulumi project directory (e.g., www/frontend/dist) and manually edited the Pulumi YAML config like this:
:path: www/frontend/distThis allowed me to keep my infrastructure and app code together, making it easier to maintain and understand everything in one place.
🧠My Decision
I tested both approaches, and while they both worked, I ultimately chose the second method. Here's why:
- I had better control over the deployment
- My infrastructure and frontend code lived together in one repo
- I could track everything more cleanly with version control
It gave me a clearer understanding of how Pulumi interacts with the application build and made debugging and updating easier going forward.

Using Pulumi
Pulumi made the deployment process seamless, structured, and developer-friendly. I didn’t have to worry about manually setting up S3 buckets, configuring IAM permissions, or writing extensive boilerplate IaC code from scratch.
Here’s how I used Pulumi in this project:
Infrastructure as Code: I provisioned AWS resources like S3 and CloudFront using Pulumi’s TypeScript SDK. Everything was version-controlled and easy to manage.
Simple Configuration: My main task was linking the application’s build folder (the
/distdirectory) to the Pulumi project. Once connected, Pulumi handled the rest—uploading the files, configuring the CDN, and setting proper access.Automation: With just one command (
pulumi up), I could deploy changes, test updates, or even roll backpulumi cancelwhen needed—no AWS Console clicking required.
Conclusion: Pulumi enabled me to streamline deployment without getting entangled in low-level infrastructure tasks. It’s a powerful tool for full-stack and solo developers who want to manage cloud infrastructure with familiar programming languages and clean, version-controlled code.
