
I will be posting my daily learning’s in this playlist so that everything can be covered while I apply for interviews in any companies in the future .
I will be posting daily contents of my learning .
Day 1 - Docker Introduction
What is a container ?
A container is a standard unit of software that packages up code and all its dependencies so the application runs quickly and reliably from one computing environment to another. A Docker container image is a lightweight, standalone, executable package of software that includes everything needed to run an application: code, runtime, system tools, system libraries and settings.
Ok, let me make it easy !!!
A container is a bundle of Application, Application libraries required to run your application and the minimum system dependencies.
Containers vs Virtual Machine
Containers and virtual machines are both technologies used to isolate applications and their dependencies, but they have some key differences:
Resource Utilization: Containers share the host operating system kernel, making them lighter and faster than VMs. VMs have a full-fledged OS and hypervisor, making them more resource-intensive.
Portability: Containers are designed to be portable and can run on any system with a compatible host operating system. VMs are less portable as they need a compatible hypervisor to run.
Security: VMs provide a higher level of security as each VM has its own operating system and can be isolated from the host and other VMs. Containers provide less isolation, as they share the host operating system.
Management: Managing containers is typically easier than managing VMs, as containers are designed to be lightweight and fast-moving.
Why are containers light weight ?
Containers are lightweight because they use a technology called containerization, which allows them to share the host operating system's kernel and libraries, while still providing isolation for the application and its dependencies. This results in a smaller footprint compared to traditional virtual machines, as the containers do not need to include a full operating system. Additionally, Docker containers are designed to be minimal, only including what is necessary for the application to run, further reducing their size.
Let's try to understand this with an example:
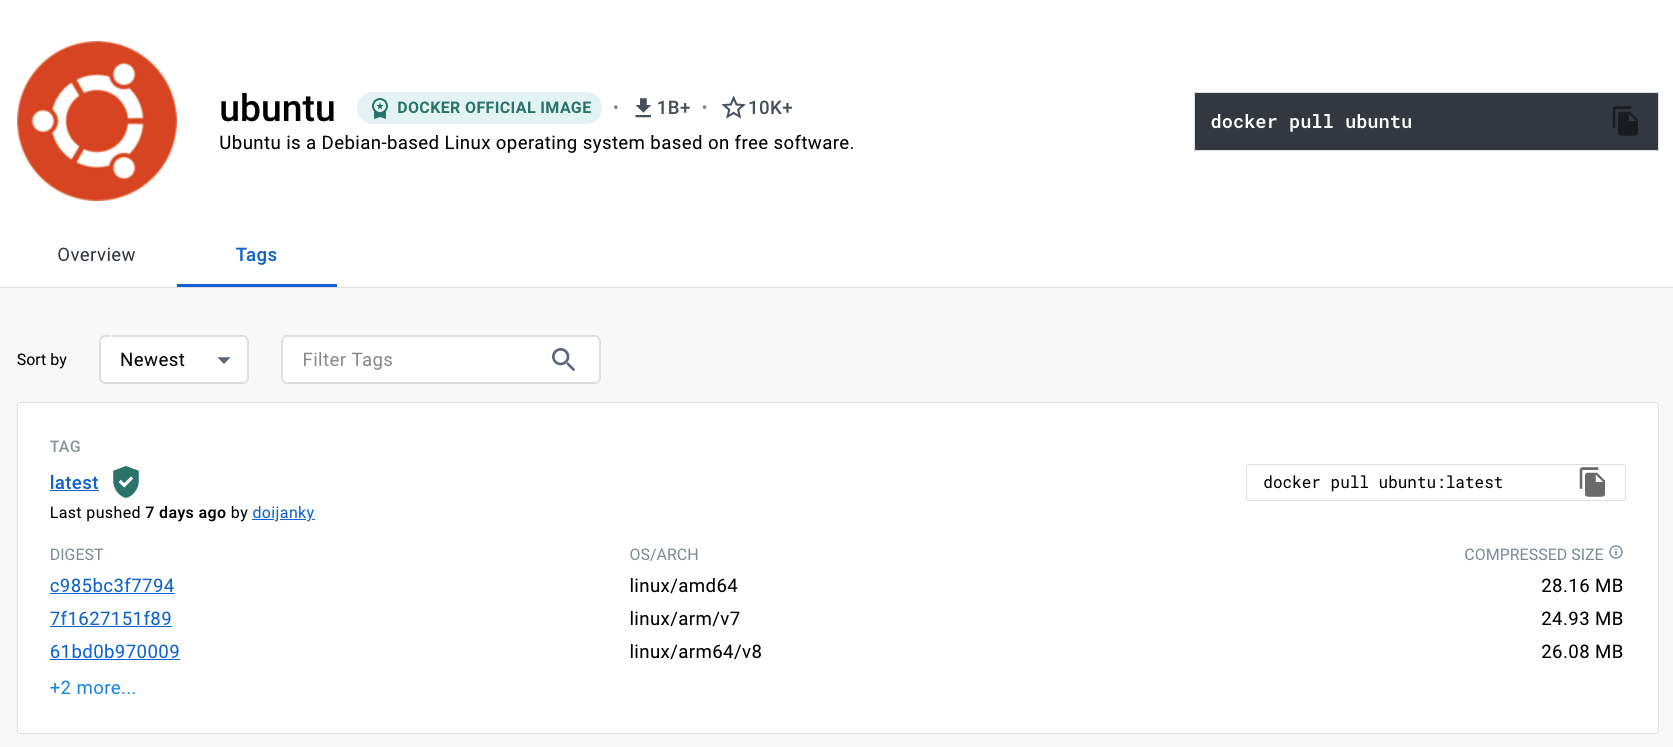
Below is the screenshot of official ubuntu base image which you can use for your container. It's just ~ 22 MB, isn't it very small ? on a contrary if you look at official ubuntu VM image it will be close to ~ 2.3 GB. So the container base image is almost 100 times less than VM image.
To provide a better picture of files and folders that containers base images have and files and folders that containers use from host operating system (not 100 percent accurate -> varies from base image to base image). Refer below.
Files and Folders in containers base images
/bin: contains binary executable files, such as the ls, cp, and ps commands.

/sbin: contains system binary executable files, such as the init and shutdown commands.

/etc: contains configuration files for various system services.

/lib: contains library files that are used by the binary executables.

/usr: contains user-related files and utilities, such as applications, libraries, and documentation.

/var: contains variable data, such as log files, spool files, and temporary files.

/root: is the home directory of the root user.
Files and Folders that containers use from host operating system
The host's file system: Docker containers can access the host file system using bind mounts, which allow the container to read and write files in the host file system.

Networking stack: The host's networking stack is used to provide network connectivity to the container. Docker containers can be connected to the host's network directly or through a virtual network.

System calls: The host's kernel handles system calls from the container, which is how the container accesses the host's resources, such as CPU, memory, and I/O.

Namespaces: Docker containers use Linux namespaces to create isolated environments for the container's processes. Namespaces provide isolation for resources such as the file system, process ID, and network.

Control groups (cgroups): Docker containers use cgroups to limit and control the amount of resources, such as CPU, memory, and I/O, that a container can access.
It's important to note that while a container uses resources from the host operating system, it is still isolated from the host and other containers, so changes to the container do not affect the host or other containers.
Note: There are multiple ways to reduce your VM image size as well, but I am just talking about the default for easy comparision and understanding.
so, in a nutshell, container base images are typically smaller compared to VM images because they are designed to be minimalist and only contain the necessary components for running a specific application or service. VMs, on the other hand, emulate an entire operating system, including all its libraries, utilities, and system files, resulting in a much larger size.
I hope it is now very clear why containers are light weight in nature.
Docker
What is Docker ?
Docker is a containerization platform that provides easy way to containerize your applications, which means, using Docker you can build container images, run the images to create containers and also push these containers to container regestries such as DockerHub, Quay.io and so on.
In simple words, you can understand as containerization is a concept or technology and Docker Implements Containerization.
Docker Architecture ?
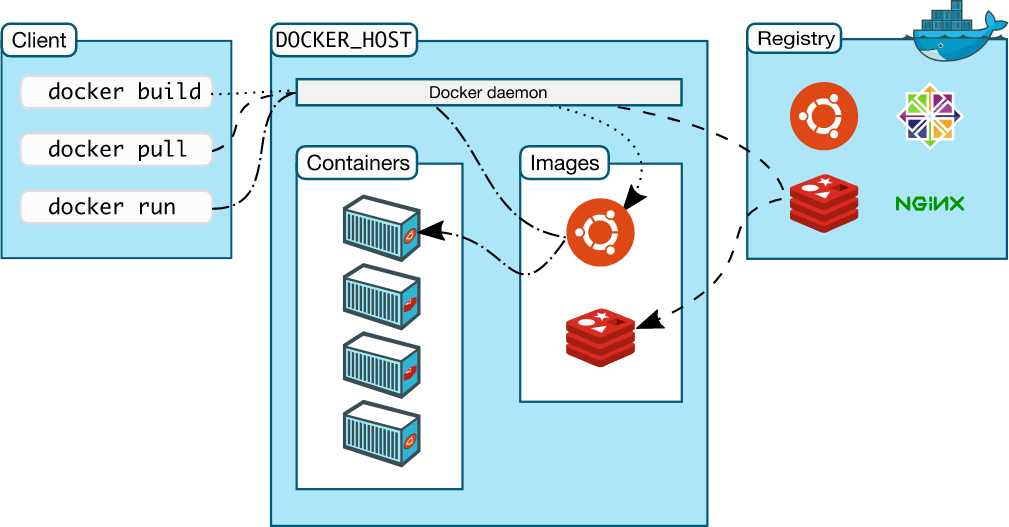
The above picture, clearly indicates that Docker Deamon is brain of Docker. If Docker Deamon is killed, stops working for some reasons, Docker is brain dead :p (sarcasm intended).
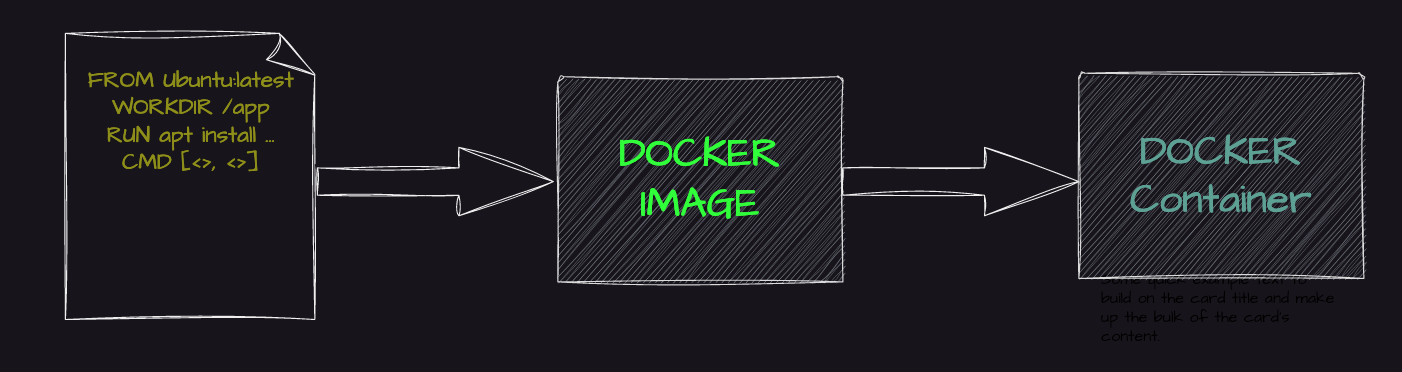
Docker LifeCycle
We can use the above Image as reference to understand the lifecycle of Docker.
There are three important things,
docker build -> builds docker images from Dockerfile
docker run -> runs container from docker images
docker push -> push the container image to public/private regestries to share the docker images
.
Understanding the terminology (Inspired from Docker Docs)
Docker daemon
The Docker daemon (dockerd) listens for Docker API requests and manages Docker objects such as images, containers, networks, and volumes. A daemon can also communicate with other daemons to manage Docker services.
Docker client
The Docker client (docker) is the primary way that many Docker users interact with Docker. When you use commands such as docker run, the client sends these commands to dockerd, which carries them out. The docker command uses the Docker API. The Docker client can communicate with more than one daemon.
Docker Desktop
Docker Desktop is an easy-to-install application for your Mac, Windows or Linux environment that enables you to build and share containerized applications and microservices. Docker Desktop includes the Docker daemon (dockerd), the Docker client (docker), Docker Compose, Docker Content Trust, Kubernetes, and Credential Helper. For more information, see Docker Desktop.
Docker registries
A Docker registry stores Docker images. Docker Hub is a public registry that anyone can use, and Docker is configured to look for images on Docker Hub by default. You can even run your own private registry.
When you use the docker pull or docker run commands, the required images are pulled from your configured registry. When you use the docker push command, your image is pushed to your configured registry. Docker objects
When you use Docker, you are creating and using images, containers, networks, volumes, plugins, and other objects. This section is a brief overview of some of those objects.
Dockerfile
Dockerfile is a file where you provide the steps to build your Docker Image.
Images
An image is a read-only template with instructions for creating a Docker container. Often, an image is based on another image, with some additional customization. For example, you may build an image which is based on the ubuntu image, but installs the Apache web server and your application, as well as the configuration details needed to make your application run.
You might create your own images or you might only use those created by others and published in a registry. To build your own image, you create a Dockerfile with a simple syntax for defining the steps needed to create the image and run it. Each instruction in a Dockerfile creates a layer in the image. When you change the Dockerfile and rebuild the image, only those layers which have changed are rebuilt. This is part of what makes images so lightweight, small, and fast, when compared to other virtualization technologies.
—————————————————————————————————
Day 2 - Docker Commands Widely Used
docker info - Gives information about the number of containers and images that the current machine is managing as well the plugins currently installed .
docker images - list informations of the images that are available on the machine ( name , ID , space it occupies , and the time elapsed since it was created ).
3.docker build - creates an image from the docker file of the current directory .
docker pull : - downloads the indicated image version to the current machine . If the download version is not indicated , all available versions are downloaded .
docker push : - uploads the version of the indicated image to a Docker registry , allowing its distribution to other machines .
docker rmi : - Deletes an image on the current machine .
docker run : - Creates a container from an image. This command allows a multitude of parameters , which are updated for each version of the Docker Engine .
docker ps - Shows the containers that are running on the machine . With the “-a” flag , it shows the containers that are stopped .
9.docker inspect container - shows detailed information of a container in JSON format . You can access a particular field with the “ docker inspect -f ‘{{.Name}}’ container “ command .
docker stop : For the execution of a container .
docker start : Resumes the execution of a container .
docker rm : Deletes a container . You can execute the docker rm -fv $(docker ps -aq) command to delete all the containers of a machine .
docker logs - Shows the logs of a container .
docker stats - Shows the execution statistics of a container such as the memory used , the CPU , and the disk .
docker exec - Executes a command in a container . It is useful to debug containers in execution with the command “ docker exec -it container bash “
docker volume ls - Lists the existing volume on the machine / Run docker volume -help for a complete list of commands related to volumes .
docker network ls - Lists the existing networks on the machine . Run docker network -help for a complete list of commands related to networks
docker cp - Copies file between the hosts and the container .
————————————————————————————————-
*Day 3 - Managing Containers and Docker Images *
Docker images are read only templates that we can use as a basis for launching containers . This means what we do in the container only persists in that container , and we do not make these modifications in the image . We must create a custom image for our future containers if we want to have one .
An image is a permanently stored instance of a container . The docker images command shows you the image on your system . We can assign multiple aliases (including names and tags) to the same image whenever it is useful .
$ docker images
Here are some of the main commands we can perform on a container such:
• docker ps - allows you to see containers in execution .
• docker ps —a -> allows you to see saved containers that are no longer in execution.
• docker [start | stop] - Let you start and stop the container execution.
Docker Layers
Docker layers are like Git confirmations and store the difference between the previous and current version of the image . And like Git commits , they are useful if you share them with other repositories.
Layers use space and the more layers you have ,the thicker the final image will be . We can see the layers of an image with the following command . In this example , we are getting layers from an Ubuntu image :
$ docker image history :
$ docker image history ubuntu:latest
*Image Tags *
Image tags allows you to identify the versions of the image . For example , let us take for Ubuntu OS , we have
• 18.04 , bionic-20210222, bionic
• 20.04 , focal-20210222, focal , latest
• 20.10 , groovy-20210225, groovy ,rolling
• 21.04 , hirsute-20210119 , hirsute , devel
• 14.04 , trusty-20191217, trusty
• 16.04 , denial -20210114,denial
We can download a specific tag image with the “docker pull “ command . We are downloading a specific version for Ubuntu operating system with the following command:
$ docker image pull Ubuntu:18.04
$ docker image pull Ubuntu:21.04
*What is a Dockerfile ? *
A Dockerfile is a text document that contains all the commands we want to execute on the command line to build an image . The image will be created using the “docker build” command that will follow the instructions .
The Docker engine executes the instructions one by one independently during the construction of the image .A layer is created for each instruction that allows them to be reused if they are cached , significantly speeding up the construction process .
*Building Images from Dockerfile *
The docker build commands builds an image following the instructions of Dockerfile that can be found in the current directory or a repository .
Instruction Description
• FROM -> Defines a base for your image.
• RUN -> Executes any commands in a new layer on top of the current image and commits the result. RUN also has a shell form for running commands.
• WORKDIR -> Sets the working directory for any RUN, CMD, ENTRYPOINT, COPY, and ADD instructions that follow it in the Dockerfile.
• COPY -> Copies new files or directories from and adds them to the filesystem of the container at the path .
• CMD -> Lets you define the default program that is run once you start the container based on this image. Each Dockerfile only has one CMD, and only the last CMD instance is respected when multiple exist.
• ENTRYPOINT -> Allows you to configure a container as executable , usually with the process that we want it to expose .
Let us write an example of a Dockerfile
syntax=docker/dockerfile:1
FROM ubuntu:22.04
install app dependencies
RUN apt-get update && apt-get install -y python3 python3-pip
RUN pip install flask==3.0.*
install app
COPY hello.py /
final configuration
ENV FLASK_APP=hello
EXPOSE 8000
CMD ["flask", "run", "--host", "0.0.0.0", "--port", "8000"]
Now let me explain all the steps individually
• The FROM instruction sets your base image to the 22.04 release of Ubuntu. All instructions that follow are executed in this base image: an Ubuntu environment. The notation ubuntu:22.04, follows the name:tag standard for naming Docker images. When you build images, you use this notation to name your images. There are many public images you can leverage in your projects, by importing them into your build steps using the Dockerfile FROM instruction.
• This RUN instruction executes a shell in Ubuntu that updates the APT package index and installs Python tools in the container.
The second RUN instruction installs the flask dependency required by the Python application.
RUN pip install flask==3.0.*
A prerequisite for this instruction is that pip is installed into the build container. The first RUN command installs pip, which ensures that we can use the command to install the flask web framework.
The next instruction uses the COPY instruction to copy the hello.py file from the local build context into the root directory of our image.
• COPY hello.py /
A build context is the set of files that you can access in Dockerfile instructions such as COPY and ADD.
After the COPY instruction, the hello.py file is added to the filesystem of the build container.
• Setting environment variables
If your application uses environment variables, you can set environment variables in your Docker build using the ENV instruction.
ENV FLASK_APP=hello
This sets a Linux environment variable we'll need later. Flask, the framework used in this example, uses this variable to start the application. Without this, flask wouldn't know where to find our application to be able to run it.
• Exposed ports
The EXPOSE instruction marks that our final image has a service listening on port 8000.
EXPOSE 8000
This instruction isn't required, but it is a good practice and helps tools and team members understand what this application is doing.
• Starting the application
Finally, CMD instruction sets the command that is run when the user starts a container based on this image.
CMD ["flask", "run", "--host", "0.0.0.0", "--port", "8000"]
This command starts the flask development server listening on all addresses on port 8000. The example here uses the "exec form" version of CMD. It's also possible to use the "shell form":
CMD flask run --host 0.0.0.0 --port 8000
There are subtle differences between these two versions, for example in how they trap signals like SIGTERM and SIGKILL.
Building
To build a container image using the Dockerfile example from the previous section, you use the docker build command:
$ docker build -t test:latest .
The -t test:latest option specifies the name and tag of the image.
The single dot (.) at the end of the command sets the build context to the current directory. This means that the build expects to find the Dockerfile and the hello.py file in the directory where the command is invoked. If those files aren't there, the build fails.
After the image has been built, you can run the application as a container with docker run, specifying the image name:
$ docker run -p 127.0.0.1:8000:8000 test:latest
This publishes the container's port 8000 to http://localhost:8000 on the Docker host.
The following example code shows a small "Hello World" application written in Python, using the Flask framework.
from flask import Flask
app = Flask(name)
@app.route("/")
def hello():
return "Hello World!"
Day 4 - Storage
By default all files created inside a container are stored in a writable container layer that sits on top of the read only , immutable image layers.
Data written to the container layer doesn’t persist when the container is destroyed . This means that it can be difficult to get the data out of the container if another process needs it . The writeable layer is unique per container . You can’t easily extract the data from the writeable layer to the host or to another container .
Storage mount options
Docker supports the following types of storage mounts for storing data outside of the writable layer of the container:
Volume mounts
Bind mounts
tmpfs mounts
Named pipes
No matter which type of mount you choose to use, the data looks the same from within the container. It is exposed as either a directory or an individual file in the container's filesystem.
Volume mounts
Volumes are persistent storage mechanisms managed by the Docker daemon. They retain data even after the containers using them are removed. Volume data is stored on the filesystem on the host, but in order to interact with the data in the volume, you must mount the volume to a container. Directly accessing or interacting with the volume data is unsupported, undefined behavior, and may result in the volume or its data breaking in unexpected ways.
Volumes are ideal for performance-critical data processing and long-term storage needs. Since the storage location is managed on the daemon host, volumes provide the same raw file performance as accessing the host filesystem directly.
Bind mounts
Bind mounts create a direct link between a host system path and a container, allowing access to files or directories stored anywhere on the host. Since they aren't isolated by Docker, both non-Docker processes on the host and container processes can modify the mounted files simultaneously.
Use bind mounts when you need to be able to access files from both the container and the host.
tmpfs mounts
A tmpfs mount stores files directly in the host machine's memory, ensuring the data is not written to disk. This storage is ephemeral: the data is lost when the container is stopped or restarted, or when the host is rebooted. tmpfs mounts do not persist data either on the Docker host or within the container's filesystem.
These mounts are suitable for scenarios requiring temporary, in-memory storage, such as caching intermediate data, handling sensitive information like credentials, or reducing disk I/O. Use tmpfs mounts only when the data does not need to persist beyond the current container session.
Named pipes
Named pipes can be used for communication between the Docker host and a container. Common use case is to run a third-party tool inside of a container and connect to the Docker Engine API using a named pipe.
VOLUMES
Volumes are persistent data stores for containers , created and managed by Docker . You can create a volume explicitly using the docker volume create command , or Docker can create a volume during container or service creation.
When you create a volume , it’s stored within the directory on the Docker host . When you mount the volume into a container , this directory is what’s mounted into the container .
*When to use volumes *
Volumes are the preferred mechanism for persisting data generated by and used by Docker containers. While bind mounts are dependent on the directory structure and OS of the host machine, volumes are completely managed by Docker. Volumes are a good choice for the following use cases:
Volumes are easier to back up or migrate than bind mounts.
You can manage volumes using Docker CLI commands or the Docker API.
Volumes work on both Linux and Windows containers.
Volumes can be more safely shared among multiple containers.
New volumes can have their content pre-populated by a container or build.
When your application requires high-performance I/O.
Volumes are not a good choice if you need to access the files from the host, as the volume is completely managed by Docker. Use bind mounts if you need to access files or directories from both containers and the host.
Volumes are often a better choice than writing data directly to a container, because a volume doesn't increase the size of the containers using it. Using a volume is also faster; writing into a container's writable layer requires a storage driver to manage the filesystem. The storage driver provides a union filesystem, using the Linux kernel. This extra abstraction reduces performance as compared to using volumes, which write directly to the host filesystem.
If your container generates non-persistent state data, consider using a tmpfs mount to avoid storing the data anywhere permanently, and to increase the container's performance by avoiding writing into the container's writable layer.
Volumes use rprivate (recursive private) bind propagation, and bind propagation isn't configurable for volumes.
A given volume can be mounted into multiple containers simultaneously. When no running container is using a volume, the volume is still available to Docker and isn't removed automatically. You can remove unused volumes using docker volume prune.