
Property management demands consistent communication with tenants about critical events such as move-out dates, maintenance requests and security deposit information.
This communication presents two significant challenges: ensuring only authorized individuals receive sensitive information and automating the notification process to eliminate manual work.
Manual notification systems break down at scale.
Sending individualized communications to dozens or hundreds of tenants creates an unsustainable workload for property managers. More critically, distributing sensitive information to unauthorized parties creates serious privacy violations and potential compliance issues.
Email services like Resend excel at message delivery but lack the authorization controls necessary for secure tenant communications.
Our solution combines Permit.io's robust authorization framework with Resend's efficient email delivery system in a NextJS application.
This integration automatically identifies upcoming tenant move-out dates, verifies user authorization based on their relationship to the property (tenant or co-signer) and delivers personalized emails containing only the appropriate information for each recipient.
Implementing relationship-based access control (ReBAC) ensures sensitive information reaches only authorized recipients, while the automation system eliminates manual tracking and communication overhead.
This approach scales efficiently across property portfolios of any size while maintaining security and compliance.
What We'll Build
Property managers transitioning tenants out of units need precise control over who receives what information.
Our system implements this control through a NextJS application that combines authorization logic with automated email delivery. The application validates tenant relationships at the property level, sending different notification types based on established permissions.
The heart of our system lies in the distinction between relationship types and content access.
Primary tenants receive comprehensive move-out instructions, including both procedural checklists and deposit information.
Co-signers, who bear financial responsibility but don't occupy the unit, receive only deposit-related communications. This separation happens automatically based on relationship definitions in Permit.io.
Our application will include:
- A property management dashboard displaying upcoming move-out dates
- A relationship-based permission model defining access rights for tenants and co-signers
- An automated notification system that detects approaching move-out dates
- Permission-enforced email generation that filters content based on recipient authorization
- A scheduled task system that runs the notification process without manual intervention
Prerequisites and Tech Stack
This project requires Node.js (v18+) and npm (v10+). You'll also need accounts with Permit.io and Resend to obtain API keys for authorization and email delivery.
Our application uses:
- Next.js with TypeScript
- Permit.io for authorization
- Resend for email delivery
- Docker for running the local Policy Decision Point
- ShadCN UI for the interface components
A basic understanding of React and TypeScript will help as we build this permission-driven notification system.
Planning Our Authorization Model
Before writing code, we need to design our authorization model. This crucial planning step establishes who can access what information in our system.
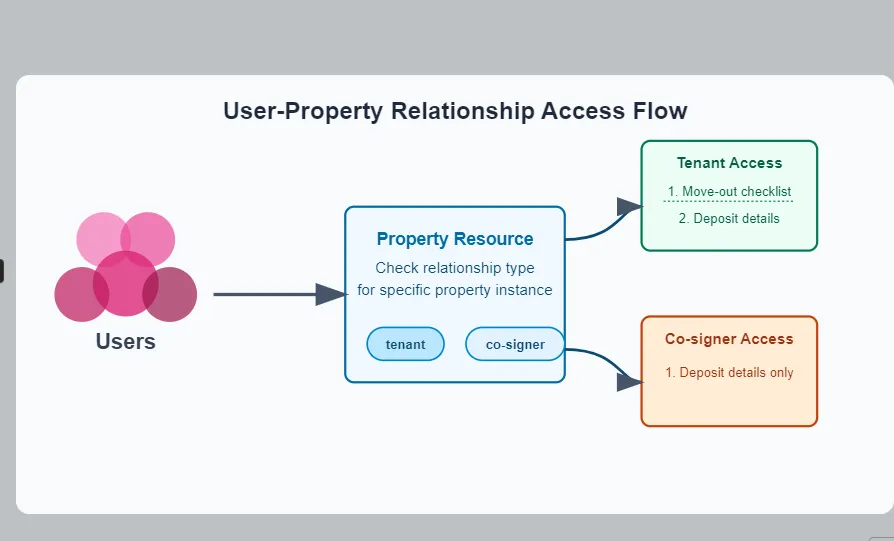
For property management, we'll implement a relationship-based access control (ReBAC) model that focuses on the connections between users and properties.
Our authorization model centers on a single resource type: Property.
Each property instance represents an individual rental unit with its own set of relationships. Rather than applying permissions globally, we'll define them at the instance level, allowing fine-grained control over who receives which notifications for each specific property.
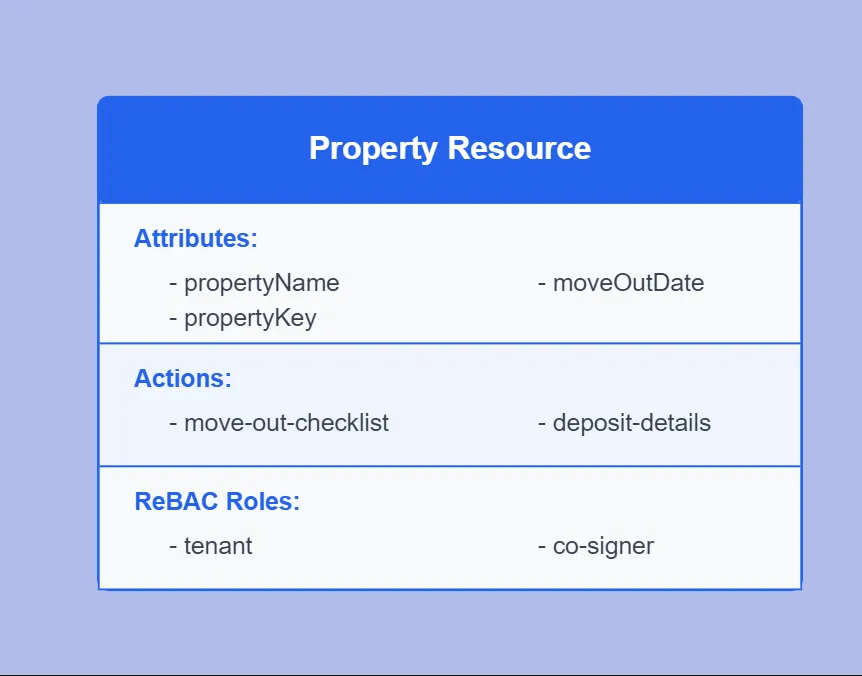
Two key relationship types exist in our model:
- Tenant: The primary renter who lives in the property
- Co-Signer: A financially responsible party who doesn't occupy the property
These relationships determine what information a user can access.
A tenant relationship grants access to both move-out checklists and deposit details.
A co-signer relationship grants access only to deposit details, reflecting their financial interest without operational involvement in the property.
Our system defines two distinct actions that require permission checks:
- move-out-checklist: Procedural information for vacating the property
- deposit-details: Financial information about security deposit handling
The permission matrix maps relationships to actions:
- Tenants can access both the move-out checklist and deposit details
- Co-signers can access only deposit details
This model reflects real-world authority structures while protecting sensitive information. When our notification system runs, it performs discrete permission checks for each content type and recipient, ensuring information boundaries remain intact.
Setting Up the Development Environment
Let's begin by creating a Next.js application with TypeScript support. This framework provides both frontend and API capabilities within a unified project structure:
npx create-next-app@latest manage-tenants --typescript
cd manage-tenants
Configuring Permit.io Resources and Permissions
Setting up Permit.io involves defining our authorization model, creating resources, and establishing permissions. Let's walk through this process step by step.
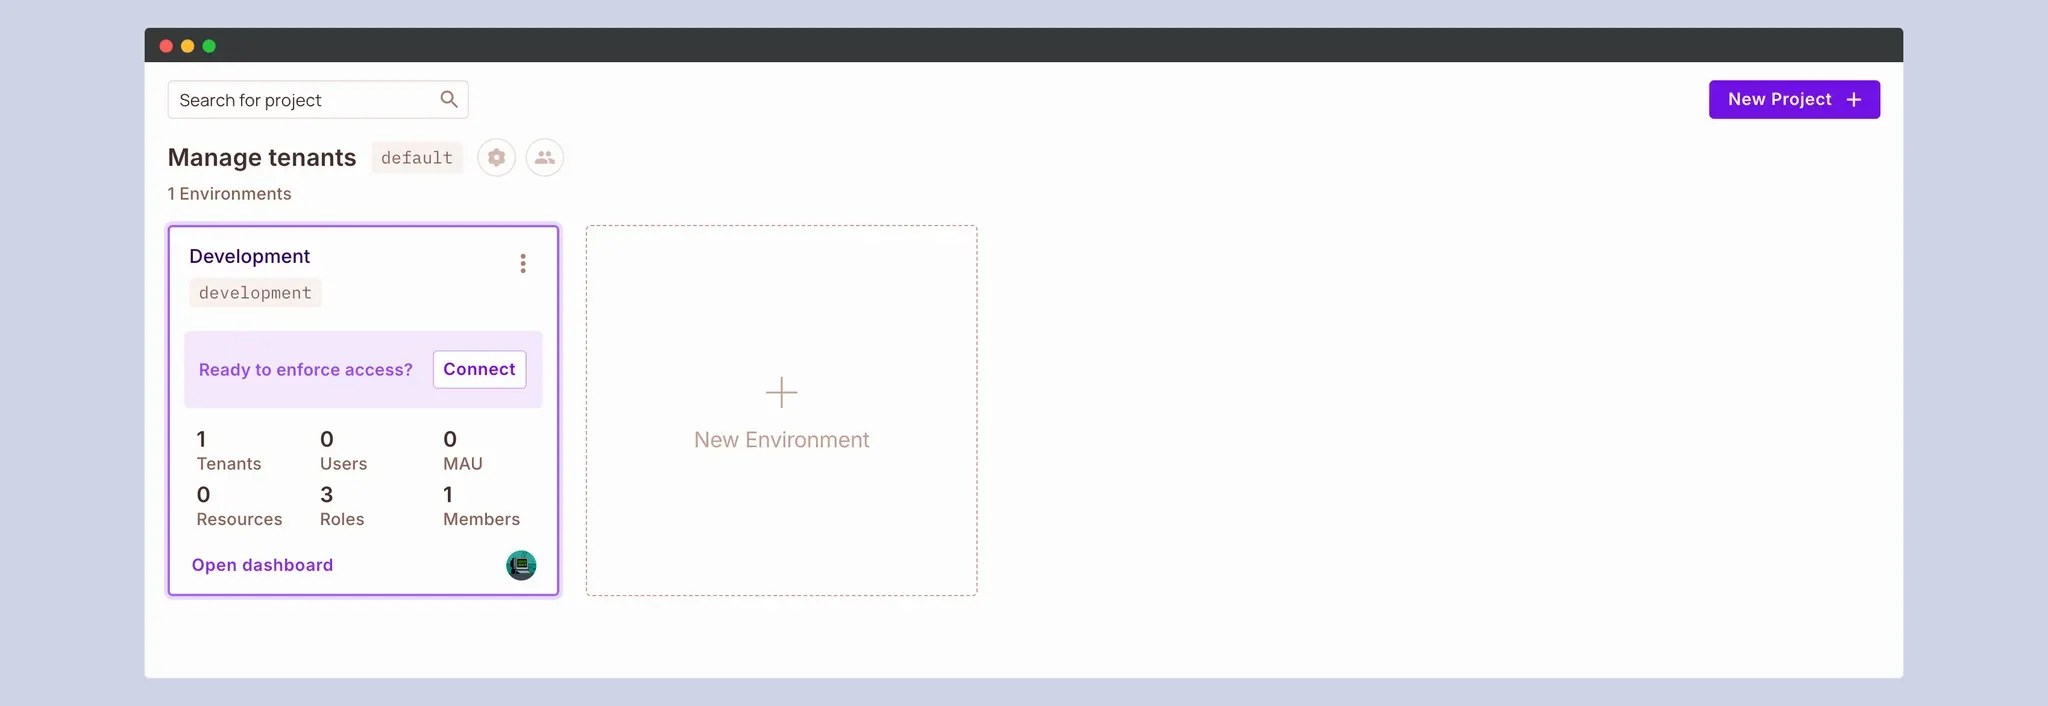
Step 1: Create a Permit.io Project
Begin by setting up your workspace in Permit.io:
- Create a new workspace for your organization
- Within the workspace, create a project called "Manage Tenants"
- Set up a "Development" environment for testing
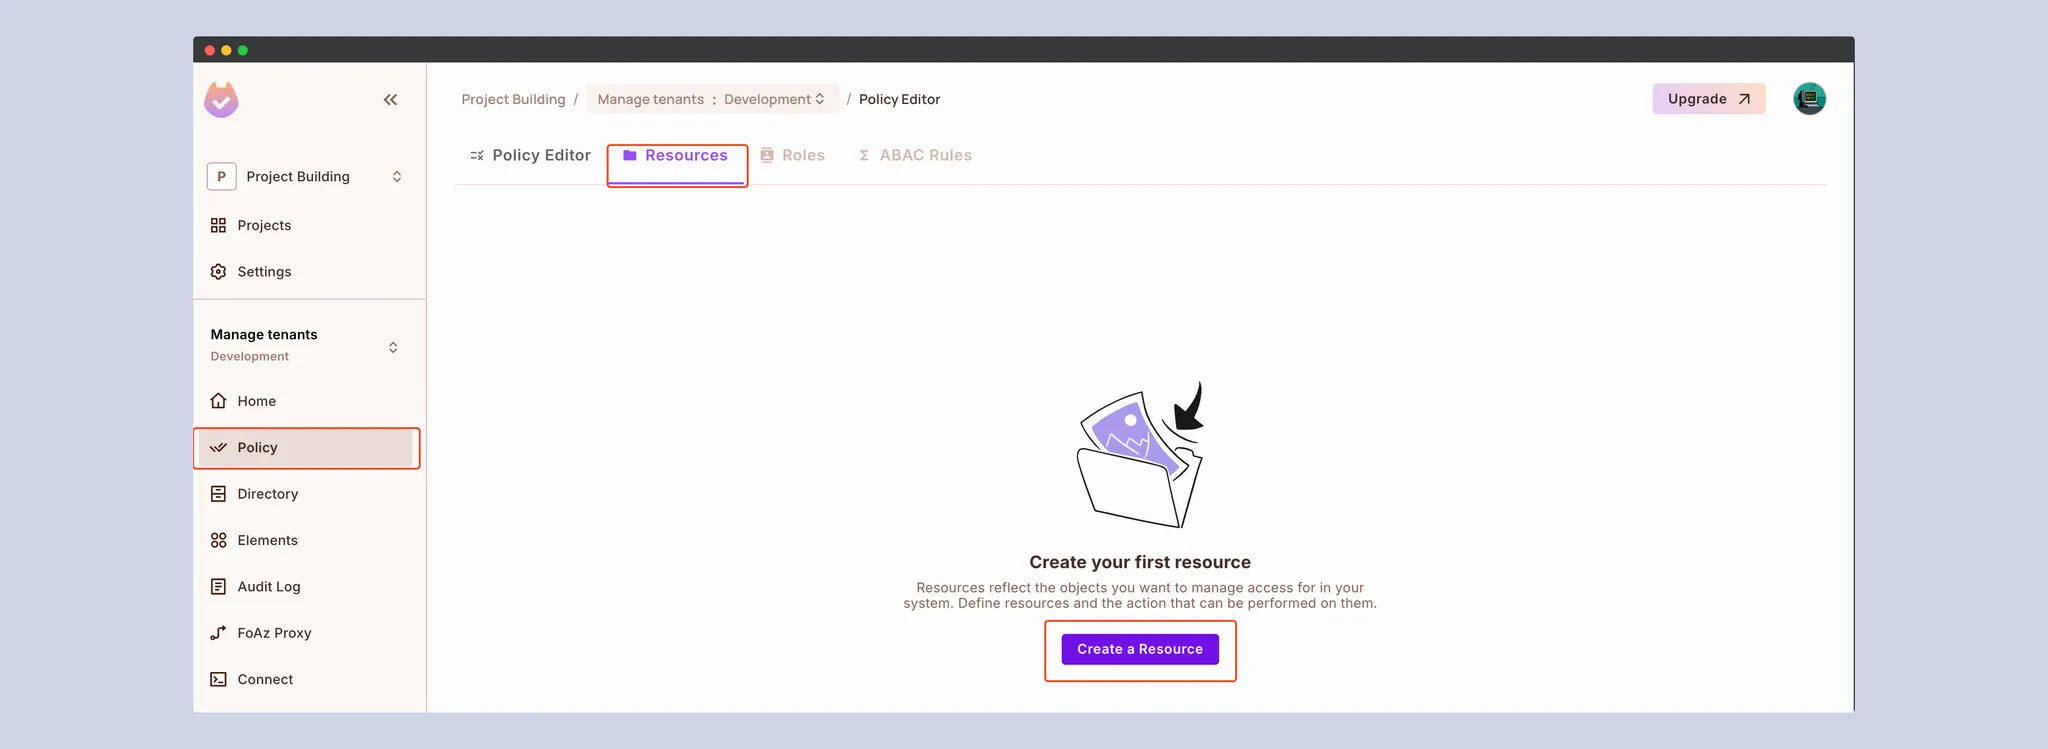
Step 2: Define the Property Resource
Next, configure the Property resource that represents rental units in our system:
- Navigate to Policy → Resources in the left sidebar
- Click "Add Resource" to open the configuration panel
- Set the following parameters:
- Name: Property
- Key: property
- Actions:
move-out-checklist,deposit-details - ReBAC Roles:
tenant,co-signer
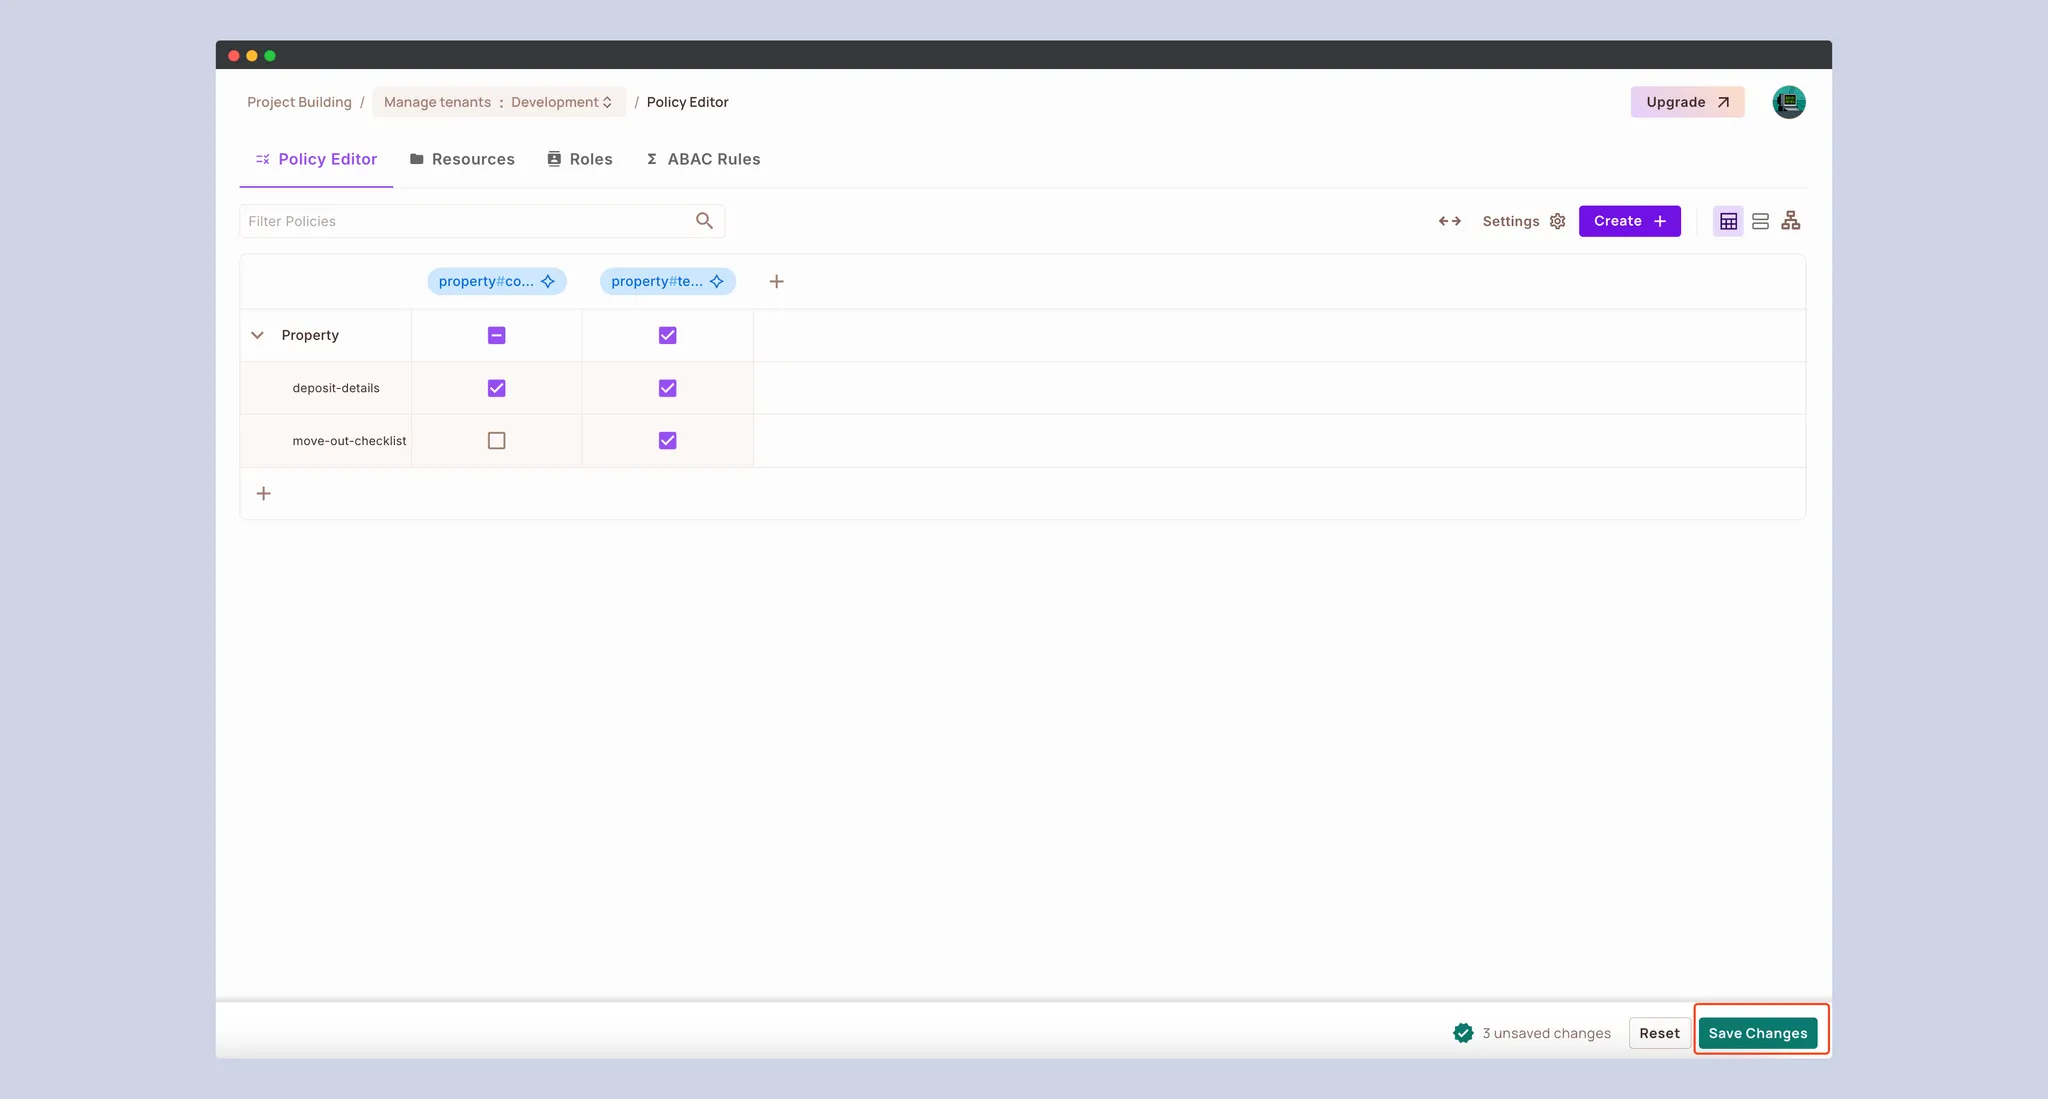
Step 3: Configure Permission Policies
With our resource defined, set up the permission rules:
- Go to the Policy Editor tab
- Grant the
tenantrole access to bothdeposit-detailsandmove-out-checklist - Grant the
co-signerrole access only todeposit-details
Step 4: Install the Permit.io SDK
Install the SDK in your Next.js project:
npm i permitioStep 5: Get API Credentials
Retrieve your API key from Permit.io:
- Navigate to Settings → API Keys in the dashboard
- Create a new API key and copy the secret value
- Add it to your environment variables in
.env.development.local:
PERMIT_API_KEY=permit_key_xxxxxxxxxxxxxStep 6: Run the Policy Decision Point (PDP)
Set up a local PDP for faster authorization decisions:
-
Create a
docker-compose.ymlfile in your project root:
version: '3' services: pdp-service: image: permitio/pdp-v2:latest ports: - "7766:7000" environment: - PDP_API_KEY=permit_key_xxxxxxxxx - PDP_DEBUG=True stdin_open: true tty: true -
Start the PDP service:
docker compose up -d
Step 7: Configure the Permit.io Client
Create a client for the SDK in lib/permitio.ts:
import { Permit } from 'permitio';

const pdpUrl = process.env.PDP_URL || 'http://localhost:7766';
const apiKey = process.env.PERMIT_API_KEY!;

export const PERMITIO_SDK = new Permit({
  token: apiKey,
  pdp: pdpUrl,
});
Building the Notification System
The notification system forms the core of our application, connecting our authorization model to email delivery. This system must determine which users should receive which types of information based on their relationship to each property.
Our notification logic performs three key operations: identifying properties with approaching move-out dates, checking user permissions for different notification types and sending authorized messages through Resend. These operations work together to ensure sensitive information reaches only appropriate recipients.
Let's create the server action that powers this functionality. Start by creating an app/actions.ts file to house our notification logic:
'use server';

import { PERMITIO_SDK } from '@/lib/permitio';
import { RESEND_SDK } from '@/lib/resend';
import { properties } from '@/properties';

export type PermissionType = 'move-out-checklist' | 'deposit-details';
export type Property = (typeof properties)[0];

const defaultAddress = ''; // Your test email for development
We define types for the permission checks and property data, establishing type safety throughout our application. The defaultAddress variable facilitates testing, as Resend initially limits sending to your verified email.
Next, we'll implement the permission checking mechanism:
const checkPermission = async (
  userKey: string,
  permissionType: PermissionType,
  resourceInstance: string
) => {
  const permission = await PERMITIO_SDK.check(
    userKey,
    permissionType,
    `property:${resourceInstance}`
  );

  return permission;
};
This function translates our authorization model into concrete permission checks. It queries the Permit.io SDK with three critical pieces of information: the user identifier (email), the action being performed, and the specific property instance. The response determines whether the user has access to that information type.
We need a function to identify properties with upcoming move-out dates:
const checkProperties = async () => {
  const properties = await getProperties();
  const today = new Date();
  const propertiesToNotify = [];

  for (const property of properties) {
    const moveOutDate = new Date(property.moveOutDate);
    const timeDiff = moveOutDate.getTime() - today.getTime();
    const dayDiff = timeDiff / (1000 * 3600 * 24);

    if (dayDiff < 1 && dayDiff >= 0) {
      propertiesToNotify.push(property);
    }
  }

  return propertiesToNotify;
};
This function calculates the time difference between today and each property's move-out date, identifying those within 24 hours. These properties trigger notifications to their associated users.
The core notification logic resides in the notifyUser function:
const notifyUser = async (
  property: Property,
  user: Property['coSigner'] | Property['tenant']
) => {
  // Email templates
  const moveOutChecklistTemplate = `
    Move Out Checklist
    Dear ${user.name},
    Please complete the move-out checklist for the property
      ${property.propertyName} before
      ${property.moveOutDate}.

    Thank you.
  `;

  const depositDetailsTemplate = `
    Deposit Details
    Dear ${user.name},
    Here are the deposit details for the property
      ${property.propertyName}.

    Thank you.
  `;

  // Permission checks for each notification type
  const hasMoveOutCheckListPermission = await checkPermission(
    user.email,
    'move-out-checklist',
    property.propertyKey
  );

  const hasDepositDetailsPermission = await checkPermission(
    user.email,
    'deposit-details',
    property.propertyKey
  );

  // Build emails based on permissions
  const emails = [];

  if (hasMoveOutCheckListPermission) {
    emails.push({
      from: 'Manage Tenants ',
      to: defaultAddress || user.email,
      subject: `Move Out Checklist for ${property.propertyName}`,
      html: moveOutChecklistTemplate,
    });
  }

  if (hasDepositDetailsPermission) {
    emails.push({
      from: 'Manage Tenants ',
      to: defaultAddress || user.email,
      subject: `Deposit Details for ${property.propertyName}`,
      html: depositDetailsTemplate,
    });
  }

  // Send emails in a batch
  if (emails.length) {
    const { data, error } = await RESEND_SDK.batch.send(emails);

    if (error) {
      console.error(error);
    } else {
      console.log('Emails sent:', data);
    }
  }
};
The permission checks happen before email composition. This ensures that unauthorized content never enters the message generation pipeline. This approach implements security at the content creation level rather than merely filtering messages afterward.
Finally, we export the main notification function that orchestrates the entire process:
export const notifyPropertyUsers = async () => {
  const properties = await checkProperties();

  for await (const property of properties) {
    await notifyUser(property, property.tenant);
    setTimeout(async () => {
      await notifyUser(property, property.coSigner);
    }, 2000);
  }
};
This function retrieves properties with upcoming move-out dates and triggers the notification process for each tenant and co-signer. The staggered sending using setTimeout prevents rate limiting issues with the email service. The batch sending approach improves efficiency by grouping authorized notifications into a single API call.
Creating the Automation Workflow
The final component of our system automates the notification process. Manual monitoring of move-out dates wastes valuable time and introduces human error risks. Our automation workflow uses scheduled tasks to identify properties with approaching move-out dates and trigger appropriate notifications without human intervention.
First, we need the node-cron package to handle scheduling:
npm i node-cron
npm i -D @types/node-cron
Node-cron provides pattern-based scheduling similar to Unix cron jobs, enabling precise control over when our notifications run. The scheduler supports various time patterns, allowing flexibility from minute-by-minute execution to specific days of the month.
Next, we'll create an API endpoint that triggers the notification task. This endpoint serves two purposes: starting the scheduled task when the application launches and providing a manual trigger for testing. Create app/api/cron/route.ts with the following implementation:
import { notifyPropertyUsers } from '@/app/actions';
import { NextResponse } from 'next/server';
import cron from 'node-cron';

export async function GET() {
  cron.schedule(
    '*/30 * * * *',  // Runs every 30 minutes
    async () => {
      await notifyPropertyUsers();
    },
    {
      name: 'notifyPropertyUsers',
    }
  );

  return NextResponse.json({
    message: 'Cron job started',
  });
}
The cron pattern */30 * * * * executes the task every 30 minutes. In production, you would adjust this pattern to match your notification requirements—perhaps once daily at midnight (0 0 * * *) for move-out reminders.
Our automation flow works through several stages:
- The scheduler triggers the
notifyPropertyUsersfunction based on the cron pattern. Thereby, monitoring upcoming move-out dates across the property portfolio - The function identifies properties with move-out dates in the next 24 hours. Thus, determining which notifications each user should receive
- For each property, the system checks permission-based access for both tenants and co-signers. As a result, compoing and sending individual emails to each recipient
- Authorized notifications generate and send automatically through Resend. Hence, enabling tracking which notifications have been sent.
To test the automation, update the app/page.tsx file to include a trigger button:
target="_blank"
  href="/api/cron"
  className="bg-white text-blue-600 py-2 px-4 rounded hover:bg-gray-200 transition duration-300"
>
  Trigger Automation
</a>
Clicking this button manually activates the cron job, making it easier to test the notification flow during development. The system starts monitoring for properties with upcoming move-out dates and sends appropriately permissioned notifications to tenants and co-signers.
For production deployments, this basic cron implementation should be replaced with a more robust scheduling system like AWS EventBridge, Google Cloud Scheduler, or a dedicated service like Temporal. These systems provide better reliability, monitoring, and error handling for mission-critical workflows.
The automation system completes our application by turning manual notification processes into an autonomous workflow driven by our permission model. Property managers now focus on handling exceptions rather than routine communications, dramatically improving operational efficiency.
Testing the Implementation
With our system completed, it's time to verify that everything works correctly. Navigate to http://localhost:3000 to access the property management dashboard. You should see our interface with the options to view properties and trigger the notification automation.
To test the system, first ensure your Permit.io directory contains properly configured users with the correct relationships to property instances. Then click the "Trigger Automation" button to start the notification process. The system will:
- Identify properties with move-out dates in the next 24 hours
- Check permissions for each tenant and co-signer
- Send appropriate emails based on their relationship to the property
When the automation completes, check your test email account. Tenants receive both notification types - move-out checklists and deposit details:
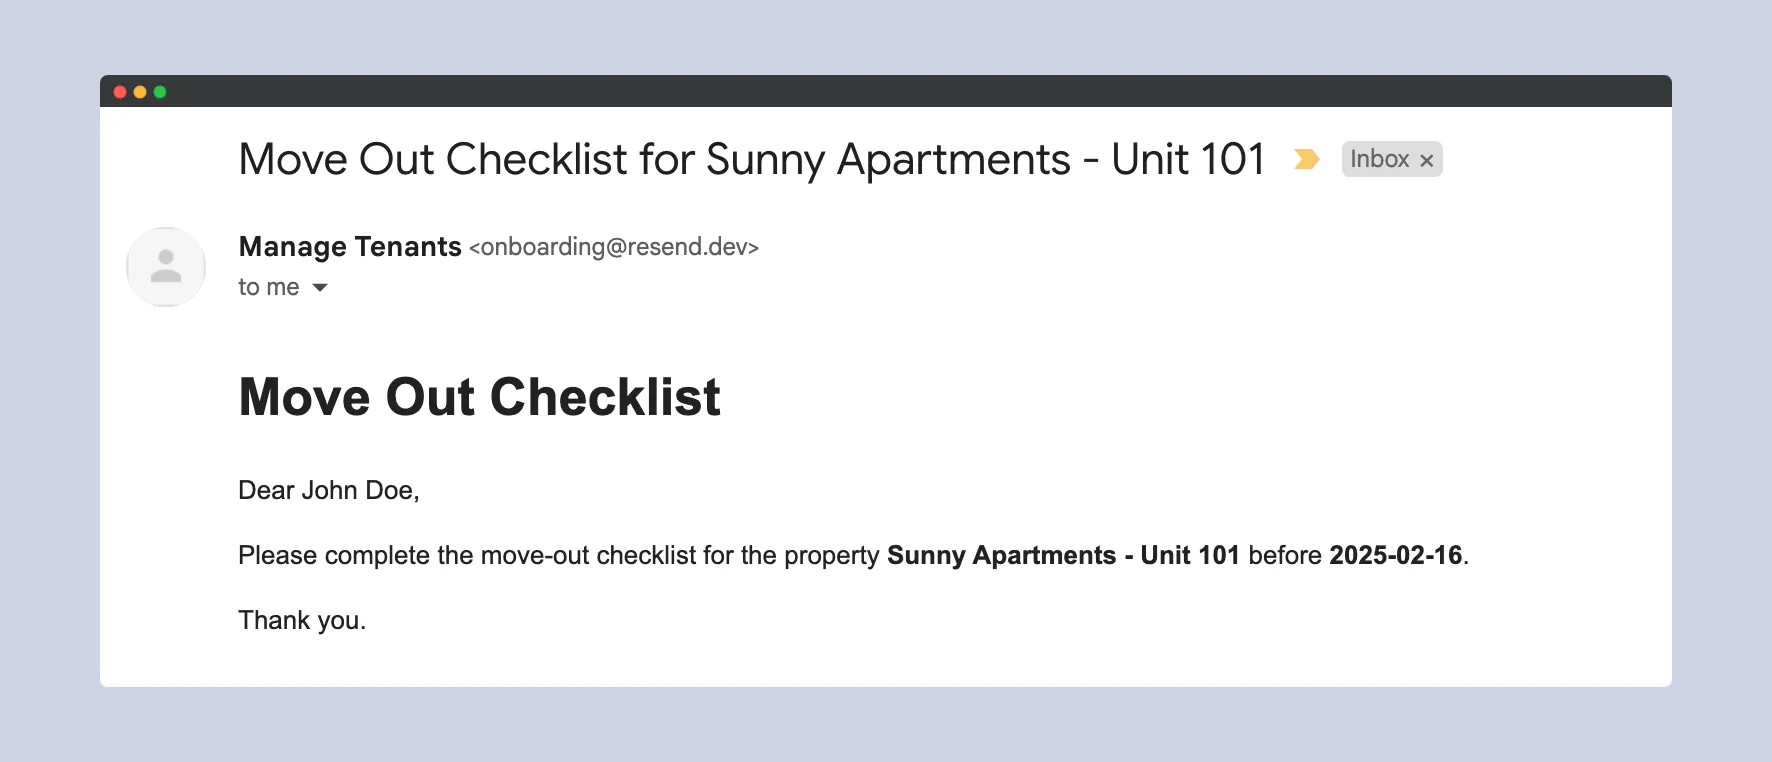
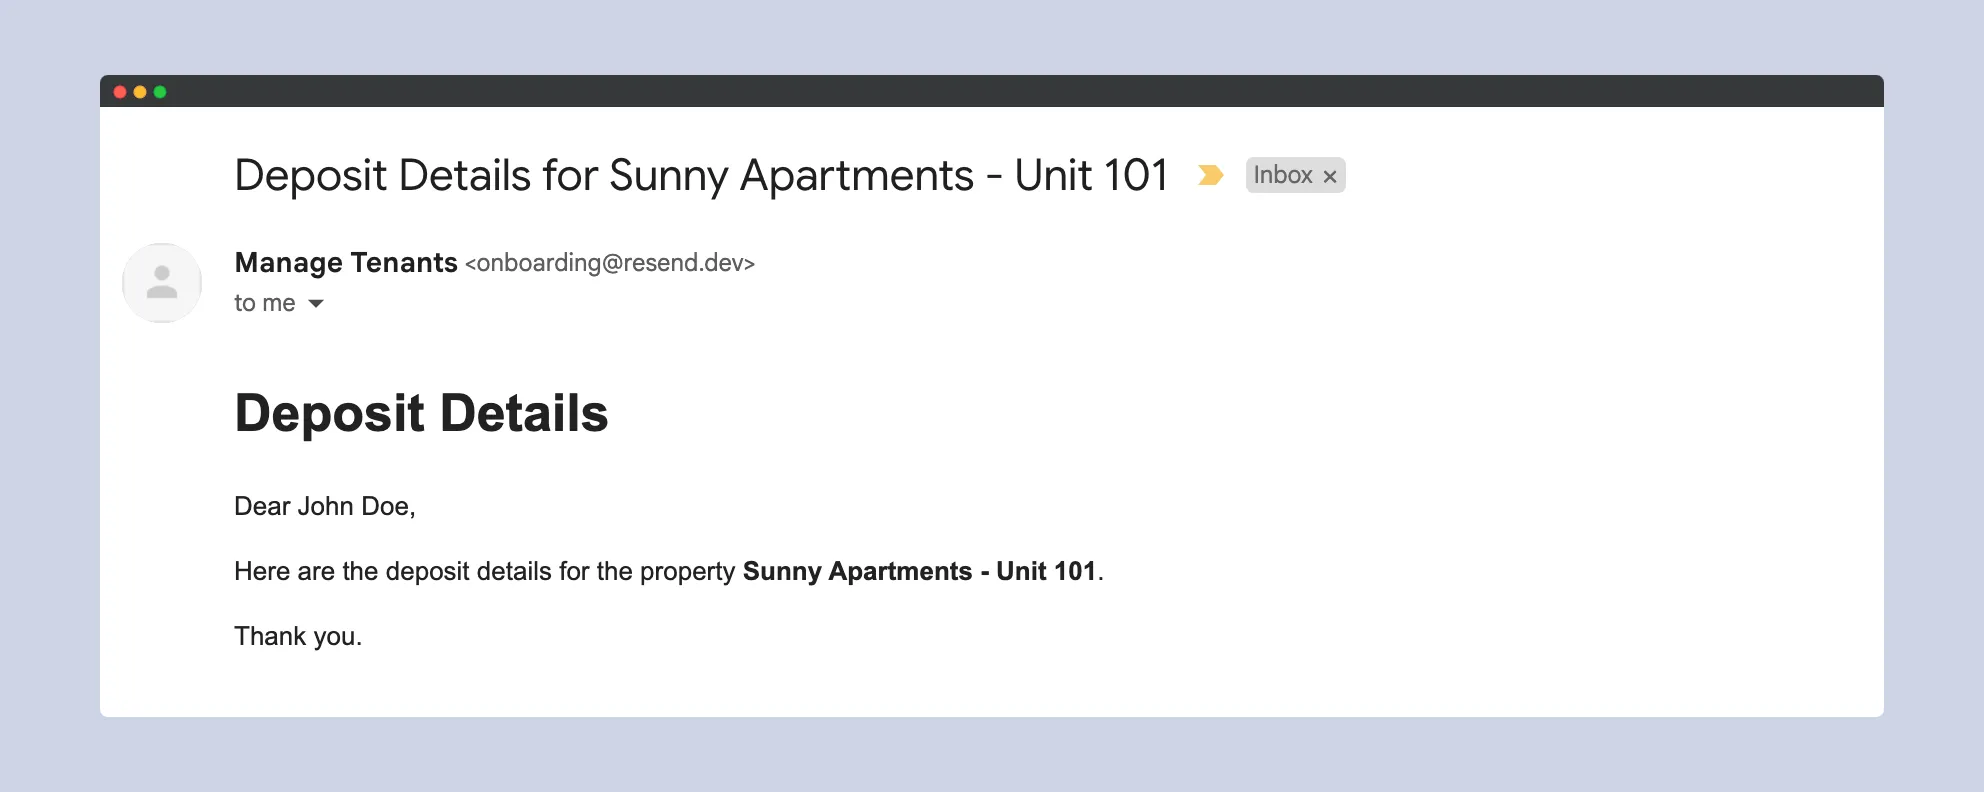
Co-signers receive only the deposit details email, demonstrating that our permission model successfully filters content based on user relationships. If any issues occur, check the console logs for permission check results and email delivery status.
This testing confirms our implementation successfully combines authorization checks with automated notifications, delivering the right information to the right recipients based on their property relationships.
Conclusion
We've successfully built a property management system that solves two critical challenges: ensuring sensitive information reaches only authorized recipients and automating tedious notification workflows. The integration of Permit.io and Resend creates a solution that respects information boundaries while eliminating manual communication overhead.
Our implementation demonstrates relationship-based access (ReBAC) control in action. This is done by modeling real-world connections between people and properties and as a result, we create a permission system that naturally reflects business reality. Tenants receive comprehensive move-out information while co-signers access only the financial details relevant to their responsibility. This granular control protects sensitive information without sacrificing operational efficiency.
The automation layer transforms what would be a time-consuming manual process into a self-running system. Property managers no longer track upcoming move-outs, determine who needs which information, or compose individual emails.
The system handles these tasks autonomously while maintaining strict information boundaries. This architecture pattern extends beyond property management to any domain requiring relationship-based permissions and targeted communications.
Healthcare providers could use similar systems for patient notifications, ensuring family members receive only appropriate medical information. Financial institutions might implement it for account alerts, with different stakeholders receiving information based on their account relationships.
For further exploration, consider extending this system with:
- More sophisticated email templates using React components in Resend
- Additional notification channels like SMS through third-party services
- More complex relationship types that reflect additional business roles
The complete source code for this implementation is available on GitHub. For more information on the technologies used, visit:
