
From S3 to CI/CD: My Cloud Resume Challenge Journey
Two years ago I began a mid-life career shift from teaching into IT and I’ve learned a lot along the way. In late 2024 I stumbled across The Cloud Resume Challenge, a step by step program for teaching cloud and software development skills. The success stories were impressive, so I decided to give a shot. I wasn’t coming in to the challenge cold. I already had a strong interest in Amazon Web Services (AWS) and had earned my AWS Certified Solution Architect Associate certification, so that was the first big hurdle already out of the way. This gave me the confidence to dive in and see what was next.
Terraform
I had a personal domain and site that was hosted in AWS, so a lot of the ground work for the Cloud Resume Challenge was already in place. The book really helped me put all of the pieces together and push me in right direction when I wasn’t sure where to go next. My personal website wasn’t much to look at, but I was more excited at automating the infrastructure. I detailed the process I used for hosting the site in a medium.com article I published a couple of years back. All of the cloud infrastructure was “console clicked” into existence, so I decided to start from scratch and provision everything using Terraform. Building in Terraform means I can have the entire infrastructure back up and running in minutes. Maintaining the code in GitHub gives me version control and rollbacks if required. I also decided to use spacelift.io to manage my Terraform workflow and maintain my state file, as much to learn the tool as anything else.
CI/CD Pipeline
Now that I had a robust and reproducible infrastructure in place, I decided to implement a CI/CD pipeline to make updates to the site and underlying infrastructure automatic. If you’re a Cloud Resume Challenge purist, I’m very sorry. Yes, I went out of order. I had been tinkering with pipelines a bit and wanted to build something bigger and more robust. I also knew that as I went through the other steps in the challenge, I would have more parts to add on as I went. To keep everything in AWS, I used AWS CodePipeline to make everything work. Every time I merged a pull request in my site repo (I disabled direct pulls to main), it would kick off the pipeline in AWS. At first, this just meant copying the updated files to S3 and invalidating the CloudFront CDN cache, but the pipeline will grow soon!
Frontend Makeover
Now that I have a solid infrastructure and deployment pipeline in place, I decided to give my actual frontend a little bit of attention. Since I’m hosting in S3, the only option is a static site- no backend dynamic content. While there are some tools built just for this purpose, I decided to go with Node.js with TailwindCSS and DaisyUI. While Node.js might be overkill for my modest static site, it was a tool I wanted to get familiar with. Node.js makes it easy to write code for your site, export it as static content, and serve it up locally for testing. The addition of Tailwind and DaisyUI made development a lot easier than custom coding my own HTML and CSS. I went from a frontend straight out of the 90s to something I was proud of in just a few hours.
Serverless API
Next I tackled the challenge of adding a “visitor counter” to my site. The initial implementation of the visitor counter is really just a page hit counter, but its somewhere to start. Whenever the main site page is loaded, it kicks off an API call to a Lambda function. The function reaches out to a DynamoDB database endpoint and increments the visitor count stored in a single value by one. The new value is returned and the visitor count is dynamically updated. At some point I’ll update this feature to count unique visitors based on their IP address instead of only site hits.
CloudWatch Alarms
Once the visitor counter was in place, I fired up a few CloudWatch alarms to make sure the API wouldn’t be abused. I set a few alarms and had them all go to an SNS topic dedicated to alarm notifications for the site. I subscribed to the SNS topic with my personal email address. To test that it was working I dropped the threshold for the “number of invocations per minute” alarm to nearly zero and tripped it intentionally by refreshing the page a few times in a short period. Alarm triggered and notification received!
Testing
The next step was installing Playwright locally to run a number of teste before deploying the site. I rolled out a test of the API and a handful of site tests. After confirming they worked as expected, I added Playwright installation and testing to the buildspec file so the AWS Code Pipeline would run them during the Build step. Currently I’m only outputting test results to the build logs, but I have future plans to trigger CloudWatch alarms and fail the build if any Playwright tests fail.
Wrap-Up
Following the Cloud Resume Challenge was exactly what I needed to take the skills and tools I had learned about and tie them together. When you’re learning IT and development, it’s easy to get caught in a loop of “tutorial hell.” At some point you have to dive in and just start building. This process has taught me a lot, including a peek at what I don’t know yet. Making things is exciting and sometimes the hardest part is the first step.
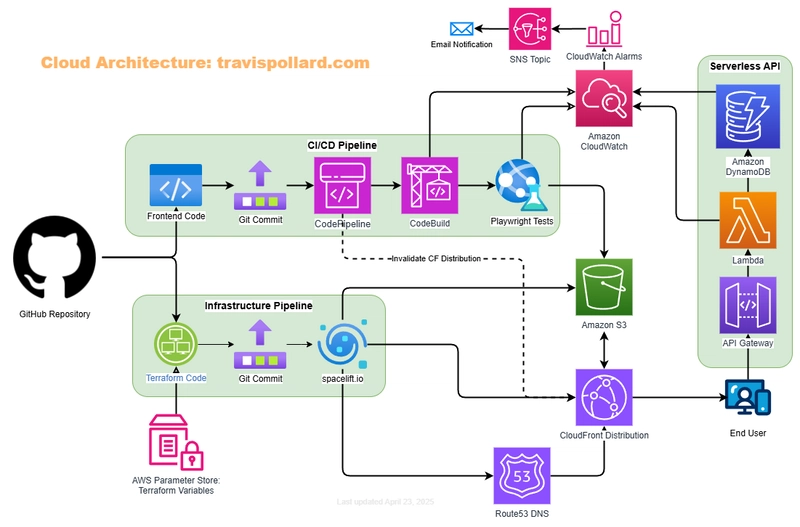
I would love for you to visit my site- https://travispollard.com. Feel free to check out the repository on github.com: https://github.com/jtravisp/travispollard.com/. I also included a diagram of the cloud infrastructure at the top of this post, which was created at draw.io and outlines all of the tools I used. I hope you enjoyed reading about my process. I love to help people reach their tech goals, so feel free to reach out if I can help you on your journey!
