Lesson learned: Always tie your architecture decisions to your business needs. We started by chasing stability — and ended up chasing cost, once scale kicked in. Don’t be afraid to shift your mindset from using external managed services to running self-hosted infrastructure. At a certain scale, this shift is critical to keep costs manageable and sustainable.
What We Needed
Trigger a timer,
Wait X seconds,
Then run a function with a specific payload.
Seems simple—until you're doing it millions of times per day, across two cloud providers, with retry logic, second-level delay precision, and full observability.
Our Journey: Azure Durable Functions → AWS Step Functions → Temporal Cloud → Temporal Self-Hosted
We've been through all the usual options:
✅ Azure Durable Functions
Worked—until traffic spiked. Then: dropped messages, hung workflows, and zero transparency. Not built for our scale.
✅ AWS Step Functions
Solid and stable. We liked it. But the more we used it, the more it cost us. Delay-heavy flows with retries added up fast. It wasn't sustainable.
❌ AWS Step Functions Express
Total execution time is capped at 5 minutes. Our flows often wait far longer than that. Not an option.
❌ EventBridge
We considered using EventBridge for scheduled triggers. But the docs admit to ~1-minute precision. We needed 1–2 second precision.
✅ Temporal Cloud
We did a full POC. It worked beautifully. But the pricing model, based on actions, didn’t fit our use case. At ~200M workflows/month (each including delay, retries, and an activity), which equates to 400M actions/month in our case, we were looking at an extremely high bill.
The Cost-Saving Move: Self-Hosted Temporal on EKS
After a long period of embracing managed services wherever possible, we realized that, in this case, going self-hosted was the only way to support the business at scale without letting cost become a blocker. So we deployed Temporal on our own infrastructure (EKS) using the official Helm charts. With some tuning, it worked smoothly.
✅ ~80% cost savings
✅ Full infrastructure and application-level control
✅ Scale without pricing surprises
Even better: our cost doesn't scale with traffic.
We configured EKS node groups and Aurora Postgres to support multiple times our current load, all for around $1,500/month.
Most of our infra is either autoscaled or manually tuned, and our cost curve is flat.
Step Functions Implementation: The Starting Point
Before diving into Temporal, here’s what our implementation looked like using AWS Step Functions.
The purpose of sharing this is to show a side-by-side with our Temporal setup later—so you can clearly see the evolution and differences in approach.
In Step Functions, you must first define your State Machine ahead of time, including all steps, transitions, and timers. This pre-declaration requirement introduces a different kind of workflow lifecycle—configuration first, execution second.
Here’s how we structured the creation of a timer-based workflow:
public Workflow CreateTimerWorkflow<T>(TimeSpan waitTime, string endpoint, T httpBody, string userId = null)
{
    return new Workflow
    {
        Id = _timerStateMachineArn,
        Request = new TimerRequest<HttpCallRequest<T>>
        {
            WaitTimeSeconds = (int)waitTime.TotalSeconds,
            Data = new HttpCallRequest<T>
            {
                Body = new MicroserviceRequest<T>
                {
                    Metadata = new RequestMetadata
                    {
                        UserId = userId,
                        RequestId = Guid.NewGuid().ToString()
                    },
                    RequestContent = httpBody
                },
                Url = GenerateUrl(endpoint),
                AppCode = new Dictionary<string, string>
                {
                    { "code", _configuration.GetServiceAuthCode() }
                }
            }
        }
    };
}
To trigger this workflow, we used a runner with built-in retry logic and AWS SDK:
await _client.StartExecutionAsync(new StartExecutionRequest
{
    StateMachineArn = stateMachineArn,
    Input = input,
    Name = requestId // I used requestId as execution name to make it easy to debug later
});
And here’s what the State Machine definition looked like:
{
  "Comment": "A description of my state machine",
  "StartAt": "Wait",
  "States": {
    "Wait": {
      "Type": "Wait",
      "InputPath": "$",
      "SecondsPath": "$.waitTimeSeconds",
      "Next": "Call third-party API",
      "OutputPath": "$.data"
    },
    "Call third-party API": {
      "Type": "Task",
      "Resource": "arn:aws:states:::http:invoke",
      "Parameters": {
        "Method": "POST",
        "RequestBody.$": "$.body",
        "Authentication": {
          "ConnectionArn": "CONNECTION_ARN_PLACEHOLDER"
        },
        "ApiEndpoint.$": "$.url",
        "QueryParameters.$": "$.appCode"
      },
      "Retry": [
        {
          "ErrorEquals": [
            "States.ALL"
          ],
          "MaxAttempts": 30,
          "JitterStrategy": "FULL",
          "Comment": "Main Retrier",
          "IntervalSeconds": 20,
          "BackoffRate": 1
        }
      ],
      "End": true,
      "InputPath": "$"
    }
  }
}
Why Temporal is Different
In Temporal, workflows are implemented entirely in code using the SDK. You don’t need to predefine a workflow structure or declare a state machine. The only setup required is creating a namespace—everything else happens dynamically at runtime.
This model shifts the ownership of orchestration from infrastructure (like JSON/YAML flow definitions) to application code. It provides flexibility for teams that want to iterate on workflow logic through code deployments and enables versioning, type safety, and testing in the developer's native language.
Both models — predefined state machines in Step Functions and code-first workflows in Temporal — represent different philosophies in how orchestration can be managed.
Temporal lets you write workflows as regular code — with built-in durability, retries, and state recovery.
Our use case was a perfect fit, just like it was with Step Functions: wait, then trigger logic. But instead of using the standard Workflow.Sleep() pattern, we took it a step further.
Saving on Actions: Using StartDelay Instead of a Timer
The typical Temporal pattern looks like this:
await Workflow.Sleep(TimeSpan.FromSeconds(X));
await Activity.CallAsync(() => DoWork());
But that Sleep adds an extra action. In Temporal Cloud, that would cost more. During our POC with Temporal Cloud, we realized this optimization could significantly reduce cost.
So instead, we used StartDelay when starting the workflow:
await _client.StartWorkflowAsync(
    (TemporalCallApiWorkflow wf) => wf.RunAsync(timerRequest.Data.Url, requestBody),
    new WorkflowOptions(
        id: requestId,
        taskQueue: _configuration.GetTemporalWorkflowOptions().TaskQueue
    )
    {
        StartDelay = TimeSpan.FromSeconds(timerRequest.WaitTimeSeconds)
    }
);
Wrapped with exponential backoff:
await CommonUtils.RetryCallWithExponentialBackoff(
    async () => await _client.StartWorkflowAsync(...),
    "TemporalWorkflowExecution",
    _logger,
    ExecutionRetries
);
This pattern reduces actions per workflow from 3 to 2, saving ~33% per execution in the cloud model, and even better—on our self-hosted setup, it reduces the performance overhead by 33% per workflow.
We configure the system with a unified structure that makes environment switching easy:
{
  "TargetHost": "temporal-frontend.temporal.svc.cluster.local:7233",
  "Namespace": "default",
  "WebhookBaseUrl": "http://my-app.test.svc.cluster.local",
  "TaskQueue": "my-api-caller-task-queue",
  "IsShadowMode": false
}
Our Infra Stack
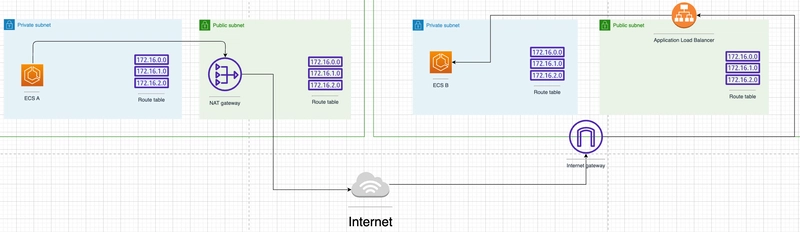
- Cluster: EKS
- Database: Aurora PostgreSQL (persistence + visibility: the two required Temporal DBs)
- Ingress: Internal-only access inside AWS, plus an NLB to allow external access to Temporal for triggering workflows. Exposing the frontend service via ALB didn’t work
- Web UI: VPN-only access
- Observability: Datadog dashboard using the official integration
-
Config: Git-managed
values.yamlvia ArgoCD
Stress Testing: What Broke, What We Fixed
We used Maru to simulate production load, and the Scaling Temporal doc to interpret the results via our Datadog dashboard.
429 "Too Many Requests"
We hit the frontend.namespaceCount limit early.
→ Fixed using:
server:
  dynamicConfig:
    frontend.namespaceCount:
    - value: 9999999
      constraints: {}
Pod Resource Starvation
Frontend, history, and worker pods couldn’t keep up.
→ Tuned:
frontend:
  service:
  resources:
    requests:
      cpu: 1
      memory: 3Gi
    limits:
      memory: 3Gi
Aurora Lagging
→ Upgraded the instance class. CPU usage remains high under stress, but it’s no longer a bottleneck.
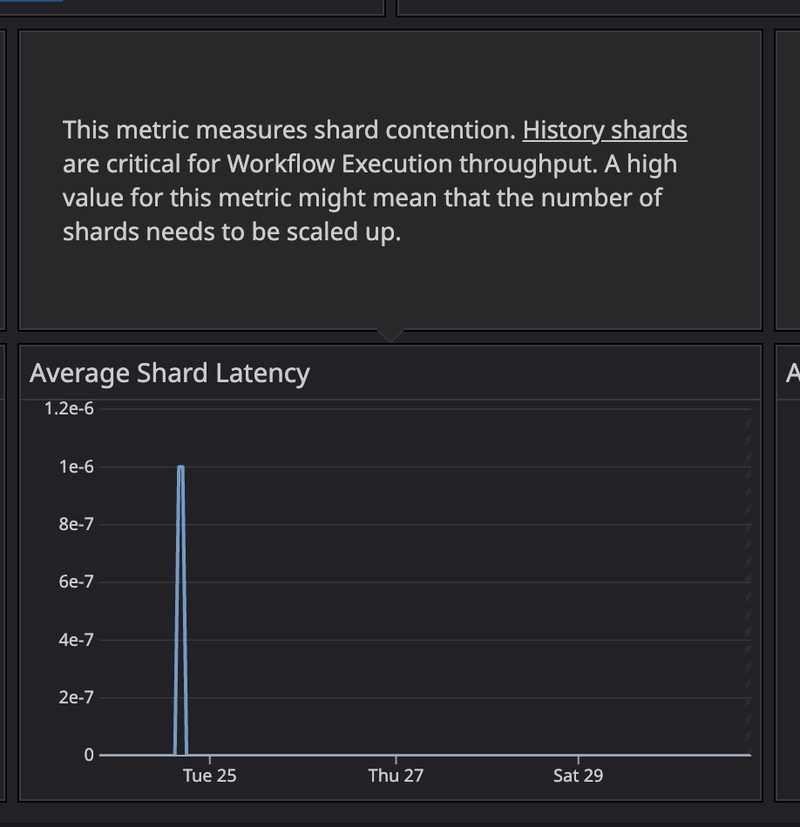
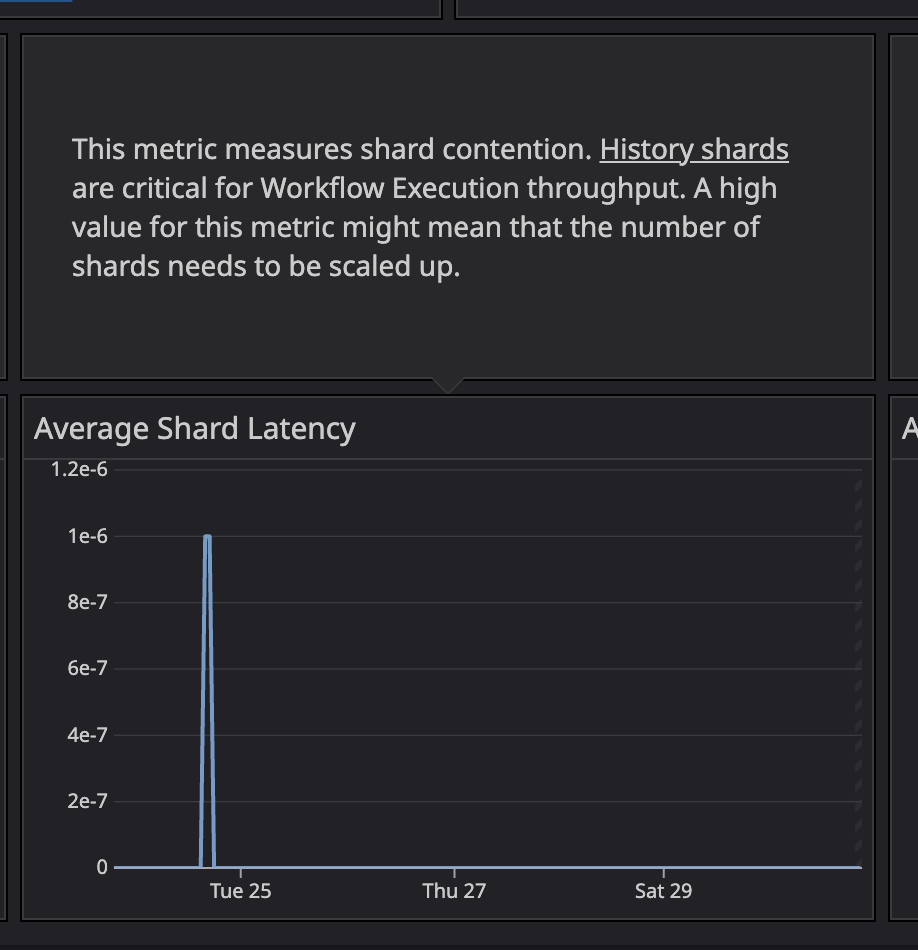
History Shards
We're still on the default history.shards value. Planning to scale it later—even though it requires a DB reset. Since we're still in shadow mode, as I'll explain in the next paragraph, that's acceptable for now.
Tuning the number of shards is a critical scaling lever in Temporal.
Highly recommend reading: Choose the Number of Shards in Temporal History Service
During stress testing, we saw shard latency spikes, signaling a need to increase shard count. We're waiting to validate this under real traffic in shadow mode before committing to a reset.
Migration Strategy: Shadow Mode
We’re not cutting over cold turkey. Instead, we’re shadowing Step Functions:
- Temporal runs the full logic
- Sends results to a mock endpoint, including the expected trigger timestamp
- If the delay > 2 seconds, we log it and investigate
- We improve iteratively and expand the experiment
- Once confidence is high, we flip the traffic
Zero risk. High signal.
Easy Rollback: Step Functions as a Safety Net
What made the decision easier was knowing we had Step Functions as a fallback.
They were already in place, already battle-tested. So we had no fear testing Temporal in production scenarios—because rollback was simple and safe.
Deployment Flow
- All changes are GitOps-managed (separate
gitopsandgitops-productionrepos) - ArgoCD watches
values.yaml - Manual sync for now — we like the control
Key Takeaway
Start with stability. Move to cost once you scale.
Once you decide to go self-hosted, don't fear it—but do it right.
Take time to deeply understand the product’s architecture. Run stress tests. Iterate.
Be ready with a fallback and observability before fully cutting over.
This approach gave us both confidence and clarity at each step.
This is an ongoing story — happy to share more details or dive deeper into any part of the article. I'll keep you posted about next steps and some more challenges I had during the process.
Feel free to reach out!