When working with frameworks like Refine, Next.js, and Ant Design, it's easy to build powerful apps — but making them fast and optimized takes some extra steps.
In this post, I'll show you how I took a standard Refine + Next.js project and customized it for better performance, faster loading times, and smoother UX.
(And yes, I'll share Core Web Vitals scores before and after the optimizations! 📈)
🔥 Quick Demo
Here's a quick demo showing the performance difference after optimization:
Before:

After:
🧩 Stack Overview
What is Refine?
Refine is a headless React framework focused on building internal tools, admin panels, and dashboards — making CRUD operations much easier.
What is Ant Design (antd)?
Ant Design is an enterprise-class UI library offering a large collection of well-designed React components, perfect for clean, consistent UIs.
⚙️ Step 1: Customizing next.config.mjs
The first big move was tuning the Next.js configuration to make imports smarter, bundles smaller, and builds faster.
Here's the updated next.config.mjs:
/** @type {import('next').NextConfig} */
const nextConfig = {
  transpilePackages: [
    "@refinedev/core",
    "@refinedev/devtools",
    "@refinedev/nextjs-router",
    "@refinedev/kbar",
    "@refinedev/nestjsx-crud",
    "@refinedev/antd",
    "@ant-design/icons",
    "antd",
  ],
  experimental: {
    optimizePackageImports: [
      "@refinedev/core",
      "@refinedev/devtools",
      "@refinedev/nextjs-router",
      "@refinedev/kbar",
      "@refinedev/nestjsx-crud",
      "@refinedev/antd",
      "@ant-design/icons",
      "antd",
    ],
  },
  swcMinify: true,
  modularizeImports: {
    antd: {
      transform: "antd/es/{{member}}",
      preventFullImport: true,
    },
    "@ant-design/icons": {
      transform: "@ant-design/icons/es/icons/{{member}}",
      preventFullImport: true,
    },
  },
  compiler: {
    reactRemoveProperties: true,
    removeConsole: { exclude: ["error", "warn"] },
  },
  output: "standalone",
};

export default nextConfig;
🧠 Key Config Changes:
- Transpile external packages for better compatibility
- Optimize package imports for tree-shaking
- Modularize imports to avoid loading full libraries
- Remove console logs and non-essential props from production
- Standalone output for lighter deployments (Docker, serverless)
✅ Result: Faster builds, smaller bundles, and better runtime performance.
🚀 Step 2: Adding a Global loading.tsx Component
We don't want users staring at blank screens, right?
I added a global loading indicator:
// app/loading.tsx
const Loading = () => (
  <div className="flex items-center justify-center h-screen text-lg">
    Loading...
  div>
);

export default Loading;
Why This Matters:
- 📱 Gives instant feedback while components load
- ⚡ Improves "perceived performance" (even if load time is the same)
- 🎯 Reduces Largest Contentful Paint (LCP) and layout shifts
- 📈 Improves SEO and Core Web Vitals
✅ Result: Faster-feeling app + better UX from the user's perspective.
⚡ Step 3: Dynamic Imports with next/dynamic
Instead of using React.lazy, Next.js offers dynamic() for better optimization.
Here’s how I used it:
import dynamic from "next/dynamic";
import { Suspense } from "react";
import LoadingSpinner from "@context/loadingSpinner";

const BlogPostCreateComponent = dynamic(
  () => import("@components/blog/create"),
  {
    ssr: false,
    loading: () => <LoadingSpinner />,
  }
);

export default function BlogPostCreate() {
  return (
    <Suspense fallback={<LoadingSpinner />}>
      <BlogPostCreateComponent />
    Suspense>
  );
}
Why Use dynamic() Instead of lazy()?
- 🏎️ Built-in to Next.js and integrates perfectly
- 🔥 Control over SSR (disable server-side rendering if needed)
- 📦 Automatic code splitting for lighter pages
- 🎡 Custom loading states (better than default browser loading)
✅ Result: Less initial JavaScript, quicker interaction, and smoother page transitions.
🎨 Step 4: Tailwind CSS Optimization with JIT Mode
Tailwind can get bloated if not handled properly.
That's why I enabled Just-in-Time (JIT) mode in tailwind.config.js:
/** @type {import('tailwindcss').Config} */
export default {
  mode: 'jit',
  content: [
    './src/**/*.{js,ts,jsx,tsx,mdx}',
  ],
  theme: { extend: {} },
  plugins: [],
};
Benefits:
- ⚡ Faster build times
- 🧹 Smaller final CSS bundle
- 🎯 Only generates classes you actually use
✅ Result: Clean, efficient, production-ready CSS.
📦 Running the Project
pnpm install     # Install dependencies
pnpm dev         # Start development server
pnpm build       # Create a production build
pnpm start       # Launch production server
👉 Pro Tip: Production optimizations (like tree-shaking and minification) are only fully applied after pnpm build.
📈 Performance Comparison: Before vs After
| Metric | Before | After |
|---|---|---|
| Bundle Size | Huge | Reduced |
| Initial Load Time | Slower | Faster |
| Console Noise | Lots | Clean |
| User Experience | Choppy | Smooth |
| Core Web Vitals | 🚫 Poor | ✅ Improved |
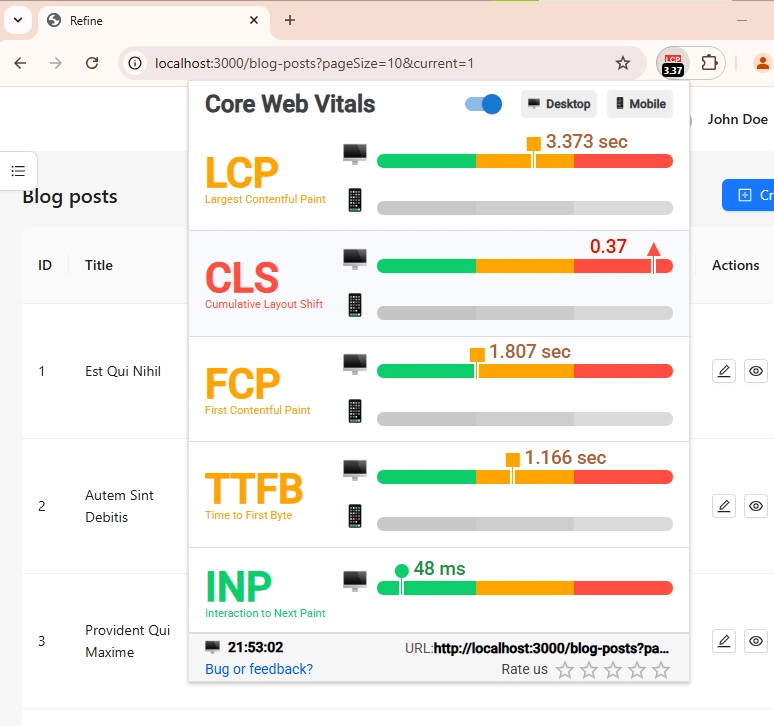
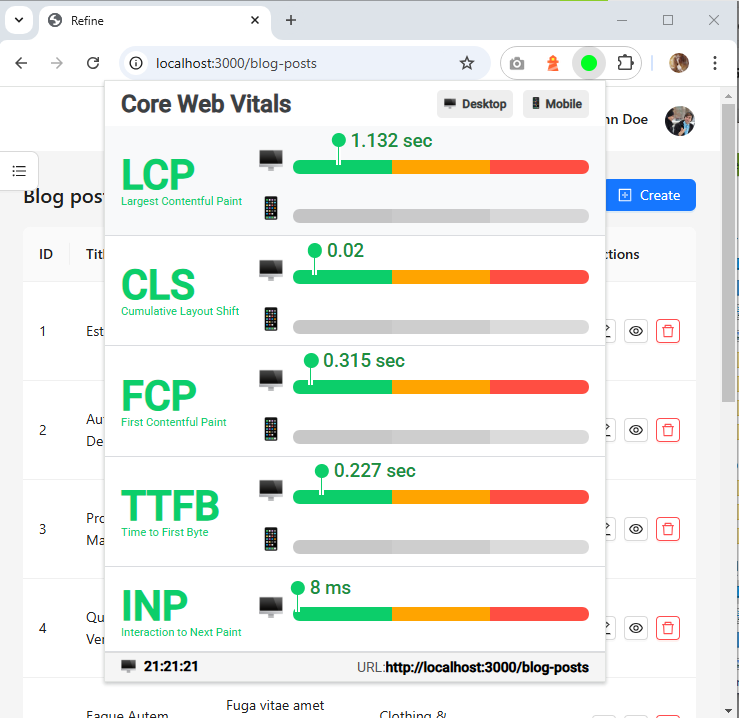
📊 Core Web Vitals Improvement
Before:

After:

✅ Noticeable improvement in LCP, FCP, CLS, and TTFB scores!
✅ Conclusion
By optimizing the Next.js config, introducing better loading strategies, dynamically importing components, and cleaning up the Tailwind setup, I transformed a good app into a great, fast, and scalable one.
These changes led to:
- 🚀 Faster load times
- 📈 Better SEO and Web Vitals
- 🧩 Easier long-term maintenance