Blog Description: Learn how we can use Kubernetes to automate the deployment, scaling, and management of Docker containers. Discover how it simplifies container orchestration and enhances application reliability.
Introduction
In today’s microservices-driven world, Docker revolutionized how we build and package applications. But managing containers at scale? That’s where Kubernetes steps in. Kubernetes is an open-source container orchestration platform that automates the deployment, scaling, and management of containerized applications — especially those created with Docker.
As part creating the Demo I've used UpCloud - A Leading European Cloud Provider.
Why UpCloud Good for Containers and Kubernetes?
UpCloud is a high-performance cloud provider known for:
⚡ Ultra-fast MaxIOPS storage
🌍 Global data centers
🧩 Easy Kubernetes-ready infrastructure (via manual setup or Terraform)
💰 Cost-effective pricing for scalable clusters
Whether you're starting locally with Minikube or going full-scale with K8s on cloud VMs, UpCloud gives you the flexibility and performance edge.
What is Docker?
Docker is a tool that packages your code, libraries, and dependencies into a container—an isolated, lightweight executable. Containers solve the “it works on my machine” problem, ensuring consistent environments across dev, test, and production.
But what happens when you have hundreds or thousands of these containers?
What Is Kubernetes?
Kubernetes (aka K8s) is an open-source container orchestration engine developed by Google. It manages clusters of Docker containers, offering automation, monitoring, and self-healing capabilities out of the box.
How Kubernetes helps to Orchestrate Docker Containers
Let’s break down the Orchestration functionality of Kubernetes brings:
1. Automated Deployment and Rollbacks
- Define your desired container state in YAML files.
- Kubernetes ensures the cluster matches this state.
- Supports rolling updates and easy rollbacks if something goes wrong.
2. Self-Healing Mechanisms
- Failed containers? Kubernetes replaces them automatically.
- Restarts containers if they crash.
- Removes non-responsive containers from the network.
3. Load Balancing and Service Discovery
- Automatically distributes network traffic across containers.
- Built-in DNS service allows containers to find each other by name.
4. Horizontal Scaling
- Scale container instances up/down based on CPU/memory usage.
- Manual or automatic scaling using the Horizontal Pod Autoscaler.
5. Resource Optimization
- Efficient bin-packing ensures optimal use of compute resources.
- Limits and requests help avoid resource hogging.
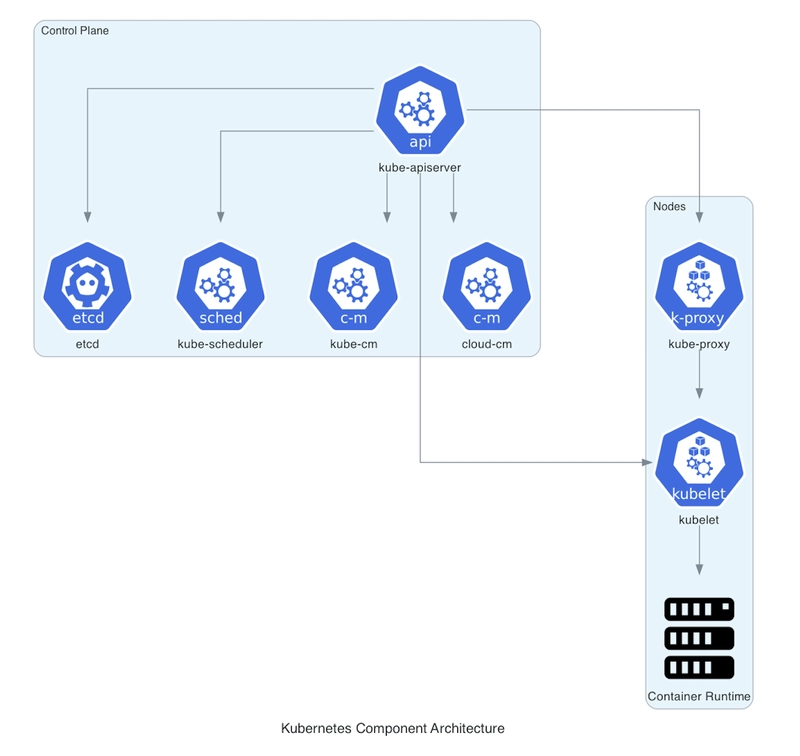
Core Components of Kubernetes

| Category | Component | Definition |
|---|---|---|
| Control Plane | kube-apiserver | Handles all REST requests and serves as the front-end of the Kubernetes control plane. |
| etcd | Stores all Kubernetes cluster data in a distributed, consistent key-value store. | |
| kube-scheduler | Assigns pods to nodes based on defined scheduling rules and resource availability. | |
| kube-controller-manager | Runs controllers to monitor and maintain the desired cluster state. | |
| cloud-controller-manager | Manages cloud-specific control loops like load balancers, volumes, and node management. | |
| Node Components | kubelet | Ensures that containers in pods are running as defined in their PodSpecs. |
| kube-proxy | Maintains network rules for pod-to-pod and pod-to-service communication. | |
| Container Runtime | Executes and manages containers on the node (e.g., containerd, CRI-O). | |
| Workload Object | Pod | The smallest deployable unit that can run a container or set of containers in Kubernetes. |
| Networking Object | Service | Exposes a stable network endpoint for accessing a group of pods. |
| Cluster Resource | Cluster | A set of nodes and control plane components that together run containerized workloads. |
Real-World Example of Kubernetes Implementation
Imagine you have a web app built with Node.js in a Docker container:
- You define a Deployment that runs 3 replicas.
- Kubernetes ensures 3 instances are always running.
- If one crashes, it spins up a new one instantly.
- A Service ensures traffic is routed to available instances.
- Want to scale to 10 instances? Just change the replica count.
Demo of Deploying a Docker image in Kubernetes
We will see the step by step approach to deploy an application Docker image in kubernetes using minikube
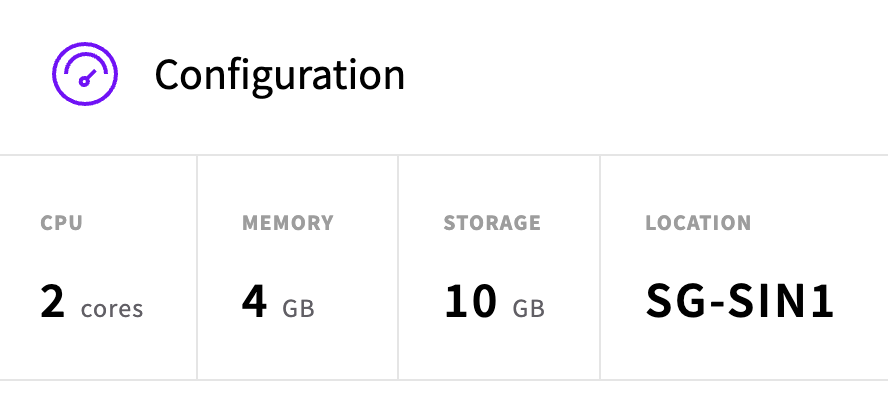
Create a Server in UpCloud
- System Requirement for Minikube is 2 Core CPU, so we have created an UpCloud server with 2 Core CPU and 4 GB RAM in Singapore Region.
👉 Start with UpCloud and deploy your next app with confidence.
You can also get started with UpCloud by following the documentation here
- Logged into UpCloud server and proceeded the further steps
Steps to Deploy Application in Kubernetes
Step 1: Install Minikube and Dependencies
1.1 Install Docker (Required for Minikube)
Please Follow Docker Installation Steps in official documentation to install Docker.
Docker Official Documentation
1.2 Install Kubectl (Kubernetes CLI)
Please Follow Installation Steps to install Kubectl here - Official Installation Docs
curl -LO "https://dl.k8s.io/release/$(curl -L -s https://dl.k8s.io/release/stable.txt)/bin/linux/amd64/kubectl"
chmod +x kubectl
sudo mv kubectl /usr/local/bin/
kubectl version --client
1.3 Install Minikube
Please Follow Installation Steps to install Minikube here - Installation Docs
- List of commands to install
Minikube
curl -Lo minikube https://storage.googleapis.com/minikube/releases/latest/minikube-linux-amd64
chmod +x minikube
sudo mv minikube /usr/local/bin/
minikube version
Step 2: Start Minikube Cluster
minikube start --driver=docker
# or
minikube start --driver=docker --force
Step 3: Deploy a Simple Application
3.1 Create a Deployment
kubectl create deployment my-app --image=nginx3.2 Expose the Deployment
kubectl expose deployment my-app --type=NodePort --port=803.3 Get Service Details
kubectl get svc my-app3.4 Access the Application
minikube service my-app --urlStep 4: Scale the Application
kubectl scale deployment my-app --replicas=3
kubectl get pods -o wide
Step 5: Clean Up Resources
kubectl delete svc my-app
kubectl delete deployment my-app
minikube stop
minikube delete
(Alternative Method) Using deployment.yaml File
- Create a
deployment.yamlfile, which deploys anginxserver and creates a service for access it.
Here’s a simple Kubernetes deployment.yaml file that deploys an nginx container and exposes it using a NodePort service.
We are deploying the yaml in minikube cluster, to access the service via your browser using minikube.
📄 nginx-deployment.yaml
apiVersion: apps/v1
kind: Deployment
metadata:
  name: nginx-deployment
  labels:
    app: nginx
spec:
  replicas: 2
  selector:
    matchLabels:
      app: nginx
  template:
    metadata:
      labels:
        app: nginx
    spec:
      containers:
        - name: nginx
          image: nginx:latest
          ports:
            - containerPort: 80
---
apiVersion: v1
kind: Service
metadata:
  name: nginx-service
spec:
  type: NodePort
  selector:
    app: nginx
  ports:
    - port: 80
      targetPort: 80
      nodePort: 30080
🧪 Steps to Deploy and Access NGINX
- Apply the YAML file:
kubectl apply -f nginx-deployment.yaml- Check pod and service status:
kubectl get pods
kubectl get svc nginx-service- Access NGINX in browser (if using Minikube):
minikube service nginx-service --urlThis will return a URL like:
http://192.168.49.2:30080— open this in your browser.
Conclusion
As part of this blog, you have learnt the following aspects,
- What is Docker and Kubernetes
- Basics understanding of various components of Kubernetes and it's advantages
- how to deploy Docker image using Kubernetes using
kubectlin-line command and Kubernetes yaml deployment.
In the next blog - we will see how to scale the application and we will get into internals of application scaling in Kubernetes.
Call to Action
Ready to scale your Docker containers with ease? Dive deeper into Kubernetes, or start building your own K8s-powered apps today!
Shout out to UpCloud for their developer-friendly cloud platform.
If you're trying out Kubernetes or deploying applications for testing or learning — check out UpCloud Developer Plans.
Use the personalized promo code cloudenginelabs to get $50 in free credits with an extended 30-day trial period.
👉 Start with UpCloud and deploy your next app with confidence.
You can also get started with UpCloud by following the documentation here