
Recently, OpenAI made its ChatGPT-4o image generation model public, allowing all users to generate and edit images directly within ChatGPT. Since then, many users have gone viral for creating fun image styles of themselves especially in Studio Ghibli format.
In this tutorial, we’ll take things further by creating a Studio Ghibli-style video creator application using AI workflows in Next.js. You’ll learn how to do this easily using Eachlabs.
Let's get started🎉

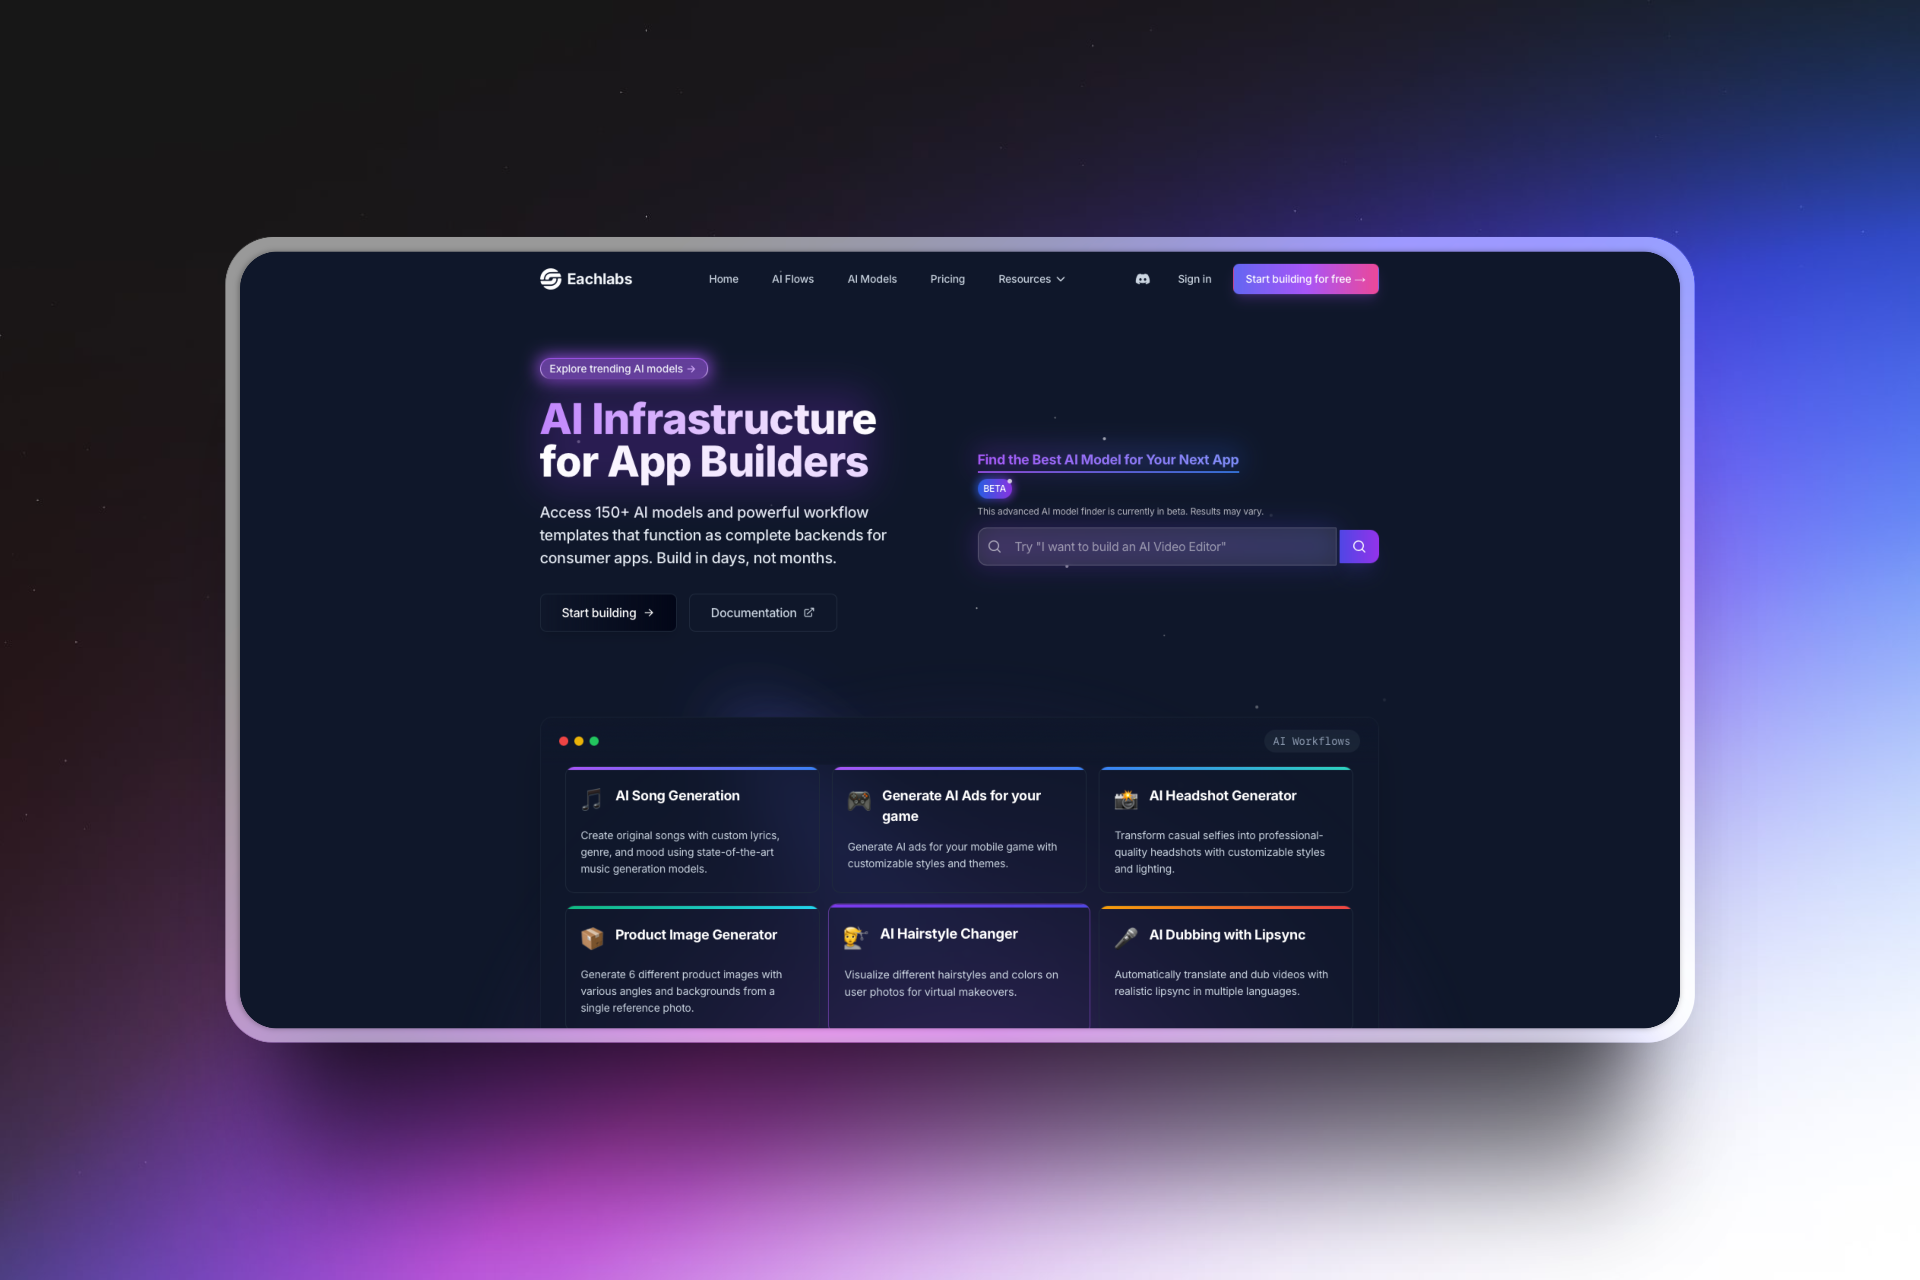
What is Eachlabs?
Eachlabs is a software infrastructure that allows you to access multiple public AI models, create workflows using these models, and deploy or integrate these workflows into your software applications.
With Eachlabs you can do the following:
- Deploy and test your AI model.
- Use more than 150+ public and vision-based models with just one click.
- Use the client SDKs to communicate with your AI models in any language.
- Handle tons of traffic with infinite scaling functionality.
- Save your infra cost with a scale of zero and lighting fast cold starts.
- Manage your models’ deployment, health status, metrics, logs and spending in your Each workspace.
Prerequisites
Eachlabs offers multiple client SDKs that support popular programming languages like Go, Python, and Node.js, making it easy to integrate AI models into your applications. It also provides a wide range of API endpoints enabling you to perform all the available operations.
For this tutorial, we'll interact with Eachlabs by making direct HTTP requests to these API endpoints.
To get started, create a new Next.js application by running the command below:
npx create-next-app ghibli-appNext, install the Shadcn UI Studio Ghibli theme.
npx shadcn@latest add https://matsu-theme.vercel.app/r/matsu-theme.jsonRun the following code snippet to install its UI components.
npx shadcn@latest add https://matsu-theme.vercel.app/r/matsu-theme-components.jsonFinally, add the following configuration into the app/layout.tsx file:
import type { Metadata } from "next";
import { Nunito } from "next/font/google";
import { PT_Sans } from "next/font/google";
import "./globals.css";

const nunito = Nunito({
    variable: "--font-nunito",
    subsets: ["latin"],
});

const ptSans = PT_Sans({
    variable: "--font-pt-sans",
    subsets: ["latin"],
    weight: ["400", "700"],
});

export const metadata: Metadata = {
    title: "\"Create Next App\","
    description: "\"Generated by create next app\","
};

export default function RootLayout({
    children,
}: Readonly<{
    children: React.ReactNode;
}>) {
    return (
        <html lang='en'>
            <body
                className={`${nunito.variable} ${ptSans.variable} antialiased relative`}
            >
                <div className='texture' />
                {children}
            body>
        html>
    );
}
Building the application interface in Next.js
In this section, you'll build the application user interface. The app allows users to upload an image and provide a video description. It then converts the image into a Studio Ghibli style and generates a video based on the prompt and the transformed image.
The home page component renders a form that collects the image and video description. In addition, you’ll create two more components:
- Loader – shows a countdown timer while the video is being generated.
- Result – displays the final output, including the generated video.
cd app && \
mkdir components && cd componenents && \
touch Loader.tsx Result.tsx
Now, let’s begin.
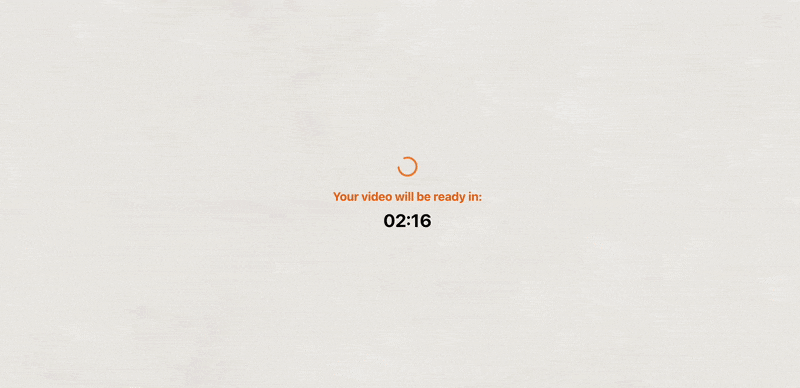
The Loader Component
Copy the following code snippet into the Loader.tsx file to display a countdown showing the time remaining for the result to be ready.
"use client";
import { Loader2 } from "lucide-react";
import { useEffect, useState, useRef } from "react";

export default function Loader() {
    const [timeLeft, setTimeLeft] = useState(150);
    const timerRef = useRef(null);

    useEffect(() => {
        if (timeLeft > 0) {
            timerRef.current = setInterval(() => {
                setTimeLeft((prev) => {
                    if (prev <= 1) {
                        clearInterval(timerRef.current!);
                        return 0;
                    }
                    return prev - 1;
                });
            }, 1000);
        }

        // Cleanup on unmount or if timeLeft becomes 0
        return () => {
            if (timerRef.current) clearInterval(timerRef.current);
        };
    }, [timeLeft]);

    const formatTime = (seconds: number) => {
        const min = Math.floor(seconds / 60)
            .toString()
            .padStart(2, "0");
        const sec = (seconds % 60).toString().padStart(2, "0");
        return `${min}:${sec}`;
    };

    return (
        <>
            {timeLeft > 0 && (
                className='flex flex-col w-full h-screen items-center justify-center'>
                    className='animate-spin text-orange-400' size={40} />
                    className='text-xl font-bold text-orange-500 mt-4 text-center'>
                        Your video will be ready in:


                    className='text-3xl mt-2 text-center font-bold'>
                        {formatTime(timeLeft)}


            )}
        >
    );
}
The useEffect hook initiates a countdown of 2 minutes and 30 seconds using the timeLeft React state. This provides enough time to process the request and ensures that the result is ready by the time it is needed.
The Result Component
Copy the code snippet below into the Result.tsx file:
import { Button } from "@/components/ui/button";

export default function Result({ link }: { link: string }) {
    return (
        <div className='flex flex-col w-full h-screen items-center justify-center'>
            <h2 className='text-2xl font-bold text-orange-500 mt-4 text-center'>
                Your video is ready!
            h2>

            <section className='flex flex-col items-center space-y-5 mt-4'>
                <video
                    className='rounded-lg shadow-lg'
                    src={link}
                    controls
                    autoPlay
                    loop
                    muted
                    style={{ width: "100%", maxWidth: "600px" }}
                />
                <Button
                    variant='destructive'
                    className='text-orange-500 border-[1px] font-semibold p-4 rounded hover:text-orange-600 transition duration-200 mt-4'
                    onClick={() => window.location.reload()}
                >
                    Generate another video
                Button>
            section>
        div>
    );
}
The Result component displays the AI-generated video in Studio Ghibli style. It also allows the user to download the video or generate a new one.
The Page Component
The app/page.tsx file renders the main Page component and conditionally displays the Loader and Result components based on the application state.
Add the following code snippet to the app/page.tsx file:
"use client";
import { useState } from "react";
import Result from "./(components)/Result";
import { Input } from "@/components/ui/input";
import { Button } from "@/components/ui/button";
import { Textarea } from "@/components/ui/textarea";
import Loader from "./(components)/Loader";

export default function Page() {
    //👇🏻 React states for manipulating the view
    const [generatingImage, setGeneratingImage] = useState(false);
    const [generatingVideo, setGeneratingVideo] = useState(false);
    const [triggerId, setTriggerId] = useState<string | null>(null);
    const [videoLink, setVideoLink] = useState<string | null>(null);

    const handleSubmit = async (e: React.FormEvent<HTMLFormElement>) => {
        e.preventDefault();
        const formData = new FormData(e.currentTarget);
        const image = formData.get("image") as File;
        const description = formData.get("description") as string;
        console.log({ image, description });
    };

    return {
        /** --- UI elements --- */
    };
}
From the code snippet above:
- The
generatingImagestate is updated while the Studio Ghibli-style image is being created. - The
generatingVideostate is updated when the AI-generated video is being processed or becomes available. - The
triggerIdandvideoLinkare values returned from the Eachlabs API. You’ll learn how to use them in the next steps.
Finally, return the following UI elements from the Page component
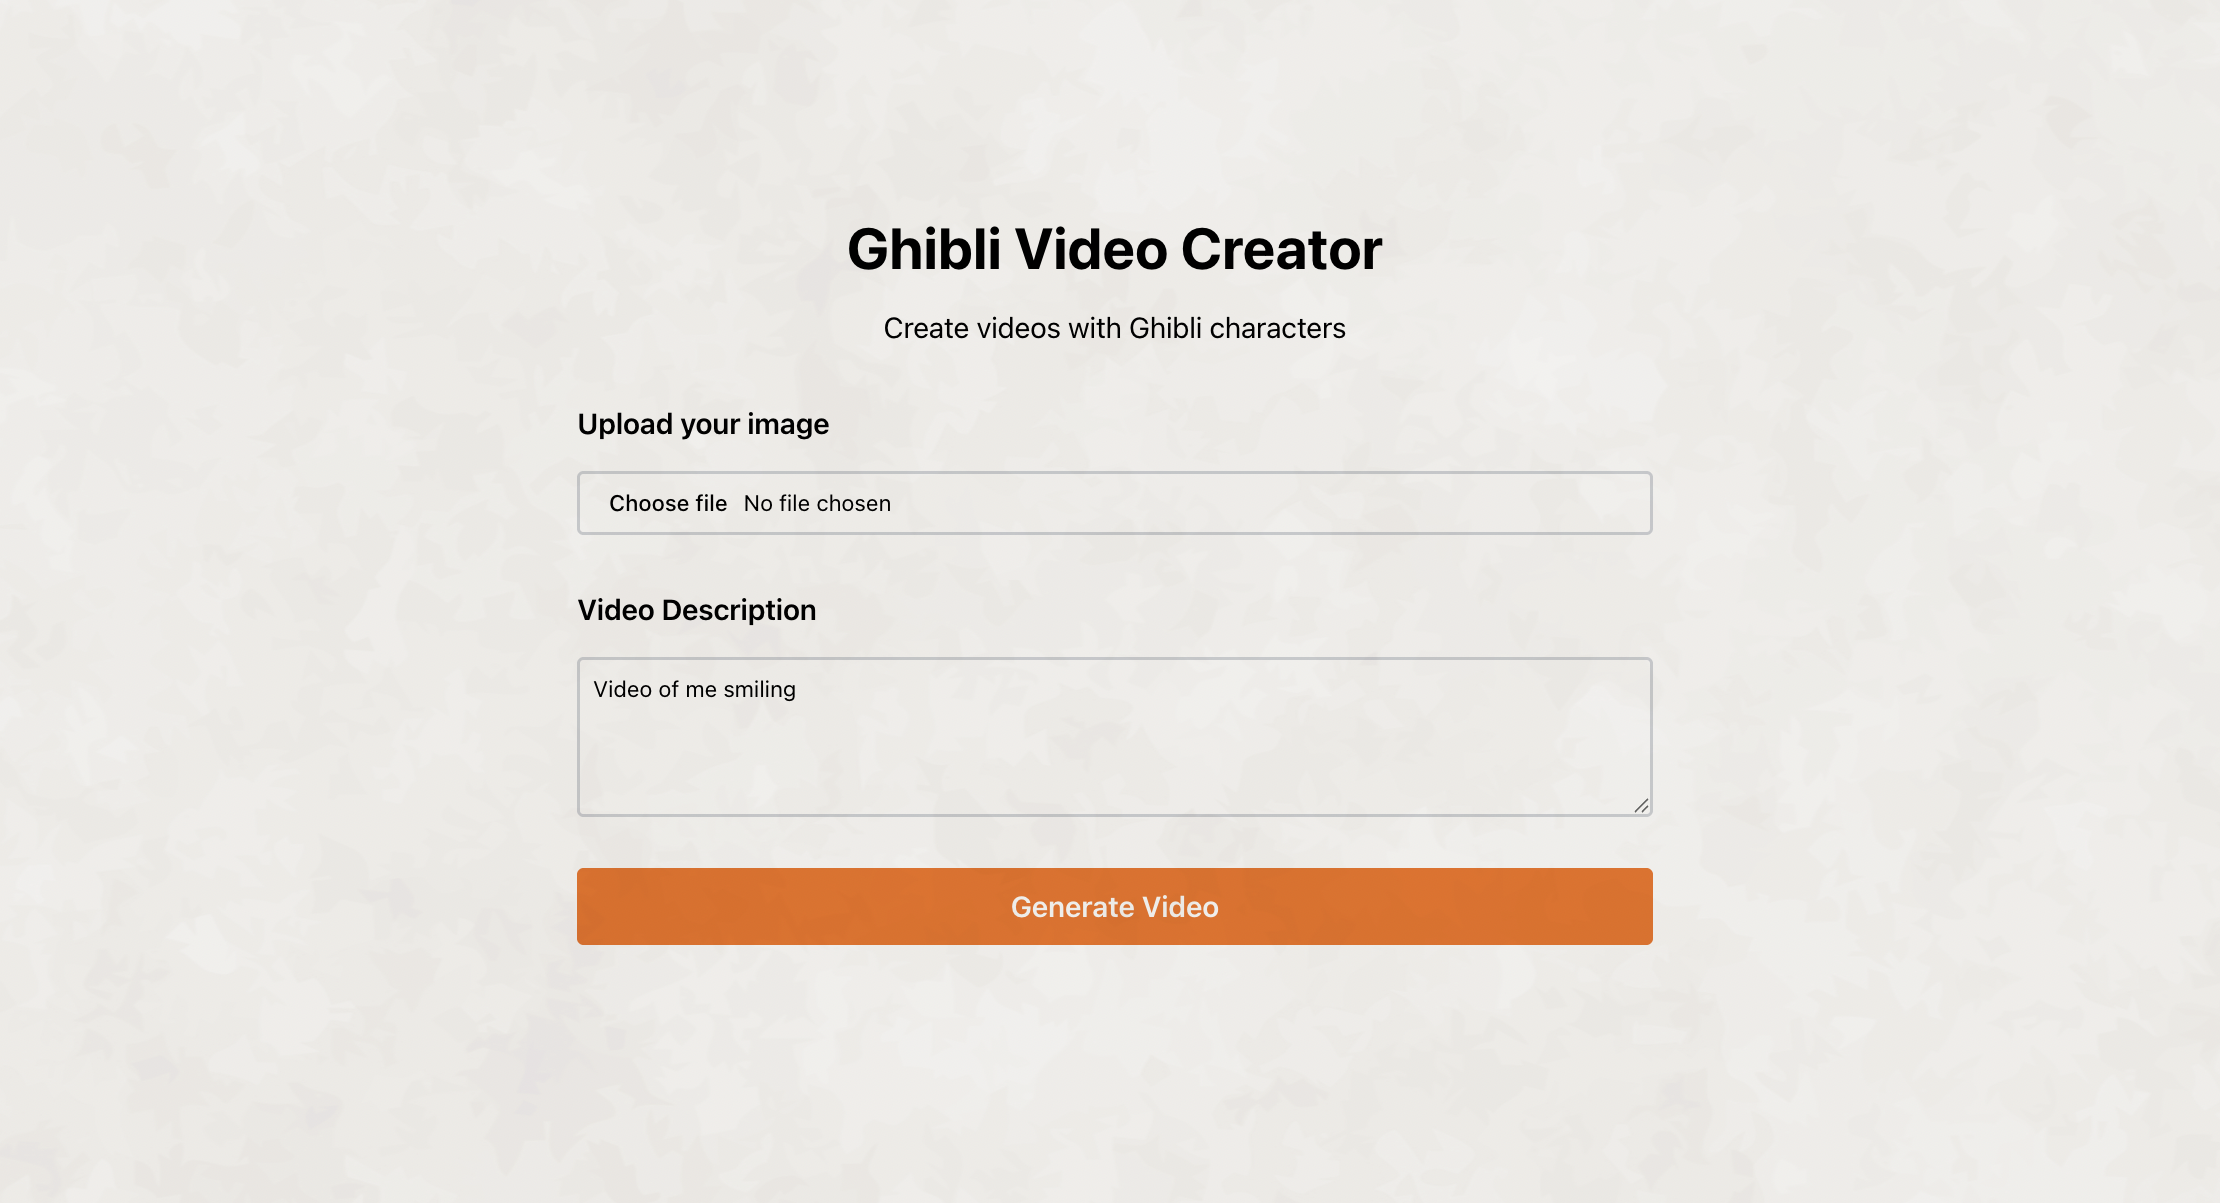
return (
    <div className='flex flex-col w-full h-screen items-center justify-center'>
        {!videoLink && !generatingVideo && (
            <div className='flex flex-col w-full h-screen items-center justify-center'>
                <h1 className='text-4xl font-bold text-center'>
                    {" "}
                    Ghibli Video Creator
                h1>
                <p className='text-lg mt-4 text-center'>
                    Create videos with Ghibli characters
                p>

                <form
                    className='mt-8 w-full max-w-2xl flex flex-col gap-4'
                    onSubmit={handleSubmit}
                >
                    <label htmlFor='image' className='text-lg font-semibold'>
                        Upload your image
                    label>

                    <Input
                        size={400}
                        type='file'
                        id='image'
                        name='image'
                        accept='.png, .jpg, .jpeg'
                        className='border border-gray-300 rounded  mb-4'
                        required
                    />

                    <label htmlFor='description' className='text-lg font-semibold'>
                        Video Description
                    label>

                    <Textarea
                        id='description'
                        rows={4}
                        name='description'
                        className='border border-gray-300 rounded p-2 mb-4'
                        placeholder='Video of me smiling'
                        required
                    />

                    <Button
                        size='lg'
                        variant='secondary'
                        type='submit'
                        disabled={generatingImage || generatingVideo}
                        className='bg-orange-500 text-lg text-white font-semibold p-4 rounded hover:bg-ogrange-600 transition duration-200 border-none'
                    >
                        {generatingImage ? "Generating Ghibli Image..." : "Generate Video"}
                    Button>
                form>
            div>
        )}
        {videoLink && <Result link={videoLink} />}
        {generatingVideo && <Loader />}
    div>
);
How to Generate Ghibli-Style Videos using AI workflows
In this section, you’ll learn how to set up Eachlabs, integrate it into your Next.js application, and create the AI workflows needed to generate a Studio Ghibli-style video.
To begin, create an Eachlabs account.
On your dashboard, Eachlabs gives you access to a wide range of text and visual AI models. You can:
- Create custom AI workflows by combining multiple models.
- Explore pre-built workflows for various use cases.
- Compare models based on results, response time, and cost to find the best fit for your application.
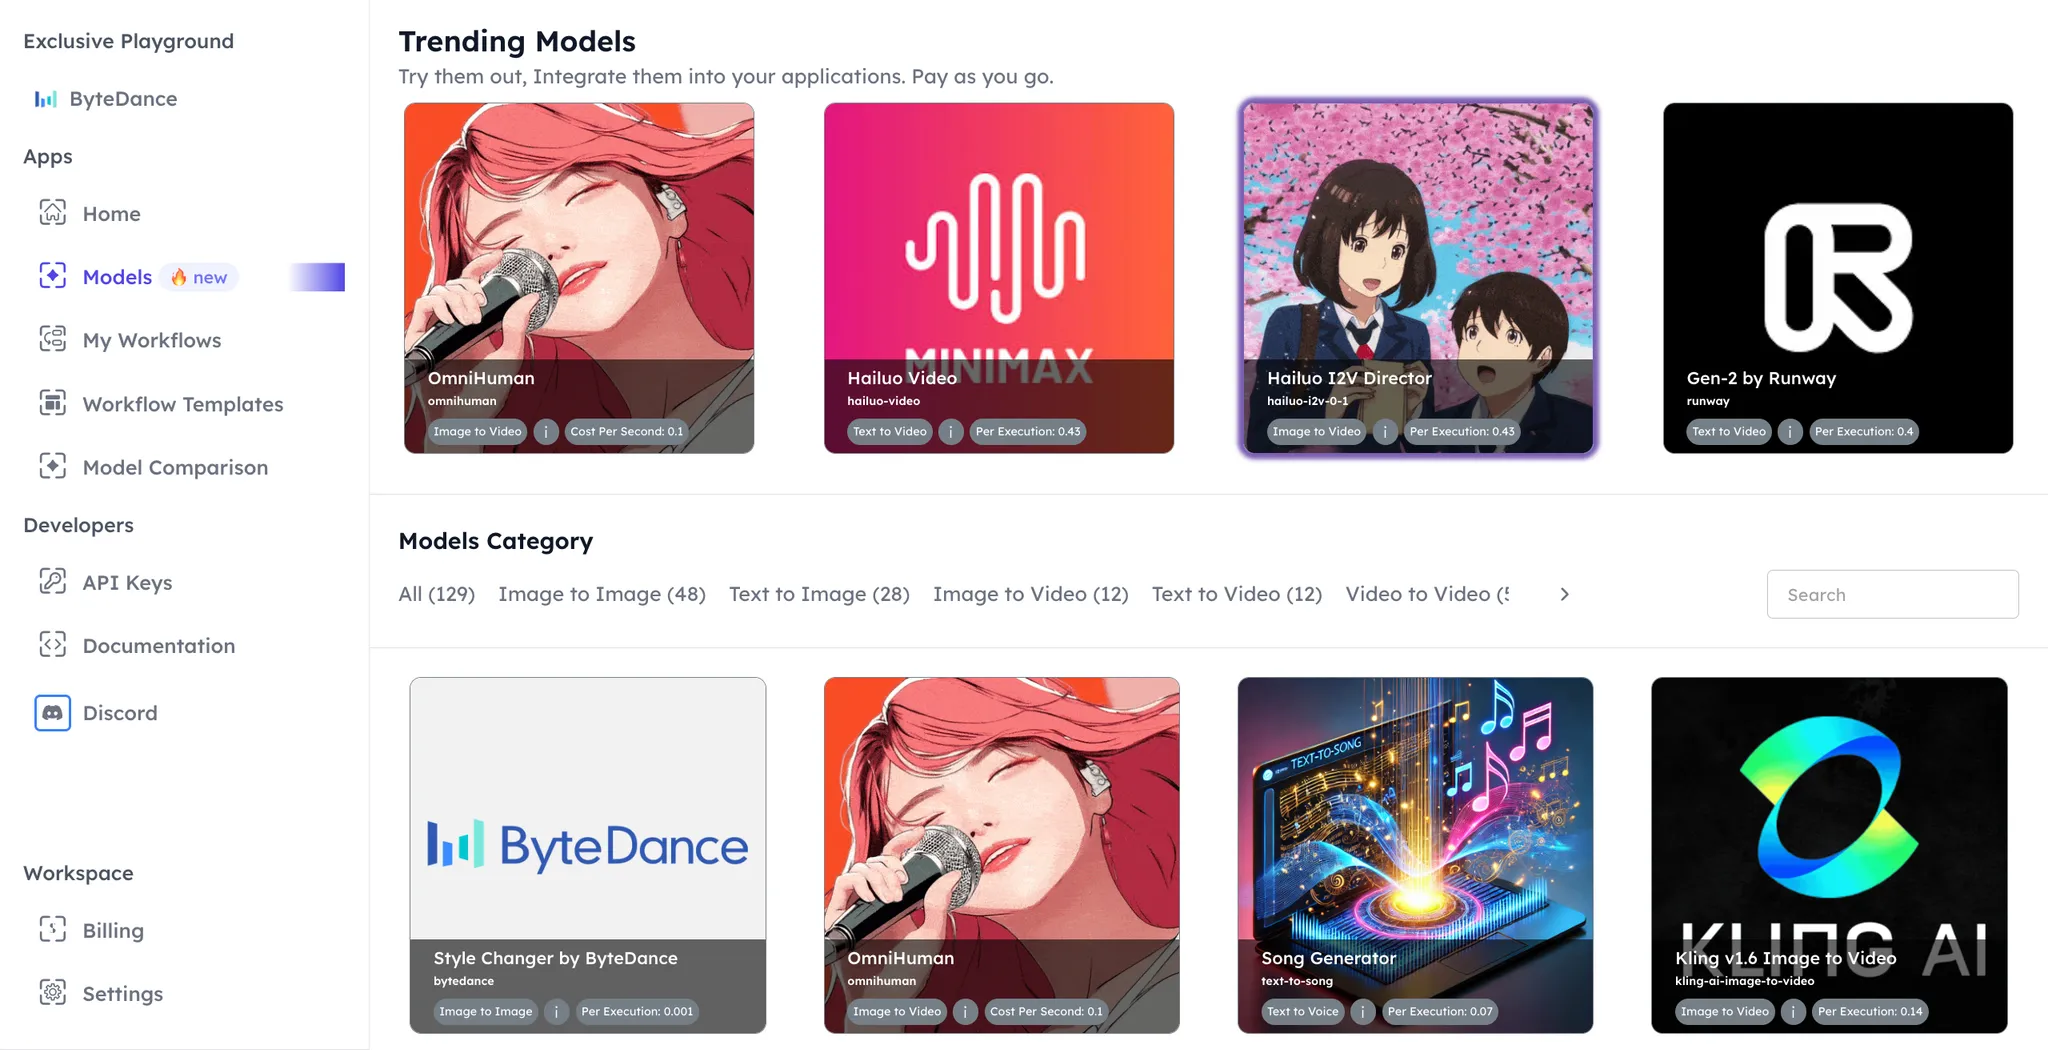
AI models are designed to perform a single task and accept specific input types such as text, video, image, or audio. They process the inputs and return the result.
AI workflows, on the other hand, combine multiple AI models, where the output of one model is passed as the input to another. This chaining allows you to perform more complex and advanced operations.
Select My Workflows from the sidebar navigation on your dashboard and click the Create Workflow button.
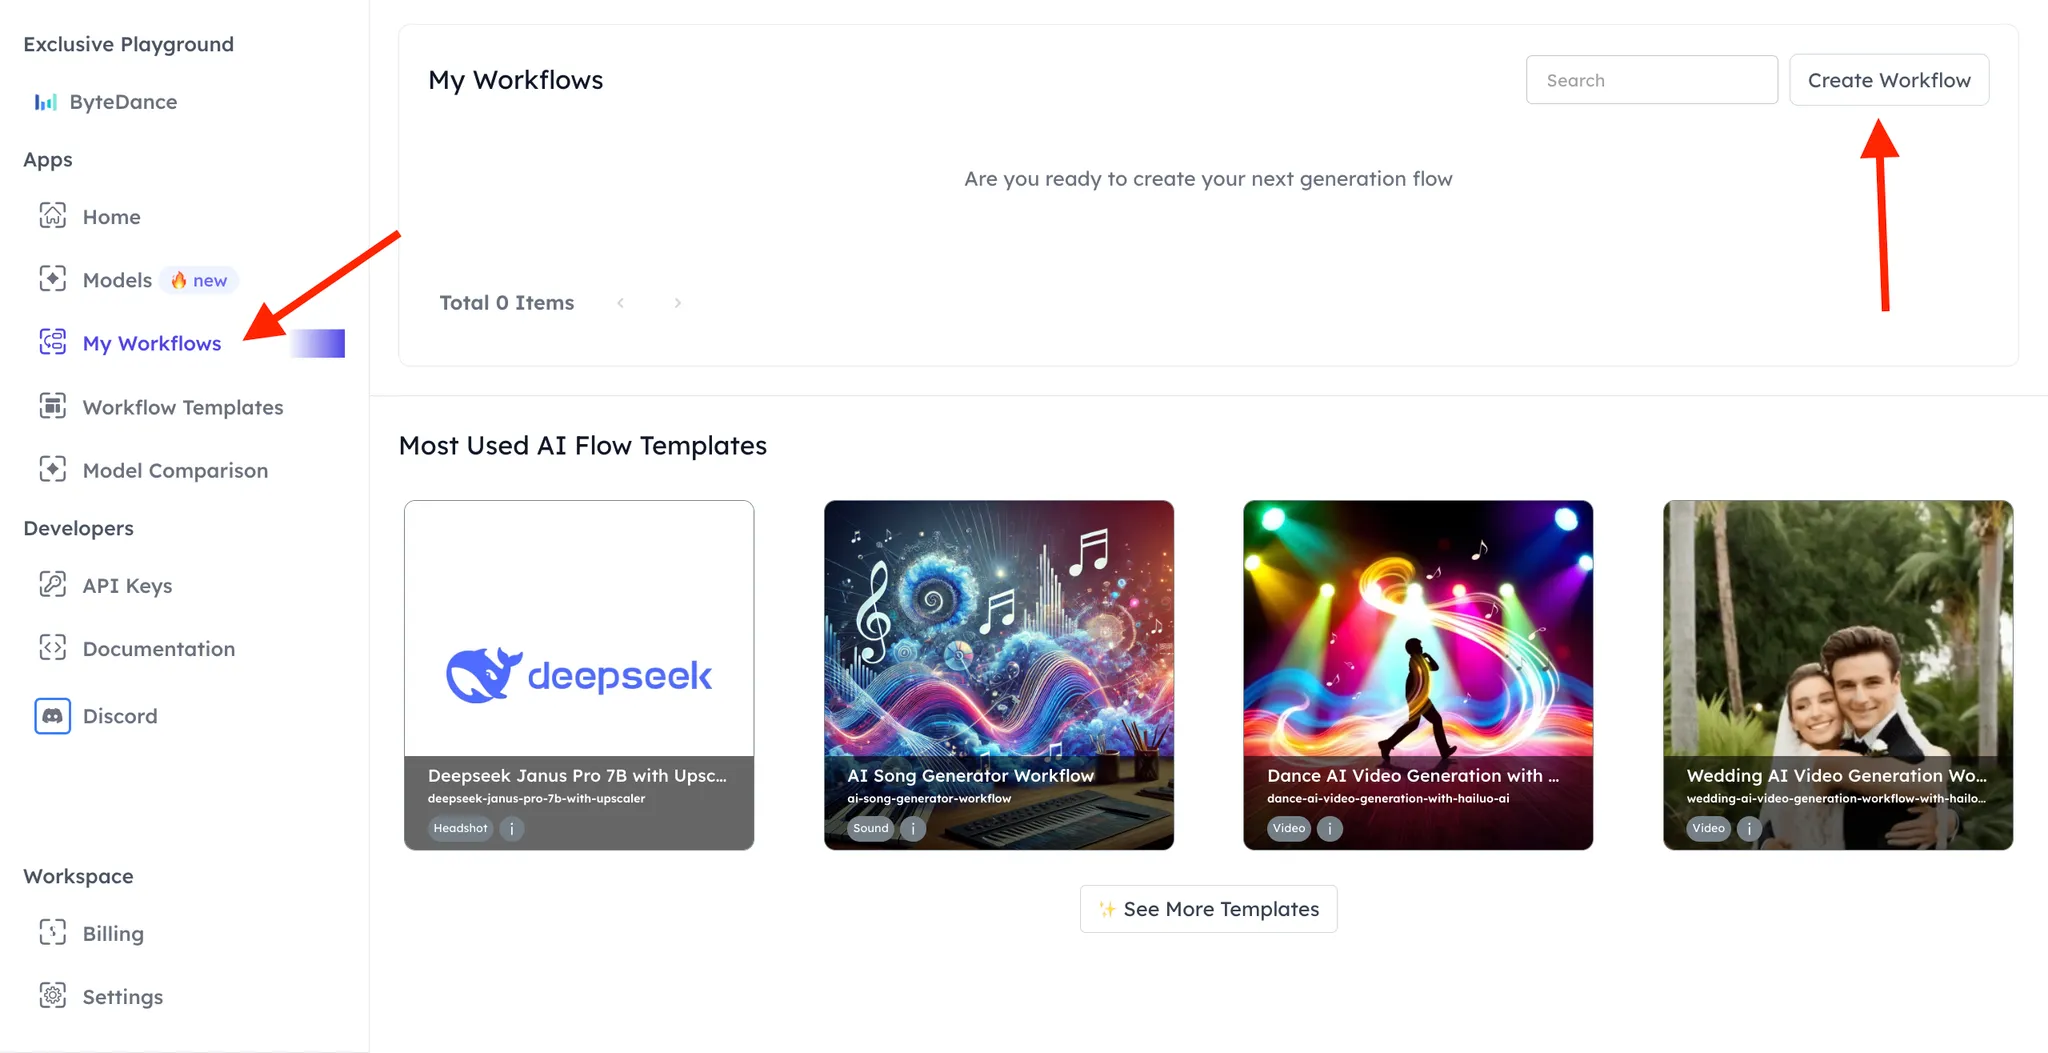
The Create Workflow button opens a new page where you can enter a name for your AI workflow, define its inputs, select the AI models to include, and generate a code snippet for easy integration into your application.
Now that you’re familiar with how Eachlabs AI works, let’s create the Studio Ghibli video workflow. Select Inputs on the canvas and add image and video description (text) inputs.
Click Add Item on the canvas, then search for the Ghibli model and add it to your workflow. This AI model will accept the image input and convert it into the Studio Ghibli style.
To convert the Ghibli image into a video, we’ll use the Pixverse model.
Search for the Pixverse model and add it to your workflow. Pass the output of the Ghibli model as the input for Pixverse, and use the video description input as the prompt to generate the video.
To integrate the AI workflow into your application, click the > icon at the top of the workflow canvas. This will display the integration code, which includes the workflow ID and your Eachlabs API key.
Finally, copy the API key and workflow ID into a .env.local file:
EACHLABS_API_KEY=
EACH_WORKFLOW_ID=
Congratulations! You have successfully created the Studio Ghibli video generation workflow.
How to Integrate AI workflows into your Next.js application
Here, you will learn how to integrate the AI workflow into your application via HTTP calls and render the results directly within the application.
First, create a Next.js API route within the application.
cd app && \
mkdir api && cd app && \
touch route.ts
Copy the following code snippet into the api/route.ts file:
import { NextRequest, NextResponse } from "next/server";

//👇🏻 -- trigger Each AI workflow and returns triggerId --
export async function POST(req: NextRequest) {
    //👇🏻 workflow inputs
    const { imageUrl, videoEffect } = await req.json();

    const options = {
        method: "POST",
        headers: {
            "Content-Type": "application/json",
            "X-API-KEY": process.env.EACHLABS_API_KEY!,
        },
        body: JSON.stringify({
            parameters: {
                imageUrl: imageUrl,
                videoEffect: videoEffect,
            },
            webhook_url: "",
        }),
    };

    try {
        const response = await fetch(
            `https://flows.eachlabs.ai/api/v1/${process.env
                .EACH_WORKFLOW_ID!}/trigger`,
            options
        );
        const data = await response.json();
        return NextResponse.json(data, { status: 200 });
    } catch (err) {
        console.error(err);
        return NextResponse.json(
            { err, status: "500", err_message: "Unable to trigger workflow" },
            { status: 500 }
        );
    }
}
The code snippet above allows the Next.js /api route to handle POST requests containing the image and video description as parameters. This route then forwards the parameters to the Eachlabs Trigger AI Workflow endpoint and returns the resulting triggerId for fetching the final video.
Next, add a GET request handler to the /api/route.ts file that uses the triggerId to fetch the result of the workflow execution.
export async function GET(req: NextRequest) {
    //👇🏻 --- triggerId from params ---
    const triggerId = req.nextUrl.searchParams.get("triggerId");

    const getOptions = {
        method: "GET",
        headers: {
            "Content-Type": "application/json",
            "X-API-KEY": process.env.EACHLABS_API_KEY!,
        },
    };

    try {
        const response = await fetch(
            `https://flows.eachlabs.ai/api/v1/${process.env
                .EACH_WORKFLOW_ID!}/executions/${triggerId}`,
            getOptions
        );
        const data = await response.json();

        //👇🏻 --- gets and cleans the video URL ---
        const url = cleanUrl(data.step_results[1].output);
        console.log({ url });

        return NextResponse.json({ url }, { status: 200 });
    } catch (err) {
        console.error(err);
        return NextResponse.json(
            { err, status: "500", err_message: "Unable to get workflow" },
            { status: 500 }
        );
    }
}

//👇🏻 -- formats/cleans the video URL --
const cleanUrl = (url: string): string => {
    if (typeof url === "string") {
        return url.replace(/^"|"$/g, "");
    }
    return url;
};
Finally, send a request to the Next.js /api endpoint when a user submits the form. The request triggers the AI workflow and also retrieves the video URL using its trigger ID.
Update the handleSubmit client function as shown below:
const handleSubmit = async (e: React.FormEvent<HTMLFormElement>) => {
    e.preventDefault();
    //👇🏻 Ghibli image generation begins
    setGeneratingImage(true);

    //👇🏻 retrieves from data
    const formData = new FormData(e.currentTarget);
    const image = formData.get("image") as File;
    const description = formData.get("description") as string;

    //👇🏻 converts raw image to URL
    const base64Image = await new Promise<string>((resolve, reject) => {
        const reader = new FileReader();
        reader.onloadend = () => resolve(reader.result as string);
        reader.onerror = reject;
        reader.readAsDataURL(image);
    });

    //👇🏻 makes a POST request to trigger the workflow
    const response = await fetch("/api", {
        method: "POST",
        headers: { "Content-Type": "application/json" },
        body: JSON.stringify({
            imageUrl: base64Image,
            videoEffect: description,
        }),
    });
    const data = await response.json();
    if (!data.trigger_id) return alert("Error: No trigger id found");

    //👇🏻 stores trigger ID and updates React states
    setTriggerId(data.trigger_id);
    setGeneratingImage(false);
    setGeneratingVideo(true);

    //👇🏻 countdown before the retrieving workflow result
    await new Promise((resolve) => setTimeout(resolve, 150_000));

    //👇🏻 retrieves workflow result
    await fetchVideo(data.trigger_id);
};
The handleSubmit function does the following:
- accepts the image and video description from the form data,
- converts the image to base64 format,
- makes a POST request containing the video description and the base64 image to the Next.js API endpoint and retrieves the workflow trigger ID,
- waits for 2mins and 30secs, giving the workflow enough time to complete.
Finally, create the fetchVideo function. This function accepts the trigger ID as a parameter and sends a GET request to the API endpoint to retrieve the generated Studio Ghibli video URL.
//👇🏻 accepts trigger ID and returns the Ghibli video URL
const fetchVideo = async (trigger_id: string) => {
    if (!triggerId && !trigger_id) return;

    //👇🏻 makes GET request
    const response = await fetch(`/api?triggerId=${trigger_id}`, {
        method: "GET",
        headers: {
            "Content-Type": "application/json",
        },
    });

    const data = await response.json();

    //👇🏻 gets video URL and updates the React state
    setVideoLink(data.url);
    setGeneratingVideo(false);
};
Congratulations! You've completed this tutorial. The source code for this article is available on GitHub
Next Steps
So far, you’ve learned how to build a Studio Ghibli video creator application using Next.js and Eachlabs. You’ve also seen how to integrate multiple AI models into a single workflow, enabling you to perform complex operations.
Apart from using the APIs and SDKs to trigger flows or retrieve results, Eachlabs also supports webhooks, enabling you to connect and trigger events within your application when specific actions are completed.
Eachlabs allows you to compare and use multiple AI models to create highly performant and scalable applications. It also provides ready-to-use workflow templates and access to various AI models from top providers like Kling AI, Hailuo AI, Elevenlabs, Runway and many others.
Here are some useful resources to help you get started:
Thankyou for reading! If you found this article useful, share it with your peers and community.
If You ❤️ My Content! Connect Me on Twitter
Check SaaS Tools I Use 👉🏼Access here!
I am open to collaborating on Blog Articles and Guest Posts🫱🏼🫲🏼 📅Contact Here
