
video of this document: https://www.youtube.com/watch?v=0vCb9bYuN9Q&t=833s
Format of the Session:
- Overview of user provisioning.
- Hands-on exercise for setting up integration.
- Discussion on access control models.
- Creation of roles for provisioning.
What is Provisioning?(1:24)
Definition
User Provisioning: The process of creating user accounts in one or more applications within a corporate environment.
- Involves pushing user profile information and entitlements (permissions) associated with those accounts.
Importance
- Attribute Variability: Different applications have different requirements for user attributes.
- Active Directory & LDAP: More flexible with customizable attributes.
- AWS/Salesforce: Limited and specific attributes that are necessary for those services.
Key Aspects of Provisioning
- Account Creation: Establishing new user accounts.
- Modification: Updating user accounts based on: Job changes (e.g., title, department). Personal life changes (e.g., name changes).
- De-provisioning: Terminating access for users who no longer need it.
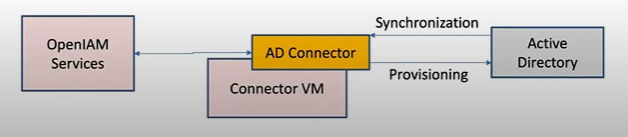
Synchronization vs. Provisioning
Synchronization:
One-way process where information is pulled from a source (e.g., Active Directory) into OpenIAM.
Provisioning:
It's the process where data is pushed from OpenIAM to the target application (e.g., creating or updating accounts in Active Directory).
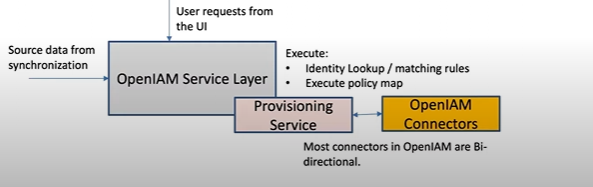
How Provisioning Works(4:17)
1.Initiation of Requests
Provisioning requests can originate from various sources:
User Interface (UI):
Actions taken by users or administrators, such as creating accounts or self-registration.
API:
Any UI operation ultimately goes through the API layer, meaning API calls can also initiate provisioning.
Source System Integration:
Data can be pulled from systems like HR through a synchronization process, which then feeds into the provisioning workflow.
2.Service Layer and Database
Once a request is initiated:
The data is sent to the service layer.
The service layer persists this data into the OpenIAM database.
3.Provisioning Service
A dedicated provisioning service processes the request:
Request Evaluation:
This service analyzes the request to determine which systems will be affected.
It uses predefined rules based on attributes like job title, location, or specific requests for group memberships.
4.Determining Affected Systems
The provisioning service acts as a broker to identify:
Target Systems:
Which applications need to be updated based on the user’s attributes or specific requests.
Entitlements:
What permissions or roles the user should have within those systems.
5.Message Publishing
After determining the necessary actions:
The provisioning service creates a data packet that specifies what the connectors should write to the target systems.
This packet includes details like user identity, organizational unit (OU), supervisors, and department locations.
6.Role of Connectors
Connectors are responsible for the actual communication with the target systems:
No Business Logic:
Connectors do not contain any business logic; they are agnostic to the specifics of the data being processed.
Data Handling:
They simply receive the data packets from the provisioning service and execute the necessary actions in the target systems.
7.Policy Map
The policy map is a crucial component in this process:
Attribute Calculation:
The policy map defines how various user attributes are calculated and what rules apply for provisioning.
Centralized Logic:
All business logic related to user identity and entitlements is handled in the OpenIAM service layer, ensuring that connectors remain simple and focused solely on data transmission.
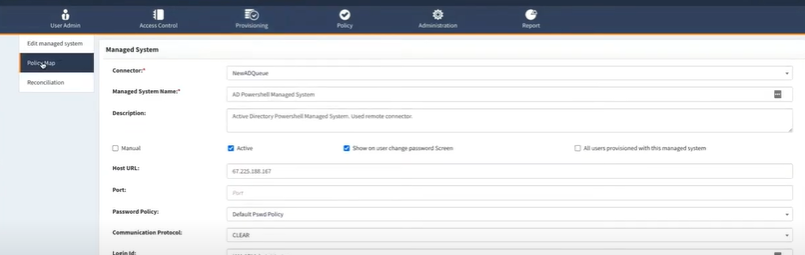
the Manage System
1.Definition:
The manage system represents a configuration for a specific instance of an application (like Active Directory, Linux, AWS).
Each manage system can point to different tenants or instances, each with unique management requirements.
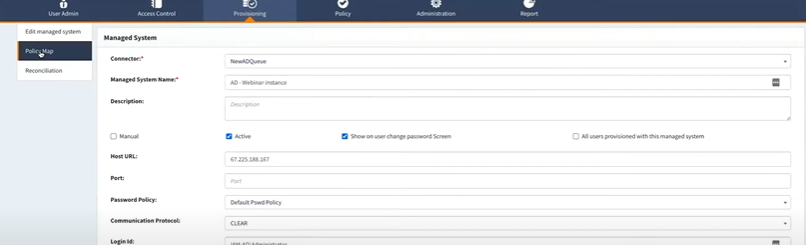
2.Components:
Connection Configuration: This is where you set up how to connect to the application.
Policy Map: This defines the rules for provisioning various objects (users, groups, roles) within the system.
Reconciliation Screen: This is used to ensure that the objects in the manage system are correctly synchronized with the application.
1.Multiple Manage Systems:
You can have multiple entries for manage systems to represent different identities (e.g., normal users vs. admin accounts).
2.Policy Map Creation:
When creating a policy map, you can specify what type of objects to provision (e.g., users, groups, computer objects).
The policy map is initially blank, and you can add mappings for the attributes you want to manage.
Building Out the Policy Map
1.Attributes and Policies:
Each mapping consists of an attribute name (fields within AD) and a policy (rules for data retrieval).
For example, you might define an attribute for the sAMAccountName (the username) and specify a policy for how this data is processed.
2.Extending the Schema:
You can easily add new attributes to the policy map to accommodate custom schemas in AD.
This flexibility allows you to adapt to various organizational requirements without needing to create new schema classes.
Creating a New User(17:09)
1.User Creation Process:
You can create a new user through the user admin screen.
The classic view allows you to see core fields without customization, making it easier for beginners.
2.Filling in User Details:
As you fill in the user details, ensure that all required attributes are included (e.g., username, primary email address, supervisor).
The policy map can automatically compute certain values based on predefined rules.
3.Supervisor Relationship:
When assigning a supervisor, ensure that the supervisor exists both in AD and within your management system.
This relationship is crucial for maintaining accurate user profiles and permissions.
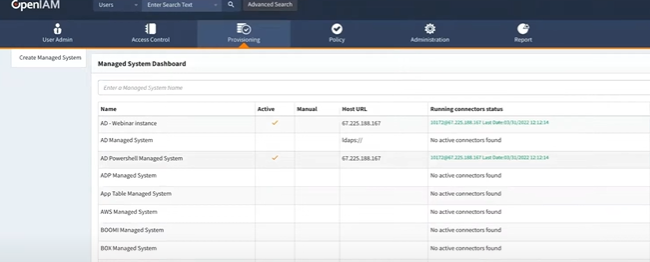
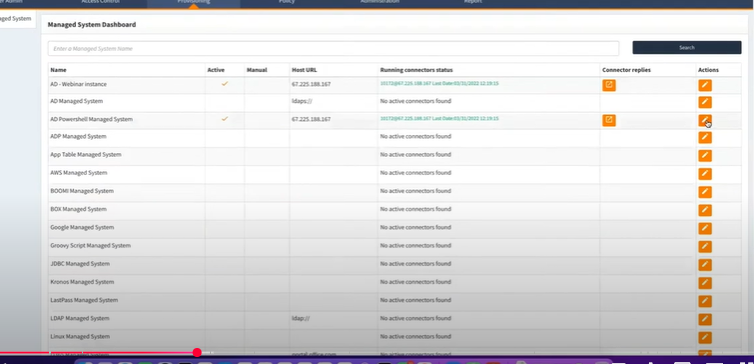
Active Directory Connection(9:18)
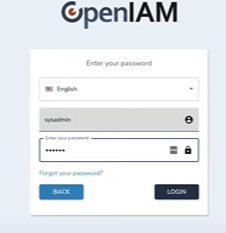
let’s review the configuration and status of our Active Directory connection.
please ensure you log in using your credentials.
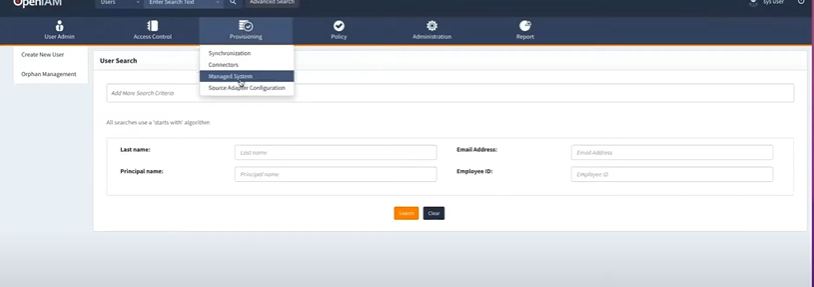
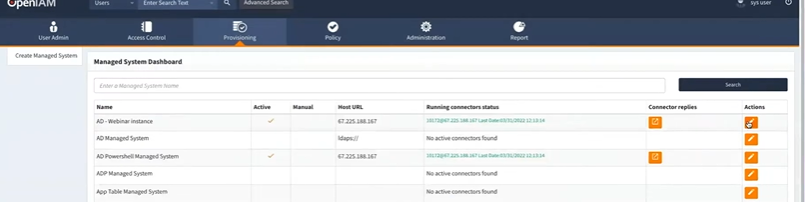
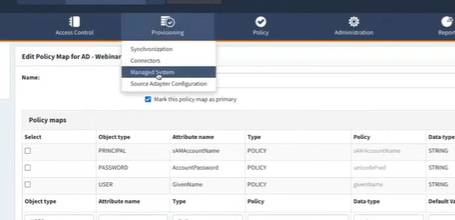
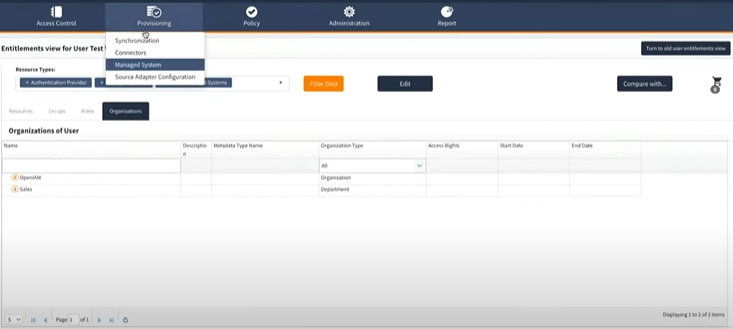
To access the system management options, navigate to the provisioning tab and select "Manage System."
Configure an application to represent multiple identities, such as normal users and admins(10:25)
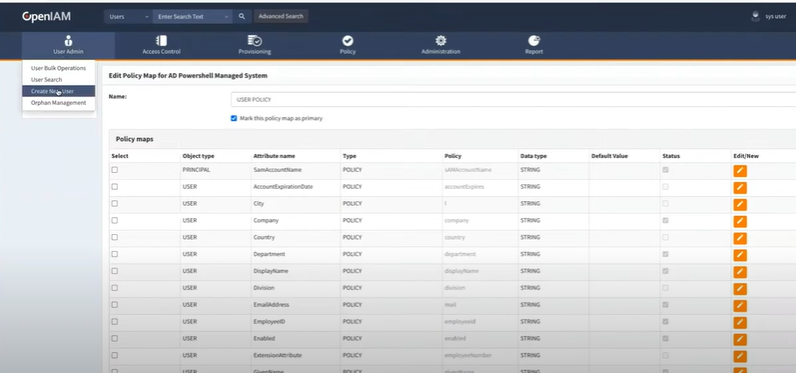
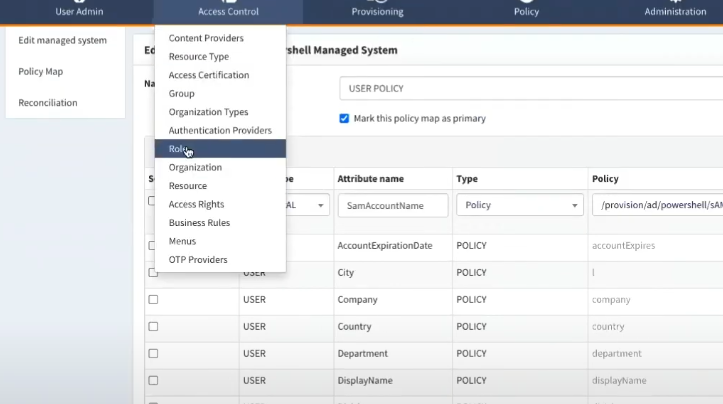
let's navigate to the policy map
choose policy map
Please select the "Add" button to proceed.
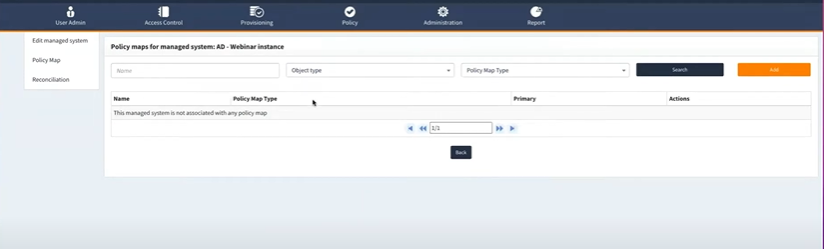
To proceed, please select the "Provision User" option as the appropriate choice, and then click on "Add."

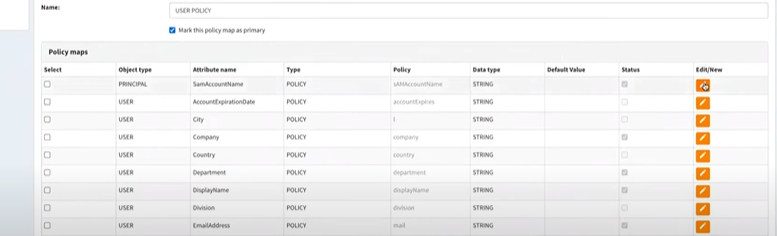
To create a user, please enter the name in the designated input field and ensure you select the option to mark this policy map as primary.
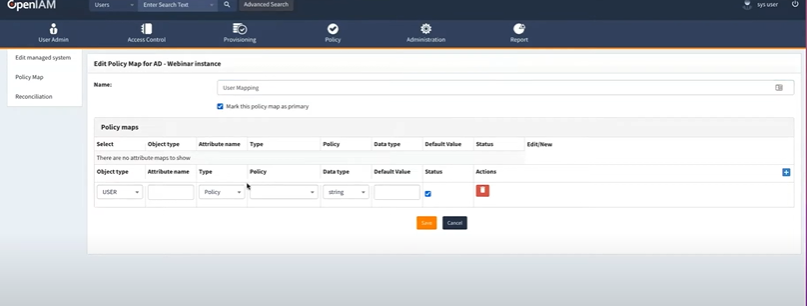
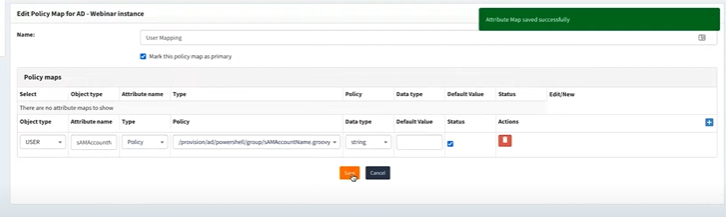
The attribute name will align with the "Sameaccount".and set the datatype to "string," and then click "Save."
(
12:49
so this is my my script and data type is going to be a string
)
Kian, it seems there’s a need to fill the policy with a specific script, but the exact script hasn’t been mentioned.
There are a few key attributes we need to focus on. Please proceed by selecting "Edit" to make the necessary adjustments.

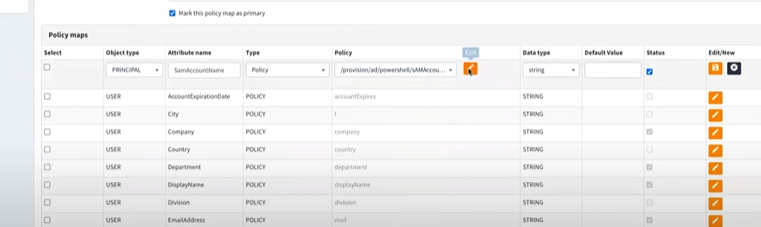
set object type principal in this part
(The principal attribute, often similar to a primary key)

also add new user and then fill attribute name and another part like before, then click save.
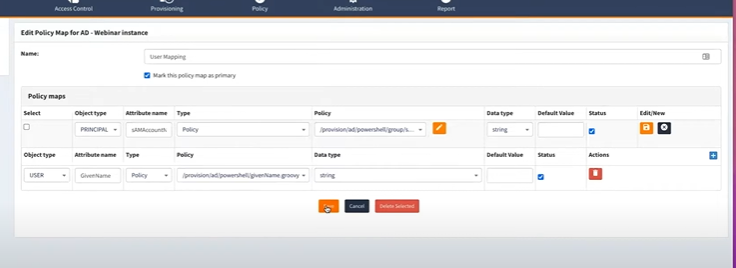
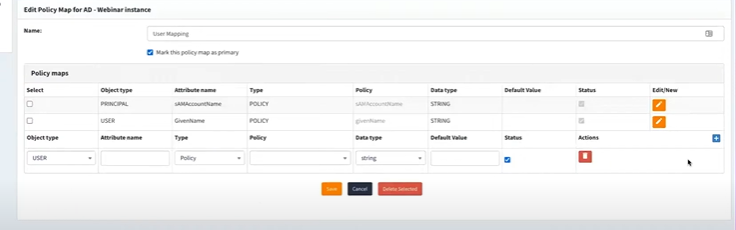
Once you complete the steps, the screen displayed should match the one shown below.
This is a common question: can I extend the schema ?
Yes, you can extend the schema in LDAP systems, those schemas are often very customized. In order to centralize.
You can type in the attribute name and have a rule for it here

To access the system management options, navigate to the provisioning tab and select "Manage System."
let's work on AD powershell management system
Then choose policy map
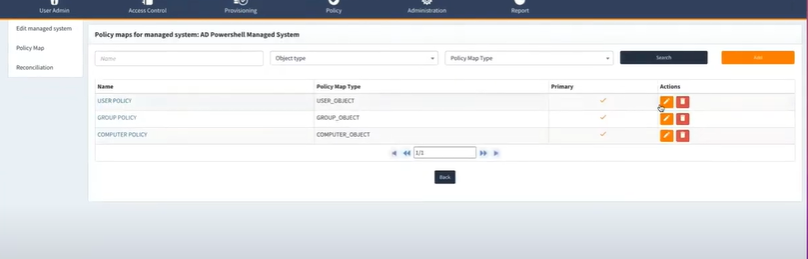
In here we'll see the same account name and all the attributes that we want to build the provision
To proceed, we will map the configuration to either a group or a role. And, we can test the mapping to ensure it functions as expected.
Let's go to our user admin and create a new user.
Creating a new user (17:15)
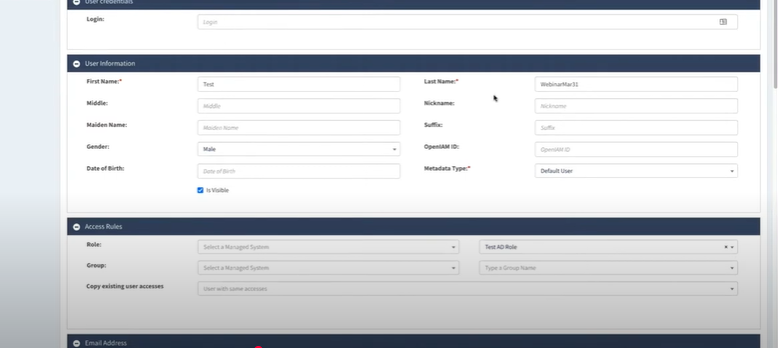
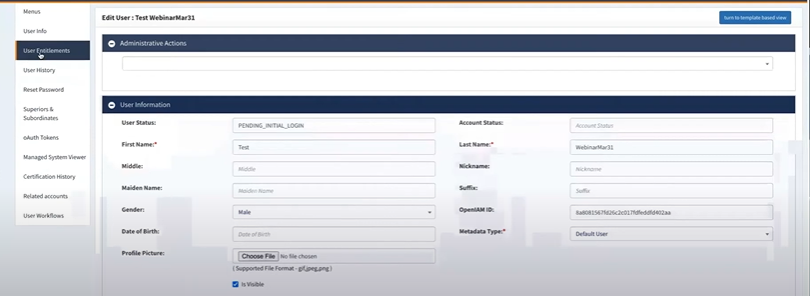
First, Let's cover the difference between the template model versus the classic view. The classic view is really just a leftover from an earlier version of OpenIAM, which kind of lifts out all the core fields without you having to do any customization. It's still pretty convenient when you're just getting started since you don't have to do any extra configuration steps. But I think from a long-term perspective,the template view is much more desirable because you can limit your view to focus on the attributes that you care about.
To proceed with filling the user information, we will select specific attributes relevant to the process. Additionally, a default metadata type will be assigned, which aligns with the established access control model. Since the role has already been created, it can be directly utilized for this purpose. However, for reference, I can also outline the steps that would have been followed to create the role if it were not pre-existing.
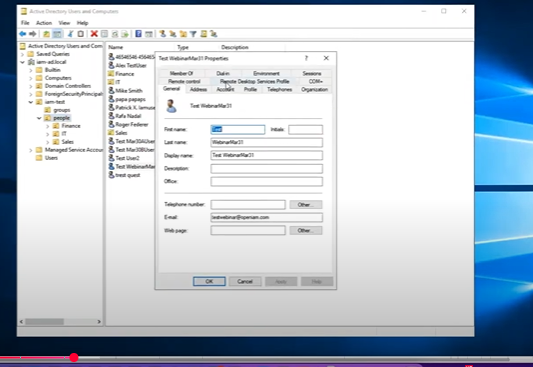
Kian, in case you can't read this user information, I typed all fields that he filled here for you. My quality is 1080, but it's not totally visible.
first name : Test
last name : Webinar31 Right
gender : Male
metadata type: DefaultUser
role placeholder (type role name): Test AD Role
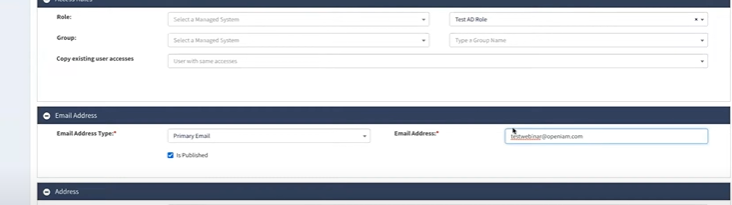
email address type: Primary Email
email address: [email protected]
select organization: OpenIAM
you should leave the login open here so the policy map will actually compute it.
supervise type :defult supervisor
supervisor:(19:10)

The notifications part should be like this:

Clicking save, and the process has started
Publishing the new user(19:44)
this will be updated shortly to reflect the changes being appended.(19:57)

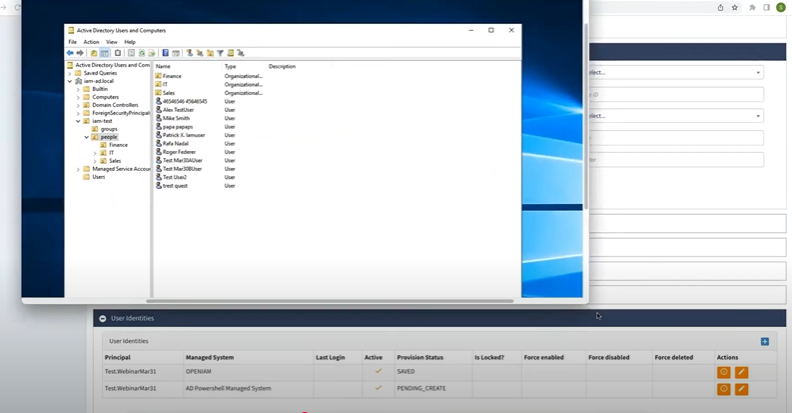
We should refresh people in this step.
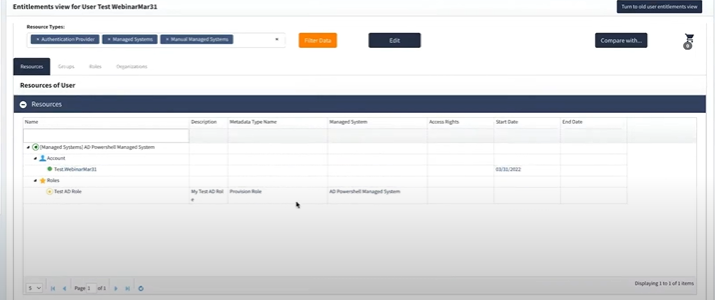
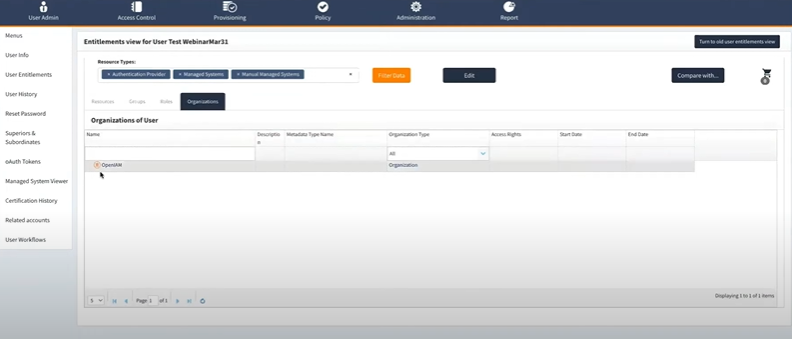
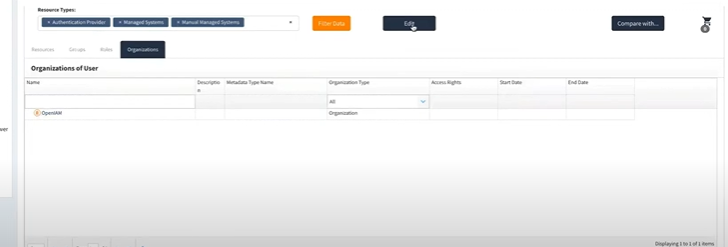
We can see all the info that was filled before in here
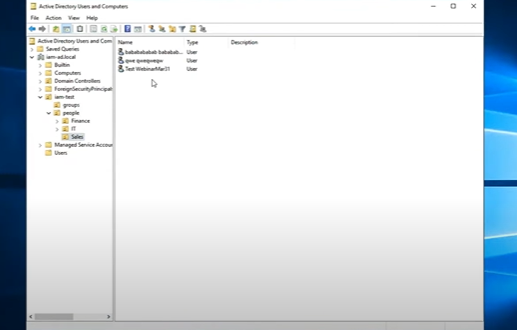
If you notice in our infrastructure, we have a finance
and a sales department, and we would really like to have the users created in the department they belong to. However, as you saw when we created this user, there was no department selected. So, let's go ahead and modify this user first.
Check if our user identity has been updated, and the transaction is completed.(21:20)

We can see the accounts being created and see a start date here.
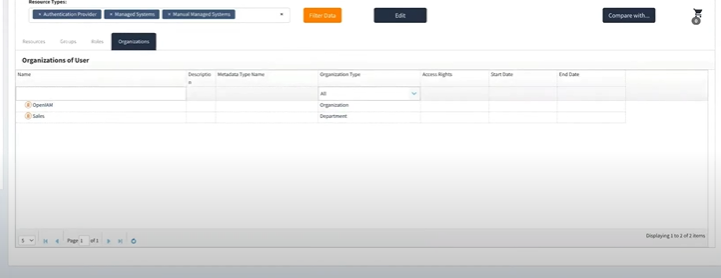
In the organization, select "OpenIAM"
click on Edit
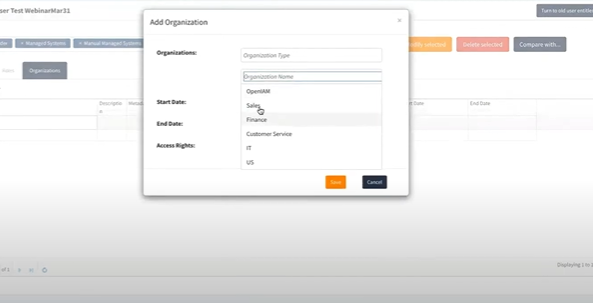
and then choose Add and organization
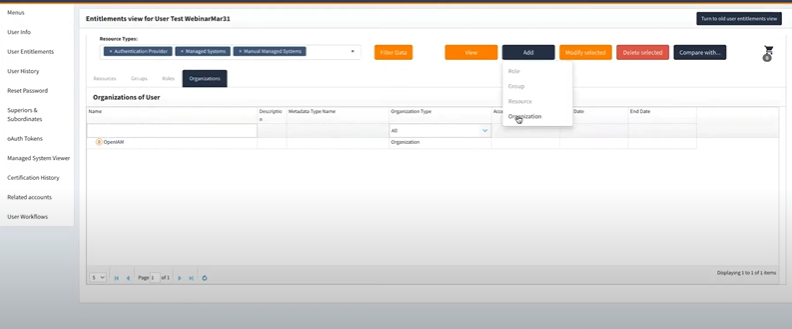
and then choose sales department and then click save
If i look at the organization view the sales department's been added
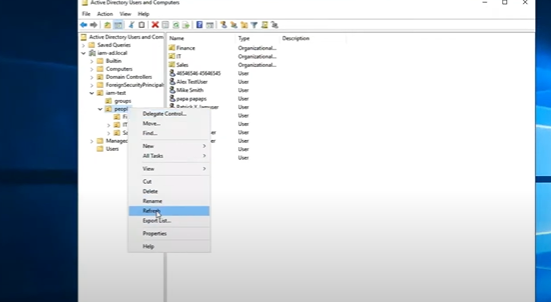
In Active Directory, view the user that exists in the People folder. If you refresh your screen, it should move to the correct place (Sales folder).
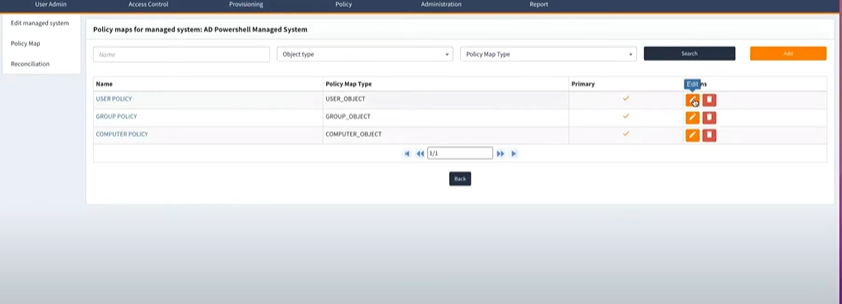
Policy map(22:54)
Let's take a look at our policy map so we go back to the managed system.
We opened Ad Power-shell Managed System

and then we opened the policy map
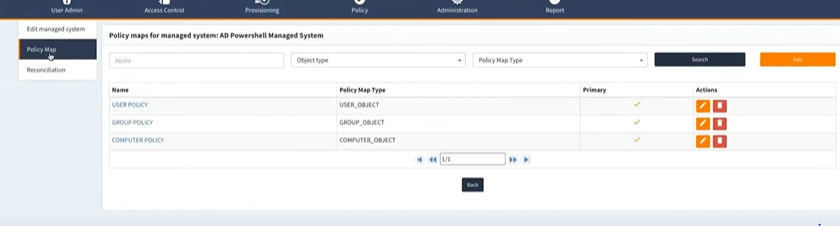
We want to edited user policy
Let's take a look at SameAccountName first of all
(23:09
and let's take a look at how a couple of these things are behaving so let's take a look at sam account name first of all
23:16
and we could take so these are all groovy scripts right so and these are really out of the box)
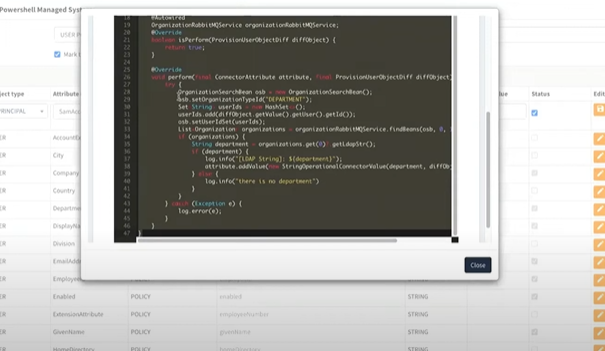
you'll see that the bulk of the work is done in this script
To ensure the process is accurate, the first step involves verifying whether the calculated identity already exists. If it does, it is essential to confirm that the provided account name is indeed unique before proceeding.
The loginExists method is a Boolean function that communicates with a service via RabbitMQ to determine whether a specific record exists. If the record is found, the method ensures that it is made unique.
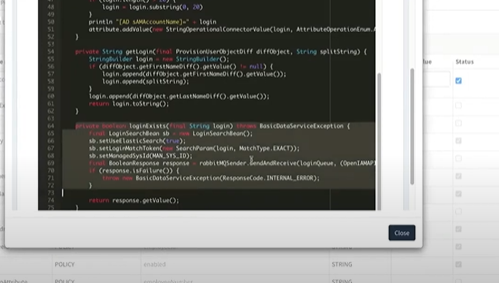
note : Check if this identity already exists in the Openly repository (not the target app) If it exists, then create a new identity which takes into account rules to make it unique.
If we examine the path attribute, we can see that it is the primary element responsible for managing the organizational unit (OU).


The process involves retrieving the department object, identifying the organizational unit (OU) associated with it, and subsequently ensuring that the creation occurs within the correct and designated structure.
Scripting(25:29)
Default Scripts:
OpenIAM comes with default scripts that can be modified for core applications.
Script Organization:
Scripts can be categorized into two buckets:
Common Scripts: These include basic attributes (e.g., first name, last name, department) that are consistent across applications and can be reused, especially when connected to multiple Active Directory (AD) domains.
Variation-Specific Scripts: Only variations need to be created for different connectors, reducing redundancy.
Groovy Editor:
Scripts can be created and edited in OpenIAM’s Groovy editor.
The editor includes a compilation feature that ensures scripts compile correctly before saving.
Versioning and Descriptions:
The upcoming version (4.2.2) includes enhancements such as:
Ability to define descriptions for each script.
Filtering capabilities for easier management.
A built-in versioning engine to manage script versions and allow rollbacks.
Effort Management:
While some work is involved in designing scripts correctly, maintaining consistency across applications should prevent this from becoming a monumental effort.
Additional Questions(28:03)
Are there scripts mapped outside of Docker?
Yes, if you make modifications to scripts and store them in Docker volumes, those changes will persist even after restarting Docker or upgrading the container. Docker volumes are designed to maintain data independently of the container lifecycle. This means your modified scripts will not be overwritten during updates, as the upgrade process respects the contents of the volumes. The scripts remain accessible within the file system wrapped inside the Docker volume, likely associated with the groovy manager container in your setup.
How do you manage the enforcement of attributes from openIAM target system?
the enforcement of the attributes is going to be through that policy map, so the policy map is going to dictate
that the attributes which are required for your target system are in fact being sent. If those attributes aren't available then the transaction will likely fail,
so think about like we sent that request for ada and let's say we left out the SameAccountName well without that, the transaction is going to fail and we're going to return back a failure.
How is it possible for OpenIAM to send emails to an email address that does not exist?
OpenIAM can send emails to addresses that do not exist on an email server by using its own SMTP(Simple Mail Transfer Protocol) account for notifications, even if the customer lacks their own email server. For effective communication, users need valid email accounts to receive these notifications. In many companies, it’s common to avoid sending emails to personal accounts to protect corporate information; instead, notifications can be sent to the hiring manager, who can provide new hires with their temporary credentials. Another approach is to implement an account claim process for new hires, though this may complicate access to systems like Windows or macOS. Companies should also consider their policies on email distribution and onboarding to ensure secure communication.
How do we ensure that updates remain synchronized between OpenIAM and external systems,and how do we validate it?
if OpenIAM is configured as the master source for information, any modifications made externally (e.g., in Active Directory) need to be synchronized back to OpenIAM. The synchronization process effectively updates OpenIAM with changes, such as moving a user to a different organizational unit (OU) or group. However, for deeper validation and enforcement of rules regarding these changes, the reconciliation feature becomes essential. Reconciliation allows for comparison of data between OpenIAM and the target system, enabling actions such as accepting changes made externally, restoring previous values, or alerting administrators about discrepancies. This process ensures that data integrity is maintained between the two systems according to predefined rules.
Can you explain the relationship between users and their identities in the system?
During the user creation process, a single user can have multiple identities or accounts, exemplified by the one-to-many relationship between a user in OpenIAM and their corresponding account in Active Directory. This allows a user profile to maintain several accounts across various systems. Additionally, users may possess more than one account within a target system, such as a standard account and a privileged admin account, which can coexist. There are two approaches to manage this: creating a separate management system for admin accounts or establishing related accounts within a user profile. The latter option offers greater flexibility by providing a clear view of access and entitlements associated with the privileged account. Furthermore, both the user and identity objects can have their own attributes, including predefined ones (like account status and creation date) as well as custom attributes defined by the organization.
Access Control Model(36:42)
The OpenIAM access control model is composed of four key objects:
1.Roles
Roles are essential for defining user permissions and responsibilities.
They support inheritance, allowing for cleaner role modeling by abstracting base roles.
2.Groups
Groups serve as a way to categorize users and permissions.
Similar to roles, they can inherit properties, facilitating easier management.
3.Resources
Resources represent various entities within the system, such as management systems, URLs, or specific items (e.g., laptops).
They provide an open-ended approach to access control, allowing for diverse representations.
4.Organizations
Organizations help structure access control across different business units or divisions.
Key Features
Metadata Types
Allows the creation of virtual types to accommodate different systems' terminology (e.g., "AD group" vs. "Salesforce profile").
Enables the definition of custom attributes for each object, enhancing the accuracy of representation.
Inheritance Capability
Supports inheritance for roles and groups, promoting cleaner and more efficient role modeling.
Attribute Definition for Permissions
Attributes can be defined to control permissions at the object level.
Permissions can vary widely across systems, such as:
File systems: read, write, execute
Banking systems: credit limits on approvals and loans
Business Roles and Access Control
Business Roles
A business role, such as a sales manager, can encompass access to various systems (e.g., Salesforce).
Permissions may include:
Active Directory (AD) accounts
Organizational Unit (OU) memberships
Group memberships
These roles can be viewed as templates that provide a comprehensive collection of access rights.
Hybrid Approach
Many companies adopt a hybrid approach to role-based access control (RBAC).
Defining a complete role model for a large corporation is challenging and time-consuming, especially when dealing with different departments.
It is advisable to define known roles iteratively, updating and adding new roles over time as they are discovered.
Iterative Role Definition
Organizations should not delay project rollouts by spending excessive time trying to finalize their RBAC model.
Roles are likely to change due to organizational shifts, so an iterative approach allows for flexibility and adaptation.
Direct Entitlement Model
OpenIAM supports a direct entitlement model, allowing access based on roles and direct entitlements to groups or other resources outside of the defined roles.
This hybrid model accommodates real-world scenarios, enhancing adaptability in access control management.
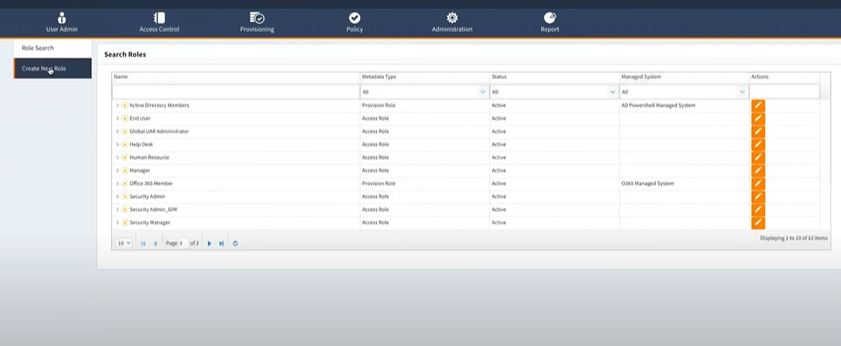
Access Roles(43:35)
we go to access control and then select role
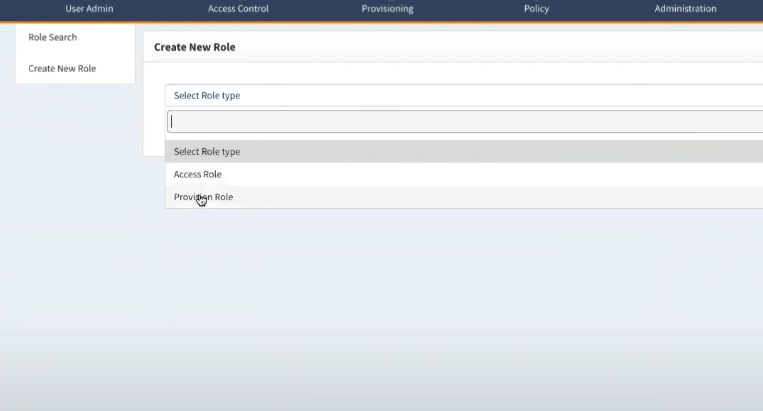
then choose create new role
Access Roles vs. Provisioning Rules
Access Roles
Access roles are designed to manage and control access within a system.
They primarily focus on Single Sign-On (SSO) functionalities, determining what users can access once they are authenticated.
Provisioning Rules
Both roles serve to manage access, but they have distinct focuses:
Access Role: Emphasizes SSO and direct access control.
Provision Role: Concentrates on provisioning and managing user access rights.
if we're developing roles which are really going to control SSO, choose Access Role. Although here we choose Provision Role.
Create New Roles(44:02)
Let's create a new user :
Role Name: Accounts Payable Role
role-managed system : AD PowerShell managed system
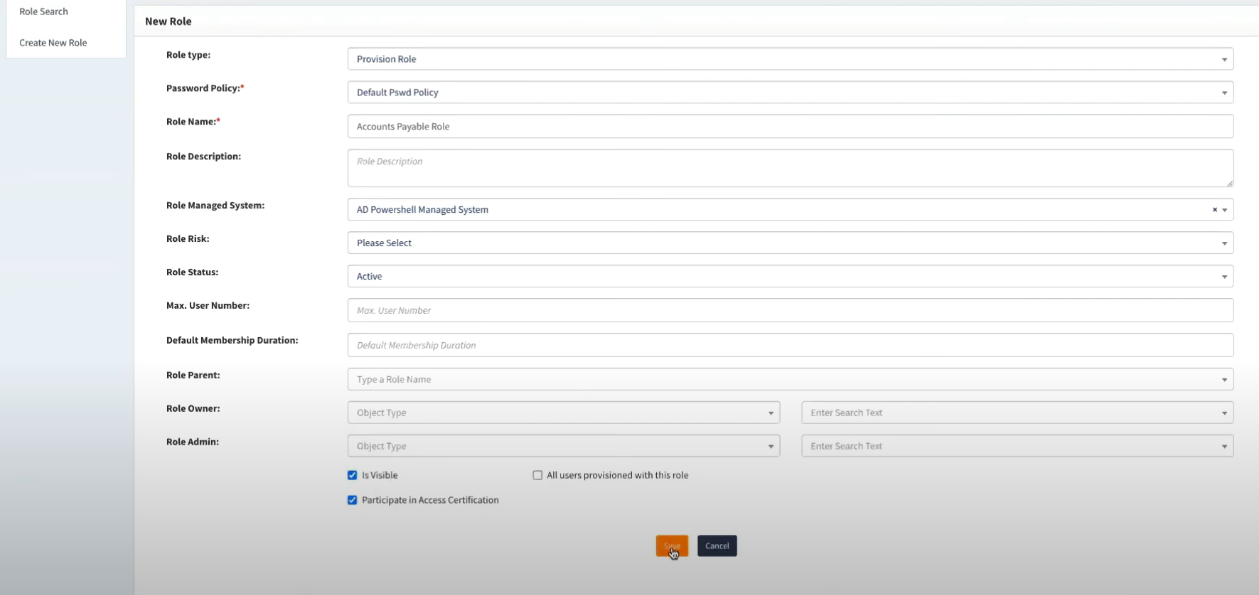
And then save it.
Role entitlements(45:21)

You should see AD PowerShell-managed system added here
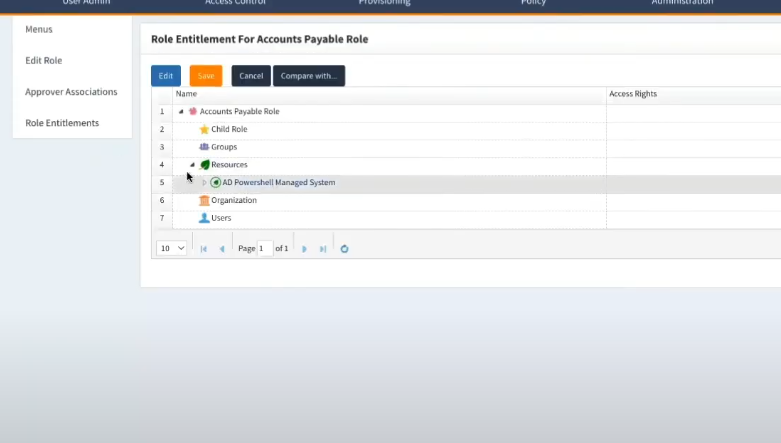
Let's add group
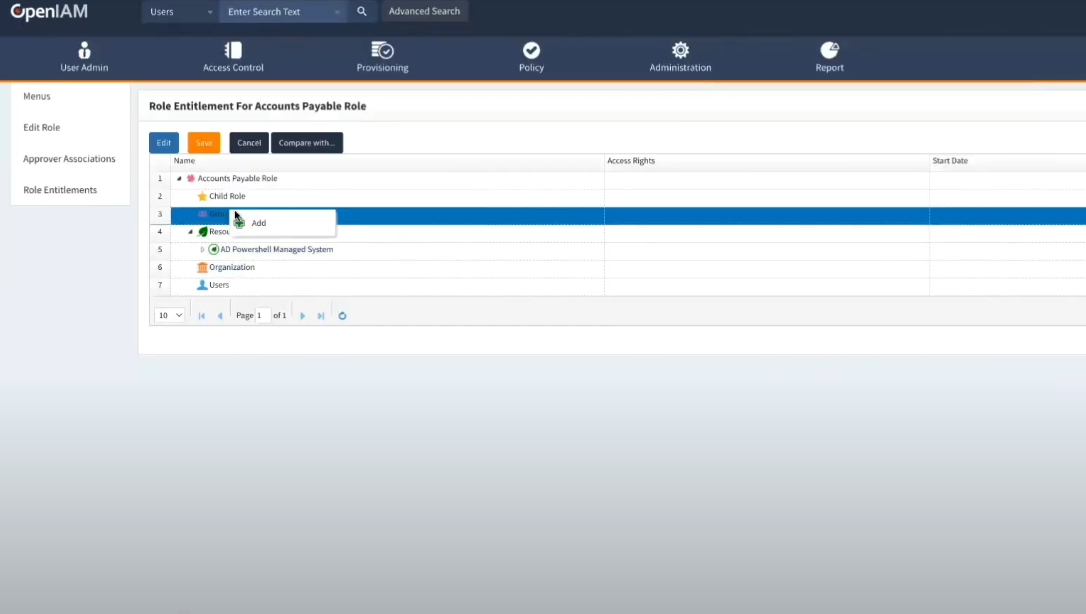
choose AD PowerShell-managed system and also finance
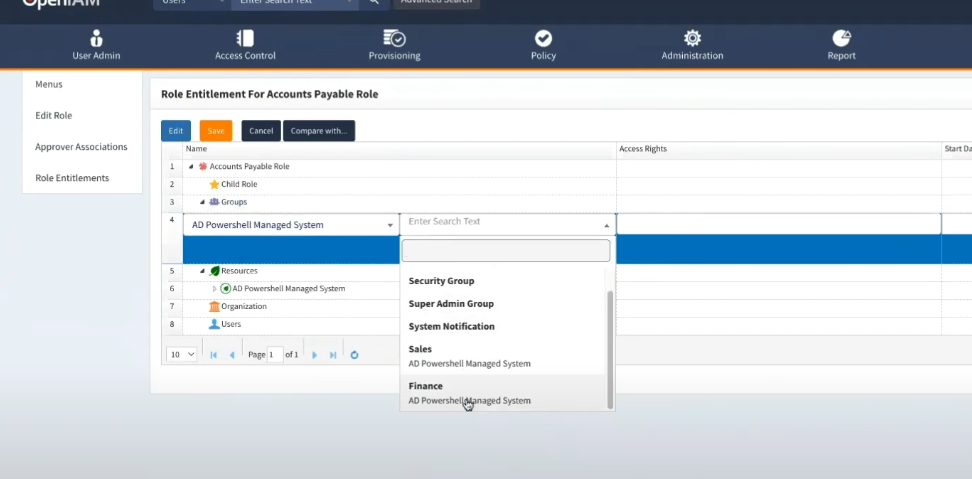
Now we go ahead and create that new user.
