What is Open Graph (OG)?
We've all copied an interesting link and pasted it into a conversation with a friend on WhatsApp, Facebook, X (formerly Twitter), Linkedin or another social network. Before even sending it, the app already loads a preview with an image, title and description of the content, right? This is possible thanks to the Open Graph protocol, which uses HTML meta tags to provide this information about the page.

What a AI said about OG?
”Open Graph is a protocol that allows customization of the content displayed when a web page is shared on social networks like Facebook and Twitter. It uses HTML tags (meta tags) to provide specific information about the page, such a title, description and image, thus controlling the presentation of the shared link.”
To delve deeper, I recommend the official site: https://ogp.me/
My Experience implementing OG in Remix
Earlier this year, 2025, I needed to create an OG in a project where I was working as a freelancer, the project was using Remix, so implementing the feature was fun and surprisingly simple.
Until then, I had never done anything like it. I started searching and soon discovered the ogp site. Since the information is in meta tags, I did a hardcoded test just to see if it worked and... it did! Just like that.
But since a developer's life isn't always about hardcoding (sometimes we do, but let's face it: the challenge is what make everything more interesting), I decided to move on to the fun part...
Hands-On: Creating Dynamic OG Images with React Router V7
I tried to keep this project as simples as possible, feel free to expand it with your creativity. At the end of this article, I'will leave the link of the complete project.
Why React Router V7?
One of the vantage of using React Router V7 (or Remix, which comes with it under the hood) is the flexibility it gives to organize your routes declaratively and logical. Moreover, with React Router V7, it's easy to configure loaders, lazy loading and even prevent certain routes from being rendered in client side, perfect for this type of route that only serves to generate an image on the backend.
Setting Up the Project
First, let's start our environment
npx create-react-router@latest og-image-generationThen I installed some dependencies
- satori - convertes HTML and CSS to SVG (Tailwind is in an experimental version, maybe a future post!?!?)
- @resvg/resvg-js - converts SVG to PNG
- fast-average-color-node - extracts information from images (I added this dependency to create a gradient in the card's background based on the predominant color of the image)
npm install satori @resvg/resvg-js fast-average-color-nodeAfter that, I used fast-average-color-node to get information from the image.
import { getAverageColor } from "fast-average-color-node";

const backgroundColor = await getAverageColor(image);

// backgroundColor {
//   value: [ 108, 98, 72, 255 ],
//   rgb: 'rgb(108,98,72)',
//   rgba: 'rgba(108,98,72,1)',
//   hex: '#6c6248',
//   hexa: '#6c6248ff',
//   isDark: true,
//   isLight: false,
//   error: undefined
// }
With this, I realized we can create a very cool effect with a gradient in the background color of our card, note that the hex, which has the predominant color, can be concatenated with E6 and 1A to tweak the color's opacity.
| Percentage | Hex |
|---|---|
| 100% | FF |
| 90% | E6 |
| 80% | CC |
| 70% | B3 |
| 60% | 99 |
| 50% | 80 |
| 40% | 66 |
| 30% | 4D |
| 20% | 33 |
| 10% | 1A |
| 0% | 00 |
`linear-gradient(
  to top right,
  ${backgroundColor.hex}E6,
  ${backgroundColor.hex}1A
)`;
There are several ways to apply opacity to a gradient, but I chose this approach because I wanted to better understand how opacity works directly in the hex value. But for those who enjoy experimenting, I'll share two more ways to do it bellow.
const backgroundColor = {
  value: [108, 98, 72, 255],
  rgba: "rgba(108,98,72,1)",
};

const { value, rgba } = backgroundColor;

// Example 01
const [r, g, b] = value;
console.log(`rgba(${r}, ${g}, ${b}, 0.8)`);

// Example 02
console.log(
  rgba.replace(
    /rgba\((\d+),\s*(\d+),\s*(\d+),\s*[\d.]+\)/,
    `rgba($1, $2, $3, 0.8)`
  )
);
I used satori to build the SVG using HTML and CSS (and for those who love Tailwind like I do 😬, there is an experimental feature available)
const svg = await satori(
    <div
      style={{
        ..., // code omitted
        background: `linear-gradient(to top right, ${backgroundColor.hex}E6, ${backgroundColor.hex}1A)`,
        color: backgroundColor.isDark ? "white" : "black"
      }}
    >
      <div>
        <div
          style={{
            ..., // code omitted
            color: backgroundColor.isDark ? "white" : "black",
          }}
        >
          <img
            src="http://localhost:5173/my-logo.svg"
            alt="My Logo"
            style={{
              ..., // code omitted
              filter: backgroundColor.isDark ? "invert(0.8)" : "invert(0.4)",
            }}
          />
          <h1
            style={{
              ..., // code omitted
              color: backgroundColor.isDark ? "white" : "black",
            }}
          >
            {title}
          h1>
          <p
            style={{
              ..., // code omitted
              color: backgroundColor.isDark ? "#dddddd" : "#636363",
            }}
          >
            {shortDescription}
          p>
        div>
        <img
          src={image}
          alt="OG Image"
        />
      div>
    div>,
    {
      width: 800,
      height: 420,
      fonts: [ // code omitted ],
    }
  );
I also used backgroundColor.isDark to invert colors like text and the logo
In the end I needed to convert SVG to PNG, so I used Resvg for that
From what I researched, the Open Graph protocol works best with
- PNG
- JPEG
- GIF (usually only the first frame is rendered)
const pngData = new Resvg(svg).render().asPng();
return pngData;
Below is the full function that generates the image
import satori from "satori";
import { Resvg } from "@resvg/resvg-js";
import { getAverageColor } from "fast-average-color-node";

async function generateOgImage({
  title,
  shortDescription,
  image,
}: {
  title: string,
  shortDescription: string,
  image: string,
}) {
  const backgroundColor = await getAverageColor(image);
  const svg = await satori(
    <div
      style={{
        display: "flex",
        alignItems: "center",
        justifyContent: "center",
        width: 800,
        height: 420,
        background: `linear-gradient(to top right, ${backgroundColor.hex}E6, ${backgroundColor.hex}1A)`,
        color: backgroundColor.isDark ? "white" : "black",
        fontFamily: "Inter, sans-serif",
      }}
    >
      <div
        style={{ display: "flex", width: "90%", maxWidth: 800, paddingLeft: 6 }}
      >
        <div
          style={{
            flex: 1,
            display: "flex",
            flexDirection: "column",
            justifyContent: "space-between",
            alignItems: "flex-start",
            paddingTop: 24,
            paddingRight: 40,
            paddingBottom: 24,
            paddingLeft: 0,
            color: backgroundColor.isDark ? "white" : "black",
          }}
        >
          <img
            src="http://localhost:5173/my-logo.svg"
            alt="My Logo"
            style={{
              alignSelf: "flex-start",
              height: 24,
              filter: backgroundColor.isDark ? "invert(0.8)" : "invert(0.4)",
            }}
          />
          <h1
            style={{
              display: "flex",
              alignItems: "center",
              justifyContent: "flex-start",
              flexGrow: 1,
              fontSize: 32,
              fontWeight: "600",
              marginTop: 20,
              lineHeight: "2.25rem",
              color: backgroundColor.isDark ? "white" : "black",
            }}
          >
            {title}
          h1>
          <p
            style={{
              alignSelf: "flex-start",
              fontSize: 16,
              fontWeight: "400",
              color: backgroundColor.isDark ? "#dddddd" : "#636363",
            }}
          >
            {shortDescription}
          p>
        div>
        <img
          src={image}
          alt="OG Image"
          style={{ width: 350, height: 350, borderRadius: "1rem" }}
        />
      div>
    div>,
    {
      width: 800,
      height: 420,
      fonts: [
        {
          name: "Inter",
          data: await fetch(
            "https://cdn.jsdelivr.net/npm/@fontsource/inter/files/inter-latin-400-normal.woff"
          ).then((res) => res.arrayBuffer()),
          weight: 400,
          style: "normal",
        },
        {
          name: "Inter",
          data: await fetch(
            "https://cdn.jsdelivr.net/npm/@fontsource/inter/files/inter-latin-600-normal.woff"
          ).then((res) => res.arrayBuffer()),
          weight: 600,
          style: "normal",
        },
      ],
    }
  );

  const pngData = new Resvg(svg).render().asPng();
  return pngData;
}

export { generateOgImage };
Now, we need a route that call the generatedOgImage function and returns the generated image as a response. For that, we'll use a Remix's loader
❤️ Remix for making this kind of thing so straightforward!
I kept this example super simple, just an array with URLs, I'm randomly picking one using Math.random(), but in a real scenario, you could use route parameters to fetch data from your DB and generate the image based on post content, a product, or even a user profile. There's a lot of room to explore here, let your creativity run wild!
// app/routes/og.ts

import type { Route } from "./+types/og";
import { generateOgImage } from "~/components/generate-og-image";

const images = [
  "https://fastly.picsum.photos/id/857/800/800.jpg?hmac=BUGUS_K7Wesbr9xUV5ya8TfYHI04KBg_kWauQkuIgS0",
  "https://fastly.picsum.photos/id/835/800/800.jpg?hmac=PJZoPbB8PjU_6jPaR4U6KX7Mesx3F2_l-2tSCVeF2Cg",
  "https://fastly.picsum.photos/id/839/800/800.jpg?hmac=Rvd_0eo62Cj10Rsw4bxKOUjvU1qTc5fA6DfWEQ3cVSE",
  "https://fastly.picsum.photos/id/981/800/800.jpg?hmac=dL5YCGb-HqSsuYOPiCgADn_NjvaUsl6PJDR-FdSBvcU",
  "https://fastly.picsum.photos/id/34/3872/2592.jpg?hmac=4o5QGDd7eVRX8_ISsc5ZzGrHsFYDoanmcsz7kyu8A9A",
  "https://fastly.picsum.photos/id/102/4320/3240.jpg?hmac=ico2KysoswVG8E8r550V_afIWN963F6ygTVrqHeHeRc",
];
export async function loader({}: Route.LoaderArgs) {
  const pngData = await generateOgImage({
    title: "Find out how to generate an image for Open Graph.",
    shortDescription:
      "The Open Graph protocol enables any web page to become a rich object in a social graph.",
    image: images[Math.floor(Math.random() * images.length)],
  });

  return new Response(Buffer.from(pngData), {
    headers: {
      "Content-Type": "image/png",
    },
  });
}
Now all we need to do is fill in the tags with the necessary values, the basics are:
- og:title
- og:type
- og:image
- og:url
Keep in mind that each social media platform may have its own preferred tags for displaying data better
export function meta({}: Route.MetaArgs) {
  return [
    { title: "Open Graph Image Generation App" },
    { name: "description", content: "Welcome to Open Graph Image Generation!" },
    { name: "og:title", content: "Open Graph Image Generation App" },
    {
      name: "og:description",
      content: "Welcome to Open Graph Image Generation!",
    },
    { name: "og:image", content: "http://localhost:5173/og/" },
    { name: "og:url", content: "http://localhost:5173/" },
    { name: "og:type", content: "website" },
    { name: "og:site_name", content: "Open Graph Image Generation" },
    { name: "og:locale", content: "en_US" },
  ];
}
If you want to see the full project, just clone the repository, install the dependencies and run it.
git clone https://github.com/douglasheldpacito/og-image-generation.git
// inside the og-image-generation folder
npm install
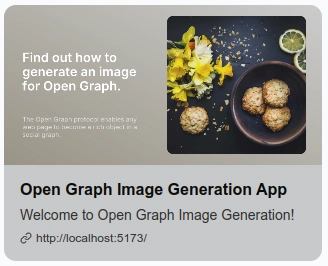
npm run devTo make things more visual, I created an example page that shows how the image will look. It's a simple way to test and understand how the final layout behaves with different images.
Every time you reload the page, a different image is used, great for testing the gradient effect, color contrast, and overall composition.
Enjoyed the idea? If you already use Open Graph on your site or blog, let me know in the comments! And if you have any questions, fell free to ask.
Cheers!
