
This is a submission for the Alibaba Cloud Challenge: Build a Web Game.*
Table of Contents
- What I Built
- Live Demo link
- Alibaba Cloud Services Implementation
- Game Development Highlights
- Conclusion
What I Built
In this article, I'll show you how to host a full HTML5 game on Alibaba Cloud using just the terminal and a custom domain — complete with SSL and everything.
I wanted to make a fun mini game with a retro look and simple mechanics — and from the beginning, I knew I would use Alibaba Cloud to host the project. In addition to developing the game, the idea was also to challenge myself to explore the OSS storage service and publish everything using the ossutil tool.
Live Demo Link
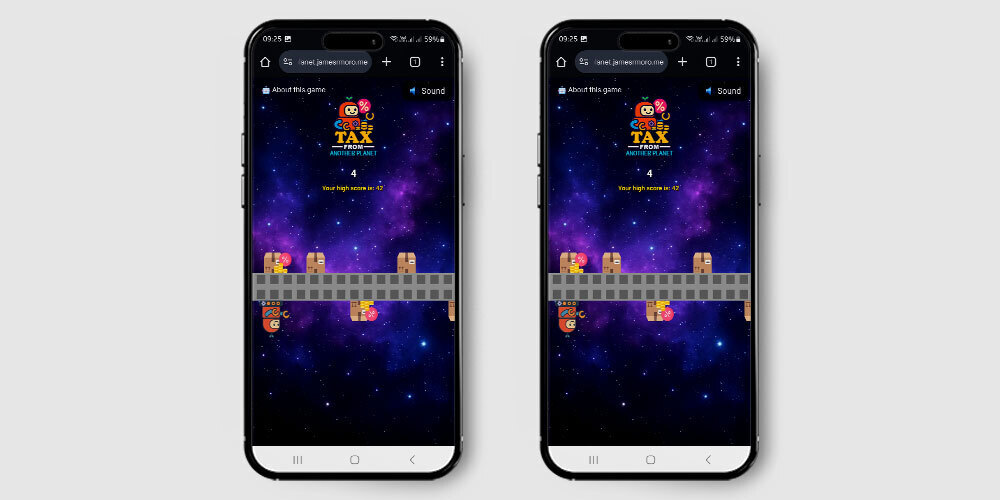
👉 Play now: https://tax-from-another-planet.jamesrmoro.me
☁️ Alibaba Cloud Services Implementation
To make the process easier to follow, I’ve broken it down into 10 simple and well-detailed steps — from bucket setup to secure HTTPS access with a custom domain.
Step 1: Access OSS via Alibaba Cloud Console
I chose to use OSS (Object Storage Service) from Alibaba Cloud to host my game, since it offers highly available and low-cost static file storage.

Follow the steps below:
- Click “Products” in the top navigation bar
- In the side menu, click “Storage”
- Then, select “Object Storage Service (OSS)”
These steps will take you to the area where you can view or create your storage buckets. Next, click on Console to open the management panel for your buckets.

⚠️ Important: If you haven’t verified your account yet, Alibaba may request documents or payment information before allowing OSS usage.
Step 2: Create an OSS Bucket
Go to https://oss.console.aliyun.com. You’ll see a blue “Create Bucket” button in the upper-left corner of the screen.
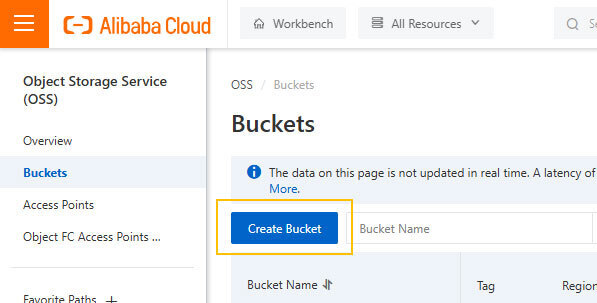
- Click Create Bucket
- Fill in the fields with your project info. In my case, I used my game’s name as an example:
-
Bucket name:
tax-from-another-planet - Region: Europe or America (e.g., UK - eu-west-1)
-
ACL:
Private
-
Bucket name:
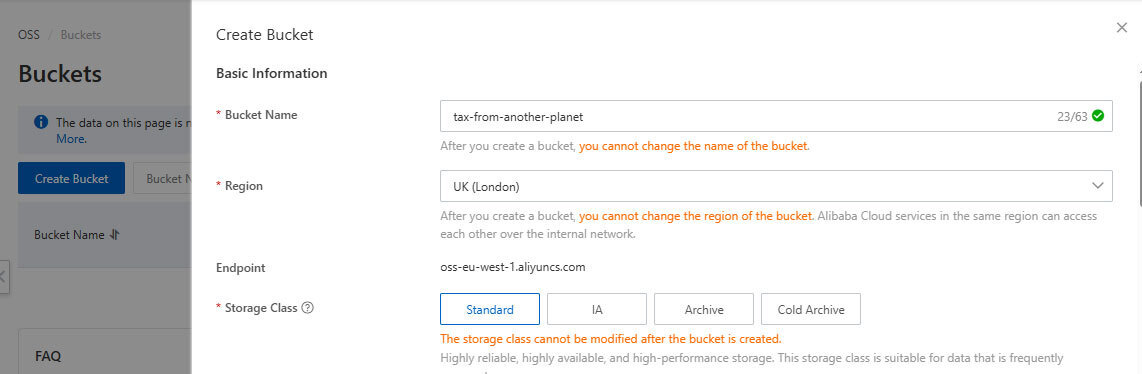
I left the rest of the form fields as default. No need to change anything else.
Step 3: Enabling Static Page on OSS
In the Alibaba Cloud console, use the search bar at the top of the page and type “Static Page” to quickly locate the option. The image below shows the search result.
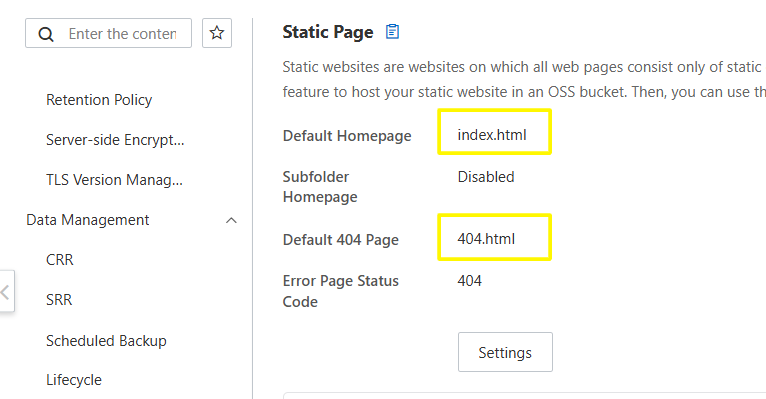
💡 Tip: I enabled the static website option because my game includes an
index.htmlhomepage and a custom404.htmlerror page.
Step 4: Install and Configure OSSUtil
Although I could upload files directly through the Alibaba Cloud panel, I found out it was possible to do it via terminal using OSSUtil — an approach I considered more practical and efficient for my workflow.
Download the OSSUtil Tool:
Access the link below to download the OSSUtil tool, which will be used in the terminal to upload your site files directly to Alibaba Cloud:
Download the version corresponding to your operating system (Windows, macOS, or Linux).
After downloading:
- Extract the ZIP file to an easily accessible folder (like your Desktop or Projects folder).
- Open the terminal (Command Prompt or Git Bash on Windows).
-
Navigate to the extracted folder using the
cdcommand. For example, on Windows:
cd ~/Desktop/ossutil-2.1.0-windows-amd64Inside the folder, run the configuration command:
./ossutil configThis command will start the interactive configuration process for ossutil, asking you for your region, endpoint, and access keys.
Fill in the requested information:
Please enter the config file name: [press ENTER to use the default]
Please enter region: eu-west-1  (this is the region I chose when creating the bucket — United Kingdom)
Please enter endpoint: https://oss-eu-west-1.aliyuncs.com
Please enter accessKeyId: YOUR_ACCESS_KEY_ID
Please enter accessKeySecret: YOUR_SECRET_KEY
Please enter STS Token: [leave blank if not using STS]
But before filling out these fields, you’ll need to have your access credentials ready.
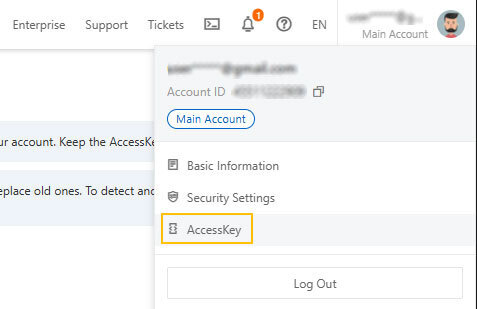
🔑 How to get your keys: In the top-right corner of the screen, where your account info is located, click on “AccessKey”. You'll be redirected to the area where you can view or create a new AccessKey, as shown in the image below.
After filling in this information, ossutil will automatically create a file named .ossutilconfig, which will be used in all future commands. This file stores your credentials and settings, so you won’t need to enter them again every time.
Step 5: Uploading the Files
Place all your static site files inside a folder named public/.
This folder should contain your index.html, 404.html, and subfolders such as /assets, /css, /images, etc.
With the site files organized inside the public/ folder, use the command below to upload all the content to your bucket on Alibaba Cloud:
./ossutil cp -r C:/my-project/public oss://tax-from-another-planet/ -f| Command | Function |
|---|---|
cp |
Copy command (uploads files from local to the bucket) |
-r |
Recursive – includes subfolders and files |
C:/my-project/public |
Local path where your site files are stored |
oss://tax-from-another-planet/ |
Destination bucket (prefix oss:// is required) |
-f |
Forces overwrite without asking for confirmation |
Step 6: Allow Public Access to Content
To make the files uploaded to the bucket publicly accessible (for example, by opening index.html in the browser), you need to adjust two settings in the Alibaba Cloud console.
1. Disable Block Public Access
Access the “Block Public Access” tab and disable the option, as shown in the image:
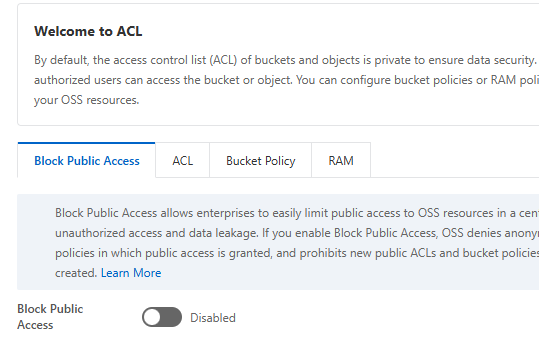
This allows objects to be publicly read, without blocking the use of
public-readpermissions.
2. Set the Bucket ACL to Public
In the “ACL” tab, select the “Public Read” option for the bucket:
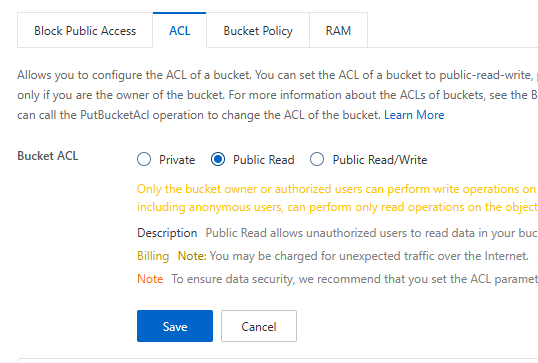
This ensures that anyone can access your bucket's files through a browser.
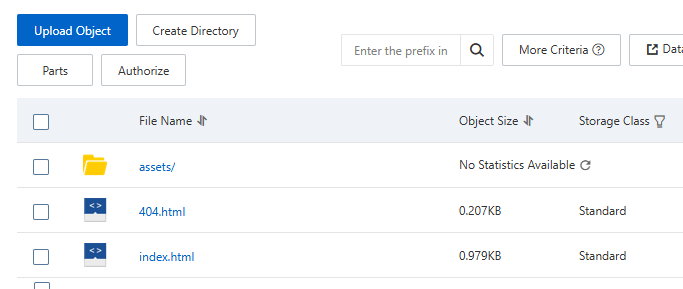
3. Verify Uploaded Files
You can view all files directly in the bucket panel. Here, for example, we have index.html, 404.html, and the assets/ folder with the game resources:
⚠️ Important: Alibaba Cloud buckets are no longer directly accessible via the default public URL. To properly access your site, you must configure a custom domain (via CNAME) pointing to the bucket. This will be covered in the next steps of the tutorial.
Step 7: Connect Your Domain (CNAME)
In your domain's DNS panel, add a CNAME record pointing to the address provided by Alibaba Cloud.
| Type | Name (Host) | Value |
|---|---|---|
| CNAME | tax-from-another-planet |
tax-from-another-planet.oss-eu-west-1.aliyuncs.com |
How to Find Your Bucket’s Endpoint
- Go to the OSS console: https://oss.console.aliyun.com
- Click on your bucket name (e.g.,
tax-from-another-planet) - On the screen, the “Overview” section will appear as the first item in the sidebar — click on it
- At the bottom of the page, in the Basic Information section, locate the “Endpoint” field under the Access Over Internet section.

Step 8: Access the Project via HTTP
After configuring your bucket and adding the CNAME record in your domain’s DNS panel, you should already be able to access your site using the HTTP protocol, like:
http://your-domain.com
Keep in mind that DNS propagation may take a few minutes.
However, most modern browsers display security warnings when accessing websites without HTTPS. This can create distrust or even cause users to leave your page.
That’s why, in the next step, we’ll add an SSL certificate to ensure your site is accessed securely (HTTPS).
Alibaba Cloud itself offers SSL services, and since I already had a valid certificate, I uploaded it manually.
Step 9: Map a Custom Domain (CNAME)
To use your own domain (such as mywebsite.com or project.domain.com), you need to map it to the OSS bucket through a simple process in the Alibaba Cloud console.
Follow the steps below:
- Go to the Domain Names menu inside the OSS panel.
- Click on Map Custom Domain.
- Enter your domain (e.g.,
tax-from-another-planet.jamesrmoro.me). - Alibaba will verify domain ownership. You’ll need to add a temporary TXT record in your domain’s DNS panel (such as Cloudflare, HostGator, etc.).
- After verification, you’ll be asked to add a CNAME record pointing to your bucket address.
Example of DNS configuration (TXT and CNAME) to add in your domain provider:
| Type | Name (Host) | Value |
|---|---|---|
| TXT | _dnsauth |
value_generated_for_verification |
| CNAME | tax |
my-bucket.oss-eu-west-1.aliyuncs.com |
Visual example of how these records appear in the Alibaba Cloud interface:
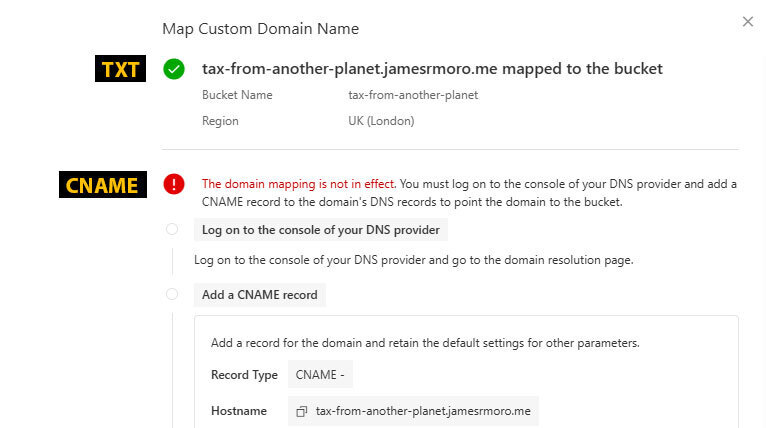
💡 The exact address of your bucket can be found in the Overview section of OSS as explained earlier.
After that, wait for DNS propagation and you'll be able to access your project using your custom domain!
Step 10: Upload Your Own SSL Certificate
Since I already had a valid SSL certificate, I uploaded it directly through the Alibaba Cloud panel.
Follow the steps below to upload your certificate:
- Access the Alibaba Cloud Console and go to the certificate management section.
- Click on Upload Certificate
- Fill in the required fields:
-
Certificate (public): the
.crtfile -
Private Key: the
.keyfile -
Certificate Name: an identifier name (e.g.,
cert-site)
-
Certificate (public): the
🎮 Game Development Highlights
After a few weeks of sketches, tests, and many tweaks, Tax from Another Planet was born — a retro-style game built with CreateJS, a JavaScript library focused on 2D canvas animations and games. The project was designed with full attention to accessibility, responsiveness, and smooth gameplay across all devices.

🧠 About the Game
You take control of a rebel robot on a dystopian planet where everything is absurdly taxed. The mission is simple: collect only fairly priced items and dodge the heavily taxed ones, which cause instant game over.
⚙️ Technical Features
- 🛠️ Built with CreateJS: leveraging the power of 2D canvas for animation and interactivity.
- 📱 Full support for desktop and mobile: with tailored controls — arrow keys on desktop, intuitive touch on mobile.
- 🎵 Ambient music and sound effects: toggled via a button, with the option to mute.
- 🔄 Smart rotation alert: on mobile, the game detects and notifies when in the wrong orientation.
- 💾 Score saving system: high scores are saved locally, encouraging players to beat their personal bests.
- 🗣️ Multilingual mode: with initial support for 4 languages, selectable via flags on the start screen.
Conclusion
By the end of this tutorial, you learned how to:
- Create and configure a bucket on Alibaba Cloud
- Enable static website mode with custom pages
- Upload files using
ossutilvia terminal - Make the content publicly accessible
- Point a custom domain to your bucket (CNAME)
- Configure HTTPS with an SSL certificate
This solution is lightweight, practical, and ideal for those looking to publish static projects — especially games, portfolios, or microsites.
This was my second project participating in dev.to challenges, and I was excited to put something different into practice. Combining game development with cloud deployment pushed me out of my comfort zone — and I hope this step-by-step guide helps you publish your own projects in a simple and efficient way.
If you enjoyed this content, share it with other devs or drop a comment!
