Ever wondered how to get rid of WampServer, Xampp, EasyPHP and similar stuff?
In this article:
- how to set up PHP, MySQL/MariaDB and Apache on your Windows dev machine (WAMP stack)
- how to run multiple PHP versions on your dev machine without constant switching
- how to set up vhosts and batch scripts to do so efficiently
💡
This post is for intermediate PHP developers or someone looking for this particular setup. Don't worry, if different
PHP versions mean nothing to you, or you are not sure what a server is,
it's perfectly okay, just bookmark this post and come back later.
Over the years of my beginnings, I used several tools like WampServer, XAMPP or EasyPHP for PHP development. I quickly realised that these tools had one common disadvantage: Slow release cycle and limited flexibility.
They allowed me to switch PHP versions, but did not allow for multiple PHP versions simultaneously, so I had to constantly switch versions when switching projects (at the time, I would work on several projects for different clients, different servers etc.).
As an example, at time of writing this, XAMPP only comes bundled with PHP 8.2, while 8.4 has been out for a few months already.
So what does a developer do when they want to or have to use recent PHP versions?
A sidenote:
This is not about Docker.Yes, Docker with WSL is a way to go to have the best flexibility, but the setup is more complicated, and there are performance issues that may be circumvented, with drawbacks.
Also, if you are on a Unix compatible platform, just use Docker.
WAMP stack
It comes down to installing and configuring 3 essential components that "WAMP" stack is composed of:
- Apache server (using vhosts)
- MySQL / MariaDB database
- PHP
- P.S., W stands for Windows, hence "WAMP"
It is possible to install multiple versions of PHP on a single Windows development machine. A single MySQL or MariaDB version was all I ever needed, but it should be no problem to run different versions in parallel on different ports, if needed be. I'm not sure about installing multiple Apache versions, I never needed those, but then again, it should be possible, serving on different ports.
Setup & Installation
I like to create a dir dedicated to my dev tools, like C:\dev.
I will be referring to it as such, or just "the install dir".
Then I keep the projects in a separate dir, let's call it C:\projects or "the projects dir".
Actually, I keep the projects on a separate encrypted drive, but that's out of scope of this article.
Stick to the x64 versions of software if your machine is x64 (it will most probably be the case). Do not mix x64 with x32 as some combinations might not work.
The trick to using several versions is in two parts:
- configuring vhosts for each project (specifying the
FCGIWrapperdirective with PHP version of choice) - setting alias batch commands (.bat files) to invoke different PHP (and composer) executables, e.g.
php84,php82,php74,composer@84, etc.

PHP
Download PHP Windows binaries of your choice. Pick the latest version, if possible.
You will spot two types of builds: Thread safe (a.k.a. TS or ZTS) and Non thread safe (a.k.a. NTS). Without going into details now, we will be using a setup where the NTS version should perform better so pick an NTS version.
💡
Note that with a "typical" Apache+PHP setup with
mod_php, like on XAMPP, you would have to pick the thread safe (ZTS) version to prevent concurrency issues.
Unpack the contents in your install dir, be sure to create a subdir for each major PHP version, like php84, php82, php74 and so on. This is to ensure multiple versions may coexist alongside each other.
Your path to PHP should look something like this C:\dev\php\php84.
To configure PHP, locate the php.ini file. If it is not present, look for php.ini-development, make a copy and rename it to php.ini.
I will leave the actual configuration up to you. But I do recommend tweaking values that do not suite you later on.
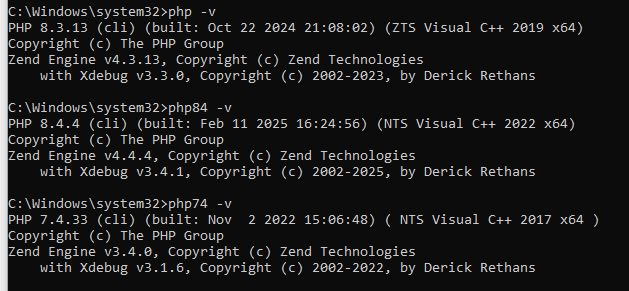
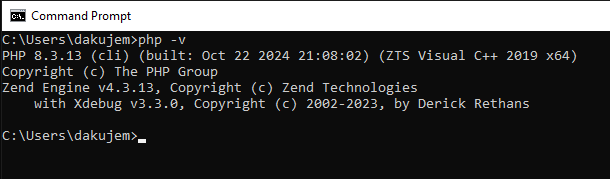
You can test or verify the configuration by calling php -v to see the version, php -m to see the installed modules or php -i to see all the configuration, which is verbose. Look out for any error/warning messages printed by PHP.
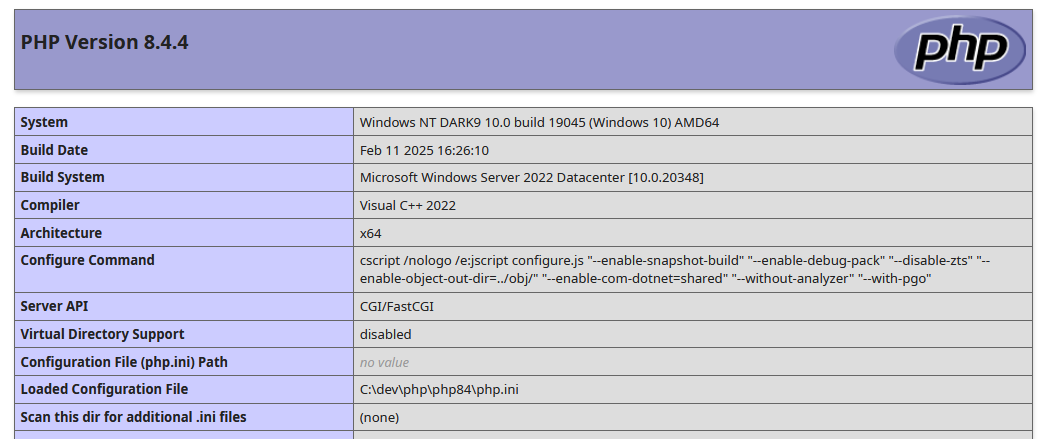
To test the web interface, create a simple script info.php and place the call to phpinfo there.
phpinfo();Then, visit it in the browser throught the particular domain (see vhosts below). You should see something like this:
HTTPS (curl, OpenSSL)
To be able to run HTTPS requests from PHP correctly, visit CA certificates extracted from Mozilla site and download cacert.pem file. Place it anywhere into your install dir.
Be sure to include it in your php.ini file (update the existing values):
[curl]
curl.cainfo = "C:/dev/cacert.pem"

[openssl]
openssl.cafile= "C:/dev/cacert.pem"
Xdebug
Visit Xdebug downloads and pick appropriate version. Take care to select the right PHP version + x64 + NTS variant combination.
Unpack the zip file - you will only need the php_xdebug-3.4xxxxx.dll file. Place the dll into your php's ext directory.
Include or modify the Xdebug section in your php.ini.
✋ Take great care here to specify the zend_extension without the php_ prefix and the .dll suffix, otherwise the module will not load. The actual value here depends on the file name you place in the ext dir.
[Xdebug]
zend_extension=xdebug-3.4.1-8.4-nts-vs17-x86_64

; Debug enables step debugging, develop has better performance.
; https://xdebug.org/docs/all_settings#mode
xdebug.mode=debug
You may rename the file to just
php_xdebug.dlland usezend_extension=xdebugin the ini file, but I recommend keeping the original file name. If you decide to rename it, you must keep thephp_prefix in the filename or the module will not load.
Once configured correctly, typing php -v in the terminal should validate correct configuration with Xdebug.
If there are any issues, PHP will print them out.
Updating
To update a PHP version, just download the new version and overwrite the installation folder contents. This will keep any extensions you added (like Xdebug) as well as the config file (php.ini) intact.
Apache server
Apache web server is software that listens for HTTP requests from clients (i.e. the browsers), processes these requests by invoking a PHP interpreter service and sends the resulting response back to the user.
We will use module called FastCGI (mod_fcgid) with NTS PHP versions.
Visit Apache Lounge download page and
- Download Apache 2.4 x64
- also grab the FastCGI module (
mod_fcgid)
Unpack the contents into your install dir, e.g. C:\dev\Apache24, and place the mod_fcgid in the \modules subdir, e.g. C:\dev\Apache24\modules.
Be sure to enable the module in httpd.conf located in C:\dev\Apache24\conf:
LoadModule fcgid_module modules/mod_fcgid.soI usually separate my per-project Apache configuration in a few config files located in the project dir, which can be included from httpd.conf using a line like this (placed at the end I suppose):
IncludeOptional "R:\httpd-include.conf"This is my current DEV configuration, tweak it to whatever suits you, or do not include it at all to use the defaults. I used this configuration when experimenting with SSE (server-sent events), but then I completely forgot about it. It might be an overkill.
FcgidIOTimeout 600
    FcgidConnectTimeout 16
    FcgidBusyTimeout 600
    FcgidMaxRequestsPerProcess 500
    FcgidMaxProcesses 50
    # 4G = 4294967296
    FcgidMaxRequestLen 4294967296

    # for experiments with SSE / streaming
    FcgidOutputBufferSize 0
Apache will install as a service. You may want configure it to not start automatically and start it manually (hit Start button and type in "services"). It is possible to use "apache monitor" that comes bundled with the server. This app enables to start/stop and monitor Apache from taskbar.
However, I'm using a small script to start/stop Apache, database and Garnet with a single command. More on this later.
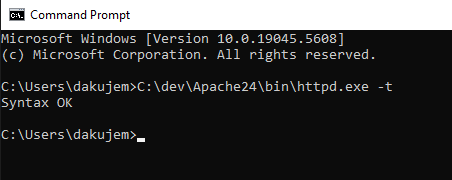
The configuration of Apache server can be tested calling apache with -t parameter: httpd.exe -t.
Vhosts (virtual hosts)
A "vhost" (abbreviation of "virtual host") is an isolated configuration listening for requests on a certain interface / domain.
I place the vhost configurations into the
R:\httpd-include.confApache config file included from the main config file. I'm using several such included files in fact. This is up to you to organize.
I'm using a separate vhost and domain for each project I'm working on for the flexibility, form prefill and other benefits.
This is what a simple such configuration template may look like:
ServerName your-project.lo
    DocumentRoot "R:/your-project"

        Options +ExecCGI +Indexes +FollowSymLinks
        AddHandler fcgid-script .php
        FCGIWrapper "C:/dev/php/php84/php-cgi.exe -c C:/dev/php/php84/php.ini" .php
        CGIPassAuth on
        AllowOverride all
        Require all granted
👉 To swap PHP version, all that needs to change is the FCGIWrapper directive. 👈
The vhost is set up once, though, there is no need to switch anything afterwards.
Depending on your configuration, multiple vhosts with different PHP versions may point to the same directory (if switching git branches is the way you work when upgrading).
I'm using .lo as TLD, but I've seen .loc and .local too. You may experiment here.
You may also define a server alias, like www.your-project.lo adding
ServerAlias www.your-project.lo to the configuration.
I'm using this as a template to create other vhosts, it is also possible to automate such creation, but it's not much of a hassle anyway.
Hosts file
You may have already checked that visiting your-project.lo in the browser probably sends you to your search engine.
Your computer does not recognize the domain and looks for the IP address using DNS, which fails for .lo TLD and you end up defaulting to search engine.
To overcome this, edit the hosts file in your system. This file is always checked before any DNS requests are issued.
The file is located here:
C:\Windows\system32\drivers\etc\hostsThe file can be used for other stuff, but here we will only direct our development domains to the localhost like this:
#
# My projects
#
  127.0.0.1      your-project.lo
  127.0.0.1      adminer.lo next.adminer.lo
#...
This will tell the system to direct all network traffic going to your-project.lo, adminer.lo and next.adminer.lo to your own localhost. Apache will take it from there.
Save this file and you are ready to go. After visiting your project domain in the browser, you should see it being rendered.
The file may be read-only or system-protected, so look for write errors when you save it.
Note that to edit the hosts file you will probably need to open it with administrator privileges, if you get errors when saving the modifications of the file. alternatively, you may try the Microsoft PowerToys that come with a hostfile editor and a bunch of other more or less useful stuff.
Vhost with HTTPS example
Here, I will set up domains adminer.lo and next.adminer.lo for local development with HTTPS redirect.
I believe that to use HTTPS you would have to generate your own self-signed certificate. I did this long time ago and have not documented how, so I'll leave this for you to experiment with. Or use your favourite AI for suggestions.
This is the vhost conf for adminer.lo which runs on legacy PHP 7.4:
ServerName adminer.lo
    Redirect / https://adminer.lo/


    ServerName adminer.lo
    DocumentRoot "R:/adminer"
    ErrorLog "R:/adminer/error.log"

        Options +ExecCGI +Indexes +FollowSymLinks
        AddHandler fcgid-script .php
        FCGIWrapper "C:/dev/php/php74/php-cgi.exe -c C:/dev/php/php74/php.ini" .php
        CGIPassAuth on
        AllowOverride all
        Require all granted

    SSLEngine on
    SSLCertificateFile ${SRVROOT}/conf/server.crt
    SSLCertificateKeyFile ${SRVROOT}/conf/server.key
And this is the vhost for running my updated Adminer fork:
ServerName next.adminer.lo
    Redirect / https://next.adminer.lo/


    ServerName next.adminer.lo
    DocumentRoot "R:/adminer-next"
    ErrorLog "R:/adminer-next/error.log"

        Options +ExecCGI +Indexes +FollowSymLinks
        AddHandler fcgid-script .php
        FCGIWrapper "C:/dev/php/php84/php-cgi.exe -c C:/dev/php/php84/php.ini" .php
        CGIPassAuth on
        AllowOverride all
        Require all granted

    SSLEngine on
    SSLCertificateFile ${SRVROOT}/conf/server.crt
    SSLCertificateKeyFile ${SRVROOT}/conf/server.key
Whenever I visit https://adminer.lo/ in the browser, PHP 7.4 will serve this request;
but whenever I visit https://next.adminer.lo/, PHP 8.4 will serve that request.
I do not need to switch anything and I am able to work on both in parallel.
Dedicated document roots for different PHP versions
Above, I'm showing how I configure a vhost/domain for each project.
If you'd rather use a single vhost for a PHP version, that is also possible. You may choose to use domains like php84.lo and php82.lo or use different ports to direct traffic to the right vhost, and only create a single vhost for each PHP version.
Your projects wil then be accessible via https://php84.lo or http://localhost:8084, this is up ot you to experiment with.
Note that
80is the default HTTP port and443is the default HTTPS port, though8080is commonly used for dev servers (e.g. Vue.js).
MariaDB / MySQL
It should not really matter whether you use MySQL or MariaDB in most cases. There are (minor) differences though, so pick the one that your clients use in production. Or install both.
Visit the MariaDB download page and pick a version. I recommend a "long-term support" version. At time of writing, this would be 11.4.
Install the database into C:\dev\MariaDB. I also create a separate dir for the actual database data, e.g. C:\dev\MariaDB_data.
My my.ini located in the MariaDB_data folder looks like this:
[mysqld]
datadir=C:/dev/local/MariaDB_data
port=3306
character-set-server=utf8mb4
innodb_buffer_pool_size=8G
max_heap_table_size=1G
[client]
port=3306
plugin-dir=C:/dev/MariaDB/lib/plugin
I prefer to setup utf8mb4 as the default charset and increase memory allowances for smooth operation. I'm not sure what the [client] section is for though.
For database management, I use Adminer, which is minimalist, but provides all the convinience I need. You may consider phpMyAdmin or HeidiSQL or something similar.
If you need to install multiple versions, or both MySQL and MariaDB, adjust the ports so that each listens on a different port. This will have to be reflected in your application.
As with Apache, you may want to validate the configuration calling mysqld with the --validate-config parameter.
Working with multiple PHP versions in parallel
Now to the scripting part. There are no vhosts in CLI, so if you open your terminal (CMD, command line) and type in php -v you will get whichever PHP you installed as default, if any.
The trick is to create a directory (which I will call the "bin" directory) in C:/dev/bin and include it in the PATH system variable. Here we will place our .bat batch command files.
Go to "Edit system environment variables" and edit the PATH variable so that it includes this directory. Windows will pick the first binary in the order which the folders appear in the PATH variable, so place the C:/dev/bin part appropriately.
Start a new terminal and type echo %PATH% ... it should be visible there (one must reopen the terminal after changing the PATH variable).
In this bin directory, I create files like php84.bat for each PHP version. I also create com84.bat for composer running with PHP 8.4 and any other version. This way I am able to invoke PHP binaries selectively.
@echo off

REM PHP 8.4

REM   %* passes all the input arguments to the PHP call
"C:/dev/php/php84/php.exe" %*@echo off
REM Composer running using PHP 8.4
REM %* passes all the input arguments to the PHP call
php84 "C:\dev\composer\composer.phar" %*I am then able to invoke php84 for PHP v8.4 and com84 for Composer running on PHP 8.4. I create such a shortcut for each version I install and have one PHP version as the default for php and com/composer.

Composer scripts
Normally, if you specify a script that runs PHP or other Composer command in composer.json like the following, you will see the script is invoked using the default php/composer binary and not the one you run the command with.
{
  "scripts": {
    "cache:warmup": [
      "php bin/cache-warmup.php"
    ],
    "cache:purge": [
      "php bin/cache-purge.php"
    ],
    "cache:test": [
      "composer cache:warmup",
      "composer cache:purge"
    ]
  }
}
See the issue here:
{
  "scripts": {
    "check": [
      "php -v"
    ]
  }
}
This script should print out the correct php version, but it prints the default system php version every time, which is not what we intended:
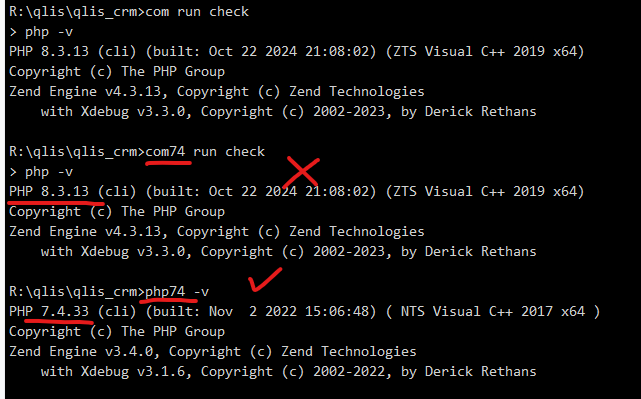
The trick is to use @php and @composer in the JSON file, that tells composer to "use the same PHP binary as it was invoked by":
{
  "scripts": {
    "check": [
      "@php -v"
    ]
  }
}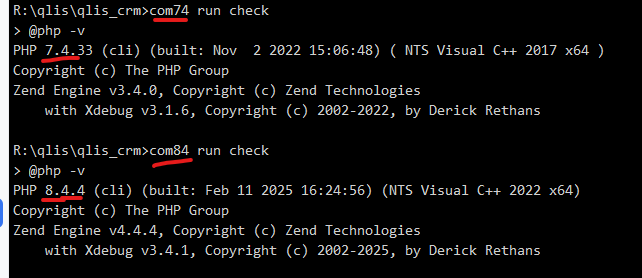
As a rule of thumb, always specify your scripts as @php and @composer:
{
  "scripts": {
    "cache:warmup": [
      "@php bin/cache-warmup.php"
    ],
    "cache:purge": [
      "@php bin/cache-purge.php"
    ],
    "cache:test": [
      "@composer cache:warmup",
      "@composer cache:purge"
    ]
  }
}
Built-in server
Assuming your project uses a /public dir as the document root, you may also just run the built-in PHP server, but keep in mind that it is not intended for serving static files (images, CSS, JS).
In the terminal, run
php -S 127.0.0.1:42300 -t public/I'm using this kind of composer.json structure, then I call it as composer serve in the project directory:
{
  "scripts": {
    "serve": [
      "Composer\\Config::disableProcessTimeout",
      "@php -S 127.0.0.1:42300 -t public/"
    ]
  },
  "scripts-descriptions": {
    "serve": "Run a lightweight PHP server"
  }
}
Remember, you are in control of which PHP version you run the script with. Be it com84 serve or com82 serve.
Other useful scripts
A script to start Apache server (with PHP module), MariaDB database and Garnet for cache - amp-on.bat:
@echo off

REM Start Apache, MariaDB and Garnet
sc start ApacheHTTPServer
sc start MariaDB
sc start GarnetServer
... and amp-off script containing sc stop for stopping the services as well.
Then a script for restarting Apache. This one is more advanced and waits for the service to stop and start:
@echo off

REM REstart Apache
set "ServiceName=ApacheHTTPServer"

REM Stop the service
echo Service %ServiceName% is shutting down.
sc stop %ServiceName%

REM Wait for the service to stop
:LOOP
timeout /t 2 /nobreak >nul
sc query %ServiceName% | find "STATE" | find "STOPPED" >nul
if %errorlevel% equ 0 (
    goto START_SERVICE
) else (
    goto LOOP
)

:START_SERVICE
REM Start the service
echo.
echo Service %ServiceName% is starting.
sc start %ServiceName%

REM Wait for the service to start
:WAIT_START
timeout /t 2 /nobreak >nul
sc query %ServiceName% | find "STATE" | find "RUNNING" >nul
if %errorlevel% equ 0 (
    goto SHOW_MESSAGE
) else (
    goto WAIT_START
)

:SHOW_MESSAGE
echo.
echo Service %ServiceName% is now running.
Takeaways
It is not a short setup, but it pays off in the long run. Installing further PHP versions is just about creating a couple of files and folders and copy-pasting the php.ini, sometimes tweaking a value here and there. Updating is a breeze.
You will benefit from efficient and flexible Windows setup.
No more waiting for third party bundlers to realease a new version!
