🛠️ TL;DR: I used Azure OpenAI on Your Data + Teams AI Library + a bit of Python to build a bot that chats with our internal wiki.
It fetches content from Azure DevOps Wiki, pushes it to blob storage, indexes it with Azure AI Search, and answers questions — all without bothering my teammates 😄
My team’s project has been around for many, many years. That means the internal wiki is huge, and while it holds a lot of useful information, it’s really hard to search. Especially if you don’t know exactly what you’re looking for.
Disclaimer: The views expressed in this article are my own and do not necessarily reflect those of Microsoft. I am a Microsoft employee, and this article is based on my personal experience.

So usually my interaction with team’s wiki would look something like this: I have a question and I ask some of my senior colleagues → I’m waiting for an answer → The answer is a link to a wiki page. :D
Which is kind of ridiculous, because
- I could find an answer myself, it was already documented, but I failed to search;
- Waiting for a reply might take hours, if the colleague is busy or away;
- Distracting teammates breaks their focus.
Besides, what is the point of a Wiki if you still need someone else to find the right page for you?
So I thought it would be fun to be able to ask a bot first to search the wiki more effectively and get quicker results.
Luckily, in 2024 Microsoft announced something called Azure Open AI on Your Data — a set of Azure services that “enables you to run advanced AI models such as GPT-35-Turbo and GPT-4 on your own enterprise data without needing to train or fine-tune models” (according to official documentation). Sounds about right. Let’s experiment!
Getting started: Going over the sample tutorial
Microsoft offers a wide set of tools to support your AI development. There’s the Teams AI Library (available in C#, JS and Python) — an official SDK for integrating GPT-based language models with custom Teams apps, and Teams Toolkit — a Visual Studio Code extension that simplifies creating, developing and testing those apps.
I started with this simple tutorial that teaches us how to create a custom engine agent in Teams.
Basically, it helps you:
- Set up your data as the knowledge source for the GPT model
- Create a bot and connect it to your Azure resources
I began by creating a new resource group and an Azure Open AI Service instance inside of my Azure subscription, then proceeded with the guide.
If you’re going with this tutorial, it guides you through a very convenient set of preconfigured interfaces. It automatically creates:
- A Blob Storage for your files
- An Azure AI Search instance with an index
- Then it indexes your uploaded files (i.e. prepares them for search). Note that you can only upload and index your files once if you’re going by the manual.
Once the resources are ready, you’ll switch to Visual Studio Code and set up a simple Teams bot application boilerplate where you will only need to populate .env file with your Azure resources information.
We end up with this setup:
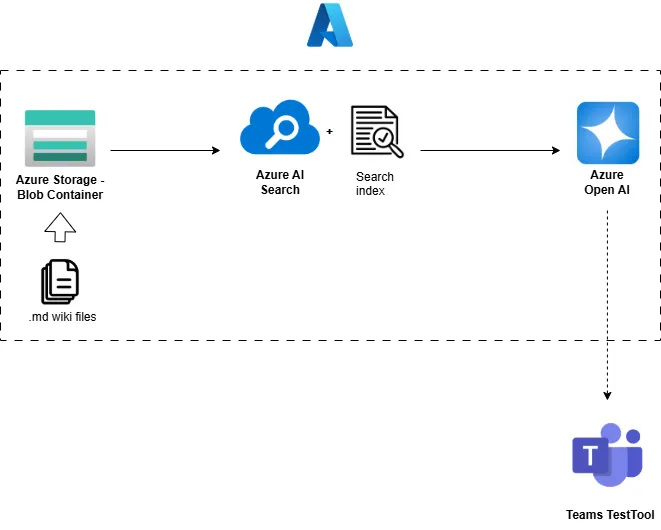
At this point you can already try running the code in Teams TestTool. If you did everything right, the chat will load in a browser window and you will be able to have a tiny conversation with your data. Yay!
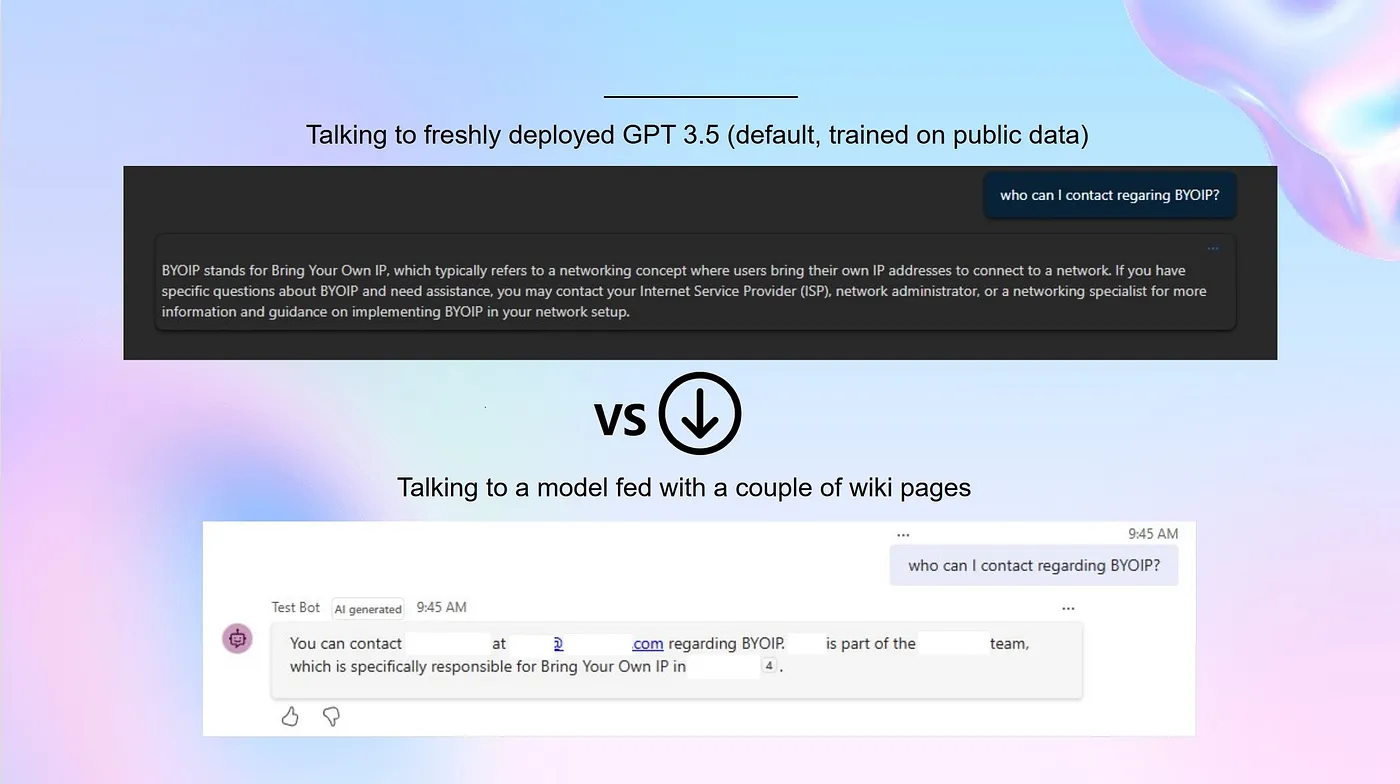 Fed with couple of Wiki pages, the model now can respond to questions with a context specific to the team.
Making it dynamic: Adding an Indexer to Azure AI Search
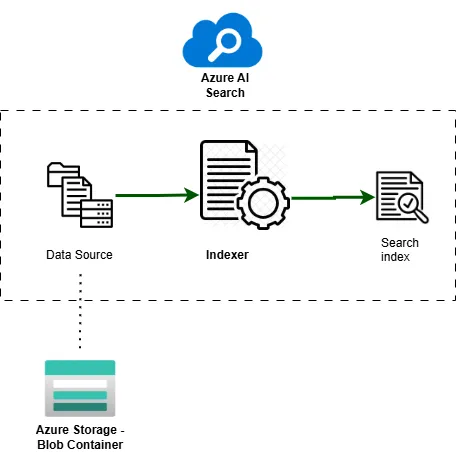
As I mentioned earlier, when you set up your data source through the Azure AI Foundry portal interface, it indexes the data you upload to the blob once at the set up. But what if the data has changed? For something like a team’s wiki, the data is never static, it constantly updates, and we need the bot to keep up. This is where we need an Indexer.
An Indexer connects your data source to the index: all three are parts of Azure AI Search. The indexer is a crawler that processes textual data in the source files and populates the search index.
The indexer is easily added via Azure Portal. Before doing so, first we’ll need to create a data source — basically a “connection” to the desired storage, Azure Blob Container in my case. Then select the index that was generated at the previous step. Finally, configure the indexer — it can run on a schedule or be triggered manually; I’m keeping it manual for now.
Once your indexer is in place, you can upload new files to the blob storage and then hit the “Run” button to re-index. The fresh data will be loaded into the search index and instantly available to the bot.
Automating it: Parsing data from Azure DevOps Wiki
Our team’s wiki has couple of hundreds notes so uploading it manually is not an option. And then of course there’s a need to re-upload the blob container when articles change and new notes pop up. Let’s write a tiny Python script to do the job.
Let’s break down what we want the script to be doing and go step by step.
Get access to Azure DevOps Wiki and download article contents
To get machine access to Azure DevOps, you can either use a Personal Access Token (PAT) generated in your account settings, or a Managed Identity that already has access. Obviously, I would prefer Managed Identity, but for some reason it wouldn’t work specifically with ADO. After hours of failed attempts I gave up and decided to use PAT stored in Azure KeyVault, which, to my surprise, was available to connect using Managed Identity.
credential = AzureCliCredential()
secret_client = SecretClient(vault_url=f"https://{keyvault_name}.vault.azure.net", credential=credential)
# this token will later be passed as an Authorization header with API requests
pat = secret_client.get_secret("AzureDevOps-PAT").value
While Azure DevOps does have a Python SDK, the coverage is not optimal, so I went with raw API calls using requests library.
# if recursionLevel=Full is passed to the request, it will return all SubPages' relative paths
response = requests.get("https://dev.azure.com/{ado_org}/{ado_project}/_apis/wiki/wikis/{ado_wiki_name}/pages?path={root_wiki_path}&includeContent=true&recursionLevel=Full&api-version=7.1-preview.1", headers={"Authorization": f"Basic {encoded_pat}"})

# a helper function to extract all page paths
def get_all_pages_paths(root_page: dict) -> list[str]:
    pages_result = [root_page['path']]
    for page in root_page.get('subPages', []):
        pages_result.extend(get_all_pages_paths(page))

    return pages_result

# get list of all available wiki pages paths
pages_paths = get_all_pages_paths(response.json())
Every subpage has a relative path you can plug into the wiki URL’s path query parameter, like this:
for subpage_path in pages_paths:
  # no need for recursionLevel parameter as we only need to load the page and its contents
  response = requests.get("https://dev.azure.com/{ado_org}/{ado_project}/_apis/wiki/wikis/{ado_wiki_name}/pages?path={subpage_path}&includeContent=true&api-version=7.1-preview.1")

  page = page_response.json()
  print(page['content']) # some markdown content
Load Wiki files to Blob Container
To access blob storage, I used azure-storage-blob lib. The SDK provides a very simple interface for connecting to a Blob Container and uploading data into it. Nice thing is that we don't even need to store files locally, and can use content loaded from Wiki API directly.
blob_connection_string = secret_client.get_secret("BlobConnectionString").value
blob_service_client = BlobServiceClient.from_connection_string(blob_connection_string)

# after connecting to a blob storage, file upload is done easily
blob_service_client \
  .get_blob_client(container=blob_container, blob=filename) \
  .upload_blob(file_content, overwrite=True)
Since the bot is supposed to help people navigate the wiki, I decided to also store original wiki page’s URL in the file metadata. This metadata can later be reused in model’s response.
Trigger Search Indexer re-run
After all the files are uploaded to blob container, we need to re-index the data so the latest changes become available to the GPT model for search. This can be done with a simple API call:
indexer_run_url = f"https://{search_service_name}.search.windows.net/indexers/{indexer_name}/run?api-version=2023-07-01-Preview"

response = requests.post(indexer_run_url, headers={
            "api-key": secret_client.get_secret("IndexerAdminKey").value,
            "Content-Length": "0"})
After putting all this code together, we get a simple script that will download all of our wiki contents into Azure Blob Storage and then re-trigger Search Indexer to update the index. In production system, I would deploy this code as an Azure Functions App that would run on a schedule — so updates happen automatically. That only requires installing azure-functions lib and slightly adjusting the code.
Customize The Search: Index custom blob metadata
By default, the indexer processes blob’s content and some standard metadata like the filename or filepath. But if we want to include some custom metadata — in our case, wikiPageLink that stores original wiki page URL — we will need to make some adjustments to both the indexer and the index schemas.
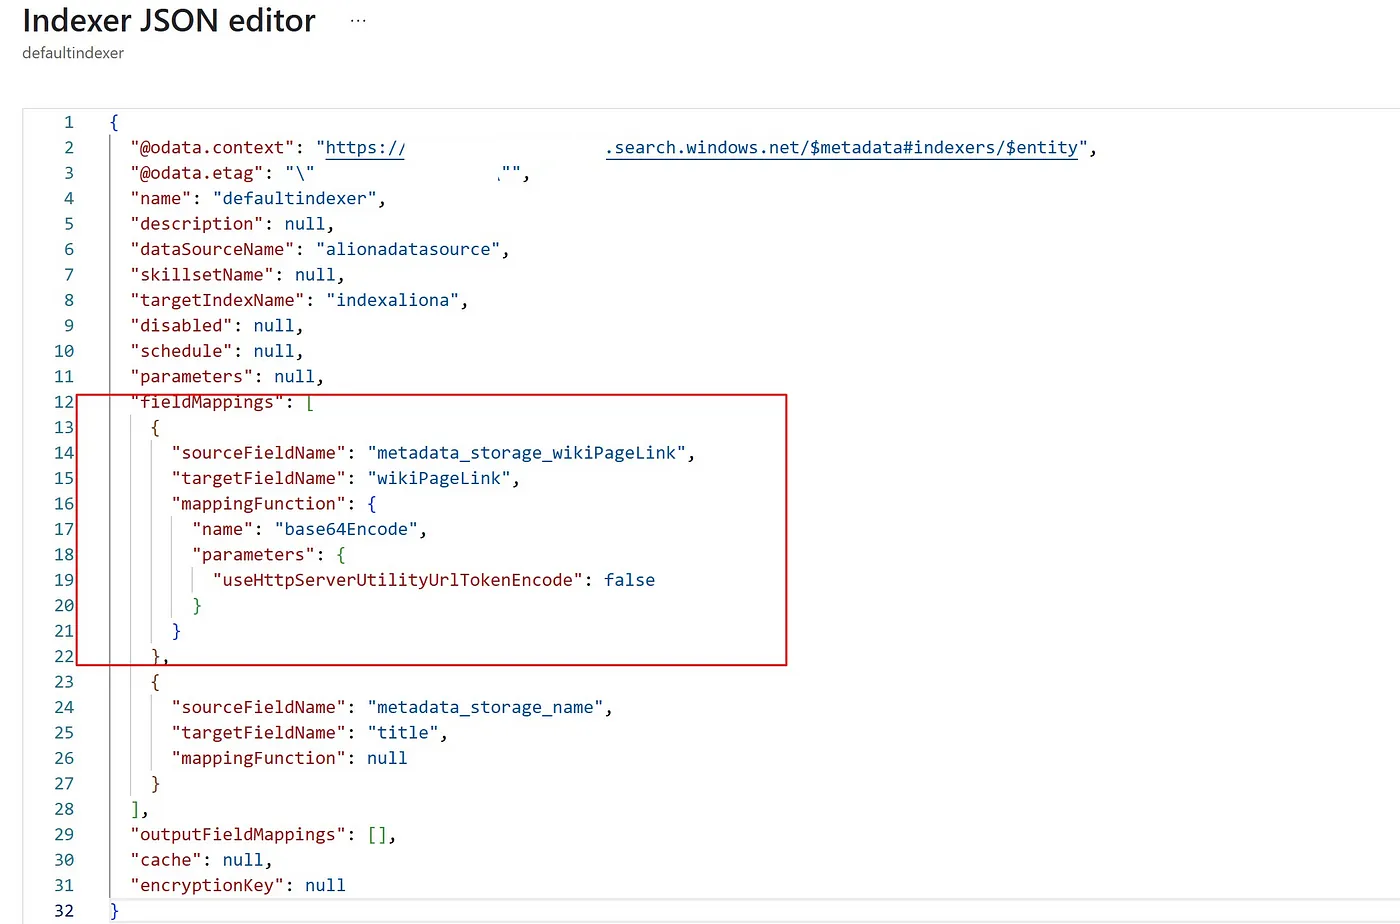 Adding a fieldMapping to the Indexer so it knows to process our custom metadata.
In the Search Indexer, let’s add a new entry into the fieldMappings array: metadata_storage_wikiPageLink (where metadata_storage_ is the default prefix for storage files metadata) value will be mapped to a wikiPageLink field in the index. Note that we also need to apply a mappingFunction because custom metadata is base64 encoded by default.
Next, we’ll update the Search Index to include the very same field and make it searchable and retrievable. This will return wikiPageLink value in a search result. The final touch — we need to let the model know it should actually use the value. I believe there are some default settings that just teach the GPT model to process content of the search result. To make it aware of additional data, we can update the base prompt.
The default prompt I used was: “You are an AI assistant that helps engineers find information about their work and specifically project in their internal wiki.”
Now I will add additonal instructions: “In the end of your response, please tell explicitly “You can read more about this in the wiki page…” and add wikiPageLink URL value of index used for generating the response (if available). Add multiple urls if used multiple indexes and adjust the message accordingly.”.
Let’s try to run it. Nice!
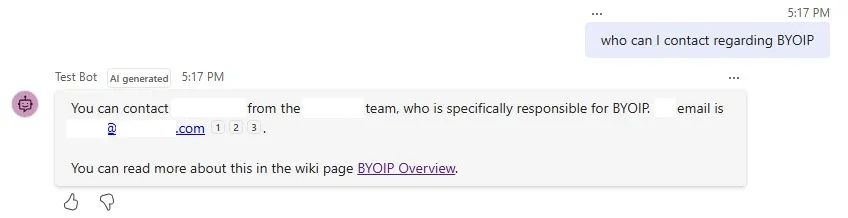 The bot response now includes a link to Azure DevOps wiki page.
It is worth noting that though at first glance it looks good, unfortunately at some point I realized the model was hallucinating — returning incorrect links or even making up unexisting URLs. This is because by default the custom metadata fields aren’t processed in the default sample boilerplate setup. And unfortunately, the Teams AI Library used in this example doesn’t currently allow you to customize the search results before passing them to the model.
As a temporary solution, I updated my script to include the original wiki URL directly into the blob content, however it is still not performing very well. Going forward, I think I’ll need to rewrite the bot to use direct API calls or explore other approaches that give me more control for application customization.
For now, though — this is just a clear area for improvement in an otherwise promising setup.
Final Touch: Deploying the Bot
Since this is still a new and rapidly evolving area, I found this part of the journey particularly challenging to navigate. Azure’s ecosystem for AI development is growing fast — and constantly changing. There are multiple libraries (like botframework and the new Teams AI Library), and a ton of tutorials and docs, some of which are already outdated.
I spent quite some time just trying to figure out how to properly deploy a bot that runs fine locally — and make it actually available in Teams for my colleagues.
In the end, I once again relied on some predefined functionality from the Teams Toolkit (using this tutorial), which helped generate a setup that looked something like this:
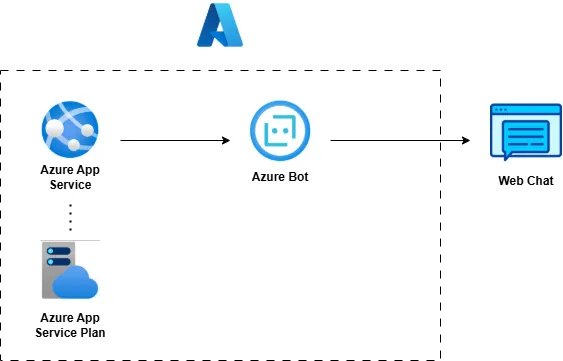
Here,
- App Service — Hosts and runs your bot
- App Service Plan — Provides compute resources (CPU/memory)
- Azure Bot — Registers the bot with the Bot Framework and connects it to Teams
- Storage Account (optional) — Supports deployment logs, state storage, etc.
Once deployed, the Azure Bot comes with a built-in Web Chat interface, so you don’t even need to upload it to Teams right away to test it. Very convenient.
However, I realized quickly enough that the the Web Chat is open to the public internet. Meaning… if I leave the setup as-is, anyone could talk to my internal wiki bot. Not great.
To properly secure access and make the bot truly internal-only, I’d need to configure an Azure VNet (Virtual Network), since exposing sensitive data through a public endpoint is clearly not acceptable. To be honest, I haven’t gone down that rabbit hole yet — and I have a feeling it would be a whole separate article. I’ll get to it. Sooner or later.
Challenges
Alright, the cherry on top of this cake — here are a few issues I ran into while building the bot with Python. Hopefully, this saves you some time:
- Poor SDK coverage
Azure DevOps SDK didn’t support some of the operations I needed, in particular loading wiki pages contents. This wasn’t big of an issue since I only needed a few endpoints, but it did make the code a bit messy: I had to mix SDK usage in some places with raw API calls in others.
-
Problems with
TokenCredential
As mentioned earlier, I couldn’t get Managed Identity to access Azure DevOps. While manually generating a token with az cli worked fine, using TokenCredential didn’t pick up the correct token automatically for some reason, so I ended up using PAT, which is not really the way to go on a long run. Here is some reference for the problem.
- Python support in Azure Functions (free tier)
The cheapest Azure Functions plan doesn’t support Python out of the box. Not a huge issue for this project, but something to keep in mind for anything more serious.
Conclusion
This was a fun little adventure — and there’s still a lot to explore. I love how AI services like this are becoming more available to the public audience helping to make life a bit easier. If you’ve tried something similar or have any thoughts about my setup, I’d love feedback!
Did you find this post helpful? Hit like and follow to read more of them later :)
