Hey fellow cloud enthusiasts! 👋 Ever wanted to build a fast, modern blog using some of the coolest technologies out there?
I recently embarked on a journey to do just that, combining the power of Nuxt.js for the frontend, Sanity.io as a headless CMS, and Cloudflare Pages for seamless deployment.
Why this stack? It offers an amazing developer experience, incredible flexibility, and blazing-fast performance. But like any real-world project, the path wasn't always straight! 😉
In this post, I'll share my step-by-step process, including the inevitable troubleshooting moments (especially navigating Nuxt 3 updates!), hoping it helps you learn and maybe even inspire your next project.
(Heads up: The specific commands and steps worked for Nuxt.js v3.16.2 and Sanity.io v3.85.1. Future versions might require adjustments due to potential changes in dependencies.)
📌 Key Takeaways:
- Understand the roles of Nuxt.js, Sanity.io, and Cloudflare Pages in a modern web JAMstack.
- Learn how to set up and connect Sanity.io (headless CMS) with a Nuxt.js frontend.
- See practical examples of fetching and displaying data using GROQ and Portable Text.
- Walk through deploying a Nuxt application globally via Cloudflare Pages.
- Gain insights from real troubleshooting steps encountered during development.
📜 Table of Contents:
- Why This Tech Stack? (Nuxt + Sanity + Cloudflare)
- Part 1: Setting Up Your Content Backend with Sanity.io
- Part 2: Building the Blog Frontend with Nuxt.js
- Part 3: Connecting Nuxt.js to Sanity & Displaying Posts (incl. Troubleshooting!)
- Part 4: Deploying to the World with Cloudflare Pages
- Bonus: Understanding GROQ & Nuxt DevTools
- Wrapping Up & Your Turn!
Let's dive in!
Why This Tech Stack? (Nuxt + Sanity + Cloudflare)
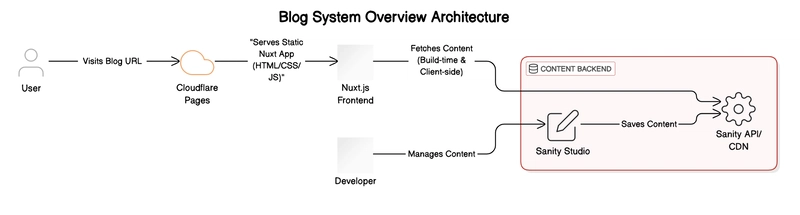
Before we jump into the code, let's briefly touch upon why these tools work so well together. We're essentially building a 3-tier application:
- Presentation Tier (Frontend): What the user sees and interacts with. We're using Nuxt.js, a powerful and intuitive framework built on Vue.js, known for features like server-side rendering (SSR), static site generation (SSG), file-system routing, and auto-imports, which simplify development.
- Logic Tier (Processing): Handles the business logic. In our case, Sanity.io handles much of this through its APIs and query language (GROQ).
- Data Tier (Storage): Where the content lives. Sanity.io acts as our headless Content Management System (CMS), providing a structured content platform hosted in the cloud. It gives us a customizable editing interface (Sanity Studio) and APIs to fetch content.
Benefits:
- Decoupled Architecture: Frontend and backend are separate, allowing independent development, scaling, and technology choices (JAMstack principles!).
- Developer Experience: Nuxt and Sanity are designed to be developer-friendly.
- Content Flexibility: Sanity's structured content approach is highly adaptable.
- Performance & Scalability: Nuxt can generate static sites or use SSR for speed, while Cloudflare Pages provides global CDN deployment.
Here's a simplified view of the architecture:
Part 1: Setting Up Your Content Backend with Sanity.io
First, we need a place to store and manage our blog posts. That's where Sanity.io comes in.
Step 1: Install Sanity Locally
This command scaffolds a new Sanity project, setting up the Sanity Studio (your content editing interface) and configuration files.
npx sanity initFollow the prompts to log in or create a Sanity account, choose a project template (like 'Blog'), and configure dataset access.
Step 2: Run Local Dev Server
To test the Sanity Studio locally:
npx sanity dev- Note: You'll likely need to log in via the browser window that opens. This local dev server (
localhost:3333by default) is private to your authenticated user.
For production builds (though we'll rely on the hosted Sanity service):
# Build the static Sanity Studio files
sanity build
# Start a local server for the built studio
sanity start
Step 3: Test Access and Add Content
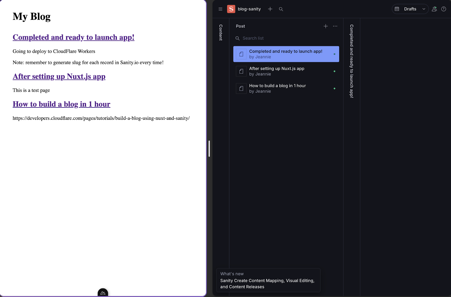
Navigate to http://localhost:3333 in your browser. You should see the Sanity Studio interface.
You can either:
- Manually add content types (like 'Author' and 'Post') and create some sample entries.
- Import sample data if your chosen template included an import script (e.g.,
npm run import-sample-data).
I manually added one author and one blog post to proceed with testing the frontend integration.
Part 2: Building the Blog Frontend with Nuxt.js
Now, let's create the Nuxt.js application that will display our blog content.
Step 1: Allow Nuxt.js Access via CORS
Since our Nuxt app (running locally on http://localhost:3000 initially) needs to fetch data from Sanity's API, we must tell Sanity to trust requests from this origin.
- Go to manage.sanity.io.
- Select your project.
- Navigate to the API tab.
- Under CORS origins, click Add CORS origin.
- Enter
http://localhost:3000and check the Allow credentials box.
Step 2: Create Nuxt Project
Use the Nuxt CLI to create a new project. I named mine blog.
npx create-nuxt-app blogDuring setup, I selected:
- Programming language: TypeScript
- Package manager: npm
- UI framework: None (can add later if needed)
- Nuxt.js modules: None (we'll add Sanity manually)
- Linting tools: (Your preference)
- Testing framework: None
- Rendering mode: Universal (SSR / SSG)
- Deployment target: Static (Static/JAMstack hosting) (Important for Cloudflare Pages)
- Development tools: (Your preference)
- Version control: Initialize git repository
Step 3: Run Local Dev Server
Navigate into your new project directory and start the development server:
cd blog
npm run dev
Step 4: Test Access
Open http://localhost:3000 in your browser. You should see the default Nuxt welcome page.
Step 5: Configure Sanity.io Integration
Install the necessary packages to connect Nuxt with Sanity:
npm install @nuxtjs/sanity @sanity/clientAdd the Sanity module to your Nuxt configuration using the Nuxt CLI helper:
npx nuxi@latest module add sanityThis command should automatically update your nuxt.config.ts. Now, you need to tell the module your Sanity project ID.
- Find your
projectIdin thesanity.config.tsfile within your Sanity project folder. - Add it to your Nuxt project's
nuxt.config.tsfile like this:
// nuxt.config.ts
export default defineNuxtConfig({
  modules: ['@nuxtjs/sanity'],
  sanity: {
    projectId: '' // Replace with your actual project ID
  },
  // other config...
  devtools: { enabled: true } // Ensure Nuxt DevTools are enabled
})
Detailed doc: https://sanity.nuxtjs.org/getting-started/quick-start/
Part 3: Connecting Nuxt.js to Sanity & Displaying Posts (incl. Troubleshooting!)
With setup complete, let's fetch and display our blog posts.
Step 1: Create the Index Page (Listing Posts)
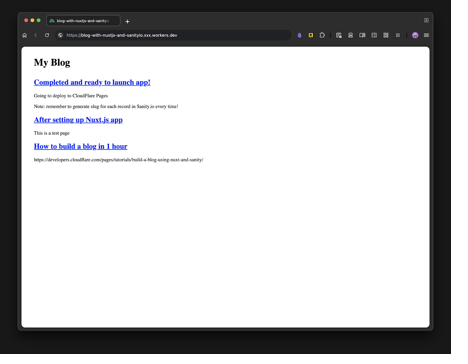
This page will fetch all posts from Sanity and list their titles as links.
- Create a
pagesdirectory in the root of your Nuxt project if it doesn't exist. - Create a file named
index.vueinside thepagesdirectory. - Add the following code:
<template>
   class="container">

       class="title">My Blog

     class="posts">
       v-for="post in posts" :key="post._id">

         :to="`/${post.slug.current}`">{{ post.title }}


template>

<script setup>
// Define the GROQ query to fetch all documents of type 'post'
const query = `*[_type == "post"]`;
// Use the useSanityQuery composable provided by @nuxtjs/sanity
const { data: posts } = await useSanityQuery(query);

// Basic error handling or loading state could be added here
script>

<style>
.container {
  margin: 2rem;
  min-height: 100vh;
}
.posts {
  margin: 2rem 0;
}
/* Basic styling for links */
a {
  text-decoration: none;
  color: #007bff;
}
a:hover {
  text-decoration: underline;
}
style>
At this point, visiting localhost:3000 should show the titles of the blog posts you created in Sanity. Clicking a title will change the URL (e.g., to /my-first-post), but the page content won't change yet.
Step 2: Create Dynamic Blog Post Pages
We need a way for Nuxt to dynamically create a page for each blog post based on its unique identifier (the "slug" generated by Sanity). Nuxt 3 uses file-based dynamic routing.
- Inside the
pagesdirectory, create a file named[slug].vue. The square brackets indicate a dynamic route parameter.
Troubleshooting Moment 1: Nuxt 2 vs Nuxt 3 Routing & Data Fetching 😅
My initial attempt used conventions from Nuxt 2 and older examples:
- Filename: I first named the file
_slug.vue(Nuxt 2 convention). This resulted in a 404 Not Found error because Nuxt 3 uses[slug].vue. -
Accessing Route Params: My first script attempt tried to access
params.slugdirectly within thescript setupblock, like this (simplified):
// INCORRECT for Nuxt 3 script setup
const query = `*[_type == "post" && slug.current == "${params.slug}"][0]`;
const { data: post } = await useSanityQuery(query);
This caused a 500 Internal Server Error with the message
params is not defined. In Nuxt 3'sscript setup, you need to explicitly import and useuseRoute()to access route parameters.
Correct Code for pages/[slug].vue:
This version uses the correct filename ([slug].vue) and properly accesses the route parameter using useRoute():
<template>
   class="container">
     v-if="post">
       class="title">{{ post.title }}
       class="content">


     v-else>
       Loading post or post not found...


       to="/">← Go back


template>

<script setup>
// Import useRoute to access route parameters
import { useRoute } from '#imports'; // or from 'vue-router' in Nuxt 3

const route = useRoute();
// Construct the GROQ query using the slug from the route params
const query = `*[_type == "post" && slug.current == "${route.params.slug}"][0]`;
// Fetch the specific post data
const { data: post } = await useSanityQuery(query);

// Optional: Add better error handling for post not found
if (!post.value && process.server) { // Check if post is null/undefined after fetch
   // throw createError({ statusCode: 404, statusMessage: 'Post Not Found' });
   console.error(`Post with slug "${route.params.slug}" not found.`);
}

// Useful for debugging during development
console.log('Current Slug:', route.params.slug);
console.log('Fetched Post Data:', post.value);
script>

<style>
.container {
  margin: 2rem;
  min-height: 100vh;
}
.content {
  margin: 2rem 0;
  max-width: 38rem; /* Adjust as needed */
}
p {
  margin: 1rem 0;
}
h4 {
    margin-top: 2rem;
}
style>
Now, when you click a blog post link on the index page, Nuxt should navigate to the correct URL (e.g., /your-post-slug) and display the title of that specific post. The content area is still empty, though.
Step 3: Render Blog Post Content (Portable Text)
Sanity stores rich text content in a structured format called Portable Text. We need a component to render this structured data into HTML.
Troubleshooting Moment 2: Portable Text Component for Nuxt 3 😵💫
Again, following older tutorials led me down the wrong path initially.
- Incorrect Package: Some guides mentioned
sanity-blocks-vue-component. I installed it and tried setting it up via a Nuxt plugin (plugins/sanity-blocks.js) as suggested for Nuxt 2. - The Error: This resulted in a dreaded "Hydration completed but contains mismatches" error in the browser console. This often happens in SSR frameworks like Nuxt when the server-rendered HTML doesn't match the client-side virtual DOM, usually due to incompatible components or incorrect setup for the framework version.
Correct Approach for Nuxt 3 using @portabletext/vue:
-
Install the Correct Package: Use the official Vue 3 compatible package.
npm install @portabletext/vue -
Create a Nuxt Plugin: Create a file named
portable-text.js(or similar) inside thepluginsdirectory.
// plugins/portable-text.js import { PortableText } from '@portabletext/vue'; export default defineNuxtPlugin((nuxtApp) => { // Register the PortableText component globally nuxtApp.vueApp.component('PortableText', PortableText); }); -
Register the Plugin: Add the plugin path to your
nuxt.config.ts.
// nuxt.config.ts
export default defineNuxtConfig({
  // ... other config
  plugins: [
    '@/plugins/portable-text.js' // Path to your plugin file
  ],
  // ... sanity config etc.
})
Update
[slug].vueto Usepages/[slug].vueto render thepost.body(assuming 'body' is the field name for your Portable Text content in Sanity).
{{ post.title }}


       Loading post or post not found...


      ← Go back


// ... (script setup remains the same as previous step) ...
import { useRoute } from '#imports';
const route = useRoute();
const query = `*[_type == "post" && slug.current == "${route.params.slug}"][0]`;
const { data: post } = await useSanityQuery(query);
if (!post.value && process.server) {
   console.error(`Post with slug "${route.params.slug}" not found.`);
}
console.log('Current Slug:', route.params.slug);
console.log('Fetched Post Data:', post.value);


/* ... (styles remain the same) ... */
.container { margin: 2rem; min-height: 100vh; }
.content { margin: 2rem 0; max-width: 38rem; }
.content p { margin: 1rem 0; } /* Example style for paragraphs within portable text */
.content h2 { margin-top: 1.5rem; margin-bottom: 0.5rem; } /* Example style */
h4 { margin-top: 2rem; }
End Result: Success! 🎉 Now, clicking a post link on the index page should take you to the individual post page, displaying both the title and the rich text content rendered correctly from Sanity.
Part 4: Deploying to the World with Cloudflare Pages
Our blog works locally, but let's make it publicly accessible using Cloudflare Pages, which integrates beautifully with Git repositories for continuous deployment.
Benefits of Cloudflare Pages:
- Automatic Deployments: Deploys a new version each time you push to your Git repository.
- Preview Deployments: Creates preview URLs for pull requests, perfect for testing changes.
- Global CDN: Serves your static site from Cloudflare's edge network for speed.
- Free Tier: Generous free tier for static sites.
Step 1: Create GitHub Repo and Push Code
- Make sure your Nuxt.js project is a Git repository (
git initif you didn't duringcreate-nuxt-app). - Create a new repository on GitHub (public or private).
-
Add the GitHub repository as a remote and push your code:
git remote add origingit branch -M main git push -u origin main (Alternatively, use the GitHub CLI (
gh) as shown in the original draft if you have it installed and configured).
- Note: You only need to push your Nuxt.js project code, not the Sanity project folder. Sanity is hosted separately.
Step 2: Publish to Cloudflare Pages
- Log in to your Cloudflare dashboard: https://dash.cloudflare.com/
- Navigate to Workers & Pages -> Create application -> Pages tab -> Connect to Git.
- Select the GitHub repository you just created.
- In the Set up builds and deployments section:
- Production branch:
main(or your default branch). - Framework preset: Select Nuxt. Cloudflare should automatically detect it and fill in the build settings.
- Build command: Should be
npm run generateornuxt generate. - Build output directory: Should be
.output/public. - (Optional) Root Directory: If your Nuxt project is inside a subfolder in your repo, specify the path here. Otherwise, leave it blank.
- Production branch:
- Click Save and Deploy.
Cloudflare will now pull your code, build the Nuxt application (generating static files), and deploy it to its global network.
Step 3: Test Access
Once the deployment is complete, Cloudflare will provide you with a unique URL (e.g.,
Don't forget! You might need to add your new Cloudflare Pages URL (e.g., https://) to your Sanity project's CORS origins list, just like you did for localhost:3000, so the live site can fetch data.
Bonus: Understanding GROQ & Nuxt DevTools
Two extra bits of knowledge that are super helpful:
1. What is GROQ? 🤔
You saw queries like *[_type == "post"] in the code. That's GROQ!
- GROQ stands for Graph-Relational Object Queries.
- It's Sanity's powerful, flexible query language designed specifically for JSON documents.
- Why? Traditional SQL or even GraphQL can be cumbersome for the deeply nested, flexible schemas often used in headless CMSs.
- Value: GROQ lets you easily:
- Filter documents (
[_type == "post"]). - Select specific fields (projections).
- Follow references between documents (e.g., fetching author details along with a post).
- Shape the returned JSON data exactly how your frontend needs it.
- Filter documents (
It's worth learning the basics if you work heavily with Sanity!
2. Nuxt DevTools 🛠️
Nuxt comes with fantastic built-in developer tools that can significantly speed up debugging directly in your browser.
- How to access: While your local dev server (
npm run dev) is running, press Shift + Option + D (Mac) or Shift + Alt + D (Windows/Linux) in your browser tab showinglocalhost:3000. - Authentication: The first time, you might see a prompt asking for an authentication code. Check the terminal where you ran
npm run dev– Nuxt usually prints the code there. Paste it into the browser prompt. - Features: Explore components, check routes, inspect state, view composable usage, analyze payloads, and much more! It's incredibly useful for understanding what's happening under the hood. (Make sure
devtools: { enabled: true }is in yournuxt.config.ts).
Wrapping Up & Your Turn!
And there you have it! We've journeyed from setting up a Sanity.io backend and a Nuxt.js frontend to connecting them, navigating some troubleshooting, and finally deploying our blog globally using Cloudflare Pages. ✨
We saw how powerful this combination is for building modern web applications, offering flexibility for content management (thanks, Sanity!), a great developer experience (go Nuxt!), and effortless, performant deployment (kudos, Cloudflare!). We also navigated a few bumps along the road, reminding us that troubleshooting is a key part of the learning process.
Key Learnings Recap:
- Sanity.io provides a flexible headless CMS experience.
- Nuxt.js makes building Vue-based frontends efficient, especially with Nuxt 3 features.
- Cloudflare Pages offers simple, fast, and integrated deployment for static/JAMstack sites.
- GROQ is a powerful language for querying Sanity data.
- Always check framework/package compatibility (Nuxt 2 vs Nuxt 3, Vue 2 vs Vue 3 components)!
- Nuxt DevTools are your friend for debugging!
I hope this walkthrough was helpful and demystified the process a bit. Building projects like this is one of the best ways to learn!
Ref:https://developers.cloudflare.com/pages/tutorials/build-a-blog-using-nuxt-and-sanity
Now, over to you! 🤔
- What are your favorite tools for building blogs or static sites?
- Have you used Nuxt.js, Sanity.io, or Cloudflare Pages before? What was your experience?
- Did you encounter similar troubleshooting hurdles, especially with framework upgrades? Share your tips!
Let me know your thoughts in the comments below – I'd love to spark a discussion! Happy coding! 💻
