Introduction
This article documents our journey migrating from AWS Lambda to a self-managed Kubernetes cluster to handle high-concurrency API requests. We'll walk through our motivation, infrastructure choices, implementation details, and most importantly - the performance results that validated our decision.
Why Migrate From Lambda?
Our original architecture used AWS Lambda behind API Gateway, but we encountered significant limitations:
- Concurrency Limitations: Our Lambda-based service was unable to handle concurrent executions exceeding 1000 users
- Poor Performance Under Load: Load testing revealed significant degradation and high failure rates at scale
- Cost Optimization: We needed to optimize our cost-per-user-served metric
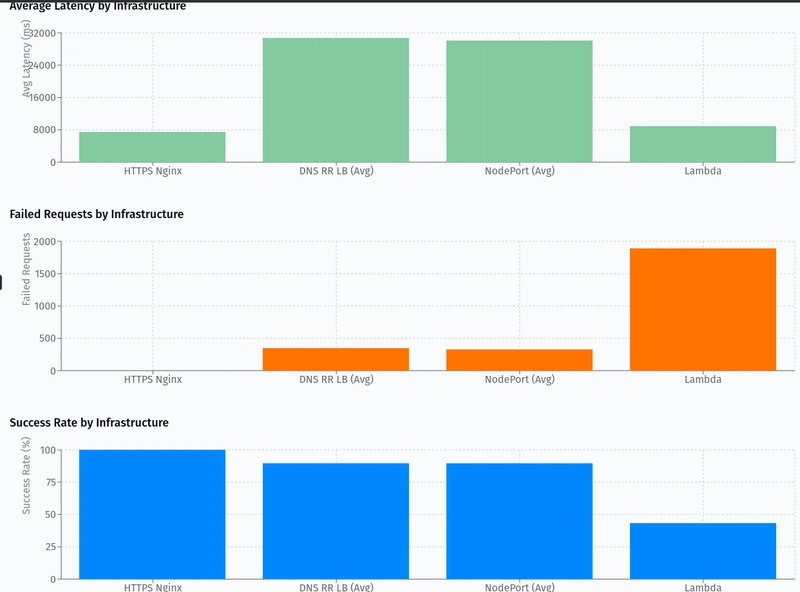
Performance Comparison
The most compelling argument for our migration comes from the load test results comparing our previous Lambda setup with our new Kubernetes infrastructure options:

Key Findings:
- HTTPS Nginx setup achieved 100% success rate with the lowest average latency (7468ms) at 1100 concurrent users
- DNS Round-Robin Load Balancer averaged ~89% success rate with varying latency across pods (from 12676ms to 53028ms)
- NodePort service averaged ~89% success rate with similar latency variance
- Lambda performed poorly with only 43.48% success rate despite being tested at a lower concurrency (800 users)
The visualization clearly demonstrates that our properly configured Nginx + Kubernetes setup significantly outperforms the Lambda architecture, particularly in handling burst traffic and maintaining high success rates.
🚀 The load test was performed using load_test_util
✅ Supports MongoDB server metric analysis
🛠️ Custom logging built-in
🧩 Fully configurable via JSON
Perfect for benchmarking infra migrations like ours :)
Read on for in-depth setup guide...
Migration Goals
We established the following optimization parameters for our migration:
- Reduce cost per user served
- Support at least 1000 RPS burst capacity
- Maintain reliability under high concurrent load
Infrastructure Choices
We selected a cost-optimized self-managed Kubernetes cluster with:
- 1 master node
- 2 worker nodes
- ECR for container registry
- NGINX load balancers (instead of AWS LB) for cost optimization
Implementation Details
Setting Up the Kubernetes Cluster (Ubuntu 22.04)
- Prepare the System
# Update packages
sudo apt update && sudo apt upgrade -y

# Install required dependencies
sudo apt install -y curl apt-transport-https- Install containerd Runtime
sudo apt install -y curl gnupg2 software-properties-common apt-transport-https ca-certificates
sudo apt install -y containerd
sudo mkdir -p /etc/containerd
containerd config default | sudo tee /etc/containerd/config.toml > /dev/null
# Edit config as needed
sudo systemctl restart containerd
sudo systemctl enable containerd- Initialize Master Node
# Add Kubernetes APT repository
curl -s https://packages.cloud.google.com/apt/doc/apt-key.gpg | sudo apt-key add -
echo "deb https://apt.kubernetes.io/ kubernetes-xenial main" | sudo tee /etc/apt/sources.list.d/kubernetes.list

# Install kubeadm, kubelet, and kubectl
sudo apt install -y kubelet kubeadm kubectl
sudo apt-mark hold kubelet kubeadm kubectl

# Initialize the cluster
sudo kubeadm init --pod-network-cidr=10.244.0.0/16

# Configure kubectl
mkdir -p $HOME/.kube
sudo cp -i /etc/kubernetes/admin.conf $HOME/.kube/config
sudo chown $(id -u):$(id -g) $HOME/.kube/config- Initialize Worker Nodes
# On worker nodes
sudo apt update && sudo apt upgrade -y
sudo apt install -y kubelet kubeadm kubectl
sudo apt-mark hold kubelet kubeadm kubectl

# Join the worker to the cluster using the token from master
sudo kubeadm join :6443 --token --discovery-token-ca-cert-hash sha256:<hash>- Configure Pod Networking with Flannel
# Install Flannel
kubectl apply -f https://raw.githubusercontent.com/coreos/flannel/master/Documentation/kube-flannel.yml

# Enable bridge networking
sudo modprobe overlay
sudo modprobe br_netfilter
lsmod | grep br_netfilter

sudo tee /etc/sysctl.d/k8s.conf <<EOF
net.bridge.bridge-nf-call-iptables = 1
net.bridge.bridge-nf-call-ip6tables = 1
net.ipv4.ip_forward = 1
EOF
Containerizing the Application
- Create Docker Images
# Tag for ECR
docker tag myimage:version .dkr.ecr..amazonaws.com/:version

# Push to ECR
docker push .dkr.ecr..amazonaws.com/:version

# Login to ECR
aws ecr get-login-password --region  --profile  | \
docker login --username AWS --password-stdin .dkr.ecr..amazonaws.com- Create Secret for ECR Access
kubectl create secret docker-registry ecr-secret \
  --docker-server=.dkr.ecr..amazonaws.com \
  --docker-username=AWS \
  --docker-password=$(aws ecr get-login-password --region  --profile )
Deployment Configuration
- Kubernetes Deployment
apiVersion: apps/v1
kind: Deployment
metadata:
  name: rest-api-deployment
spec:
  replicas: 3  # Creates 3 Pods
  selector:
    matchLabels:
      app: rest-api
  template:
    metadata:
      labels:
        app: rest-api
    spec:
      containers:
      - name: rest-api-container
        image: my-api-image:latest  # Replace with your actual API image
        ports:
        - containerPort: 5000
        livenessProbe:  # Ensures failed pods restart
          httpGet:
            path: /health
            port: 5000
          initialDelaySeconds: 5
periodSeconds: 10- Service Exposure via NodePort
apiVersion: v1
kind: Service
metadata:
  name: rest-api-service
spec:
  type: NodePort
  selector:
    app: rest-api
  ports:
    - protocol: TCP
      port: 80        # Internal Cluster Port
      targetPort: 5000 # API Container Port
      nodePort: 30080  # Exposes API on :30080
Load Balancing Configuration
The initial NGINX configuration failed under burst load with errors like:
2025/04/01 09:18:00 [alert] 977643#977643: *14561 socket() failed (24: Too many open files) while connecting to upstreamOptimized NGINX Configuration
We addressed these limitations with the following tuned NGINX configuration:
user www-data;
worker_processes auto;
pid /run/nginx.pid;
worker_rlimit_nofile 65536;
error_log /var/log/nginx/error.log;
include /etc/nginx/modules-enabled/*.conf;

events {
    worker_connections 4096;
    multi_accept on;
}

http {
    sendfile on;
    tcp_nopush on;
    types_hash_max_size 2048;

    include /etc/nginx/mime.types;
    default_type application/octet-stream;

    ssl_protocols TLSv1 TLSv1.1 TLSv1.2 TLSv1.3;
    ssl_prefer_server_ciphers on;

    access_log /var/log/nginx/access.log;

    gzip on;

    keepalive_timeout 75s;
    keepalive_requests 10000;
    proxy_buffering on;
    proxy_buffers 16 16k;
    proxy_busy_buffers_size 32k;
    proxy_read_timeout 60s;
    proxy_send_timeout 60s;

    upstream backend_servers {
        server 192.0.2.1:30008;
        server 192.0.2.2:30008;
    }

    server {
        listen 80;
        listen 443 ssl http2;
        server_name app.example.com;

        ssl_certificate /etc/ssl/certs/fullchain.pem;
        ssl_certificate_key /etc/ssl/private/privkey.pem;

        location / {
            proxy_pass http://backend_servers;
            proxy_http_version 1.1;
            proxy_set_header Host $host;
            proxy_set_header X-Real-IP $remote_addr;
            proxy_set_header X-Forwarded-For $proxy_add_x_forwarded_for;
            proxy_set_header X-Forwarded-Proto $scheme;
            proxy_set_header Upgrade $http_upgrade;
            proxy_set_header Connection "Upgrade";
        }

        # Additional configuration omitted for brevity
    }
}
Key optimizations include:
- Increased
worker_rlimit_nofileto 65536 - Set
worker_connectionsto 4096 - Enabled
multi_accept - Increased
keepalive_timeoutto 75s - Set
keepalive_requeststo 10000 - Optimized buffer sizes
Results and Conclusion
Our migration from Lambda to a self-managed Kubernetes cluster with optimized NGINX configuration delivered:
- Improved Reliability: From 43% success rate to 100% success rate under load
- Better Latency: Significantly lower average response times
- Higher Capacity: Successfully handling 2000+ concurrent users
- Cost Optimization: Lower cost per user served compared to Lambda
These results validate our architectural decision to migrate from serverless to a self-managed Kubernetes setup for high-concurrency APIs.
Key Takeaways
- Serverless isn't always the answer, especially for high-concurrency applications
- Properly configured traditional infrastructure can outperform serverless at scale
- System tuning (especially NGINX configuration) is critical for performance
- A cost-optimized Kubernetes cluster can provide an excellent balance of performance and economics
Would you like to learn more about our journey or have questions about implementing a similar migration? Let me know in the comments!
Note: This article is based on real migration and performance testing conducted in March-April 2025.