
Debugging Kubernetes applications locally can be overwhelming, especially when dealing with complex microservices that require environment variables, mounted volumes, and webhook traffic.
In this post, I’ll walk you through how I tackled this challenge while contributing to Dapr, using Telepresence Replace mode to turn my local machine into a full Kubernetes pod — and how you can do it too.
In the past few days, I started investigating an issue in one of the components of the CNCF-graduated project, Dapr. This was my first time contributing to the project, which meant I initially knew nothing about the codebase.
Dapr is composed of components that can run as microservices in Kubernetes. On top of that, the issue I'm trying to fix requires configuring Kubernetes Mutating Webhooks. As you can imagine, debugging and testing locally would be a nightmare without the right tools.
To run this microservice component locally, we need to:
- Have all other components up and running.
- Send and receive traffic from other components.
- Receive traffic from the Kubernetes Webhook.
- Access mounted volumes and environment variables.
I’ll revisit these requirements toward the end of this post here.
When working with a complex application like this, there’s usually a Helm chart that defines all the defaults needed to deploy and run it. However, depending on the size and complexity of the templates, it can be challenging to find all the necessary environment variables and required files.
This is where Telepresence shines, offering three powerful development modes:
- Replace: Telepresence removes (or sidecars) the original pod, allowing your local machine to fully act as the pod inside the cluster.
- Intercept: Telepresence forwards specific port traffic from the remote pod to your local machine, enabling local development for network traffic while keeping the actual pod alive for everything else.
- Injest: Telepresence injects a traffic agent to make the remote environment available locally, providing read-only access to volumes without rerouting traffic.
In this post, I’ll focus on Replace mode, which I find the most powerful of the three. This feature was added in version 2.22.0 (March 14 release), so if you have an older version of Telepresence installed, you’ll need to upgrade to use it.
https://telepresence.io/docs/install/client
Using Telepresence
Before using Telepresence, we need to have a development cluster up and running. I recommend using kind but any Kubernetes distribution will work.
Caution 📣
Only install Telepresence in development clusters or low-impact environments. A basic setup like the one in this post opens several potential attack vectors.
(I plan to write a separate blog post on how to deploy Telepresence safely!)
Setup
To start using Telepresence, we first need to define the namespace where the Traffic Manager will be installed. By default, Telepresence uses a namespace called ambassador. After installing the Traffic Manager, we connect to it and specify the namespace where we want to intercept traffic:
telepresence helm install traffic-manager --namespace  datawire/telepresence

# Connect to one of our cluster namespaces
telepresence connect --namespace  --manager-namespace

# List all available workloads to intercept
telepresence list
If there’s nothing to intercept yet, we can create a simple deployment for testing:
kubectl create deployment web --image nginx --namespace

telepresence list
# deployment web : ready to engage (traffic-agent not yet installed)
The deployment above will, by default, mount a projected volume containing the Kubernetes default service account token.
Let's assume our application needs access to this token to work correctly.
Telepresence Volumes
The Replace mode includes the --mount option, which lets us specify whether we want container-mounted volumes to be accessible from our local machine.
By default, --mount=true will mount these volumes into a directory automatically created by Telepresence, but we can also specify a custom location with --mount= if needed.
Telepresence also sets the TELEPRESENCE_ROOT environment variable, making it easy to reference the mounted folder in our local environment.
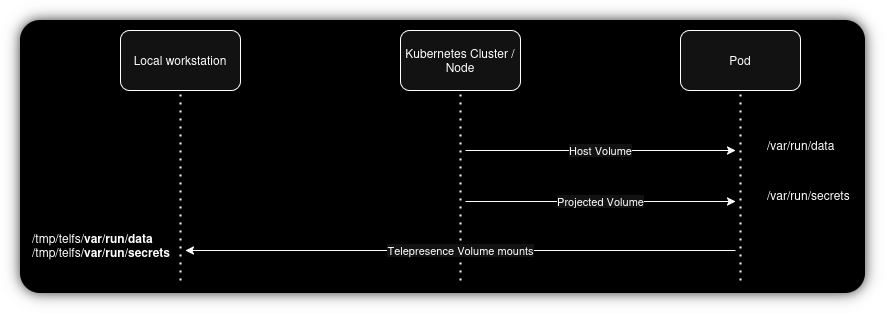
In the diagram above we can see that Telepresence will mount all the mounted volumes from the container to our host.
Caution 📣
Before usingmountmake suresshfsis installed and verify thatuser_allow_otheris uncommented in/etc/fuse.conf. More here
Running replace
We can now use Replace mode to fetch the token and use it as needed. The syntax for replace is:
telepresence replace -- <command> ...Then to read the token, we can run:
telepresence replace web --mount=true -- /bin/sh -c 'cd $TELEPRESENCE_ROOT && python3 -m http.server 8080'The command above changes the directory to $TELEPRESENCE_ROOT (set automatically by Telepresence) and starts a Python HTTP server, making all files in that directory accessible via the browser:
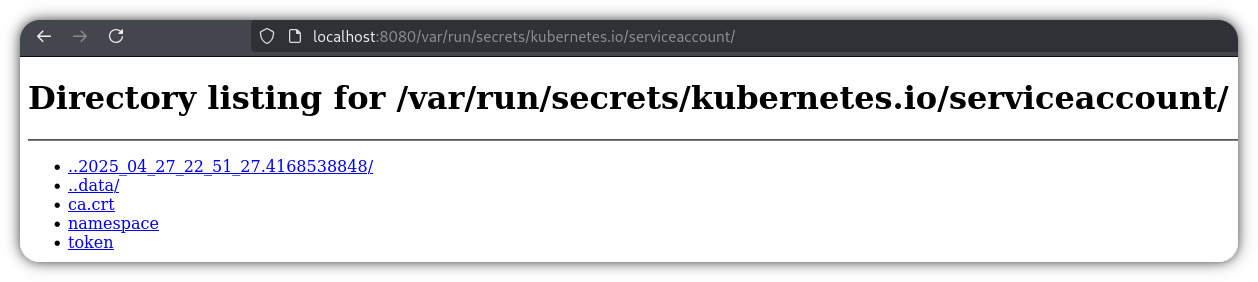
This is why a misconfigured Telepresence deployment can be dangerous — it can expose sensitive information like service account tokens. Only use Telepresence in development environments.
Linking Back to Microservices
Now, circling back to our original requirements, let’s see how Telepresence helps:
Have all other components up and running
We usually take this for granted and focus only on making sure our local development instance can communicate with everything else (and vice versa).
For a development cluster, simply running:
helm installshould bring everything up if configured properly.
Receive and send traffic to other components
Both Replace and Intercept modes satisfy this.
However, if your service needs outgoing access to multiple services, you might also need to use kubectl port-forward and set environment variables when running your local application to correctly route traffic.
Receive traffic from the Kubernetes Webhook
This requirement is also satisfied by both Replace and Intercept modes.
Have access to the mounted volumes and environment variables
Accessing mounted volumes and environment variables locally is handled by Replace mode.
You can still overwrite environment variables before running your application if you need to make any modifications for local development.
Conclusion
Telepresence is an incredibly powerful tool for local development in Kubernetes environments.
By using Replace mode, we can fully replicate our pod’s environment, interact with other services, and even handle webhook traffic — all from our local workstation.
However, with great power comes great responsibility. Always limit the use of Telepresence to development clusters and ensure you understand the risks of exposing volumes and tokens.
I hope this post helps you speed up your debugging workflows and makes contributing to complex projects like Dapr much more approachable.
Stay tuned for a future post where I’ll cover how to deploy Telepresence in a safer and more production-friendly way!
