Mastering Authentication in MERN Stack Apps with JWT
In this tutorial, we will focus on implementing JWT Authentication in a MERN stack application. JWT is a popular and efficient way to handle user authentication in modern web apps. By the end of this tutorial, you will be able to set up user registration, login, and secure routes using JWT.
What is JWT?
JWT (JSON Web Token) is an open standard (RFC 7519) that defines a compact and self-contained way to securely transmit information between parties as a JSON object. This information stored as JWT is digitally signed. That means information can be verified that it is not tempered and from original source. Because of JWT is self-signatured, this token is widely used for authentication and information exchange in web applications.
Benefits of Using JWT
- Stateless Authentication: JWT is stateless, meaning you don’t need to store session information on the server.
- Secure: JWT tokens can be signed and optionally encrypted, providing security and integrity of data.
- Scalable: Since JWT is stateless, it is ideal for scaling applications across multiple servers.
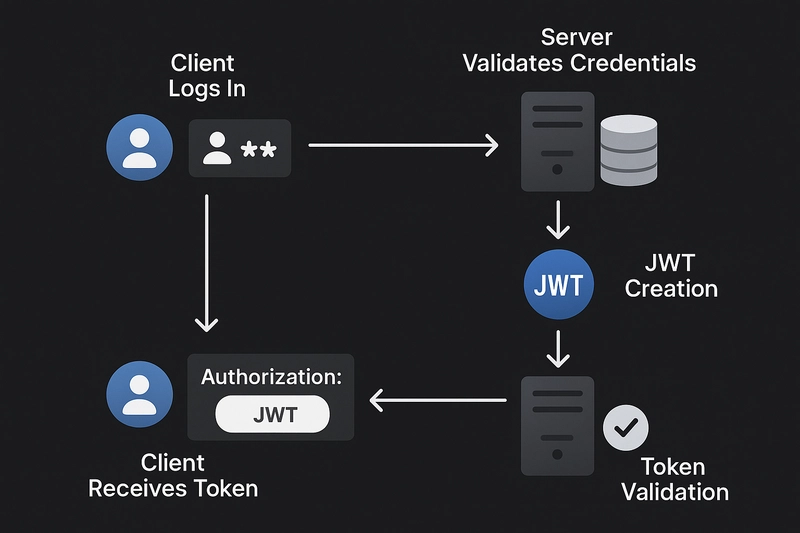
How JWT Works
- Client Logs In: The user provides their credentials (username and password) to the server.
- Server Validates Credentials: The server validates the credentials against the database.
- JWT Creation: If the credentials are correct, the server generates a JWT token that contains user information (typically, user ID and other claims).
- Client Receives Token: The client stores the token (usually in local storage or cookies) and includes it in the Authorization header of future requests.
- Token Validation: On every API call, the server validates the token to check if the user is authenticated.

Project Setup
To get started, let's create a basic MERN stack application with MongoDB, Express.js, React.js, and Node.js. This will include user registration and login functionality.
First, initialize the Node.js app:
We can initialize node application using npm init and it initializes a project by generating a package.json file, which contains metadata about the project, such as its name, version, description, main file, scripts, author, license, and dependencies.
When you run npm init in a terminal, it prompts you with a series of questions to gather information about your project. You can either provide specific answers or press enter to accept the default values.
mkdir mern-jwt-auth
cd mern-jwt-auth
npm init -y
After initializing project, we need to add some dependencies which we will use on our example. We are using express for server, mongoose as ODM (Object Data Modeling) library for MongoDB, jsonwebtoken for generating and verifying JWT tokens, bcryptjs for encryption, dotenv for accessing environment variables.
Install the required dependencies:
npm install express mongoose jsonwebtoken bcryptjs dotenv cors
npm install --save-dev nodemon
Note: We are adding nodemon as dev dependency, So , we do noyt have to re-run our server every time when we changes something. It will be automatically handled by nodemon.
Set up your backend structure like so:
backend/
  ├── config/
  ├── controllers/
  ├── middleware/
  ├── models/
  ├── routes/
  └── server.js
It is self-explanatory that all controllers are in controllers folder/directory, middleware are in middleware folder/directory and so on for models and routes also.
Let's start creating our first model using mongoose. Models are nothing but logical structure of database schema/structure.
Creating the User Model
In the models folder, create a User.js file with the following code to define the User schema:
const mongoose = require('mongoose');
const bcrypt = require('bcryptjs');

const userSchema = new mongoose.Schema({
  name: {
    type: String,
    required: true,
  },
  email: {
    type: String,
    required: true,
    unique: true,
  },
  password: {
    type: String,
    required: true,
  },
});

// Hash the password before saving to the database
userSchema.pre('save', async function (next) {
  if (!this.isModified('password')) return next();
  this.password = await bcrypt.hash(this.password, 10);
  next();
});

const User = mongoose.model('User', userSchema);
module.exports = User;
Explaining the Model Structure
User Schema: We define the User schema using Mongoose, which allows us to model our MongoDB data. The schema defines the structure of the documents we store in the database. For instance, the
name,email, andpasswordfields are crucial for our authentication process.Email as Unique: We ensure the
emailfield is unique so that no two users can register with the same email address. This is important for preventing conflicts during the authentication process and ensures each user is identified by a unique email.Hashing the Password: We use bcryptjs to hash the user's password before saving it to the database. This is done in the
pre('save')hook, which is executed before the user document is saved to the database. Why Hash? Storing passwords as plain text is highly insecure. Hashing ensures that even if the database is compromised, the actual passwords remain unreadable.Why
this.isModified('password')?: This check ensures that we only hash the password when it is newly created or updated, avoiding unnecessary hashing if the password hasn't changed.
If you are not familiar with mongoose schema you can check it official documentation. Below is working link of its documentation while I am writing this blog.
Mongoose Documentation : Mongoose Documentation
Register and Login Routes
Now, let’s set up the registration and login routes. We can consider routes are endpoint of rest api. These routes will handle user registration and authentication. In the routes folder, create a authRoutes.js file:
const express = require('express');
const bcrypt = require('bcryptjs');
const jwt = require('jsonwebtoken');
const User = require('../models/User');

const router = express.Router();

// Register user
router.post('/register', async (req, res) => {
  const { name, email, password } = req.body;
  const userExists = await User.findOne({ email });
  if (userExists) return res.status(400).json({ msg: 'User already exists' });

  const user = new User({ name, email, password });
  await user.save();
  res.json({ msg: 'User registered successfully' });
});

// Login user
router.post('/login', async (req, res) => {
  const { email, password } = req.body;
  const user = await User.findOne({ email });
  if (!user) return res.status(400).json({ msg: 'User does not exist' });

  const isMatch = await bcrypt.compare(password, user.password);
  if (!isMatch) return res.status(400).json({ msg: 'Invalid credentials' });

  const token = jwt.sign({ id: user._id }, process.env.JWT_SECRET, { expiresIn: '1h' });
  res.json({ token });
});

module.exports = router;
Steps of JWT authentication
Register Route: First, we check if the user already exists using
User.findOne({ email }). This prevents multiple users from registering with the same email address. If the email already exists, we return an error message.Login Route: After validating the email, we use bcryptjs to compare the provided password with the hashed password stored in the database. If the password is incorrect, we return an error.
JWT Generation: Once the user’s credentials are validated, we create a JWT token using
jwt.sign(). Theidof the user is included in the token's payload, allowing the server to identify the user on subsequent requests.Why Use JWT? JWT allows us to create stateless sessions. Once the user logs in, they receive a token, which can be stored on the client side (usually in local storage or cookies). The server doesn’t need to remember anything about the user between requests, making this approach scalable and efficient.
Middleware for Protecting Routes
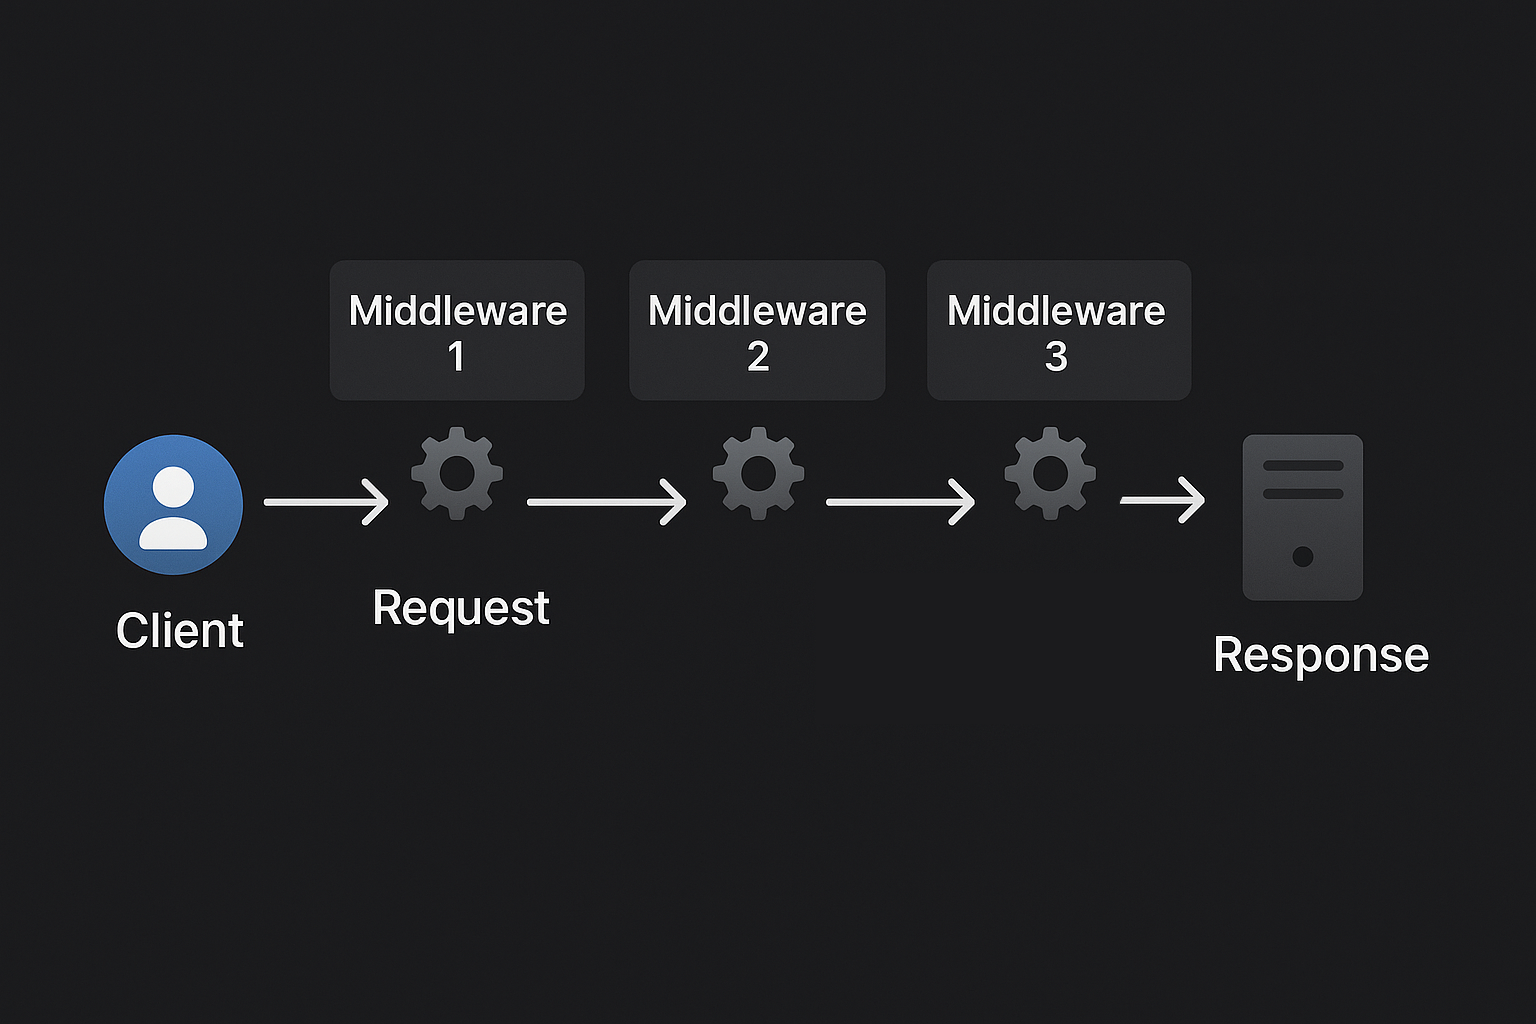
Middleware refers to functions that process requests before reaching the route handlers. These functions can modify the request and response objects, end the request-response cycle, or call the next middleware function. Middleware functions are executed in the order they are defined.
Below image shows how middleware works.
Now back to our authentication part.
To protect certain routes and ensure only authenticated users can access them, create a authMiddleware.js file in the middleware folder:
const jwt = require('jsonwebtoken');

const authMiddleware = (req, res, next) => {
  const token = req.header('Authorization')?.split(' ')[1];
  if (!token) return res.status(401).json({ msg: 'No token, authorization denied' });

  try {
    const decoded = jwt.verify(token, process.env.JWT_SECRET);
    req.user = decoded;
    next();
  } catch (err) {
    res.status(400).json({ msg: 'Token is not valid' });
  }
};

module.exports = authMiddleware;
Why Middleware?
The authMiddleware function intercepts incoming requests to protected routes, checks for a valid JWT in the Authorization header, and decodes the token to verify the user’s identity. If the token is missing or invalid, the middleware returns an error.
By using this middleware, we ensure that only authenticated users can access protected routes, like viewing or updating their profile.
Frontend Setup with React
On the frontend, we'll use React to handle user registration and login forms. The Axios library will be used to make API requests to our backend.
First, install Axios:
npm install axiosThen, create a login.js component to handle login and save the token to localStorage:
import React, { useState } from 'react';
import axios from 'axios';

const Login = () => {
  const [email, setEmail] = useState('');
  const [password, setPassword] = useState('');

  const handleLogin = async () => {
    try {
      const response = await axios.post('http://localhost:5000/api/auth/login', { email, password });
      localStorage.setItem('token', response.data.token);
    } catch (err) {
      console.error('Error logging in', err);
    }
  };

  return (
    <div>
      <input type='email' value={email} onChange={(e) => setEmail(e.target.value)} placeholder='Email' />
      <input type='password' value={password} onChange={(e) => setPassword(e.target.value)} placeholder='Password' />
      <button onClick={handleLogin}>Login</button>
    </div>
  );
};

export default Login;
Conclusion
JWT authentication is a simple, effective, and scalable method to handle user authentication in modern web applications. By following this guide, you’ve learned how to implement JWT-based authentication in your MERN stack application. You can expand on this by adding features such as user roles, refresh tokens, and token expiration handling.
Keep Learning and keep growing!
