Photo of Oksana Lyniv by Oliver Wolf pic (License CC BY 4.0)
When considering multi-tenancy, it is often associated with SaaS applications. However, most of my clients do not seem to be involved because they typically address internal needs.
But these days, a new paradigm is rising. It's called Platform Engineering. And it doesn't target only operational software but also data related products.
We need to develop accessible data tools for corporate end users, sush as dashboards and ETL services.
Therefore, providing Airflow with multi-tenant capabilities is essential.
Nearly four years ago, someone questioned the community on Stack Overflow about how to provide a multi-team feature with Airflow. Jarek Potiuk, a main Airflow contributor, provided a very comprehensive answer. In summary, he explained that Airflow did not yey provide a multi-tenancy feature. He went further adding that, even if in the next months this could be designed and implemented in Airflow 3, from it side, the multi-tenancy should be still adressed with multiple Airflow instances in some context where isolation is a must have.
Finally, AIP-1, an Airflow Improvement Proposal, aimed to enhance the Airflow security in all the dag lifecycle (from submission to execution), starts feeding the discussion of the multi-tenancy design.
The AIP-43 and AIP-44 provided an initial solution to implement this feature as early as Airflow 2. 🤩
⚠️ As described in the AIP-44, the Airflow 2 changes are experimental and they already provide a PR to remove these changes for the AF 3 version. You need to run at least Airflow version 2.10.4.
Of course the previously mentioned AIPs do not provide a complete multi-tenant feature because it's missing the ressources (like variables and connection) isolation between tasks. This is one of the goals of the AIP-72, which will only be implemented with Airflow 3.
With Airflow 2, the only isolation that can be proposed is with team-worker-specific instance and so with worker specific configuration (Environment variables or local files).
The next part is a demonstration of how to apply configuration in Airflow 2 to isolate DAG code between teams in a company and how to make sure that a team A can't access ressources (machines, databases, file shares, etc.) owned by another team.
How-to Implement Sort of Multi-Tenancy with Airflow 2
In the next steps, we will:
- Configure Airflow to load dags from team dedicated directories
- Give each user permission to see only dags related to its team
- Attach one worker to a team. Shares rights and network specific policies are team specific
All the steps start from the Airflow Docker installation. Previously you must, follow all the installation steps before going through the next instruction.
‼️ Stop just before runnint docker compose up at the Running Airflow paragraph.
Step 1: Split DagProcessor for Scheduler
According to the documentation, set the environment variable AIRFLOW__SCHEDULER__STANDALONE_DAG_PROCESSOR to True.
So in the docker-compose.yaml file, add a new line :
_PIP_ADDITIONAL_REQUIREMENTS: ${_PIP_ADDITIONAL_REQUIREMENTS:-}
    # The following line can be used to set a custom config file, stored in the local config folder
    # If you want to use it, outcomment it and replace airflow.cfg with the name of your config file
    # AIRFLOW_CONFIG: '/opt/airflow/config/airflow.cfg'
    + AIRFLOW__SCHEDULER__STANDALONE_DAG_PROCESSOR: "true"
    AIRFLOW__WEBSERVER__EXPOSE_CONFIG: "true"
    AIRFLOW__LOGGING__DAG_PROCESSOR_LOG_LEVEL: "DEBUG"
    AIRFLOW__LOGGING__LOGGING_LEVEL: "INFO"
Step 2: Define a Dag Processor for Each Team
We will assume that we have two teams : team1 and team2 and each of them will have a dedicated directory under /opt/airflow/dags, which is the default dags folder.
Here are two new services, one for each processor in the docker-compose.yaml:
airflow-dag-processor-team1:
    <<: *airflow-common
    command: dag-processor --subdir /opt/airflow/dags/team1/
    healthcheck:
      test: ["CMD", "curl", "--fail", "http://localhost:8974/health"]
      interval: 30s
      timeout: 10s
      retries: 5
      start_period: 30s
    restart: always
    depends_on:
      <<: *airflow-common-depends-on
      airflow-init:
        condition: service_completed_successfully

  airflow-dag-processor-team2:
    <<: *airflow-common
    command: dag-processor --subdir /opt/airflow/dags/team2/
    healthcheck:
      test: ["CMD", "curl", "--fail", "http://localhost:8974/health"]
      interval: 30s
      timeout: 10s
      retries: 5
      start_period: 30s
    restart: always
    depends_on:
      <<: *airflow-common-depends-on
      airflow-init:
        condition: service_completed_successfully
As you can see, the command is dag-processor followed by the subdir argument and its value, the path to the team's DAGs directory.
Step 3: Configure a Worker for Each Team
By replacing the default worker:
airflow-worker:
    <<: *airflow-common
    command: celery worker
[...]
With :
airflow-worker-team1:
    <<: *airflow-common
    command: celery worker -q team1
    healthcheck:
      # yamllint disable rule:line-length
      test:
        - "CMD-SHELL"
        - 'celery --app airflow.providers.celery.executors.celery_executor.app inspect ping -d "celery@$${HOSTNAME}" || celery --app airflow.executors.celery_executor.app inspect ping -d "celery@$${HOSTNAME}"'
      interval: 30s
      timeout: 10s
      retries: 5
      start_period: 30s
    environment:
      <<: *airflow-common-env
      # Required to handle warm shutdown of the celery workers properly
      # See https://airflow.apache.org/docs/docker-stack/entrypoint.html#signal-propagation
      DUMB_INIT_SETSID: "0"
    restart: always
    depends_on:
      <<: *airflow-common-depends-on
      airflow-init:
        condition: service_completed_successfully

  airflow-worker-team2:
    <<: *airflow-common
    command: celery worker -q team2
    healthcheck:
      # yamllint disable rule:line-length
      test:
        - "CMD-SHELL"
        - 'celery --app airflow.providers.celery.executors.celery_executor.app inspect ping -d "celery@$${HOSTNAME}" || celery --app airflow.executors.celery_executor.app inspect ping -d "celery@$${HOSTNAME}"'
      interval: 30s
      timeout: 10s
      retries: 5
      start_period: 30s
    environment:
      <<: *airflow-common-env
      # Required to handle warm shutdown of the celery workers properly
      # See https://airflow.apache.org/docs/docker-stack/entrypoint.html#signal-propagation
      DUMB_INIT_SETSID: "0"
    restart: always
    depends_on:
      <<: *airflow-common-depends-on
      airflow-init:
        condition: service_completed_successfully
As you can see, each worker runs with the argument -q so each worker will execute only tasks from its configured queue.
ℹ️ The dedicated team worker is where you could enforce security of connection, ressources (network policies) or variables and made them specific to a team.
Step 4: Add a Cluster Policy to Redirect Tasks
To route each DAG's task to a specific worker, we need to build a cluster task policy.
In the directory config of the AIRFLOW_HOME variable, add a file airflow_local_settings with the following content:
from airflow.models import DAG, BaseOperator
from airflow.policies import hookimpl
from airflow.exceptions import AirflowClusterPolicyViolation
import re

pattern = r"^([^/]+)/.+\.py$"


@hookimpl
def task_policy(task: BaseOperator) -> None:

    print(f"Task policy activated : task.dag.filepath : {task.dag.filepath}")
    match = re.search(pattern, task.dag.filepath)

    if match:
        task.queue = match.group(1)
    else:
        raise AirflowClusterPolicyViolation(
            f"DAG {task.dag.dag_id} is not in the correct path location. File path: {task.dag.filepath}"
        )
From the task dag filepath (or fileloc since filepath is deprecated), the name of the team will be extracted and for each task the correspond queue will be targeted with task.queue = match.group(1).
⚠️ It's important to understand that security relies on the team dag directory access rights. So you must control who can add (write) a dag in this directory. It could be a human user or one assigned to a tool like a ci/cd job.
Step 5: Add DAG Samples to Test
So we need to add two dags one in the directory dags/team1 and the other in the directory dags/team2.
For testing purpose, we choose this sample.
What you need to do is only, to modify the dag name, add access_control, eventualy its description and why not adding a tag with the team name.
Example for the team1 DAG:
with DAG(
    "tutorial_team1",
    # These args will get passed on to each operator
    # You can override them on a per-task basis during operator initialization
    default_args={
        "depends_on_past": False,
        "email": ["[email protected]"],
        "email_on_failure": False,
        "email_on_retry": False,
        "retries": 1,
        "retry_delay": timedelta(minutes=5),
        # 'queue': 'bash_queue',
        # 'pool': 'backfill',
        # 'priority_weight': 10,
        # 'end_date': datetime(2016, 1, 1),
        # 'wait_for_downstream': False,
        # 'sla': timedelta(hours=2),
        # 'execution_timeout': timedelta(seconds=300),
        # 'on_failure_callback': some_function, # or list of functions
        # 'on_success_callback': some_other_function, # or list of functions
        # 'on_retry_callback': another_function, # or list of functions
        # 'sla_miss_callback': yet_another_function, # or list of functions
        # 'on_skipped_callback': another_function, #or list of functions
        # 'trigger_rule': 'all_success'
    },
    description="A simple tutorial DAG team1",
    schedule=timedelta(days=1),
    start_date=datetime(2021, 1, 1),
    catchup=False,
    access_control= {
        "Team1" : {"can_read", "can_edit", "can_delete"}
    }
    tags=["team1"],
) as dag:
[...]
🔒 See the access_control which associated with permissions and roles control whose users can interact with those dags.
Step 6: Provide Team Users and Give Them Rigths
First, we need to create two roles : one for each team. Of course, you could create more than one role for each team, for example to separate viewers and operators.
We need also to add permissions that will associate dag to roles.
With the airflow cli provided with the docker-compose write:
- A role creation command:
docker compose run airflow-worker-team1 airflow roles create Team1- Add standard permissions to the role:
- First, launch a shell:
docker compose run airflow-worker-team1 bash- Then launch all of these:
# Associative array to hold resources and their corresponding actions
declare -A permissions=(
  ["My Password"]="can_edit can_read"
  ["My Profile"]="can_edit can_read"
  ["DAG Runs"]="can create can_read can_edit menu_access"
  ["Browse"]="menu_access"
  ["Jobs"]="can_read menu_access"
  ["Task Instances"]="can_read"
  ["DAG Dependencies"]="can_read menu_access"
  ["DAG Code"]="can_read"
  ["Import Error"]="can_read"
  ["Task logs"]="can_read"
  ["Website"]="can_read"
)

# Iterate over the associative array and add permissions using the Airflow CLI
for resource in "${!permissions[@]}"; do
  actions=${permissions[$resource]}

  for action in $actions; do
    # Construct and execute the Docker Compose command
    command="airflow roles add-perms Team1 -a \"$action\" -r \"$resource\""
    echo $command
    eval $command
  done
done
😪 It can take a while...
Then, you need to create users. For example, user1 belongs to team1 and user2 to team2.
- A user who will have this role
docker compose run airflow-worker-team1 airflow users create \
-e [email protected] \
-f user1 \
-l user1 \
-p ******* \
-u user1 \
--role Team1
🛎️ Don't forget to edit the password *******
And that's it! 🎉
Try to log in with user1; you should view and be able only one DAG!
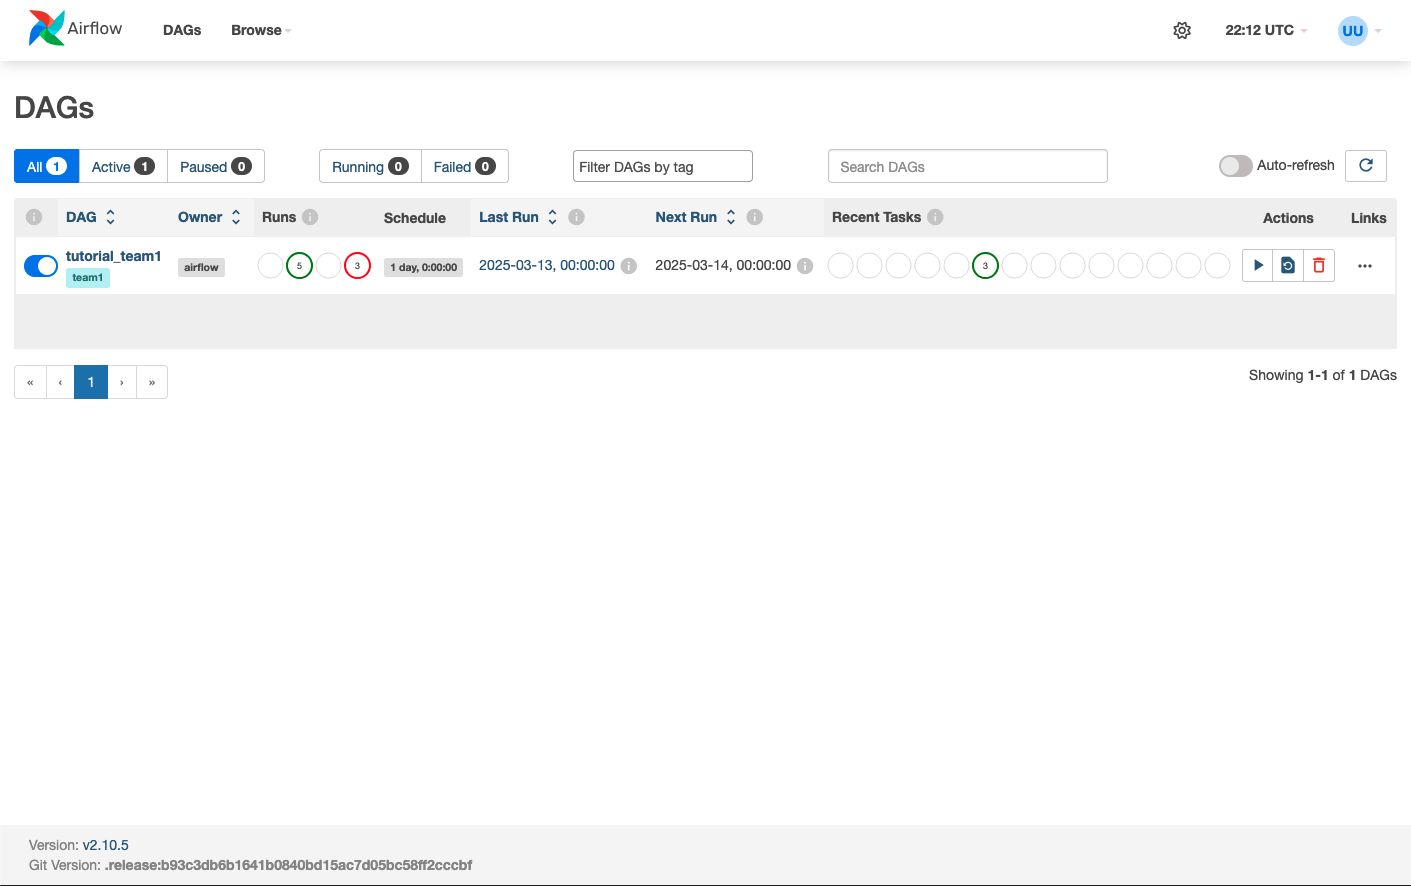
Run the dag, and you should see the worker1 executing it :