
This is a submission for the Pulumi Deploy and Document Challenge: Fast Static Website Deployment
What I Built
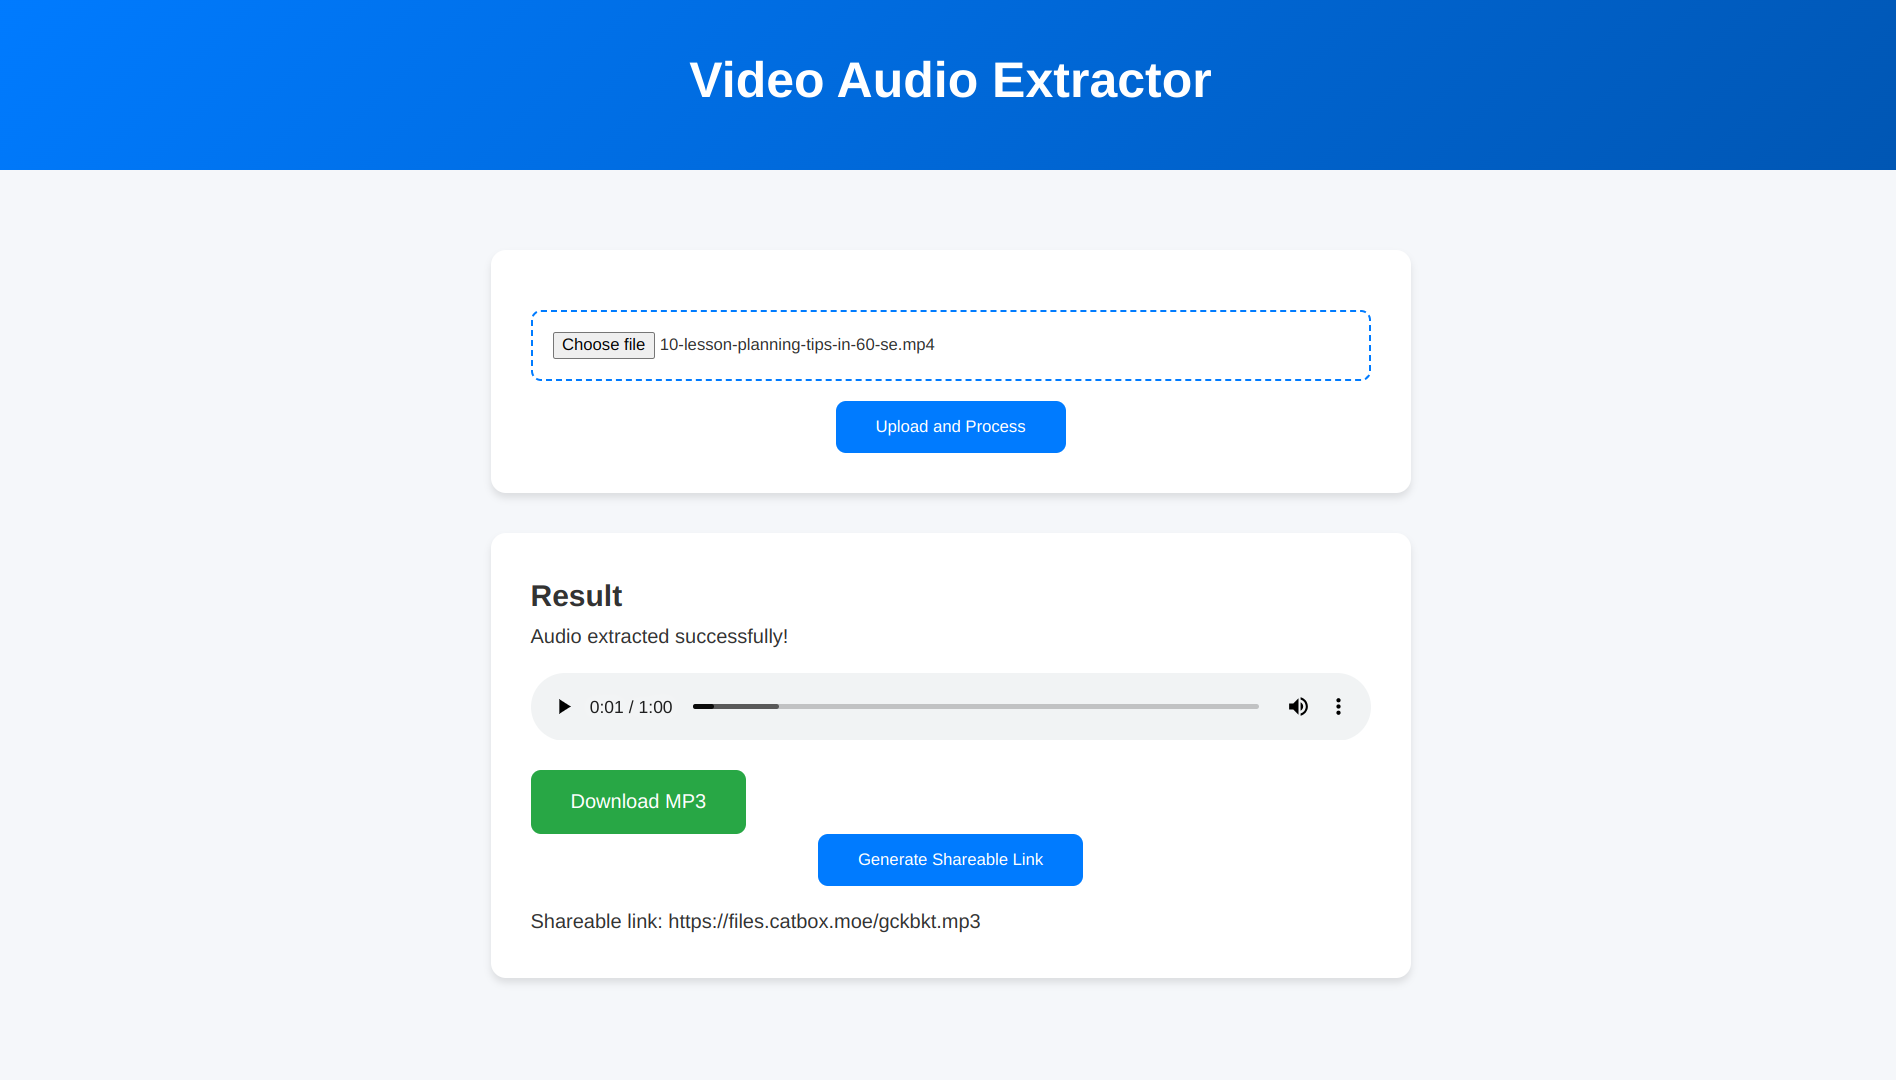
In this tutorial, we'll deploy a dynamic Node.js web application that converts uploaded video files (MP4) into downloadable MP3 audio. The app provides a simple web interface, uses ffmpeg on the server for conversion, and even generates shareable links.
We'll use Pulumi with TypeScript to provision the necessary AWS infrastructure: a VPC, an EC2 instance running Ubuntu to host our app, an Application Load Balancer (ALB) to distribute traffic, and the required Security Groups.
Live Demo Link
You can try the deployed cloud version of Video-to-MP3 converter here
Project Repo
Complete Source code of the deployed project:
 sojinsamuel
/
pulumi-video-converter-deploy
sojinsamuel
/
pulumi-video-converter-deploy
Video to Mp3 converter Project Deployed to AWS via Pulumi
☁️🚀 Deploy Video-to-MP3 Converter to AWS with Pulumi 🎬🎵
This repository contains the Pulumi infrastructure code (IaC) written in TypeScript to deploy the Node.js Video-to-MP3 Converter application to AWS.
The Goal: To automate the provisioning of AWS resources (EC2, Application Load Balancer, Security Groups, VPC configuration) required to host and run the web application, making deployment repeatable and manageable.
📖 Companion Tutorial: This repository is best understood alongside the detailed tutorial available on dev.to [https://dev.to/sojinsamuel/pulumi-v2-4fai]
🏗️ Architecture Overview
This Pulumi program deploys the following AWS resources:
- Networking: Uses your AWS account's Default VPC and associated Subnets.
-
Security Groups:
-
alb-sg: Allows public HTTP traffic (port 80) to the Load Balancer. -
instance-sg: Allows traffic from the ALB to the EC2 instance on the application port (3001) and allows SSH access (port 22) for management (Important: Restrict SSH source IP!). Allows all outbound traffic.
-
- Compute: An EC2…
Tutorial Starter Repo
For this tutorial, we'll be using this repo as the starter code, which I've already created for you. It doesn't use Pulumi or AWS as a cloud service, which is exactly what we'll be adding today. We'll come back to it later as our application code to follow along with the tutorial.
My Journey
Moving beyond simple static sites, this project tackles deploying a real-world Node.js application. We need a server, file processing, and external API interaction.
This guide walks through cloning the application code, setting up a separate Pulumi project to define our AWS infrastructure, configuring Git, and finally deploying everything using Pulumi's Infrastructure as Code approach.
We'll focus on clarity and explain the "what" and "why" behind each step, especially for those new to Pulumi or AWS cloud deployments.
So, in this article, we'll cover:
- Setting up the project structure locally.
- Cloning the application code.
- Optionally running the app locally.
- Initializing a separate Pulumi project for infrastructure.
- Writing the Pulumi code (Infrastructure as Code) in TypeScript.
- Handling Git repository setup for deployment.
- Deploying to AWS using
pulumi up.
Why Pulumi? Pulumi lets us define cloud infrastructure using familiar programming languages like TypeScript. This improves productivity, enables version control, and fits naturally into modern development workflows. It supports CI/CD integration, encourages better collaboration, and works across multiple cloud providers; making infrastructure easier to manage, automate, and scale.
Prerequisites:
- An AWS account with configured credentials (IAM user or default profile with permissions for EC2, VPC, ALB).
- AWS CLI installed
- Pulumi CLI installed.
- Node.js (v18+ recommended, I used v22.x.x).
- Git installed.
- A GitHub account to host your code repository.
Step 1: Create Your Main Project Directory
First, let's create a parent directory on your local machine to hold both the application code and the infrastructure code. This keeps everything organized.
mkdir pulumi-video-converter && cd pulumi-video-converterWhy? This top-level folder will be our Git repository root later, containing both the app and pulumi IaC subdirectory.
Step 2: Clone the Application Code
Inside the pulumi-video-converter directory, clone the GitHub repository containing the application code, i created for you.
# Tutorial starter code!
git clone https://github.com/sojinsamuel/video-to-mp3-app-example.git video-to-mp3-app
This creates a subdirectory video-to-mp3-app containing our app:
pulumi-video-converter/
└── video-to-mp3-app/     # <-- Cloned application code
    ├── public/
    ├── .git/             # <-- Will be removed in next step
    ├── .gitignore
    ├── server.js
    ├── package.json
    └── ...
Step 3: Remove Nested .git Directory (Important!)
The video-to-mp3-app directory you just cloned contains its own .git history from the original repo. To avoid issues with Git treating this as a submodule or causing conflicts when we initialize Git for our main pulumi-video-converter project, remove the nested .git folder:
rm -rf video-to-mp3-app/.gitWhy? This ensures that video-to-mp3-app is treated as just a regular subdirectory within our main project's Git repository, which we'll set up later.
Step 4: Install App Dependencies & Test Locally (Optional)
Before deploying, let's ensure the app runs locally.
-
Navigate into the application directory (if you're not already):
cd video-to-mp3-app -
Install dependencies:
npm install -
Run the server:
node server.js Open your browser to
http://localhost:3001. You should see the application interface. Test uploading a small video file if you like.Stop the local server by pressing
Ctrl+Cin the terminal.-
Navigate back to the parent directory:
cd ..
Why? This verifies the application code itself is working before we deploy.
Step 5: Initialize Pulumi for Infrastructure
Now, from the root pulumi-video-converter directory, create a new subdirectory for your infrastructure code:
mkdir pulumi-infra && cd pulumi-infraInside the pulumi-infra folder, initialize a new Pulumi project using the AWS TypeScript template:
pulumi new aws-typescript --stack devPulumi will:
- Ask for basic project details like description and the AWS region where you want to deploy (you can accept the defaults or customize them).
- Generate standard Pulumi files inside the
pulumi-infrafolder, includingPulumi.yaml,Pulumi.dev.yaml,index.ts, and more. - Use the
--stack devflag to create and select a stack nameddev. A stack is an isolated instance of your infrastructure (like dev, staging, or production).
Your structure now looks like:
pulumi-video-converter/
├── video-to-mp3-app/   # Application code (no .git folder)
└── pulumi-infra/       # Infrastructure code (Pulumi project)
    ├── node_modules/
    ├── Pulumi.yaml
    ├── Pulumi.dev.yaml
    ├── index.ts
    └── ...
Step 6: Configure AWS Credentials
Ensure the AWS CLI (and therefore Pulumi) can authenticate with your AWS account. If you haven't configured the CLI before:
aws configureYou'll be prompted to enter your AWS Access Key ID, Secret Access Key, and default region (e.g., ap-southeast-2).
Note: This command won't work if the AWS CLI isn't installed. Make sure you’ve installed it first.
Why? Pulumi uses the same credential chain as the AWS CLI to interact with your AWS account.
Step 7: Write the Pulumi Infrastructure Code (index.ts)
Navigate into your infrastructure code directory:
cd pulumi-infraNow, replace the contents of pulumi-infra/index.ts with the code below. This TypeScript code uses the Pulumi AWS SDK to declare the cloud resources needed.
import * as pulumi from "@pulumi/pulumi";
import * as aws from "@pulumi/aws";

const config = new pulumi.Config();
// Instance type for EC2, defaulting to t2.micro (free tier eligible)
const instanceType = config.get("instanceType") || "t2.micro";
// **Placeholder for Our app's GitHub repo URL - we'll set this later!**
const appRepoUrl = config.require("appRepoUrl");

// --- Networking (Using Default VPC) ---
const vpc = aws.ec2.getVpc({ default: true });
const vpcId = vpc.then(v => v.id);

const subnetIds = vpc.then(v => aws.ec2.getSubnets({
    filters: [{ name: "vpc-id", values: [v.id] }]
})).then(s => s.ids);

// --- Security Groups ---

// ___Security Group for the Application Load Balancer (ALB)___
// Allows public HTTP traffic on port 80
const albSg = new aws.ec2.SecurityGroup("alb-sg", {
    vpcId: vpcId,
    description: "Allow HTTP inbound traffic for ALB",
    ingress: [{ // Allow HTTP from anywhere
        protocol: "tcp", fromPort: 80, toPort: 80, cidrBlocks: ["0.0.0.0/0"],
    }],
    egress: [{ // Allow all outbound traffic
        protocol: "-1", fromPort: 0, toPort: 0, cidrBlocks: ["0.0.0.0/0"],
    }],
    tags: { Name: "video-to-audio-converter-alb-sg" },
});

// ___Security Group for the EC2 Instance___
// Allows traffic from ALB on port 3001 and SSH
const instanceSg = new aws.ec2.SecurityGroup("webapp-instance-sg", {
    vpcId: vpcId,
    description: "Allow HTTP from ALB and SSH",
    ingress: [
        { // Allow HTTP traffic on port 3001 ONLY from the ALB
            protocol: "tcp", fromPort: 3001, toPort: 3001, securityGroups: [albSg.id],
        },
        { // Allow SSH traffic on port 22 - **IMPORTANT: Restrict this CIDR block!**
            protocol: "tcp", fromPort: 22, toPort: 22, cidrBlocks: ["0.0.0.0/0"], // <-- Change to your IP/32
        },
    ],
    egress: [{ // Allow all outbound traffic (for apt-get, git clone, npm, External APIs)
        // This is a broad rule, consider restricting it further based on your needs
        protocol: "-1", fromPort: 0, toPort: 0, cidrBlocks: ["0.0.0.0/0"],
    }],
    tags: { Name: "video-converter-instance-sg" },
});

// --- EC2 Instance ---

// Find the latest Ubuntu 22.04 LTS AMI (Jammy) for amd64
const ami = aws.ec2.getAmi({
    filters: [
        { name: "name", values: ["ubuntu/images/hvm-ssd/ubuntu-jammy-22.04-amd64-server-*"] },
        { name: "virtualization-type", values: ["hvm"] },
    ],
    mostRecent: true,
    owners: ["099720109477"], // Canonical's AWS account ID
});

// **IMPORTANT**: (Assumes you have an existing key pair created in AWS)
const keyPairName = config.require("keyPairName");

console.log(`---> DEBUG: Pulumi resolved keyPairName as: '${keyPairName}'`);

const userData = pulumi.interpolate`#!/bin/bash
# Exit on first error
set -e
echo ">>>> Starting UserData script..."

# --- Install git ---
echo ">>>> Installing git..."
sudo apt-get update -y && sudo apt-get install -y git
echo ">>>> Git installed."

# --- Clone the repo into /home/ubuntu/app ---
echo ">>>> Cloning repository ${appRepoUrl} into /home/ubuntu/app..."
sudo -u ubuntu git clone ${appRepoUrl} /home/ubuntu/app
echo ">>>> Clone finished."

# --- Install NVM and Node.js as ubuntu user ---
echo ">>>> Installing NVM and Node.js 22 for user ubuntu..."
sudo -i -u ubuntu bash << EOF
echo ">>>> Running as ubuntu user for NVM install..."
curl -o- https://raw.githubusercontent.com/nvm-sh/nvm/v0.40.2/install.sh | bash
\\. "\\$HOME/.nvm/nvm.sh"
nvm install 22
nvm use 22
nvm alias default 22
echo ">>>> Node.js installed. Verifying versions..."
node -v
nvm current
npm -v
EOF
echo ">>>> Finished NVM and Node.js installation."

# --- Install dependencies and setup PM2 in video-to-mp3-app ---
echo ">>>> Setting up application in /home/ubuntu/app/video-to-mp3-app..."
sudo -i -u ubuntu bash << EOF
\\. "\\$HOME/.nvm/nvm.sh"
cd /home/ubuntu/app/video-to-mp3-app
echo ">>>> Running npm install..."
npm install
echo ">>>> npm install finished."
echo ">>>> Installing PM2 globally..."
npm install pm2 -g
echo ">>>> Starting server.js with PM2..."
pm2 start server.js --name video-converter
echo ">>>> PM2 process started."
EOF
echo ">>>> Application setup finished."

echo ">>>> UserData script finished successfully."
`;

// Create the EC2 instance
const instance = new aws.ec2.Instance("webapp-instance", {
    instanceType: instanceType,
    ami: ami.then(a => a.id),
    vpcSecurityGroupIds: [instanceSg.id],
    subnetId: subnetIds.then(ids => ids[0]), // Use the first default subnet
    keyName: keyPairName, // Assign your key pair for SSH access
    userData: userData, // Run the setup script on launch
    tags: { Name: "video-to-audio-converter" },
});

// --- Application Load Balancer (ALB) ---

// Create the ALB, Target Group, and Listener
const alb = new aws.lb.LoadBalancer("webapp-lb", {
    internal: false,
    loadBalancerType: "application",
    securityGroups: [albSg.id],
    subnets: subnetIds, // Assign the ALB to the default subnets
    tags: { Name: "video-to-audio-converter-alb" },
});

const targetGroup = new aws.lb.TargetGroup("webapp-tg", {
    port: 3001, protocol: "HTTP", targetType: "instance", vpcId: vpcId,
    healthCheck: { // Basic health check for the root path
        path: "/", protocol: "HTTP", matcher: "200-399", interval: 30, timeout: 5,
        healthyThreshold: 2, unhealthyThreshold: 2,
    },
    tags: { Name: "video--audio-converter-tg" },
});

const targetGroupAttachment = new aws.lb.TargetGroupAttachment("webapp-tg-attachment", {
    targetGroupArn: targetGroup.arn,
    targetId: instance.id,
    port: 3001,
});

const listener = new aws.lb.Listener("webapp-listener", {
    loadBalancerArn: alb.arn,
    port: 80, protocol: "HTTP",
    defaultActions: [{ type: "forward", targetGroupArn: targetGroup.arn }],
});

// --- Outputs ---
// Public DNS name of the ALB so we can access the app
export const albUrl = alb.dnsName;
// Instance ID for reference
export const instanceId = instance.id;
// Public IP of the instance for SSH access
export const instancePublicIp = instance.publicIp;
Here's what it does:
Configuration (
pulumi.Config): ReadsappRepoUrlandkeyPairNamefrom a config file. Setst2.microas the default instance type.Networking: Uses the default AWS VPC and its subnets for simplicity.
ALB Security Group (
alb-sg): Controls traffic to the Load Balancer.EC2 Security Group (
webapp-instance-sg): Secures the EC2 instance, restricting inbound traffic to specific sources.EC2 Instance (
aws.ec2.Instance): Runs on the latest Ubuntu 22.04 LTS AMI with a setup script executed on boot.UserData Script: Automates app setup by installing tools, cloning the repo, and starting the application.
Application Load Balancer (
webapp-lb): Public ALB that receives incoming traffic.Target Group (
webapp-tg): Directs traffic to the EC2 instance with a health check.Listener (
webapp-listener): Connects the ALB to the target group.Outputs: Provides the ALB DNS name, instance ID, and instance public IP for access.
PS: It's completely okay to have doubts. A helpful tip, you can copy-paste index.ts into Pulumi Copilot to explore it further. It's available as a Pulumi VS Code extension powered by their official REST API, and also on the official Pulumi website.
Step 8: Initialize Git & Push Our Project to GitHub
Our EC2 instance (to be created by pulumi IaC) needs to download the application code. We also want to version control our infrastructure code. So, let's put everything into a single main Git repository.
-
Navigate to Parent Directory: Ensure you are in the main
pulumi-video-converterdirectory.
# If you are inside pulumi-infra: cd .. -
Initialize Git:
git init -
Create
.gitignore: Create a.gitignorefile in thepulumi-video-converterroot to exclude unnecessary files:
# Node modules node_modules/ pulumi-infra/node_modules/ video-to-mp3-app/node_modules/ # Pulumi state and logs .pulumi/ pulumi-infra/.pulumi/ # Application Uploads (local and server) video-to-mp3-app/uploads/ uploads/ # OS generated files .DS_Store Thumbs.db # Log files *.log npm-debug.log* yarn-debug.log* yarn-error.log* pm2.log logs/ # Environment files .env* -
Add and Commit: Stage all files and make your first commit.
git add .
git commit -m "Initial commit: Add app code and Pulumi infra code"
Create GitHub Repository: Go to GitHub and create a new public repository (e.g.,
pulumi-video-converter-deploy). Do not initialize it with a README, license, or .gitignore on GitHub.-
Link Remote and Push: Connect your local repository to the GitHub remote and push your code (replace the URL with your new repository's URL):
git remote add origin https://github.com/your-username/pulumi-video-converter-deploy.git
git branch -M main
git push -u origin main
Why Git? It versions both your app and infrastructure code. The userData script in pulumi-infra/index.ts relies on git clone using the public URL you configure in the next step.
Your current project structure should look like:
pulumi-video-converter/  (Git repository root)
├── .git/
├── .gitignore
├── video-to-mp3-app/    # Application code (no .git folder here)
│   ├── node_modules/    # (Ignored by Git)
│   ├── public/
│   ├── uploads/         # (Ignored by Git, created by app)
│   ├── server.js
│   └── package.json
│   └── ...
└── pulumi-infra/        # Infrastructure code (Pulumi project)
    ├── node_modules/    # (Ignored by Git)
    ├── .pulumi/         # (Ignored by Git)
    ├── index.ts         # Pulumi IaC definition
    ├── package.json
    ├── Pulumi.yaml
    ├── Pulumi.dev.yaml  # Contains your config (repo URL, key name)
    └── tsconfig.json
Step 9: Configure Pulumi Stack (Repo URL & Key Pair)
Now, tell Pulumi the URL of the repository it needs to clone and the name of your EC2 key pair (we'll create it later).
Follow these steps:
-
Navigate to Infra Directory: Make sure you are inside the
pulumi-infradirectory.
cd pulumi-infra -
Set GitHub Repository URL: Use the HTTPS URL of the main
pulumi-video-converter-deployrepository you created on Step 8.
# Replace with YOUR project repository URL && Execute it in your terminal
pulumi config set appRepoUrl https://github.com/your-username/pulumi-video-converter-deploy.git
How to Create/Find Key Pair:
A) Go to the AWS EC2 Console in your target region (e.g., ap-southeast-2). Navigate to Network & Security -> Key Pairs.
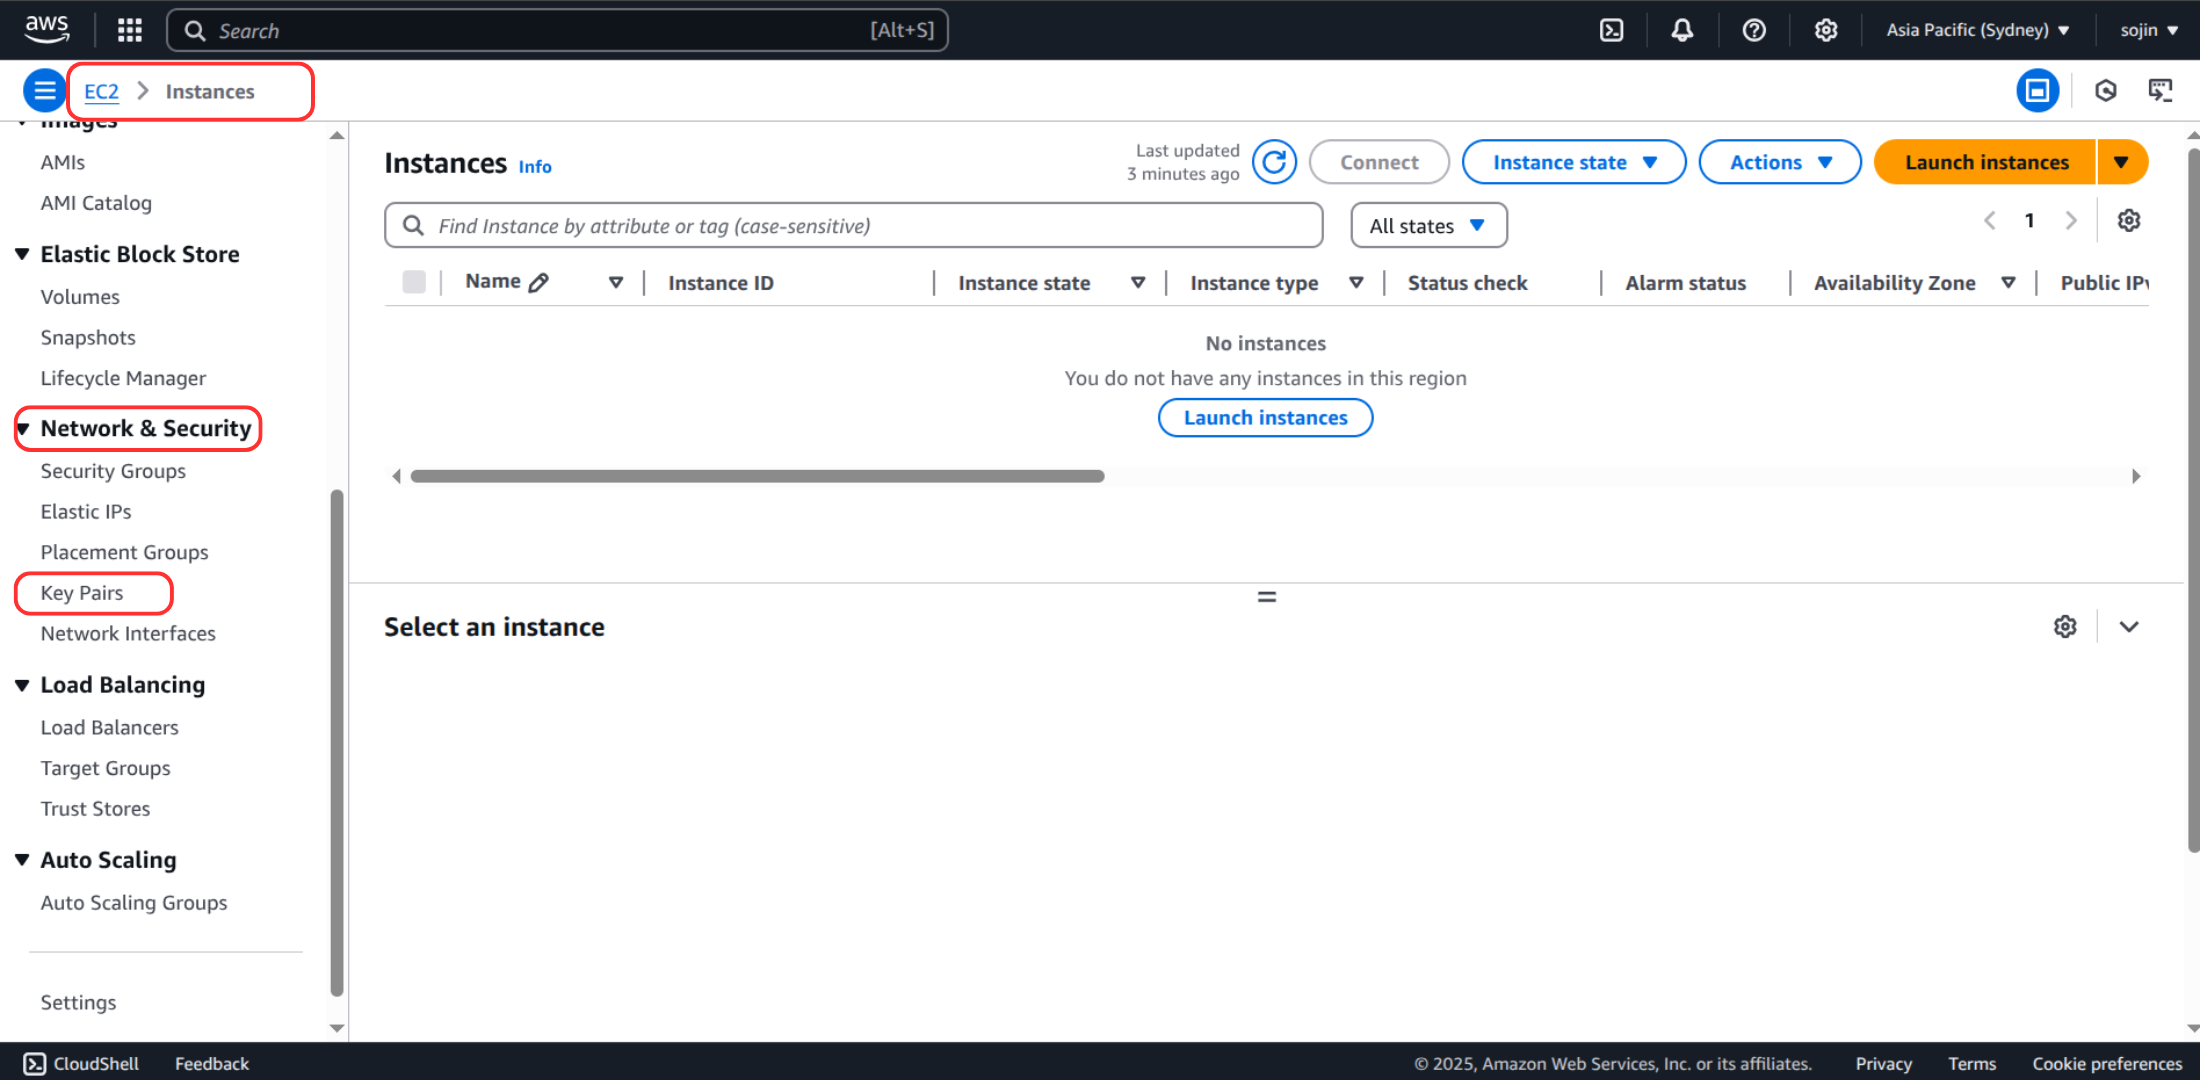
B) Click Create key pair
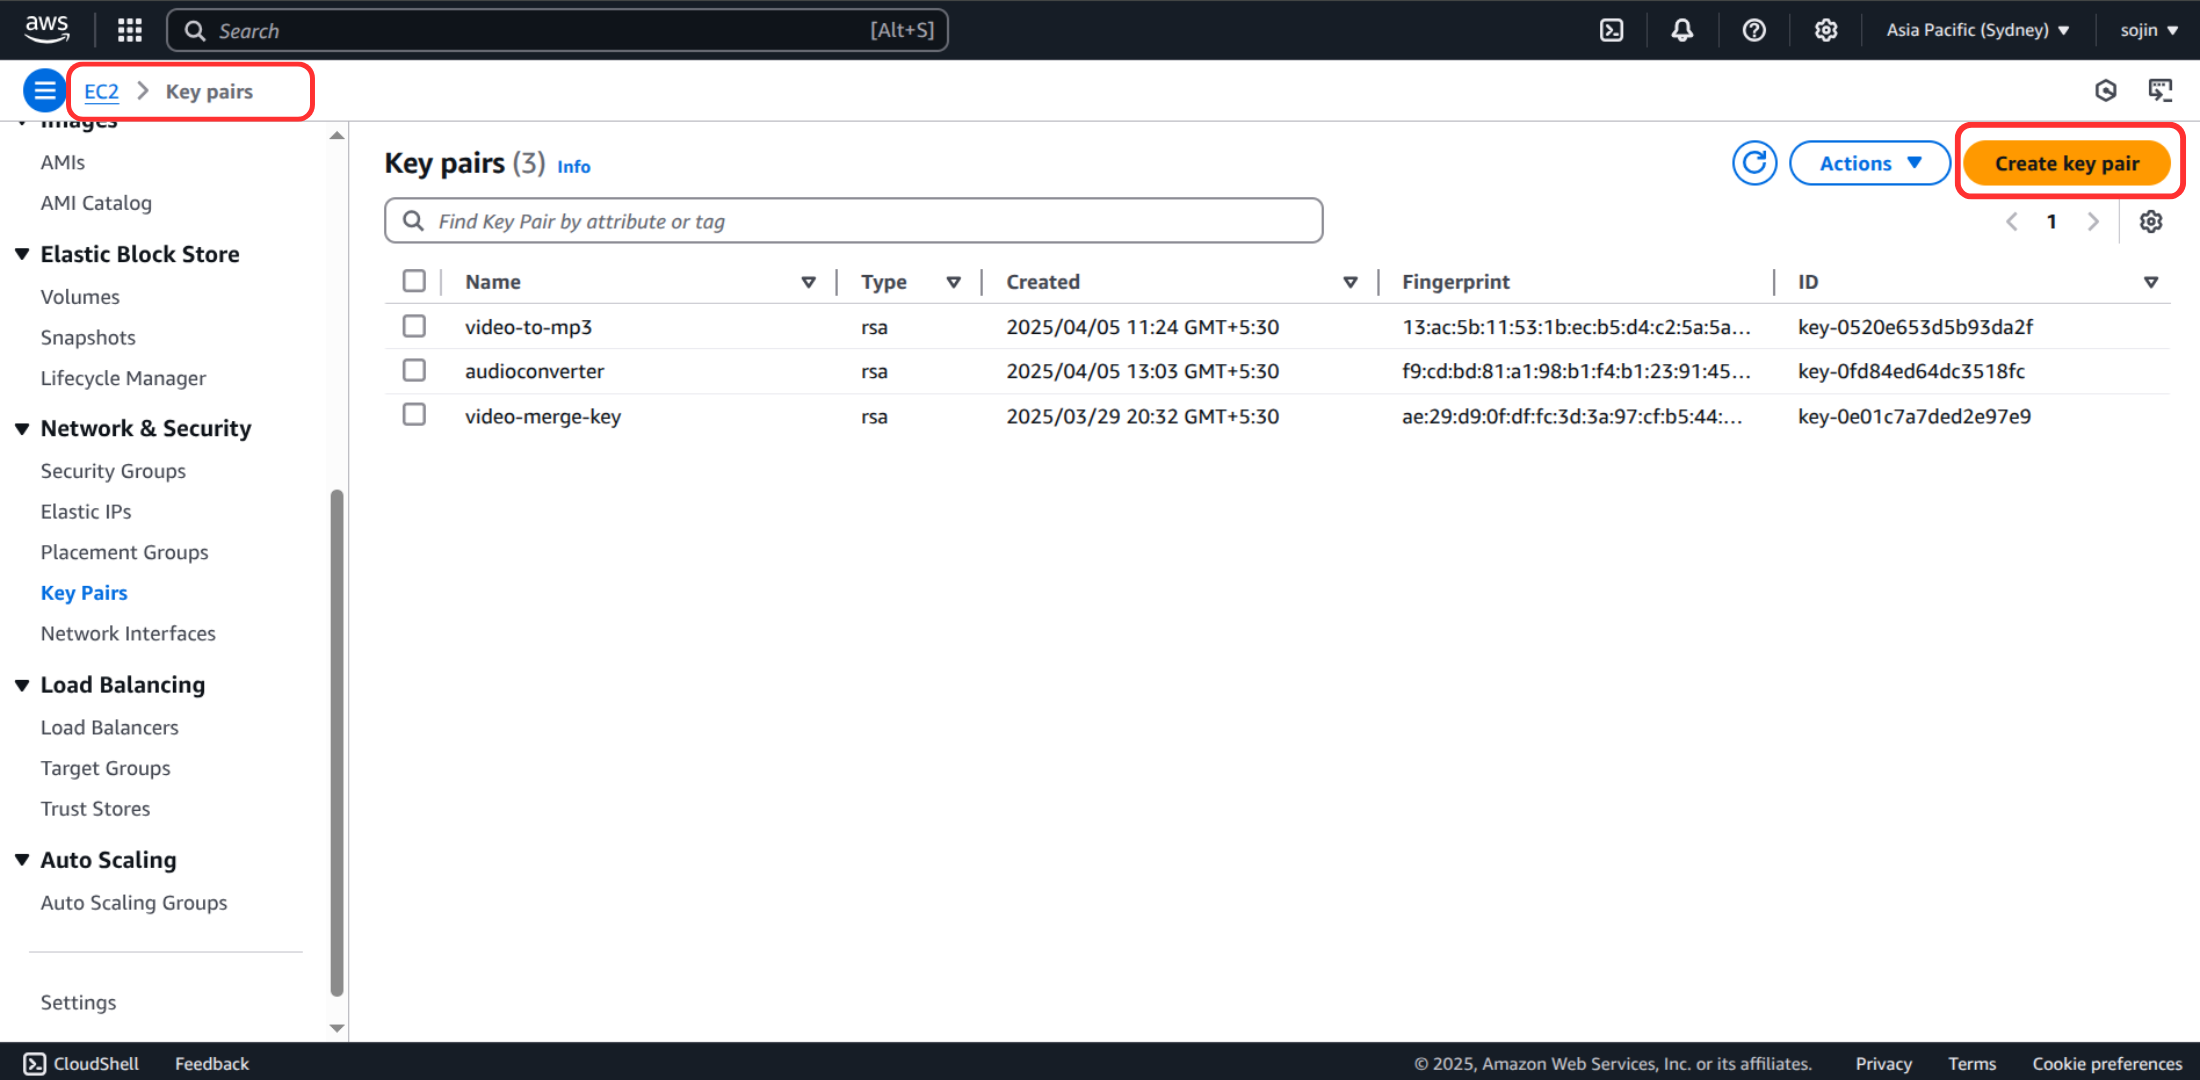
C) Give it a name (e.g., video-converter-key) and choose RSA type and .pem format for SSH clients. Then click "Create key pair". It will automatically download the .pem file (e.g., video-converter-key.pem).
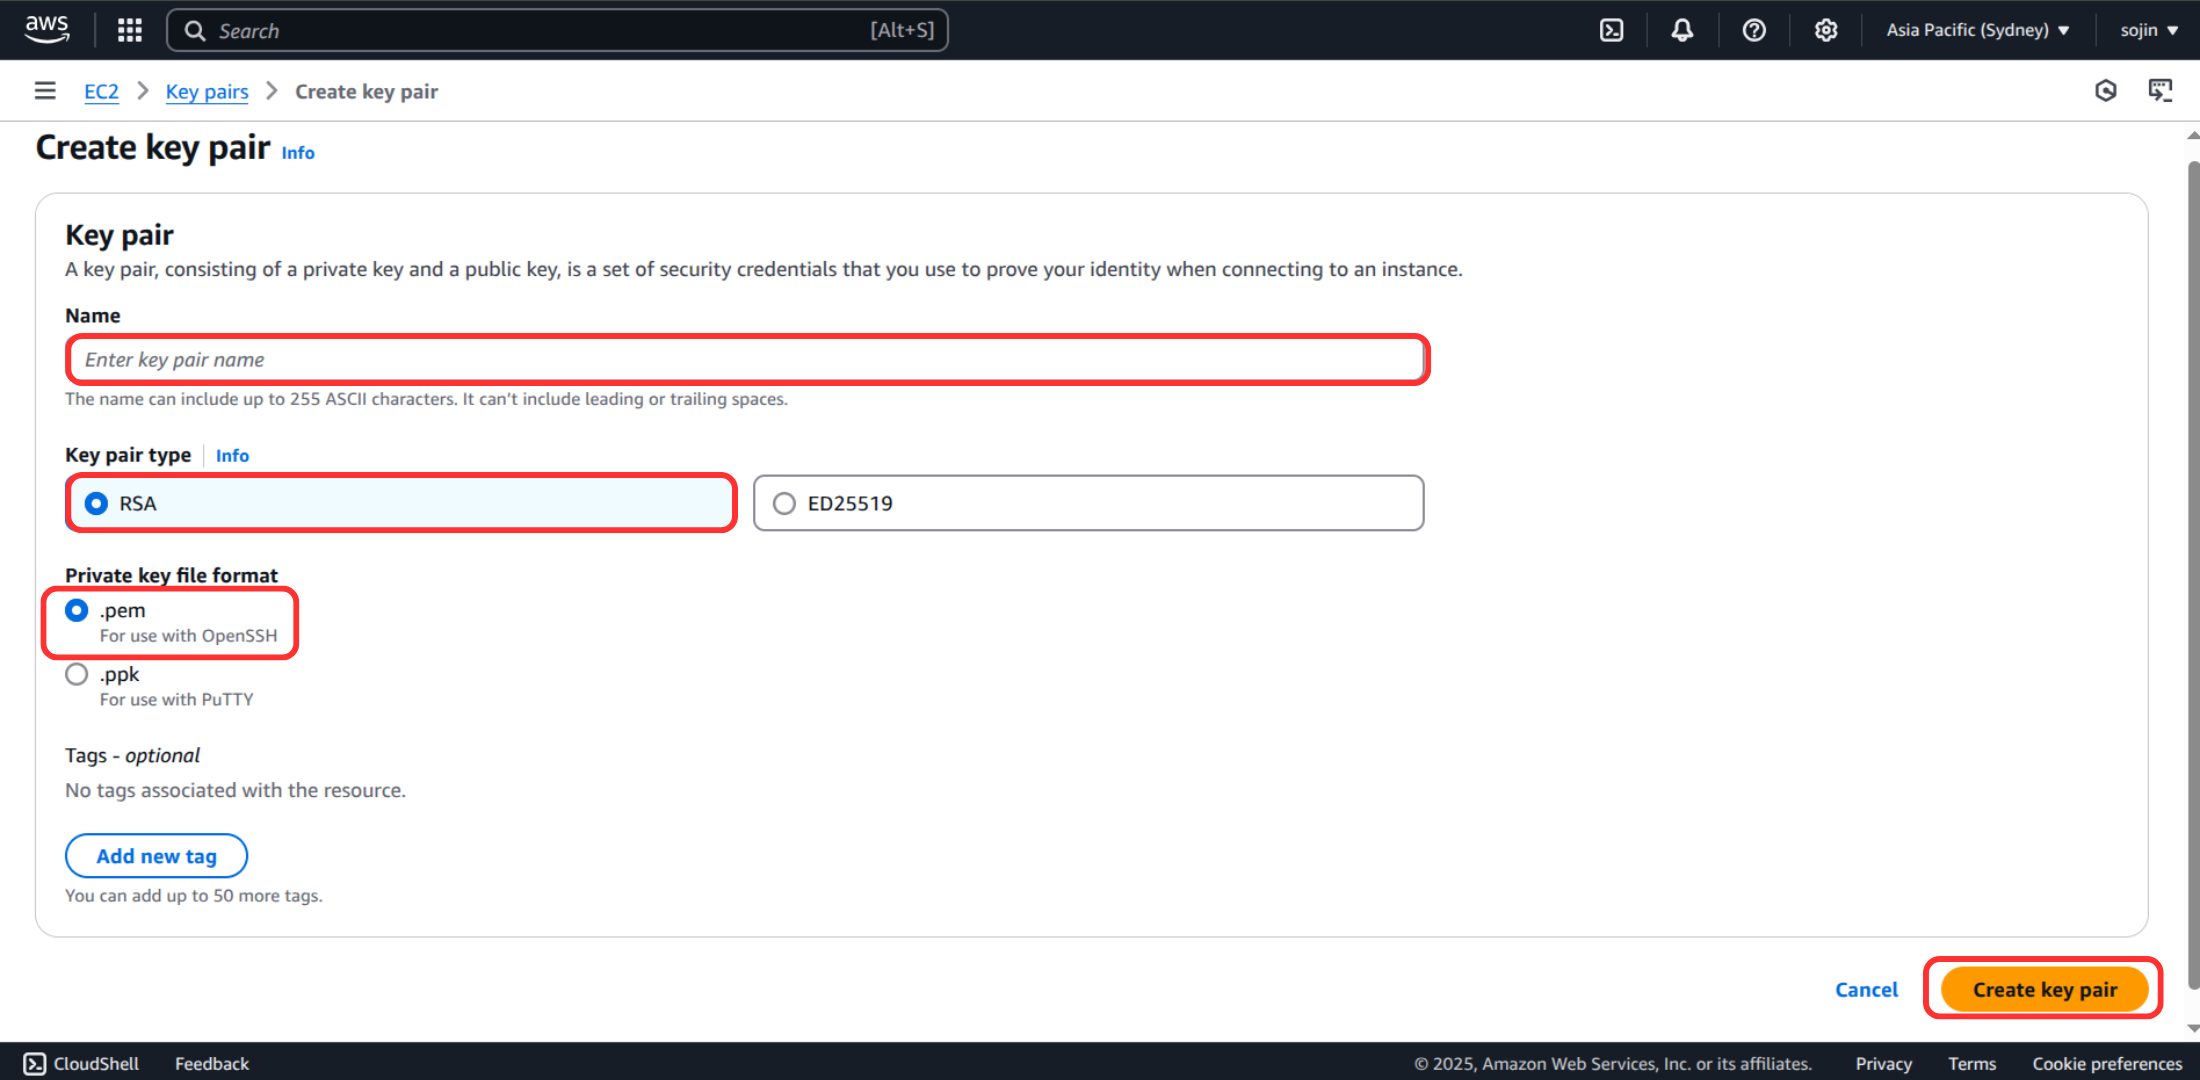
D) Configure Pulumi: Use the name you gave the key pair in AWS console (without .pem extension).
# Replace 'video-converter-key' with the exact name from Console

pulumi config set keyPairName video-converter-key
Why configure? This securely injects these values into your Pulumi program (index.ts) where config.require("appRepoUrl") and config.get("keyPairName") are used, avoiding hardcoding sensitive or environment-specific details.
Tip: After executing the commands, you can also double check the values you just set, by visting your pulumi-infra/Pulumi.dev.yaml file
config:
  aws:region: ap-southeast-2
  pulumi-infra:appRepoUrl: https://github.com/sojinsamuel/pulumi-video-converter-deploy.git
  pulumi-infra:keyPairName: video-converter-key
This is a snapshot of my Pulumi.dev.yaml file, in your case, you'll have a different value for the appRepoUrl and keyPairName. if you come across any issues or mistyped your property values you can reset it by running the appropriate pulumi config set "
Step 10: Deploy to AWS!

It's time to bring your infrastructure to life! Run pulumi up from within the pulumi-infra directory:
# Make sure you are in the pulumi-infra directory!
pulumi up
Pulumi will:
- Show you a preview of all the AWS resources it will create (VPC, Subnets, SGs, EC2, KeyPair association, ALB, Target Group, Listener, etc.).
- Ask for confirmation (
yes).
Review the plan carefully. If it looks right, type yes and press Enter. Pulumi will provision the resources in AWS. This can take several minutes.
Once finished, Pulumi will display the outputs, including the albUrl.
Outputs:
    albUrl          : "webapp-lb-xxxxxxxxxxxxxxxxx.ap-southeast-2.elb.amazonaws.com"
    instanceId      : "i-xxxxxxxxxxxxxxxxx"
    instancePublicIp: "xx.xx.xx.xx"
Step 11: Verify Your Deployment
Copy the albUrl value from the Pulumi output and paste it into your web browser. You should see your Video Audio Extractor application!
Test it: Upload a small MP4 file, process it, download the MP3, and try generating the shareable link.
Troubleshooting Tips if your albUrl fails to display the webapp in your browser:
-
Invalid key pair: If you see an invalid key pair error in your terminal after running
pulumi up, it likely means the key pair name in your AWS Console doesn’t match the one you set usingpulumi config. Double-check that both names are exactly the same.
One issue I ran into was that I had an old AWS access key and secret saved in my ~/.aws folder, which I had completely forgotten about. So when I ran pulumi up, resources were getting created in my old AWS account. Pulumi then failed to use the key pair name I had created in my new account because that key pair didn’t exist in the old one.
To avoid this, make sure you’ve set your AWS credentials and region correctly as explained in Step 6.
-
Bad Gateway: If you're getting a 502 Bad Gateway error after visiting the
albUrl, it usually means something went wrong during the execution of theuserDatascript inpulumi-infra/index.ts.
To find the root cause, SSH into the EC2 instance and investigate:
#  is shown in your `pulumi up` output
# Replace /path/to/your/key/yourkeyname.pem with the actual path to your key file
ssh -i /path/to/your/key/yourkeyname.pem ubuntu@
Once you're in, check the logs for script output:
cat /var/log/cloud-init-output.logYou probably won’t even need to go through these troubleshooting steps, your albUrl should display the application right away. I've already configured pulumi-infra/index.ts after a lot of trial and error on my end.
But if anything comes up, I'm just a message away on LinkedIn.
Wrap Up
And there we have it! 🚀 We've successfully taken a standard Node.js video conversion application from a local setup to a fully deployed service on the AWS cloud, all orchestrated using Pulumi and TypeScript.
We navigated the process of:
- Structuring our project with separate directories for application and infrastructure code.
- Cloning the starter application code and preparing it for deployment.
- Initializing a Pulumi project to define our cloud resources declaratively.
- Writing TypeScript code to provision a VPC (default), EC2 instance, Application Load Balancer, Target Group, Listener, and necessary Security Groups.
- Tackling the crucial EC2
userDatascript, leveragingnvmfor reliable Node.js installation andpm2to run our application. - Configuring Git and handling repository details for automated cloning during deployment.
- Using
pulumi upto bring our infrastructure to life and iterating through troubleshooting steps (like credential issues, key pair mismatches, anduserDatascript errors).
This journey reflects a realistic workflow for deploying dynamic web applications. By defining our infrastructure as code, we've created a repeatable, version-controlled, and manageable deployment process – a huge step up from manual configurations!
💰 Cost Considerations
Deploying resources to AWS incurs costs. While we've used the free-tier eligible t2.micro instance type by default, be aware of the following:
- EC2 Instance:
t2.microinstances are part of the AWS Free Tier (subject to hourly limits per month for the first 12 months of your AWS account). If you exceed these limits or use a different instance type, you will be charged per hour the instance is running. - Application Load Balancer (ALB): ALBs are not included in the standard Free Tier. You are charged for each hour an ALB is running and for Load Balancer Capacity Units (LCUs) consumed based on traffic metrics. This is likely the main cost driver for this deployment.
- Data Transfer: AWS charges for data transferred out from EC2 and the ALB to the internet. Uploading videos incurs negligible ingress costs, but downloading the converted MP3s contributes to egress costs. Significant usage could lead to noticeable charges.
- EBS Volume: The EC2 instance uses an EBS General Purpose SSD (gp2/gp3) volume for its root disk. There's a Free Tier allowance (e.g., 30 GB), but usage beyond that incurs costs.
Recommendation:
- Monitor Billing: Keep an eye on your AWS Billing Dashboard to understand costs.
-
Destroy When Done: Most importantly, if you are only running this for the tutorial or testing, destroy the infrastructure when you are finished to stop incurring charges:
# Run from the pulumi-infra directory
pulumi destroy
Confirm
yeswhen prompted. This will terminate the EC2 instance, delete the ALB, and remove associated resources managed by Pulumi.
🤔 Using Pulumi: Lessons Learned & Copilot Assistance
Deploying this application involved significantly more moving parts than a simple static website. Pulumi proved invaluable in managing this complexity, though the journey highlighted key cloud deployment concepts and debugging strategies.
How Pulumi Benefited This Project:
- Managing Interconnected Resources: Defining the ALB, Target Group, Listener, EC2 Instance, and their associated Security Groups in TypeScript made their relationships explicit. Pulumi automatically understood dependencies (e.g., the instance needing the SG, the ALB needing the SG and subnets, the listener needing the ALB and TG) and created them in the correct order, preventing errors that are common with manual setups or less expressive tools. Referencing resource IDs directly in code (like
securityGroups: [albSg.id]) is much clearer than manually tracking ARNs or names. - Infrastructure as Code (IaC): Having the entire infrastructure defined in
index.tsmeans:- Repeatability: Anyone (including future you!) can run
pulumi upand get the same setup. - Version Control: Our infrastructure definition lives in Git alongside the application code (in separate folders), allowing us to track changes, revert if needed, and collaborate.
- Clarity: The TypeScript code serves as documentation for the deployed resources.
- Repeatability: Anyone (including future you!) can run
- Configuration Management: Using
pulumi config setfor theappRepoUrlandkeyPairNamewas essential. It allowed us to inject environment-specific values into the deployment without hardcoding them inindex.ts, keeping the code clean and reusable for different stacks or users. - Iterative Development & Debugging
userData: Bootstrapping EC2 instances withuserDatais notoriously tricky. While Pulumi didn't write the script for us, it made iterating much easier:- We could define the multi-step installation process (NVM, Node, Git, clone, npm install, pm2) directly within our TypeScript code using
pulumi.interpolate. - If the script failed (causing 502 errors), we could modify the
userDatastring inindex.tsand simply runpulumi up. Pulumi would detect the change, replace the EC2 instance, and run the new script, allowing for relatively quick test cycles compared to manually creating/terminating instances and running scripts.
- We could define the multi-step installation process (NVM, Node, Git, clone, npm install, pm2) directly within our TypeScript code using
- State Management & Recovery: Although i hit issues due to initial credential mix-ups causing state inconsistencies, Pulumi's state management was ultimately helpful. Once the state became invalid (preventing
pulumi destroy), thepulumi state deletecommand provided a necessary escape hatch to manually remove "ghost" resources from the state file, allowing us to reset and achieve a clean deployment withpulumi up.
Leveraging Pulumi Copilot:
During my troubleshooting phase, especially with userData and configuration, Pulumi Copilot (VS Code Extension / Web) was very valuable to accelerate debugging:
-
Initial
userDataStructure: When the firstapt-get install nodejsapproach failed, a prompt like this helped explore alternatives:Show me a Pulumi TypeScript example of EC2 userData to install Node.js v20 using nvm on Ubuntu 22.04 and run a simple Node app.(This provided the basic structure for using
sudo -i -u ubuntu bash << EOFand installing/using nvm). -
Configuration Issue: The persistent
InvalidKeyPair.NotFounderror, despite the key existing, led to asking:Explain how pulumi config set stores values in Pulumi.yaml and how config.require() reads them in TypeScript compared to config.get().(This clarified the project-name prefixing behavior and why
config.requirewas the correct choice). -
Debugging 502 Errors: When the 502 errors occurred, general debugging prompts were useful:
Why would an AWS Application Load Balancer return a 502 Bad Gateway error when the EC2 instance seems to be running?(Copilot suggested checking target group health, security groups allowing traffic on the app port from the ALB, and application logs on the instance – guiding the SSH troubleshooting steps).
Specific Resource Syntax: For refining the code:
How do I correctly specify filters when using aws.ec2.getSubnets in Pulumi TypeScript?
(This helped fix the vpcId vs filters issue).
While Copilot didn't write the final, perfect script, it provided valuable code snippets, explanations of Pulumi concepts, and common debugging checklists that significantly reduced the time spent resolving issues encountered during this real-world deployment scenario.
What's Next?
Restrict SSH Access: Immediately update the Instance Security Group (
instance-sg) inindex.tsto allow SSH (port 22) only from your IP address (YOUR_IP/32) instead of0.0.0.0/0. Runpulumi upto apply.HTTPS: Secure your site using AWS Certificate Manager (ACM) and configure the ALB Listener for HTTPS (port 443).
Robust PM2 Startup: Re-add and test
pm2 startup/pm2 save(within theubuntuuser context inuserData) if you need the application to restart automatically on server reboots.ffmpegDependency: If deploying this to a different AMI, you might need to addffmpegback to theapt-get installline inuserData.Static Assets: Serve frontend files from S3/CloudFront.
Containerization: Dockerize the app and deploy via ECS/Fargate managed by Pulumi.
CI/CD: Automate deployments with GitHub Actions triggering
pulumi up.Cleanup: When finished, run
pulumi destroyfrom thepulumi-infradirectory to remove all AWS resources and avoid costs.
This journey, including the bumps along the way, is typical of real-world cloud deployments. By using Infrastructure as Code with Pulumi, we made the process manageable, repeatable, and ultimately successful!
Feel free to reach out on linkedin if you have questions or feedback!
Happy coding champs 👋
