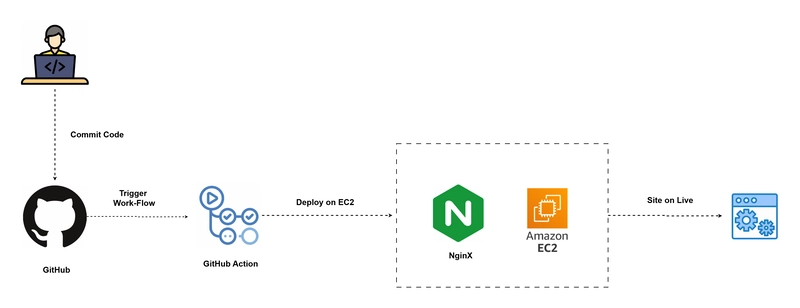
This guide explains how to configure an EC2 instance, install Nginx, and set up auto deployment using GitHub Actions for a UAT environment.
✅ 1. Create EC2 Instance
Steps:
- Login to AWS Console → Go to EC2 Dashboard.
- Launch Instance → Choose Amazon Linux 2 as your OS.
- Configure basic settings like name, instance type, and network settings.
- Create/Use Key Pair → This key will be used later for SSH connection.
In the Security Group, allow:
- Port 22 (SSH): For connecting remotely to EC2.
- Port 80 (HTTP): For regular web traffic.
- Port 443 (HTTPS): For secure (SSL) web traffic.
📌 Explanation:
Security groups act like a firewall. Opening ports allows your instance to communicate with the internet properly.
🔐 2. Connect to EC2 via SSH
Windows Users (PowerShell using OpenSSH):
ssh -i "path/to/your-key.pem" ec2-user@📌 Explanation:
This command connects your local computer to the EC2 instance using the .pem key. You need this to log in securely.
⚙️ 3. Install and Configure Nginx
For Amazon Linux 2:
sudo yum update -y
sudo amazon-linux-extras enable nginx1
sudo yum install nginx -y
For Ubuntu:
sudo apt update && sudo apt install nginx -yStart Nginx:
sudo systemctl start nginx
sudo systemctl enable nginx
🧪 Check Nginx:
Open a browser and visit http:// – You should see the default Nginx welcome page.
📌 Explanation:
Nginx is a web server used to serve your frontend app. We’re installing and starting it here.
🛠️ 4. Configure Nginx to Serve Your App
Create New Config File:
sudo nano /etc/nginx/conf.d/app-proxy.confSample Config (Generic):
server {
    listen 80;
    server_name your-subdomain.example.com;
    return 301 https://$host$request_uri;
}

server {
    listen 443 ssl;
    server_name your-subdomain.example.com;
    root /usr/share/nginx/html/your-app-folder;
    index index.html;

    location / {
        try_files $uri /index.html;
    }

    error_page 404 /404.html;

    ssl_certificate /etc/letsencrypt/live/your-domain/fullchain.pem;
    ssl_certificate_key /etc/letsencrypt/live/your-domain/privkey.pem;
}
📌 Explanation:
- First block: Redirects HTTP to HTTPS.
- Second block: Serves the app using SSL (HTTPS).
- root: The directory where your built frontend app files are copied.
- try_files
$uri /index.html: This is for frontend routing support (like React or Angular apps). - SSL certs are from Let's Encrypt (set up using Certbot separately).
Test and Restart Nginx:
sudo nginx -t
sudo systemctl restart nginx
🚀 5. Auto Deployment Using GitHub Actions
Steps:
In your GitHub repo, create folder:
.github/workflows/
Inside it, add a file: deploy-uat.ymlGitHub Actions Example:
name: Deploy Frontend App to EC2 with Nginx

on:
  push:
    branches:
      - deploy

jobs:
  build-and-deploy:
    runs-on: ubuntu-latest

    steps:
      - name: Checkout code
        uses: actions/checkout@v4

      - name: Set up Node.js
        uses: actions/setup-node@v3
        with:
          node-version: 20

      - name: Install Dependencies
        run: npm ci --legacy-peer-deps

      - name: Build App
        env:
          CI: false
        run: |
          npm run build
          ls -l build/

      - name: Archive Build Folder
        run: tar -czf build.tar.gz -C build .

      - name: Deploy to EC2
        run: |
          echo "${{ secrets.SSH_PRIVATE_KEY }}" > my-key
          chmod 600 my-key
          scp -i my-key -o StrictHostKeyChecking=no build.tar.gz ec2-user@:/usr/share/nginx/html/your-app-folder/

      - name: Extract Build on EC2
        run: |
          ssh -i my-key -o StrictHostKeyChecking=no ec2-user@ << EOF
            cd /usr/share/nginx/html/your-app-folder/
            if [ -f build.tar.gz ]; then
              tar -xzf build.tar.gz
              rm build.tar.gz
              echo "Deployment successful!"
            else
              echo "Error: build.tar.gz not found!"
              exit 1
            fi
          EOF
📌 Explanation:
- Trigger: Runs when you push to the deploy branch.
- Build: Installs dependencies and builds the frontend app.
- Archive: Compresses the build files.
- Upload: Sends the files to the EC2 server using scp.
- Extract: Unzips files on EC2 to serve them with Nginx.
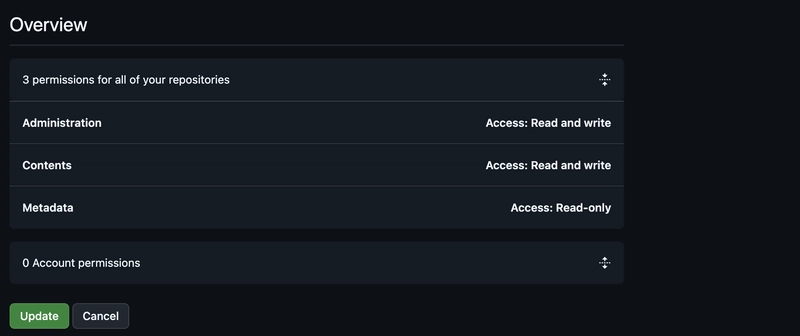
🔐 Use GitHub Secrets:
To avoid hardcoding private keys, store them as GitHub repository secrets like SSH_PRIVATE_KEY.
🧪 6. Test Auto Deployment
Make a small change in your frontend code.
Push to deploy branch.
Check GitHub → Actions tab to monitor the workflow.
Visit your subdomain or EC2 public IP to confirm the changes are live.