Introduction
Bonjour! Welcome to the first article in the series: "OAuth2 Authentication for APIs". Our starting point is integrating Google OAuth2 with a Vue.js frontend and a Node.js backend. The end goal of this series is to create a modular authentication system that can support multiple providers.
What is OAuth2?
Rather than reinvent the wheel, here are some excellent resources that cover OAuth2 in detail:
Thus, these are the main concepts:
- Client: The frontend application that wants access to user data from Google.
- Backend Engine: This is the server-side application that has all the business logic.
- Authorization Server: This is a google server that issues access and a refresh token to the Client application.
- Resource server: This is google server that validates whether an access token is valid.
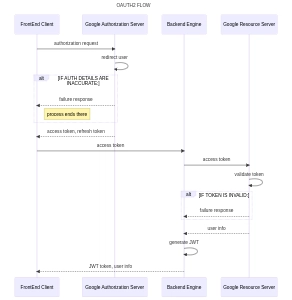
OAuth2 Flow Overview
From the image above, view the following steps:
- The frontend requests Google login.
- User is redirected to Google to log in.
- Google returns an authorization code.
- Frontend sends the code to the backend.
- Backend exchanges the code for tokens.
- Backend verifies the ID token and extracts user info.
- Backend issues its own JWT to the frontend.
- Frontend stores JWT for API calls.
- Backend handles access token refresh when needed.
The following are the steps I performed to make this project a success:
- Create a Google client ID and client secret.
- Create a Frontend client
- Create a backend application
- Connecting everything
Configuration on Google Cloud Console 🧱
- Sign in to Google Cloud Console
- Navigate to *API & Services > Credentials > Create credentials > OAuth Client ID * to create a new application.
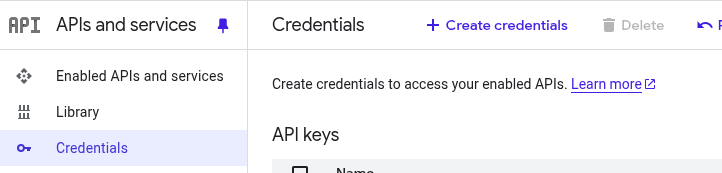
- Specify:
- Application type: Web Application.
- Application name: Sample_Application
- Authorised JavaScript origins (which is the domain of your web application): http://localhost:5173
- Authorised redirect URIs _(which is the path to be used when a user authenticates with Google.): http://localhost:5173/auth/callback
- Copy your Client ID and Client Secret.
Configure Frontend Application to work with GCP 💻
- Create your app:
npm create vue@latest- Add a login button:
class="google-oauth">
   @click="loginWithGoogle" class="btn-primary">
class="fab fa-google">Sign in With Google- Implement the button logic:
const loginWithGoogle = async () => {
 return await authService.redirectToGoogle();
};- .env configuration:
VITE_GOOGLE_CLIENT_ID=
VITE_GOOGLE_CLIENT_SECRET=
VITE_GOOGLE_REDIRECT_URI=
VITE_BACKEND_URL=- Use these variables to create the link to initiate the authentication to Google:
backend_url: string;
google_client_id: string;
google_client_secret: string;
google_redirect_uri: string;

constructor() {
 this.backend_url = import.meta.env.VITE_BACKEND_URL;
 this.google_client_id = import.meta.env.VITE_GOOGLE_CLIENT_ID;
 this.google_client_secret = import.meta.env.VITE_GOOGLE_CLIENT_SECRET;
 this.google_redirect_uri = import.meta.env.VITE_GOOGLE_REDIRECT_URI;
}
async redirectToGoogle() {
 const scope = "openid email profile";
 const responseType = "code";

 try {
 const googleAuthUrl = `https://accounts.google.com/o/oauth2/v2/auth?client_id=${this.google_client_id}&redirect_uri=${this.google_redirect_uri}&response_type=${responseType}&scope=${scope}&prompt=consent&access_type=offline`;
            window.location.href = googleAuthUrl;
 } catch(error) {
   console.error("Google OAuth Redirect Error:", error);
  }
}
We wish to access your google credentials after authentication, in this case, your email and your name.
Explanation of the Redirect URL Parameters:
- scope=openid email profile: Requests access to the user's basic profile info, including:
- openid: Needed to obtain an ID token.
- email: Access to the user's email address.
- profile: Access to basic profile information like name and picture.
- response_type=code: You're requesting an authorization code (which you'll exchange for tokens on the backend).
- prompt=consent: Always show the Google consent screen. This ensures you get a refresh token even if the user has already previously consented.
- access_type=offline: Asks Google for a refresh token, allowing your backend to request new access tokens without the user needing to log in again.
The OpenID Connect documentation has more attributes that can be tweaked in the link.
- Specifying routes You ought to specify the routes in the routes folder like so:
{
      path: "/auth/callback",
      name: 'auth-callback',
      component: AuthCallback,
    }
When a user is authenticated in google, the auth-callback route will be used by google to return an access token to the frontend application.
Our goal is to issue the user with a JWT token from our own backend server, so we have to send this google access token to the backend like so:
onMounted(async () => {
  const code = route.query.code; // Get code from URL

  if (code) {
    try {
      // Send code to backend for token exchange
      const response = await axios.post(`${backendUrl}/auth/google`, { code });
      localStorage.setItem("jwt", response.data.jwt); // Store backend JWT
      localStorage.setItem("access_token", response.data.access_token);
      router.push("/profile");

    } catch (error) {
      console.error("Authentication failed", error.message);
      router.push("/sign-up");
    }
  }
});Processing authentication...Configure Backend application 💾
When the frontend sends the code to your backend, your backend needs to:
- Exchange the code for tokens
- Verify the Google ID token
- Generate and return a JWT
We aim to make the backend know that the user has been authenticated by the frontend, but how do we authenticate this user to access resources from the backend?🎇
We start here:
const response = await axios.post(`${backendUrl}/auth/google`, { code });The URI being called links to this method in the backend:
async getGoogleRefreshToken(req, res) {
        const { code } = req.body;
        const client = new OAuth2Client(this.googleClientId);
        const authMiddleware = new AuthenticationMiddleware();

        try {
            const response = await axios.post(this.googleTokenUrl, {
                client_id: process.env.GOOGLE_CLIENT_ID,
                client_secret: process.env.GOOGLE_CLIENT_SECRET,
                redirect_uri: process.env.GOOGLE_REDIRECT_URI,
                grant_type: "authorization_code",
                code,
            }, { headers: { "Content-Type": "application/x-www-form-urlencoded" }});

            const { id_token, access_token, refresh_token } = response.data;
            const ticket = await client.verifyIdToken({ idToken: id_token, audience: this.googleClientId});
            const payload = ticket.getPayload();

            if (payload.sub == null) {
                return res.status(409).json({
                    error: payload,
                });
            }

            this.refreshTokens.set(payload.sub, refresh_token);
            const jwtToken = authMiddleware.generateJwt({userId: payload.sub, email: payload.email}, res);

            return res.json({
                jwt: jwtToken,
                access_token
            });
        } catch(error){
            return res.status(400).json({error: "Invalid authorization code"});
        }
    }
What it does:
- Uses the authorization code to get id_token, access_token, and refresh_token from Google.
- Verifies the id_token with Google.
- Extracts user info and generates a signed JWT.
- Sends the JWT and access token to the frontend.
const response = await axios.post(this.googleTokenUrl, {
  client_id: process.env.GOOGLE_CLIENT_ID,
  client_secret: process.env.GOOGLE_CLIENT_SECRET,
  redirect_uri: process.env.GOOGLE_REDIRECT_URI,
  grant_type: "authorization_code",
  code,
}, { headers: { "Content-Type": "application/x-www-form-urlencoded" }});
The section makes a request to Google's token endpoint to exchange the code for tokens:
- access_token: Used to access Google APIs on behalf of the user. id_token: JWT containing user info from Google.
- refresh_token: Used to get a new access token without user login (if offline access requested). we had specified it in the frontend request
const ticket = await client.verifyIdToken({
  idToken: id_token,
  audience: this.googleClientId
});
const payload = ticket.getPayload();
This ensures the token is really issued by Google, and extracts user info.
const jwtToken = authMiddleware.generateJwt({ userId: payload.sub, email: payload.email }, res);

return res.json({
  jwt: jwtToken,
  access_token
});
Generates your own JWT token (signed using your secret) so the frontend can use it for API calls and returns the JWT and Google access token back to the frontend.
The frontend will use that JWT to authenticate a request to the backend.
Connecting everything 🤝
Let's test!
Run your frontend and backend.

Choose the google account to use. You'll see the application name in the google page.
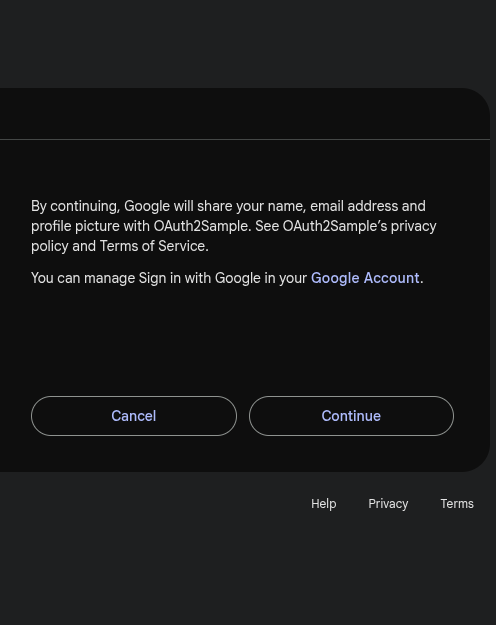
You'll view your email address as I had specified in this page:
<script setup>
async function fetchProfile() {
  try {
    const token = localStorage.getItem("jwt");
    const response = await axios.get("http://localhost:3000/api/v1/profile", {
      headers: { Authorization: `Bearer ${token}` },
    });
    profile.value = response.data.user;
  } catch (err) {
    error.value = "Unauthorized. Please sign in again.";
  }
}

onMounted(fetchProfile);
</script>

<template>
  <div>
    <h2>Profile</h2>
    <p v-if="error">{{ error }}</p>
    <div v-if="profile">
      <p>Email: {{ profile.email }}</p>
    </div>
  </div>
</template>
Conclusion🎉
I hope this article was helpful. Incase of any need for reference, kindly go to this github link for more information. I couldn't have summarised everything here.
Don't forget to provide some feedback!
Happy coding!