In this post, I’ll walk you through the entire process of building an R model, containerising it as a RESTful API using the Plumber package, and adding detailed logging. We’ll cover every step, including troubleshooting common issues (like missing system libraries) and ensuring reproducibility with renv. By the end of this tutorial, you’ll have a Docker image that serves your model via an API endpoint—ready for local testing or deployment to cloud services like AWS. In this part, we will build the components required for local testing, deployment to AWS will come in part 2.
You can find the entire code and Dockerfiles in the GitHub repo.
Table of Contents
- Overview & Prerequisites
- Building & Saving an R Model
- Building the Base Image with System Dependencies and renv
- Iterative Model Image for Rapid Development
- Automating Docker Builds with a Shell Script
- Managing R Dependencies with renv
- Creating a Plumber API Endpoint
- Testing the API
- Troubleshooting
1. Overview & Prerequisites
In this guide, we build a predictive model using the classic iris dataset and train a random forest classifier. We then containerise our R code with Docker and expose a RESTful API via Plumber. We’ll add logging using the logger package and manage dependencies with renv for reproducibility.
Key components include:
- R Model Training: Using randomForest to train on the iris dataset.
- Containerisation: Creating a reproducible R environment using Docker.
- Dependency Management: Using renv to lock package versions.
- Plumber API: Exposing a /predict endpoint with Swagger documentation.
- Logging: Detailed logging of API requests and responses, with logs mounted on the host.
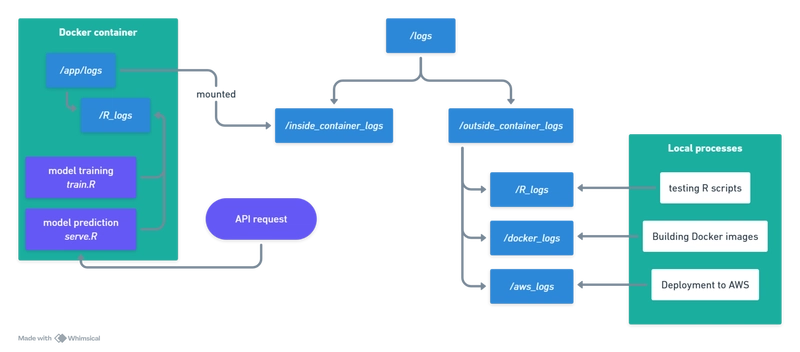
To effectively monitor our deployment workflow, I have established a dual logging system. The outside_container_logs directory captures logs generated during local development—this includes running and testing individual R scripts, building the Docker container, and future deployments. Meanwhile, logs from processes running inside the container are directed to inside_container_logs, which is mounted to /app/logs within the container. This separation enables us to clearly differentiate between pre-deployment activities and runtime behavior inside the container, allowing us to efficiently troubleshoot and ensure that both our development and production environments are operating as expected.

Before you begin, ensure you have the following installed:
- Docker: For container building.
- R (4.4.1 or compatible): For model training and package management.
- renv: For dependency management.
- Plumber and logger packages: To expose the API and manage logs.
2. Building & Saving an R Model
First, we create a training script (train.R) that trains a random forest model on the iris dataset and logs each step. This script automatically detects whether it’s running inside a container (by checking for /app/logs) and sets up the appropriate logging directory.
train.R
# train.R
library(randomForest)
library(logger)

# Choose the log directory based on whether /app/logs exists (inside container) or not (outside)
log_dir <- if (dir.exists("/app/logs")) {
  "/app/logs/R_logs"
} else {
  "logs/outside_container_logs/R_logs"
}

# Ensure the directory exists; create it if necessary
if (!dir.exists(log_dir)) {
  dir.create(log_dir, recursive = TRUE)
}

# Create a timestamp for the log file name
timestamp <- format(Sys.time(), "%Y%m%d_%H%M%S")
log_file <- file.path(log_dir, paste0(timestamp, "_training.log"))

# Configure logger with a unique file name for each run
log_appender(appender_file(log_file))

log_info("Starting model training...")

# Train a random forest model to classify iris species
data(iris)
model <- randomForest(Species ~ ., data = iris, ntree = 100)

log_info("Model training complete.")

# Capture the output of print(model)
model_output <- capture.output(print(model))
# Log the captured output
log_info("Model details:\n{paste(model_output, collapse = '\n')}")

# Save the trained model to disk
saveRDS(model, file = "data/model.rds")
log_info("Model saved to model.rds.")
Run this script (manually or as part of your Docker build) to generate your model and record the training process.
3. Creating a Plumber API Endpoint
Next, create an API using Plumber. We’ll define an endpoint /predict that:
- Loads the pre-trained model.
- Parses the incoming JSON request.
- Makes a prediction.
- Logs request and response details.
serve.R
# serve.R
library(plumber)
library(randomForest)
library(logger)
library(jsonlite)

# Set up logging
log_dir <- if (dir.exists("/app/logs")) {
  "/app/logs/R_logs"
} else {
  "logs/outside_container_logs/R_logs"
}
if (!dir.exists(log_dir)) {
  dir.create(log_dir, recursive = TRUE)
}
# Create a timestamp for the log file name
timestamp <- format(Sys.time(), "%Y%m%d_%H%M%S")
log_file <- file.path(log_dir, paste0(timestamp, "_request.log"))
log_appender(appender_file(log_file))

# Load the trained model
model <- readRDS("data/model.rds")

#* @filter log_requests
function(req, res) {
  log_info("Incoming request: {req$REQUEST_METHOD} {req$PATH_INFO}")
  log_info("Request body: {req$postBody}")
  plumber::forward()
}

#* @post /predict
#* @serializer json
function(req) {
  data <- fromJSON(req$postBody)
  input_data <- as.data.frame(data)
  pred <- predict(model, input_data)
  log_info("Prediction: {paste(pred, collapse=', ')}")
  list(prediction = as.character(pred))
}
Plumber automatically generates Swagger documentation (accessible at http://localhost:8080/__docs__/) from these annotations.
4. Building the Base Image with System Dependencies and renv
To ensure that the heavy lifting of installing system dependencies and R packages is done only once, we created a base image. This image includes R 4.4.1, necessary system libraries (for packages such as textshaping and ragg), and restores R packages using an renv.lock file.
Dockerfile.base
# Use a specific R base image
FROM r-base:4.4.1

# Install system dependencies required by R packages
RUN apt-get update && apt-get install -y \
    libcurl4-openssl-dev \
    libssl-dev \
    libxml2 \
    libxml2-dev \
    libz-dev \
    libsodium-dev \
    libfontconfig1-dev \
    libfreetype6-dev \
    libharfbuzz-dev \
    libfribidi-dev \
    libpng-dev \
    libtiff5-dev \
    libjpeg-dev \
    build-essential \
    pkg-config \
    wget \
    apt-transport-https \
    ca-certificates \
 && rm -rf /var/lib/apt/lists/*

# Create a directory for your application
WORKDIR /app

# Copy your renv lock file to restore R packages
COPY renv.lock /app/renv.lock

# Install renv and restore packages using renv.lock
RUN R -e "install.packages('renv', repos='http://cran.rstudio.com/'); \
          renv::restore(repos = c(CRAN = 'http://cran.rstudio.com/'))"
This image (tagged as, for example, r-base-mlops:4.4.1) serves as a stable foundation.
5. Iterative Model Image for Rapid Development
Building on the base image, we created a smaller model iteration image that contains only our model code. This image allows us to rapidly iterate on our model (or API) without reinstalling all the system dependencies and R packages every time.
We’ll create a Docker image that:
- Uses the R base image (here, version 4.4.1).
- Copies your scripts and model into the container.
- Exposes the Plumber API on port 8080.
Dockerfile.model
# Use the prebuilt base image that contains R 4.4.1 and all system dependencies & renv packages
FROM r-base-mlops:4.4.1

# Set the working directory
WORKDIR /app

# Create directories for logs and model data
RUN mkdir -p /app/logs/docker_logs /app/logs/R_logs /app/logs/aws_logs
RUN mkdir -p data

# Copy your model scripts into the container
COPY ./R/train.R /app/train.R
COPY ./R/serve.R /app/serve.R
# Copy the runner script to start the API
COPY ./R/run_api.R /app/run_api.R

# Run the training script to generate or update your model (e.g. data/model.rds)
RUN Rscript train.R

# Expose the port on which your Plumber API will run
EXPOSE 8080

# Start the Plumber API using the runner script
CMD ["Rscript", "run_api.R"]
The run_api.R script simply loads serve.R and starts the API:
# run_api.R
pr <- plumber::plumb("serve.R")
pr$run(host = "0.0.0.0", port = 8080)
This setup ensures that when you change your model code (in train.R or serve.R), you only need to rebuild the model image—not the entire base image.
6. Automating Docker Builds with a Shell Script
To build the Docker images, you can run these command lines:
# 1. Build the Docker base image
docker build --no-cache -f docker/Dockerfile.base -t r-base-mlops:4.4.1 .
# 2. Build the Docker model image
docker build --no-cache -f docker/Dockerfile.model -t my-r-sagemaker-model .
However, to simplify the process of building your Docker images above and ensure thorough logging, I’ve created an automation script. This script lets you choose between building the model image or the base image with a simple command-line argument. It also saves detailed build logs for later review.
docker_build.sh
#!/bin/bash

# Change working directory to the repository root.
# This works if your script is in ./bash/ and your repo root is one level up.
REPO_ROOT="$(cd "$(dirname "$0")/.." && pwd)"
cd "$REPO_ROOT" || exit 1

# Check if an argument is provided
if [ $# -eq 0 ]; then
  echo "Usage: $0 "
  exit 1
fi

container_type=$1

# Ensure the logs directory exists
mkdir -p logs/outside_container_logs/docker_logs/

# Create a unique log filename using a timestamp and the container type
timestamp=$(date +'%Y%m%d_%H%M%S')
log_file="logs/outside_container_logs/docker_logs/${timestamp}_${container_type}_build.log"

echo "Building starting. Build log will be saved to $log_file"

# Check the argument to determine which Docker build command to use
if [ "$container_type" = "model" ]; then
    docker build --no-cache -f docker/Dockerfile.model -t my-r-sagemaker-model . > "$log_file" 2>&1
elif [ "$container_type" = "base" ]; then
    docker build --no-cache -f docker/Dockerfile.base -t r-base-mlops:4.4.1 . > "$log_file" 2>&1
else
    echo "Unknown container type: $container_type. Use 'model' or 'base'."
    exit 1
fi

echo "Build log saved to $log_file"
To run this script:
# To give it permission
chmod +x ./bash/docker_build.sh
# To build the base image
./bash/docker_build.sh base
# To build the model image
./bash/docker_build.sh model
7. Managing R Dependencies with renv
Using renv ensures that your container installs the exact versions of R packages required by your project. To set this up locally:
# 1. Initialise renv:
renv::init()
# 2. Install any packages you use (eg. plumber, randomForest, logger, tidyverse).
# 3. Snapshot the environment:
renv::snapshot()
8. Testing the API
Running a Container of the Built Image
Normally, to run a container, this is all you need to run:
docker runLet's say our container image name is called my-r-sagemaker-model.
But since we want to expose the container's API specifically to port 8080, we need to explicitly map the container's port 8080 to port 8080 on our host machine.
docker run -p 8080:8080 my-r-sagemaker-modelWithout the -p 8080:8080 flag, the container will still run, but Docker does not automatically expose any ports to your host. This means that even though your API is running inside the container on port 8080, you wouldn’t be able to connect to it from your host machine.
Finally, since we also want to mount the app/logs/ folder within the container with our external log folder (/logs/inside_container_logs):
docker run -p 8080:8080 -v "$(pwd)/logs/inside_container_logs:/app/logs" my-r-sagemaker-modelTesting the Container Using Curl
curl -X POST "http://localhost:8080/predict" \
     -H "Content-Type: application/json" \
     -d '{"Sepal.Length": 5.1, "Sepal.Width": 3.5, "Petal.Length": 1.4, "Petal.Width": 0.2}'
You should be getting this result:
Prediction: setosaTesting the Container Using Postman
- Set the HTTP method to POST.
- Enter the URL: http://localhost:8080/predict.
- Under the Headers tab, add
Content-Typefor Key with valueapplication/json. - In the Body tab, select raw and choose JSON from the dropdown.
- Paste the following JSON:
{
     "Sepal.Length": 5.1,
     "Sepal.Width": 3.5,
     "Petal.Length": 1.4,
     "Petal.Width": 0.2
}- Click Send to view the response.
Testing the Container Using R’s httr Package
library(httr)
library(jsonlite)

url <- "http://localhost:8080/predict"
input <- list(
  Sepal.Length = 5.1,
  Sepal.Width  = 3.5,
  Petal.Length = 1.4,
  Petal.Width  = 0.2
)
response <- POST(
  url,
  body = toJSON(input, auto_unbox = TRUE),
  encode = "raw",
  add_headers("Content-Type" = "application/json")
)
result <- content(response, as = "parsed")
print(result)
9. Troubleshooting
Container fails to install a package
If a package fails to install (e.g., textshaping or ragg), check the error message for missing system libraries. Update your Dockerfile.base to install the required development packages (such as libharfbuzz-dev, libfribidi-dev, libpng-dev, libtiff5-dev, and libjpeg-dev).
If you don't have the logs setup, you can check by running the container, then call the library to see if it's installed, and try to reinstall it inside the container to see if it's having any issues:
Run the container interactively:
docker run -it my-r-sagemaker-model RThen you will be in the R console. Here you can check if something is installed (Eg. plumber):
library(plumber)If the package wasn't installed correctly, it will say there's no package. Here you can try to reinstall it to see what error comes out, if it's an issue with missing system requirements, it should tell you what is missing, then you just need to that package's installation to the Dockerfile.base script. If the package loads without error, the issue is resolved. To exit, type:
q()and then press n when prompted to save the workspace.
Docker Volume Mount
When running your container, use the Docker -v (or --volume) flag to map the host directory to the container directory. For example, if your host directory is in the current working directory, you could run:
docker run -v "$(pwd)/logs/inside_container_logs:/app/logs" your_container_imageThis command tells Docker to mount your host’s logs/inside_container_logs directory into the container at /app/logs.
After running the container, use docker container inspect to verify that the mount is correctly set, and check the local folder to ensure that logs are being written there.
Working on Windows brought its own challenges. When mounting a host directory to capture logs, my Docker run command was appending extra characters like ;C to the path. For example, instead of a clean path, I saw:
"Mounts": [
            {
                "Type": "bind",
                "Source": "C:\\Users\\Vince\\repos\\AWS-projects\\deploy-R-model-to-AWS-ECR\\logs\\inside_container_logs;C",
                "Destination": "\\Program Files\\Git\\app\\logs",
                "Mode": "",
                "RW": true,
                "Propagation": "rprivate"
            }
This was due to Git Bash’s interpretation of Windows paths, so it's recommended to use another terminal/powershell for this.
Any logs written to /app/logs by your R scripts (e.g., logs/R_logs/training.log and logs/R_logs/requests.log) will now be saved in your local logs folder (logs/inside_container_logs/R_logs), allowing you to access them even after the container stops.
Interact with Running Container
If you want to interact directly with a running container, for instance, you need to inspect logs directly within a running container without mounting a volume, you can use the docker exec command:
docker exec -it  bash
ls /app/logs
For example, I first call docker ps to get the container-id, then run the above docker exec command to enter the container, where you can do various things with it, such as inspecting the logs:
For example:
Vince@tanjiro [~/.../AWS-projects/deploy-R-model-to-AWS-ECR] ± master ✓           [12:35:08]> docker ps
CONTAINER ID   IMAGE                         COMMAND                  CREATED       STATUS
     PORTS                    NAMES
04221d808cc1   my-r-sagemaker-model:latest   "R -e 'pr <- plumber…"   4 hours ago   Up 4 hours   0.0.0.0:8080->8080/tcp   distracted_nobel
Vince@tanjiro [~/.../AWS-projects/deploy-R-model-to-AWS-ECR] ± master ?:1 ✗       [16:31:35]1 > docker exec -it 04221d808cc1 bash
root@04221d808cc1:/app# ls
data  logs  renv.lock  serve.R  train.R
root@04221d808cc1:/app# cd logs/
root@04221d808cc1:/app/logs# ls
R_logs
root@04221d808cc1:/app/logs# cd R_logs/
root@04221d808cc1:/app/logs/R_logs# ls
20250310_012557_request.log
root@04221d808cc1:/app/logs/R_logs#
exit

What's next:
    Try Docker Debug for seamless, persistent debugging tools in any container or image → docker debug 04221d808cc1
    Learn more at https://docs.docker.com/go/debug-cli/