Extending standard practices with parameterized dialogs and callback patterns.
👋 Introduction
Model-Driven Apps (MDA) are powerful, but historically lacked flexibility when it came to user-friendly modal dialogs. The introduction of Custom Pages in Power Apps brought new possibilities - especially when used as dialogs.
You’ve probably seen great content already like Matthew Devaney’s tutorial or Microsoft’s official documentation. These cover the basics of using Xrm.Navigation.navigateTo() to open custom pages as modal dialogs.
This post builds on those ideas and focuses on two core improvements:
- 📥 Passing structured parameters to Custom Pages
- 📤 Receiving data back (callbacks) after the dialog closes
Let’s walk through the challenges, the solutions, and see some code you can reuse.
🧩 The Challenge
Custom Pages offer a canvas-like experience inside MDAs, but:
-
navigateTo()only supports a single parameter (recordId) - The dialog can't return values directly via
.then()—Back()doesn't support return values
These limitations make it hard to build richer UI interactions like:
- Approval popups with comment capture
- Multi-value form input for background processing
- Conditional logic on dialog result
🚀 Solution Overview
Here’s how we enhance the dialog experience:
-
Pass structured data by serializing it to JSON and putting it in the
recordIdfield - Receive data back using a callback mechanism powered by a custom Dataverse table and a session ID
This keeps our dialogs lightweight, extensible, and decoupled.
📦 Step 1: Passing Data with JSON
Instead of just passing a recordId, we serialize a full object into a string:
var pageInput = {
        pageType:   "custom",
        name:       customPageName,
        entityName: tableName,
        recordId:   JSON.stringify({
          recordId: recordId,
          sessionId: sessionId,
          additionalParameters: additionalParameters
        })
      };

      Xrm.Navigation.navigateTo(pageInput, navigationOptions)
        .then(function () { return fetchCallbackData(sessionId); })
        .then(function (cbData) {
          if (cbData && typeof callbackFn === "function") {
            callbackFn({
              formContext:  formContext,
              callbackData: cbData,
              entityName:   tableName,
              recordId:     recordId
            });
          }
        })
        .catch(function (err) {
          console.error("triggerCustomPageOpenEvent error", err);
        });
🖼️ Step 2: Reading Parameters in Custom Page (Power Fx)
In your custom page, parse the incoming JSON:
Set(varInput, ParseJSON(Param("recordId")));
Set(gblRecordId, Text(varInput.recordId));
Set(gblAdditionalParams, ParseJSON(varInput.additionalParameters));
Set(gblSessionId, Text(varInput.sessionId));
Now your page can be fully dynamic!
🔄 Step 3: Returning Data via Callback
In the Power Fx "Submit" button (or other buttons as we design), we write to a custom table (e.g., custompagescallback - In the end I am providing the link to the solution you import in your environment with custompagescallback table) using the sessionId:
Patch(
  custompagescallback,
  Defaults(custompagescallback),
  {
    sessionid: gblSessionId,
    callbackjson: JSON({ Status: drpStatus.Selected.Value }),
    statuscode: 1,
    statecode: 0
  }
);
Back();
💡 Step 4: Handling the Result in JS
Here’s the example of handler you can include in your CustomPageHandler.js file:
// after Web Resource loads...
CustomPageHandler.callbacks.myHandler = async function(input) {
    // input.formContext, input.callbackData, input.entityName, input.recordId
    console.log("Got callback data:", input.callbackData);

    let status = input.callbackData.Status;

    if (status === "Rejected") {
        input.formContext.getAttribute("statecode").setValue(1); // Inactive
        input.formContext.getAttribute("statuscode").setValue(2);
    } else if (status === "Approved") {
        input.formContext.getAttribute("statecode").setValue(1); // Inactive
        input.formContext.getAttribute("statuscode").setValue(865420001);
    }

    await input.formContext.data.save();
};
You can further extend this to support other types of inputs or multi-record updates. Here is where you can manipulate the MDA form after receiving data from the Custom Page.
💼 Real-World Use Cases
- ✅ Approval Flows – Capture decision and notes via dialog
- 📁 SharePoint Integration – Select and return a document from a folder
- 🧭 Advanced Lookups – Custom selection UI with map filters
- 🔄 Wizard-style Forms – Guide users through complex input screens
🛠️ How to Wire It Up (Minimal Steps to Be Awesome)
Here’s the minimal setup to make this pattern work with any button in your model-driven app:
⚙️ Prerequisites
Before wiring everything up, make sure you have the following in place:
✅ 1. Create or Import the cu_custompagescallback Table
This custom table is used for storing the return values from your dialog (the callback). It must include at least these two columns:
| Column Logical Name | Type | Purpose |
|---|---|---|
cu_sessionid |
Single Line Text | Used to uniquely identify the dialog session |
cu_callbackjson |
Multiline Text | Stores the data returned from the dialog as JSON |
👉 You can import the solution from my GitHub repo to automatically deploy this table to your environment.
✅ 2. Create the Custom Page
You’ll need a Custom Page in your solution that acts as the dialog. This page should:
- Read data from
Param("recordId")and parse it usingParseJSON() - Store results using a
Patch()to thecu_custompagescallbacktable using the sessionId passed in - Call
Back()after submitting
✅ Make sure your custom page is added to your Model-Driven App using the App Designer.
You can adapt the following Power Fx for the button:
Patch(
  cu_custompagescallback,
  Defaults(cu_custompagescallback),
  {
    cu_sessionid: gblSessionId,
    cu_callbackjson: JSON({ Status: drpStatus.Selected.Value })
  }
);
Back();
1️⃣ Upload your Web Resource
Upload CustomPageHandler.js (you can download it in the Resources section at the very bottom) to your environment as a Web Resource.
2️⃣ Register Your Callback
After the Web Resource loads, register your callback (below is just an example - you need to adapt it for your needs!):
// after your Web Resource loads...
CustomPageHandler.callbacks.myHandler = function(input) {
  // input.formContext, input.callbackData, input.entityName, input.recordId
  console.log("Got callback data:", input.callbackData);

  const status = input.callbackData.Status;

  if (status === "Rejected") {
    input.formContext.getAttribute("statecode").setValue(1); // Inactive
  } else if (status === "Approved") {
    input.formContext.getAttribute("statuscode").setValue(865420001);
  }

  input.formContext.data.save();
};
3️⃣ Add or Edit Your Button
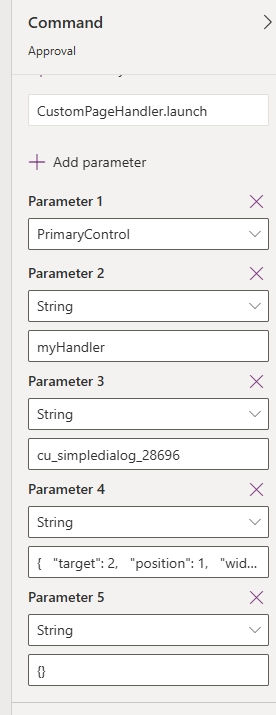
Use Power Apps Command Designer (modern) or Ribbon Workbench (classic) to add your button and link it to the handler.
-
Library:
CustomPageHandler.js -
Function Name:
CustomPageHandler.launch - Parameters (in exact order):
| Type | Description |
|---------------|---------------------------------------------------------------|
| PrimaryControl | Execution context |
| String | Callback key (e.g., "myHandler") |
| String | Custom Page Name (e.g., "my_custom_page") |
| String | JSON with navigation options |
| String | JSON with additional parameters (or "{}" if none) |
📦 Sample Navigation Options JSON:
{
  "target": 2,
  "position": 1,
  "width": { "value": 680, "unit": "px" },
  "height": { "value": 280, "unit": "px" },
  "title": "Delete Ticket"
}
🎉 Done! Now, every button just calls the same CustomPageHandler.launch(...) with its own parameters, and your business logic stays cleanly organized in the CustomPageHandler.callbacks map.
This makes it easy to reuse, extend, and maintain across multiple dialogs in your apps.
🧠 Final Thoughts
Custom Pages bridge a long-standing gap in Model-Driven Apps. With just a few enhancements, they become powerful tools for user interaction. By implementing JSON-based parameters and a session-based callback mechanism, you unlock:
- Easier integration scenarios
- Better user experiences
- Stronger separation of concerns
Let me know what you build with this approach!