No more waiting for the GUI to load! This approach saves valuable time and creates a more authentic server management experience.
One of the biggest productivity boosters in my RHEL learning journey has been setting up SSH access to my virtual machine directly from my MacBook Pro terminal.
🎯 In this article, you'll learn:
- How to configure SSH access to a RHEL virtual machine
- Two networking approaches: NAT with port forwarding vs. bridged networking
- Instructions for registering your RHEL server (required for setup SSH daemon)
- Step-by-step walkthrough on setting up SSH
- Troubleshooting tips for common SSH connection issues
Table of Contents
- Prerequisites
- Registering Your RHEL Server
- Setting Up SSH on RHEL
- Networking Options Compared
- Troubleshooting Tips
- What's Next
Prerequisites
- RHEL installed in VirtualBox
- A MacBook Pro (though these instructions work for any host OS)
- Basic terminal familiarity
- Red Hat developer account (free)
Registering Your RHEL Server
Before installing any packages, you'll need to register your RHEL server to access Red Hat's package repositories:
- Create a Red Hat developer account if you don't already have one
- Log into your RHEL server
- Run the registration command:
subscription-manager registerSetting Up SSH on RHEL
Step 1: Install OpenSSH Server
First, we need to install and enable the SSH server on our RHEL system:
Ref: https://www.redhat.com/en/blog/access-remote-systems-ssh
# Install the OpenSSH server package
sudo dnf install openssh-server

# Enable and start the SSH service
systemctl enable --now sshd
This installs the SSH server and configures it to start automatically on boot.
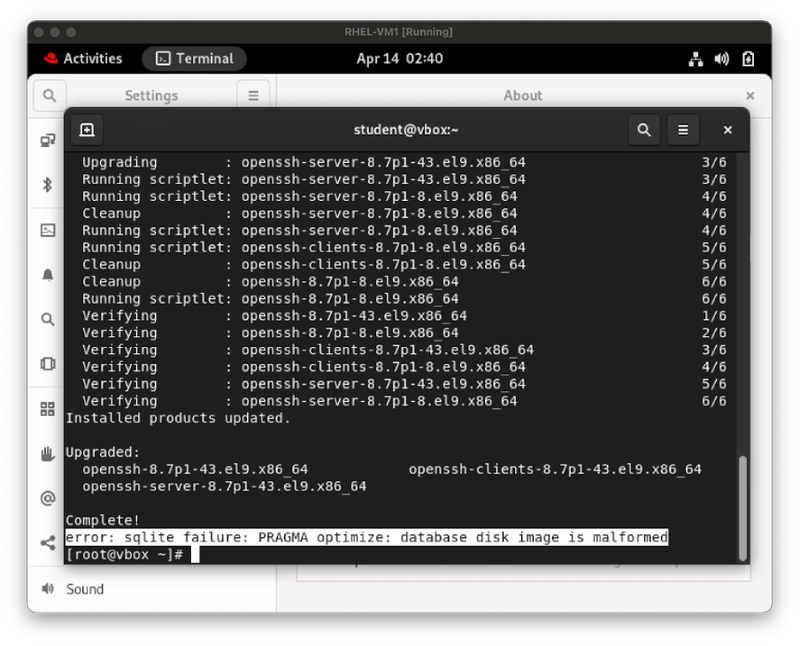
💡 Note: I encountered an error during registration:
"Error: sqlite failure: PRAGMA optimize: database disk image is malformed". Despite this, I was able to proceed with the SSH setup without issues. If you encounter similar errors, try continuing with the next steps anyway.
Step 2: Configure VM Networking
For SSH access, you'll need to configure networking in VirtualBox. There are two main approaches:
- Port forwarding with NAT (what I chose)
- Bridged networking
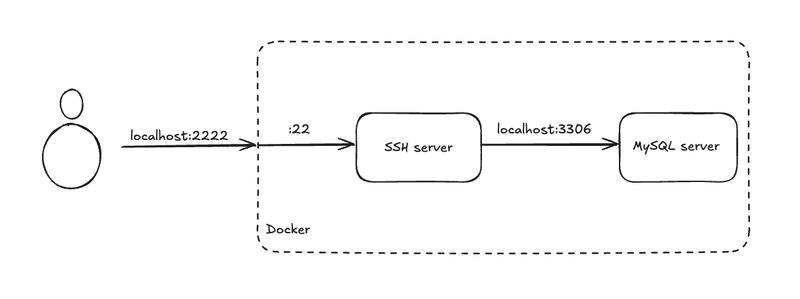
I opted for port forwarding because I only need to access the VM from my MacBook, not from other devices on my network. Here's how to set it up:
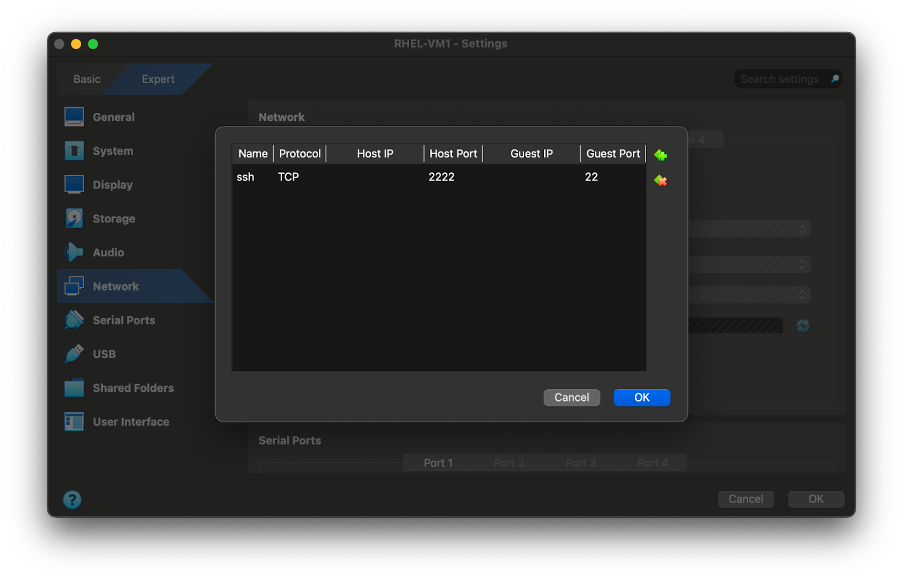
- Open VirtualBox
- Select your RHEL VM
- Go to Settings → Network → Adapter 1
- Make sure "NAT" is selected
- Click on "Port Forwarding"
- Add a new rule with these settings:
- Protocol: TCP
- Host Port: Choose a port (e.g., 2222)
- Guest Port: 22 (standard SSH port)
- Leave other fields at their defaults
Step 3: Test SSH Connection
Now for the moment of truth! Open your terminal on your MacBook and connect to your RHEL VM:
ssh -p 2222 username@localhost -vReplace 2222 with whatever host port you configured in the port forwarding rule, and username with your RHEL username.
The -v flag enables verbose output, which is incredibly helpful for troubleshooting if anything goes wrong. Once you've confirmed everything works, you can omit this flag for cleaner output.
Below steps are extra and for my best practice on security and working efficiency:
Step 4: Generate SSH Key
On your host/local machine:
ssh-keygen -t rsa -b 4096 -C "student@loca-rhel-vm1" -f ~/.ssh/student@local-rhel-vm1-C flag for the comment for key file, which will be append at the end of the whole key value. You can cat the key file to check.
-f flag for the file name you wish it to appear in your file system for easier recognization.
Check where the keys are generated. You may move the key to desired location. My practice is to under
~/.ssh. You will need the location in next commands.
Step 5: Copy SSH Key to the Remote Server
ssh-copy-id -p 2222 -i student@localhostIt will prompt you for password, input the password for that user account.
Step 6: Connect to VM via SSH
ssh -p 2222 student@localhost -iStep 7: Config Shortcut
Optional and for extra efficiency!
Create or edit ~/.ssh/config:
Host rhel-vm-student
  HostName localhost
  User student
  Port 2222
  IdentityFile
Then SSH with:
ssh rhel-vm-studentNetworking Options Compared
Here's a quick comparison of the networking options to help you decide which is best for your use case:
| Feature | NAT + Port Forwarding | Bridged Networking |
|---|---|---|
| Host IP used? | ✅ Yes | ❌ No — VM has its own IP |
| Needs port forwarding? | ✅ Yes (manually per port) | ❌ No (direct access) |
| Connect from other devices? | ❌ Difficult (only via host IP/port) | ✅ Yes (use VM's IP directly) |
| Security | 🔒 More isolated | ❗ Exposed to LAN/network |
| Best for | Personal dev/testing, local services | Network testing, server hosting |
Troubleshooting Tips
-
Connection refused? Make sure the SSH service is running:
systemctl status sshd - Authentication issues? Verify your username and check SSH key permissions
- Can't reach server? Double-check your port forwarding configuration
- Slow connection? Try disabling DNS lookups in the SSH server config
What's Next
Success! I now have a streamlined workflow where I can connect directly to my RHEL environment from my terminal without launching the VirtualBox GUI. This setup will make all future labs and exercises much more efficient.
In the next post of this series, I'll dive into essential RHEL operations and system administration tasks. Stay tuned!
In this second post of my RHEL learning series, I walked through the exact steps I took to configure SSH access to a RHEL virtual machine running in VirtualBox. Whether you're studying for RHCSA certification or just exploring Red Hat's enterprise environment, this setup will make your life much easier.
Follow me for the complete RHEL Learning Journey series.