
What is Jitsi?
Jitsi is a free open source, and encrypted video conferencing platform that allows users to start or join meetings directly in their browser without requiring account creation and software downloads. Jitsi also allows you to self host on your own server.
Why should you use Jitsi?
Jitsi provides secure, high-quality video conferencing with end-to-end encryption, ephemeral meeting rooms, and no account requirement for quick access. It supports WebRTC for seamless browser compatibility without extra software. The platform is highly scalable, allowing unlimited participants without artificial restrictions. Its user-friendly interface makes setup and use easy, even for non-technical users. Jitsi also integrates with third-party services like Slack and calendars for improved workflow. Its open-source nature ensures continuous updates, transparency, and flexibility, backed by an active community offering extensive documentation and support.
Why you would want to self host Jitsi?
Self-hosting Jitsi offeres enhanced control, privacy, and customization of your video conferencing need.
Which means you get:
- To own your own infrastructure: You have complete control over the server, network rules and security settings
- Scalability and Performance: You can scale your jitsi instance to meet your specific needs.
- Data Control: You have full control of your user data when your selfhosted version is used which enhances privacy
- Vendor Lock-in: It reduces the reliance on a single vendor allowing for flexibility
How Jitsi Works Under the Hood
Jitsi consists of:
-
Jitsi Meet- is the WebRTC compatible JavaScript application that uses Jitsi Videobridge to provide video conferencing -
Jitsi Videobridge (JVB)- is the server that is designed to route video streams amongst participants in a conference. -
Jitsi Conference Focus (jicofo)- is a server component that manages media sessions and acts as a load balancer between each of the participants and the video bridge. -
Jitsi Gateway to SIP (jigasi)- is a server application that allows regular SIP clients to join Jitsi Meet conferences -
Jitsi Broadcasting Infrastructure (jibri)- a set of tools for recording and streaming a jitsi meet conference that works by launching a chrome instance rendered in a virtual framebuffer and capturing and encoding the output with ffmpeg -
Prosody- XMPP server used for signalling
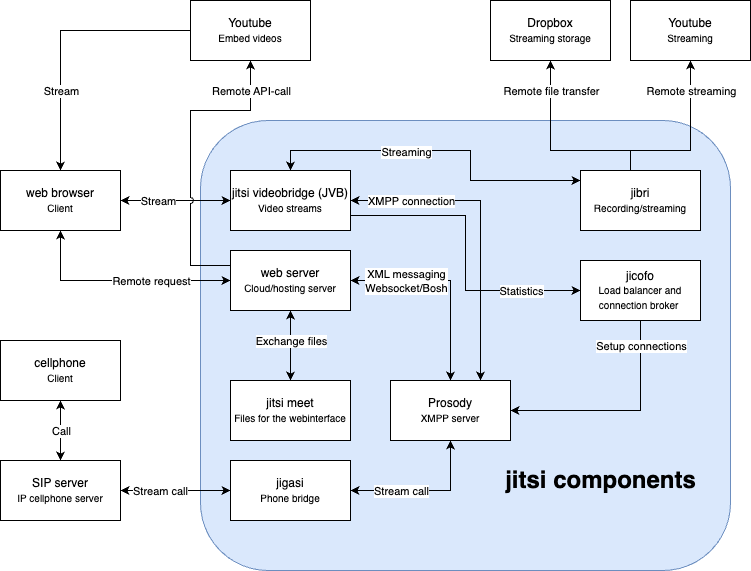
How it all comes together - Source: Architecture | Jitsi Meet
Self-Hosting Jitsi Meet with Docker and Cloudflare Tunnel
Step 1: Install Required Software
Before setting up Jitsi, you need Docker, Docker Compose, and WSL (Windows Subsystem for Linux) if you're using Windows.
-
Install Docker & Docker Compose
- Follow the official Docker installation guide for your OS
- Verify installation:
docker -v
docker-compose -v
Install WSL (Windows Users Only)
If you're on Windows, install WSL and set Ubuntu as your default distribution:
```
  wsl --install -d Ubuntu
  ```
Step 2: Clone the Jitsi Docker Repository
Jitsi provides a Docker Compose setup for easy self-hosting.
-
Clone the repository:
``` git clone https://github.com/jitsi/docker-jitsi-meet && cd docker-jitsi-meet ``` -
Copy the example environment file:
```
cp env.example .env
```
Step 3: Configure Jitsi Environment Variables
Open the .env file and configure the following settings:
```
  # Set your public domain (replace with your actual subdomain)
  PUBLIC_URL=meet.

  # Disable automatic SSL since we will use Cloudflare Tunnel
  ENABLE_LETSENCRYPT=0

  # Enable authentication (optional)
  ENABLE_AUTH=0
  ENABLE_GUESTS=1

  # Enable WebSockets (important for mobile support)
  ENABLE_XMPP_WEBSOCKET=1
  ```
💡 Note: If you plan to restrict meeting creation, set ENABLE_AUTH=1 and configure authentication later.
Step 4: Start Jitsi Services
Run Jitsi using Docker Compose:
```
docker-compose up -d
```
Verify that all services are running:
```
docker ps
```
You should see containers for:
✅ prosody (XMPP server)
✅ web (main frontend)
✅ jicofo (conference management)
✅ jvb (video bridge)
If everything works, your Jitsi server should be accessible locally via http://localhost:8000.
Step 5: Expose Jitsi to the Internet Using Cloudflare Tunnel
If you don’t have a static IP, Cloudflare Tunnel allows you to expose Jitsi without opening firewall ports.
Step 5.1: Set Up Cloudflare Tunnel
- Create a Cloudflare Account
- Sign up at https://dash.cloudflare.com/
- Add your domain to Cloudflare
- Create a subdomain for Jitsi (e.g., meet.)
-
Install Cloudflare Tunnel (
cloudflared)
``` sudo wget https://github.com/cloudflare/cloudflared/releases/latest/download/cloudflared-linux-amd64 -O /usr/local/bin/cloudflared sudo chmod +x /usr/local/bin/cloudflared ``` -
Authenticate Cloudflare Tunnel
 ```
 cloudflared tunnel login
 ```
- This opens a browser to authenticate with Cloudflare.
- Select your **Cloudflare domain** (e.g., ).-
Create a Cloudflare Tunnel
 ```
 cloudflared tunnel create jitsi-tunnel
 ```
This generates a tunnel ID and a credentials file:
``` /root/.cloudflared/.json ``` -
Configure the Tunnel
Create a config file:
 ```
 nano ~/.cloudflared/config.yml
 ```
Add the following:
``` tunnel:credentials-file: /root/.cloudflared/ .json ingress: - hostname: meet. service: http://localhost:8000 - service: http_status:404 ``` -
Run the Cloudflare Tunnel
``` cloudflared tunnel run jitsi-tunnel ``` -
Set Up DNS in Cloudflare
- In the Cloudflare Dashboard, go to DNS Settings.
- Add a CNAME record:
-
Name:
meet. -
Target:
.cfargotunnel.com
-
Name:
Step 6: Fix Cloudflare & Jitsi Issues
Issue 1: 405 Not Allowed Error (Nginx)
Fix: Disable Cloudflare Proxy
- Go to Cloudflare Dashboard → DNS
- Find the CNAME record for your Jitsi domain
- Click the orange cloud icon (proxy) and disable it
- Wait a few minutes, then test again
Issue 2: Mobile Devices Can’t Access /config.js
Fix: Bypass Cloudflare Security for /config.js
When using Jitsi in a mobile application (e.g., React Native or Kotlin), Cloudflare security settings might block access to /config.js, preventing the app from connecting.
To fix this:
- Go to the Cloudflare Dashboard → WAF (Firewall Rules)
-
Create a new Custom Rule:
-
If:
http.request.uri contains "/config.js"
-
Then:
Skip:
- Browser Integrity Check
- Bot Fight Mode
- Security Level
-
If:
This ensures that Jitsi’s configuration file is accessible to mobile clients.
Issue 3: Mobile Devices Can’t Join Jitsi Meetings
Fix: Allow WebSockets in Cloudflare
Jitsi uses WebSockets for real-time communication. If WebSockets are blocked, mobile apps won’t be able to join meetings.
To fix this:
- Go to the Cloudflare Dashboard → Security → WAF
-
Create a new Custom Rule:
-
If:
URI Full equals "meet.favour.dev/xmpp-websocket" - Then: Allow WebSockets
-
If:
This allows WebSockets to pass through Cloudflare without being blocked, ensuring smooth connectivity for mobile users.
Final Steps
🚀 Your Jitsi instance is now live at meet.!
💡 If you run into problems, check logs with:
```
docker-compose logs -f
```
Let me know if you need clarifications!
