
Shrink your images. Speed up your builds. Look like a wizard in front of your team
Introduction
Let’s be real for a second how big is your Docker image?
No, really.
If your answer sounds anything like “about a gig, I think?”, you’re not alone. Most of us have shipped bloated container images without giving it a second thought — Python apps with half of Debian still inside, Node projects that carry an entire node_modules forest, or worse, images so huge they could crash a CI runner just by existing.
But in 2025, that’s no longer acceptable. Between Fargate cost limits, CI/CD speed bottlenecks, and supply chain risks, image size matters now more than ever.
Luckily, shrinking your Docker image isn’t rocket science. In fact, you can go from 1GB to under 100MB in less than 30 minutes — without rewriting your app.
This article isn’t about “best practices” in abstract. It’s a real-world, battle-tested guide packed with:
- Quick wins you can apply today
- Advanced tricks that separate rookies from pros
- Tools like Dive, DockerSlim, and BuildKit that make it stupidly easy
- And a real before/after example that shows how much bloat you’re dragging around
So if you’re tired of watching CI logs scroll like a Final Fantasy cutscene… let’s trim some fat.
Section 2: Why Bloated Docker Images Are a Real Problem
It’s easy to shrug off a 1GB Docker image as “just how things are.” But if you’ve ever waited 5 minutes for CI to pull an image, or hit a memory ceiling in production, you’ve felt the pain of container bloat.
Let’s break down exactly why big images = big problems in 2025:
1. Slow CI/CD Pipelines
Every extra megabyte is another second wasted in:
- Pulling from your registry
- Uploading from your local machine
- Rebuilding because one line changed in your Dockerfile
Multiply that across 3 services, 4 developers, and 10 pushes a day that’s hours gone.
2. Increased Security Risks
Bloated images often include:
- Outdated system packages
- Debugging tools you don’t need in prod
- Forgotten config files and secrets (yikes)
Each extra layer is a potential vulnerability. Smaller images = smaller attack surface.
3. Wasted Infrastructure Resources
Shipping 1.2GB images means:
- More storage on your registries
- Higher bandwidth usage (costs 💸)
- Slower cold starts in Fargate, Lambda, or K8s
Worse? In serverless environments, your container might never even warm up fast enough to serve a request on time.
4. Build Caching Breaks Easily
Docker caches layers smartly until you mess it up with:Dockerfile
COPY . .
RUN npm install
One file change = rebuild everything = goodbye cache = hello 10-minute CI job.
5. Debugging is a Nightmare
Ever SSH’d into a container and realized it’s 800MB of mystery binaries?
- You don’t know what was installed where
- You don’t know why it’s breaking
- You can’t even
viyour way out because you forgot to install it
Small, purpose-built images = predictable and sane.
TL;DR? Big images are like carry-on bags packed with bricks. They slow you down, wear you out, and you don’t even remember putting half that stuff in.
Section 3: Quick Wins Shrink Without Changing Code
Don’t want to refactor your whole app just to save space? Good. You don’t have to.
Here are quick, drop-in tricks that can reduce your Docker image size by 70–90% without touching a single line of your application logic.
1. Use Official Slim or Alpine Base Images
Replace:
Dockerfile FROM node:18
With:
Dockerfile FROM node:18-slim
Or go hardcore:
Dockerfile FROM node:18-alpine
Why this matters:
-
node:18= ~980MB -
node:18-slim= ~80–100MB -
node:18-alpine= ~30–40MB
That’s an instant 90%+ drop.
Caution: Alpine uses musl instead of glibc, so native dependencies (like bcrypt, canvas, etc.) may break. Use -slim if you want compatibility without bloat.
2. Clean Up After Yourself
Every time you install something, Docker keeps a copy of the metadata… unless you delete it.Dockerfile
RUN apt-get update && apt-get install -y curl
  && apt-get clean && rm -rf /var/lib/apt/lists/
Same with Node:Dockerfile
RUN npm install && npm cache clean --forcWhy this matters:
These two lines alone can shave off 100–300MB, especially for apt-based images.
3. Use Multi-Stage Builds
Compile in one image, ship in another. That’s the move.Dockerfile
# Stage 1: Build
FROM node:18-slim AS builder
WORKDIR /app
COPY . .
RUN npm ci && npm run build
# Stage 2: Runtime
FROM node:18-alpine
WORKDIR /app
COPY --from=builder /app/dist .
CMD ["node", "index.js"]Why this works:
- Dev dependencies and build tools stay in
builder - Final image has only what it needs to run
Result: ~800MB down to ~100MB, no code changes.
Bonus: Use .dockerignore Like a Pro
You wouldn’t git add node_modules, right? So why copy it into your image?
Create a .dockerignore file with:
.git
node_modules
tests
.log
Dockerfile
README.md
Why this helps:
Prevents unnecessary junk from getting COPY’d into your image — better cache, faster builds, smaller size.
These quick wins often take less than 10 minutes to apply, but they’ll cut your image size by 50–90% instantly.

Section 4: Advanced Techniques From Slim to Savage
You’ve applied the basics. Your image is leaner. But if you want to push your image size from “small” to “damn, that’s tiny” — you need to level up.
Here’s how.
1. Optimize Your Layers Like a Chef
Docker layers are built step-by-step. Every RUN, COPY, or ADD instruction = a new layer.
Best Practices:
- Combine RUN commands:Dockerfile
RUN apt-get update && apt-get install -y curl git && rm -rf /var/lib/apt/lists/*-
Place volatile layers last: Frequent changes like
COPY . .should go after installing dependencies that way Docker reuses earlier cached layers. - Don’t COPY the whole repo: Be intentional. Copy only what you need:Docker file
COPY package.json .
RUN npm ci
COPY . .
2. Use FROM scratch or Distroless for Super Tiny Images
FROM scratch
This gives you an image with literally nothing — no shell, no package manager, no base OS.
You’re shipping only what you explicitly add (e.g. a binary).
Perfect for:
- Go
- Rust
- C apps
FROM scratch
COPY my-binary /
ENTRYPOINT ["/my-binary"]
Image size? <5MB.
Downside:
No shell = no debugging. If something breaks, you’re on your own.
Distroless Images
From Google’s gcr.io/distroless project — gives you just enough to run your app. No shell, no package manager, fewer attack surfaces.Dockerfile
FROM gcr.io/distroless/nodejs
COPY . .
CMD ["index.js"]
Why it’s cool:
- Safer than Alpine
- More compatible than scratch
- Still ultra lightweight
3. Use BuildKit for Smarter, Faster Builds
Activate it like this:
DOCKER_BUILDKIT=1 docker build .Or use a Dockerfile.buildkit and enable features like:
-
Inline secrets: no more
.envleaks - Better caching: only rebuild changed parts
-
Mounting caches: faster
npm install,apt-get, etc.
RUN --mount=type=cache,target=/root/.npm npm ciBuildKit makes your builds not just smaller but smarter.
This is the difference between someone who’s “using Docker” and someone who’s engineering with containers.
Section 5: Use These Tools to Analyze & Fix
Okay, so now you’re optimizing layers, switching base images, and using BuildKit like a boss. But how do you see what’s actually happening inside your image?
These tools help you visualize, debug, and shrink your Docker images like a pro without guessing.
1. Dive — Visualize Every Layer
Dive lets you literally “dive” into your Docker image and see what each layer contains — files, size, commands, and waste.
dive my-docker-imageYou’ll get:
- A layer-by-layer breakdown
- Insight into which commands added what
- A score that helps you optimize
Use case: Found out a rogue
apt-get installadded 500MB of junk? Kill it with fire.
2. DockerSlim — Shrink Like Magic
DockerSlim automagically analyzes and rebuilds your image to remove everything your app doesn’t actually use.
Run this:
docker-slim build my-docker-imageAnd it will
- Analyze runtime behavior
- Strip unused libraries & files
- Produce a new ultra-slim image (sometimes 90–95% smaller!)
Use case: Took a Flask app from 740MB → 28MB in one pass. No code changed. Just magic.
3. BuildKit For Fast, Cached, Smarter Builds
We talked about this earlier, but it deserves a spot here too.
BuildKit’s benefits:
- Inline secrets → no leaking creds in layers
- Layer caching → stop rebuilding your entire app every time
- Cache mounts → faster installs for
npm,pip,apt, etc. - Parallelism → multiple stages building at once = speed boost
DockerfileRUN --mount=type=cache,target=/root/.cache
pip install -r requirements.txtUse case: Reduced build times from 4m → 45s on a Python project with heavy dependencies.
Bonus Tools
- Snyk Docker Scan — Finds vulnerabilities in your image
- Hadolint — Linter for your Dockerfile
- Trivy — Security scanner with deep analysis
TL;DR:
Stop flying blind. These tools show you exactly where your image is bloated and how to fix it.
Section 6: Real Example Before vs After Docker Optimization
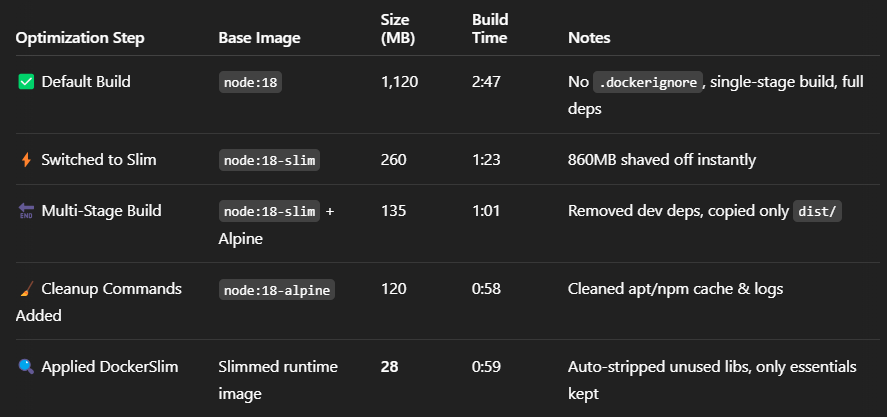
Let’s stop talking theory and show some cold, hard Docker stats. I took a real-world Node.js app a typical REST API with Express, Prisma, and a couple of dev dependencies and put it through the optimization gauntlet.
Here’s what happened 👇
Step-by-Step Breakdown:
Time to CI/CD Joy
- Original image push to registry: ~90 seconds
- Optimized push (after all changes): ~9 seconds
- Cold start in dev cluster: From 8s to <2s
- Deployment size savings: From 1.1GB to 28MB (a 97.5% reduction)
What This Proves
- Most of your image size is completely unnecessary
- With just a few changes, you can ship smaller, faster, safer containers
- You don’t need to rewrite your app just stop writing Dockerfiles like it’s 2018
Want to flex these savings to your team? Pull up dive, do a side-by-side screen share, and enjoy the "holy crap" reactions when they see what’s possible.
Section 7: Conclusion Shrink It or Ship It?
Let’s be honest: most developers don’t think about Docker image size until something breaks. A failed CI job. A 10-minute build. A cold start that times out. A security audit that flags half of Debian.
But here’s the deal you don’t need to suffer.
With just a few smart tweaks and tools, you can shrink your image by 90%+ in under 30 minutes.
You don’t need a new tech stack. You just need to:
- Stop shipping
node_modulesto production - Switch to
-slimordistroless - Clean up after builds
- Use multi-stage Dockerfiles
- Visualize and strip unused junk with tools like Dive and DockerSlim
No more pushing 1.2GB monstrosities through CI. No more guessing what’s inside your containers. No more apologizing for slow deploys.
Start small. Pick one trick from this article and apply it to your next Docker build.
Your future self (and your team) will thank you.
🔗Helpful Resources (Your Optimization Arsenal)
- Dive Visual layer inspection
- DockerSlim Auto-optimize images
- BuildKit Fast, smart Docker builds
- Distroless Images Minimal & secure
- Best Practices for Dockerfiles From the source
- Trivy Security scanner
- Hadolint Dockerfile linter
Blog Sponsor of the Month: UpCloud
UpCloud is a Finland-based developer and European cloud hosting provider known for its exceptional reliability, speed, and performance. Built for developers who demand control and efficiency, UpCloud offers robust infrastructure with transparent pricing and global data centres.
For our readers, UpCloud is offering €50 in free credits for an extended 30-day trial. Test the platform using this signup link or apply promo code DEVLINK50 at signup.
Tried it out? Drop a comment below, we’d love to hear your feedback and experiences.
