Hii Guys!
This blog is the continution to 👉Stock Management System ,Please go through the process
As we set up the basic API end points.Let's move forward to complete the requirements.
- Completing the Products Module with all required CURD operations performance in productController
productController.js
Adding a new Product - destructuring the field names to its requested json body, and adding them to the product object then storing them to the database asper the Model defined.
const addProduct = async (req, res) => {
    try {
        const { name, category, price, stockQuantity } = req.body;
        const product = new Product({ name, category, price, stockQuantity, itemsSold: 0 });
        await product.save();
        res.status(201).json({ message: 'Product added successfully', product });
    } catch (error) {
        res.status(500).json({ message: 'Error adding product', error });
    }
};
Fetch all products - find() method applied to the particular model, to fetch all existing products.
const getProducts = async (req, res) => {
    try {
        const products = await Product.find();
        res.status(200).json(products);
    } catch (error) {
        res.status(500).json({ message: 'Error fetching products', error });
    }
};
Update a product - Based on productId retrieving data and modifying the json and then saving the results.
const updateProduct = async (req, res) => {
    try {
        const { id } = req.params;
        const updatedProduct = await Product.findByIdAndUpdate(id, req.body, { new: true });
        if (!updatedProduct) {
            return res.status(404).json({ message: 'Product not found' });
        }
        res.status(200).json({ message: 'Product updated successfully', updatedProduct });
    } catch (error) {
        res.status(500).json({ message: 'Error updating product', error });
    }
};
Delete a Product - by fetching productId and performing action.
const deleteProduct = async (req, res) => {
    try {
        const { id } = req.params;
        const deletedProduct = await Product.findByIdAndDelete(id);
        if (!deletedProduct) {
            return res.status(404).json({ message: 'Product not found' });
        }
        res.status(200).json({ message: 'Product deleted successfully' });
    } catch (error) {
        res.status(500).json({ message: 'Error deleting product', error });
    }
};
Finally export the arrow functions to import in respective routes referenced.
-
productRoutes.js
const express = require('express');
const { getProducts, addProduct, updateProduct, deleteProduct } = require('../controllers/productController');
const router = express.Router();

router.post('/products', addProduct);
router.get('/products', getProducts);
router.put('/products/:id', updateProduct);
router.delete('/products/:id', deleteProduct);

module.exports = router;- Test these curd operations like we did previously to get these restful API's working correct.
- Implementing the Business Logic.
Business Logic - The rules and operations that define how data should be processed according to the business needs.
So, as per our needs we are implementing the business logic under 4conditions satisfying to manage the stock.
- Updating the stock when sale happens.
- Preventing sales if stock is insufficient.
- Calculating total revenue based on sales.
- Sending alerts when stock is low.
-> So, to implement above steps.Create a new sales.js route.
const express = require("express");
const { sellProduct } = require("../controllers/productController");

const router = express.Router();
// Endpoint to handle sales
router.post("/sell", sellProduct);
module.exports = router;
-> Now Update the controller function to perform the actions in particular route.
// Sell Product and Update Stock
const sellProduct = async (req, res) => {
try {
const { productId, quantity } = req.body; // Get product ID and quantity from request
// Check if product exists
const product = await Product.findById(productId);
if (!product) {
return res.status(404).json({ message: "Product not found" });
}
// Prevent sales if stock is insufficient
if (product.quantityInStock < quantity) {
return res.status(400).json({ message: "Insufficient stock available" });
}
// Update stock and sales details
product.quantityInStock -= quantity; // Reduce stock
product.itemsSold += quantity; // Increase total items sold
product.totalRevenue += quantity * product.price; // Calculate revenue
// Save updated product details
await product.save();
// Check if stock is low and send an alert (For example, if stock < 5)
if (product.quantityInStock < 5) {
console.log(`⚠️ Alert: Stock for ${product.name} is low! Only ${product.quantityInStock} left.`);
// You can also trigger an email or notification system here
}
res.status(200).json({
message: "Sale successful",
updatedProduct: product
});
} catch (error) {
res.status(500).json({ message: "Server Error", error: error.message });
}
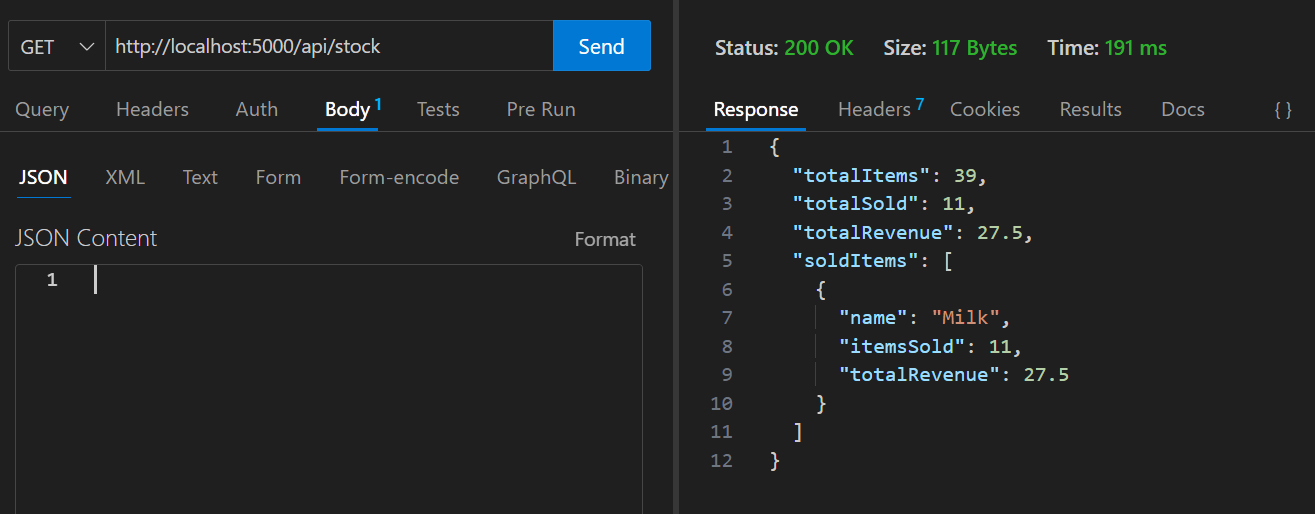
};-> Now to get stock overview, create stock.js route and handle the controller function.
const express = require("express");
const { stockOverview } = require("../controllers/stockController");

const router = express.Router();
// Get stock overview (total items sold and revenue)
router.get("/", stockOverview);

module.exports = router;
stockController.js
const Product = require('../models/Product');

const stockOverview = async (req, res) => {
    try {
        console.log("Stock overview API called"); // Check if API is called

        const products = await Product.find(); // Fetch all products

        let totalItems = 0;
        let totalSold = 0;
        let totalRevenue = 0;
        let soldItems = [];

        products.forEach(product => {
            totalItems += product.quantityInStock || 0;
            totalSold += product.itemsSold || 0;
            totalRevenue += product.totalRevenue || 0;

            if (product.itemsSold && product.itemsSold > 0) { // Ensure condition is met
                soldItems.push({
                    name: product.name,
                    category: product.category,
                    quantitySold: product.itemsSold,
                    revenueGenerated: product.totalRevenue
                });
            }
        });

        res.status(200).json({
            totalItems,
            totalSold,
            totalRevenue,
            soldItems
        });
    } catch (error) {
        console.error("Stock Overview Error:", error.message);
        res.status(500).json({ message: "Server Error", error: error.message });
    }
};


module.exports = {
    stockOverview
};
-> Test this api endpoint to get the required results.
Now that we are done with business logic let's complete our bonus steps.i.e, Authentication, CSV Uploads, filters and sorting on stock overview, Charts for visualizing stock trends and revenue.
3.User Authentication.
- Setup User Model
models/User.js
1.A MongoDB NoSql schema for data storage and retrieval.Provide all the required fields in the schema so that user model can perform all functionalities.
2.Password Hashing to protect the user credentials in the database.
const mongoose = require("mongoose");
const bcrypt = require("bcryptjs");

const UserSchema = new mongoose.Schema({
    name: { type: String, required: true },
    email: { type: String, required: true, unique: true },
    password: { type: String, required: true },
    role: { type: String, enum: ["admin", "user"], default: "user" }
});

// Hash password before saving
UserSchema.pre("save", async function (next) {
    if (!this.isModified("password")) return next();
    const salt = await bcrypt.genSalt(10);
    this.password = await bcrypt.hash(this.password, salt);
    next();
});

module.exports = mongoose.model("User", UserSchema);- User Registration API
controllers/authController.js- a controller function that provides all the fields wrt the user model so as to save the registered details, as per the request sent by the user.A duplicate user check is done before registering and storing to the database.
const User = require("../models/User");

const registerUser = async (req, res) => {
    try {
        const { name, email, password, role } = req.body;

        let user = await User.findOne({ email });
        if (user) return res.status(400).json({ message: "User already exists" });

        user = new User({ name, email, password, role });
        await user.save();

        res.status(201).json({ message: "User registered successfully" });
    } catch (error) {
        res.status(500).json({ message: "Server Error", error: error.message });
    }
};

module.exports = { registerUser };- User Login & JWT Token
controllers/authController.js- User Authentication is done by using jsonwebtokens. 1.As per the requested login credentials which are destructured and then email is checked in the database whether it exists or not,if not the response is returned with the status code 500. 2.If user exists ,then password check is done as the password is hashed in the databased it is retrieved to its normal form and compared with the user requested password using bcrypt if no match we get error with status. 3.If there is a match a token is generated from the sign method of jwt.The secret key is used to sign the token to ensure its authenticity, is defined in.envfile.
const bcrypt = require("bcryptjs");
const jwt = require("jsonwebtoken");
const User = require("../models/User");

const loginUser = async (req, res) => {
    try {
        const { email, password } = req.body;

        const user = await User.findOne({ email });
        if (!user) return res.status(400).json({ message: "Invalid email or password" });

        const isMatch = await bcrypt.compare(password, user.password);
        if (!isMatch) return res.status(400).json({ message: "Invalid email or password" });

        const token = jwt.sign({ id: user._id, role: user.role }, process.env.JWT_SECRET, { expiresIn: "1d" });

        res.json({ token, user: { id: user._id, name: user.name, email: user.email, role: user.role } });
    } catch (error) {
        res.status(500).json({ message: "Server Error", error: error.message });
    }
};

module.exports = { registerUser, loginUser };
add these routes to
server.jsand test the endpoints to ensure it's working is fine.Protect Routes with Middleware
middleware/authMiddleware.js- To get the authorized access of the particular routes create a middleware based on the token, to allow access after verifying it.
const jwt = require("jsonwebtoken");

const protect = (req, res, next) => {
    const token = req.header("Authorization")?.split(" ")[1];

    if (!token) return res.status(401).json({ message: "Access Denied" });

    try {
        const decoded = jwt.verify(token, process.env.JWT_SECRET);
        req.user = decoded;
        next();
    } catch (error) {
        res.status(403).json({ message: "Invalid Token" });
    }
};

module.exports = protect;- use in Routes
routes/stockRoutes.js- add the middleware in the routes where you want to perform authorized access.
router.get("/stock-overview", protect, stockOverview);- Role Based Access Control
1.modify authMiddleware.js - create a middleware to specify the Role based access to seperate the user centric functionality.
const adminOnly = (req, res, next) => {
    if (req.user.role !== "admin") {
        return res.status(403).json({ message: "Access denied. Admins only" });
    }
    next();
};

module.exports = { protect, adminOnly };- Use in Admin Routes - here for creating new product admins only has the access, if user tries to access it then access denied message is generated.
const { protect, adminOnly } = require("../middleware/authMiddleware");

router.post("/add-product", protect, adminOnly, addProduct);- Connect routes in
routes/userRoutes.js- update the routes ,by providing the respective functionality.
const express = require("express");
const { registerUser, loginUser } = require("../controllers/authController");

const router = express.Router();

router.post("/register", registerUser);
router.post("/login", loginUser);

module.exports = router;
and call this authRoutes in server.js
const userRoutes = require('./routes/userRoutes');
app.use("/api/auth", userRoutes);
test these endpoints to ensure they are working fine.
- As the jsonwebtokens provides the authorized access to the routes through middleware which is passed inside the routes that specifies only registered or logged in user is allowed to access the particular route controllers.
- When it comes to role based access I have specified the role in User model so that if the logged in user is admin he has his own functionality and that is be differed with user access, which is even specified in the authMiddleware.
Let's complete the further steps in upcoming blog. Reach out in comment section for any queries.
Happy Developing!
Let'grow together