Hello Everyone! 👋🏻
I’m Shreyash Srivastava, a 1st-year CSE student at DSCE and I’m back again with a new blog! (You can also check my previous one here)
So the main inspiration behind this blog was I recently worked on an issue with a friend of mine, which was a new one for us so I wanted to share my experience and how I was able to solve it ! (Also my first sem just ended and I was free :P). Let’s begin…
Documenting APIs is one of the most important aspects of building scalable and maintainable web applications. Recently, We were given a task of adding Swagger documentation to a Next.js website. And before that we need to know some basics:
What is an API?
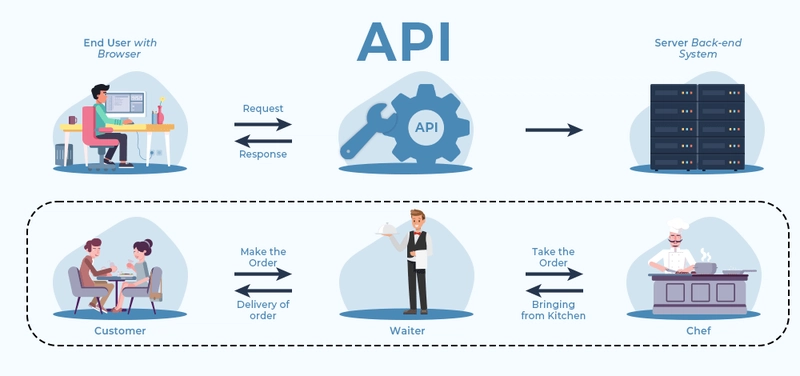
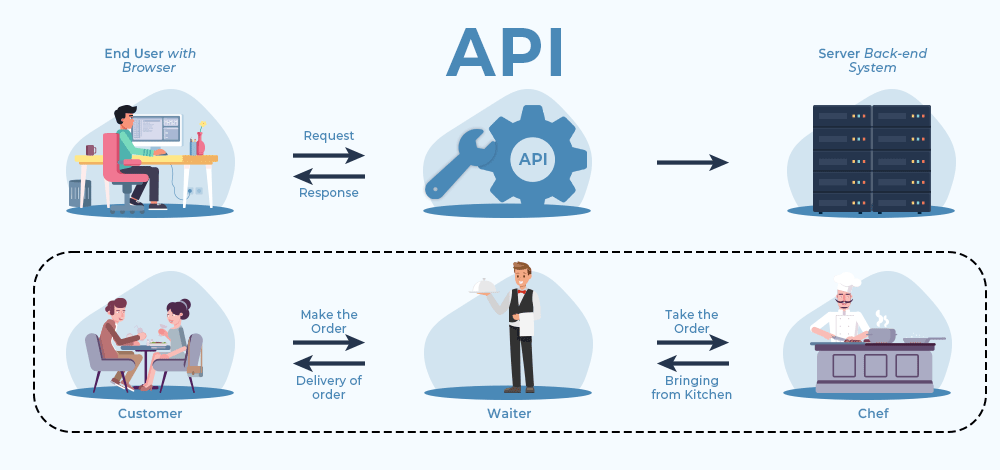
At its core, an API (Application Programming Interface) is a set of rules that allows different software applications to communicate with one another. It defines how data is exchanged between systems, including the methods used to request and send data. APIs are crucial in modern web development, allowing services to interact with each other seamlessly.
What are API Endpoints?
API endpoints are like doorways through which we access various functionalities within an API. Each endpoint corresponds to a specific URL that serves a particular function or resource. For instance, in a blogging platform, your API might have these endpoints:
-
GET /posts– Retrieve a list of all blog posts -
POST /posts– Create a new blog post -
GET /posts/{id}– Fetch a specific blog post by ID Endpoints are the building blocks of an API, and documenting them is critical for ensuring other developers can use your API effectively.
What is Swagger?
Swagger is an open-source framework designed for building and documenting RESTful APIs. It gives us a user-friendly interface to visualize and interact with our API endpoints. Swagger documentation is usually written in the OpenAPI Specification (previously known as Swagger Specification), a standardized format for describing REST APIs.
With Swagger, we can:
- Automatically generate comprehensive API documentation.
- Test API endpoints directly from the documentation.
- Share API specifications with your team or external developers.
Swagger documentation is essential for a few key reasons:
- For API Consumers: Developers can easily understand how to use your API.
- For Testing: You can test your endpoints directly from the documentation.
- For Maintainability: Keeping your API documentation updated is much simpler with Swagger.
How to Add Swagger in Next.js
Next.js is a powerful React framework for building server-rendered applications. Adding Swagger to a Next.js app involves a few steps:
- Installing necessary dependencies
- Adding Swagger annotations to your API routes
- Generating a Swagger JSON file
- Setting up middleware or a library to serve the Swagger UI
Our Process: Adding Comments and Creating a swagger.ts File
The first thing was adding JSDoc comments to all the API routes. These comments describe the purpose, parameters, and responses for each endpoint. For instance, in this route.ts file for the /api/members endpoint, my friend added the Swagger annotations like this:
/**
 * @swagger
 * /api/members:
 *   get:
 *     summary: Retrieve all members
 *     description: Fetches all members from the database and returns their details.
 *     tags:
 *      - Members
 *     responses:
 *       200:
 *         description: A list of all members
 *         content:
 *           application/json:
 *             schema:
 *               type: array
 *               items:
 *                 type: object
 *                 properties:
 *                   id:
 *                     type: string
 *                   name:
 *                     type: string
 *                   role:
 *                     type: string
 *                   company:
 *                     type: string
 *                   year:
 *                     type: string
 *                   linkedInUrl:
 *                     type: string
 *                   imageUrl:
 *                     type: string
 *       500:
 *         description: Internal server error
 */
export async function GET() {
  // Implementation here...
}
Once the comments were to all the routes, we need to consolidated the Swagger definitions into a single swagger.ts file. I used the next-swagger-doc library to generate the Swagger specification like so:
import { createSwaggerSpec } from 'next-swagger-doc';
export const swaggerOptions = {
  definition: {
    openapi: '3.0.0',
    info: {
      title: 'Next.js API Documentation',
      version: '1.0.0',
      description: 'API documentation for the application endpoints',
    },
    servers: [
      { url: 'http://localhost:3000', description: 'Development server' },
    ],
    tags: [
      { name: 'Members', description: 'Member data management endpoints' },
      //all the tags should be added here...............
],
  },
  apis: ['./app/(default)/api/members/route.ts'],
      //all the apis used........
};
export const getApiDocs = async () => {
  return createSwaggerSpec(swaggerOptions);
};
In this file, I set up the basic structure for the Swagger documentation — such as the API title, version, and server URL — and pointed to the locations of the API routes with Swagger annotations.
The Middleware Solution
Now, here’s where things got tricky. Next.js doesn’t natively serve Swagger documentation out of the box. I needed to find a way to expose the Swagger JSON file through an endpoint like /api/docs.
To solve this, I created a route.ts file that generates and serves the Swagger JSON:
import { getApiDocs } from '@/lib/swagger';
import { NextResponse } from 'next/server';
export async function GET(request: Request) {
  try {
    const spec = await getApiDocs();
    return NextResponse.json(spec, {
      headers: {
        'Content-Type': 'application/json',
        'Access-Control-Allow-Origin': '*',
      },
    });
  } catch (error) {
    console.error('Error generating API docs:', error);
    return NextResponse.json(
      { error: 'Failed to generate API documentation' },
      { status: 500 }
    );
  }
}
The middleware makes sure that the Swagger JSON is available at the /api/docs endpoint. But I ran into a CORS issue while trying to access the Swagger JSON. To fix this, I created a middleware that sets the correct headers for CORS:
import { NextResponse } from 'next/server';
import type { NextRequest } from 'next/server';
export function middleware(request: NextRequest) {
  if (request.nextUrl.pathname === '/api/docs') {
    return NextResponse.next({
      headers: {
        'Content-Type': 'application/json',
        'Access-Control-Allow-Origin': '*',
      },
    });
  }
  return NextResponse.next();
}
With this, the /api/docs route was working fine, and I was able to handle cross-origin requests without issues.

Displaying API Endpoints as JSON
After setting up the middleware, visiting /api/docs returned the Swagger JSON. This JSON followed the OpenAPI Specification and contained all the details I had defined in the JSDoc comments. It became the foundation for generating a Swagger UI.
Wrapping Everything with next-swagger
Next, I wanted to make the Swagger documentation more interactive and visually appealing. I used the next-swagger module, which wraps the Swagger JSON and provides a beautiful, interactive UI for the documentation.
Here’s how I set it up:
- Install the library:
npm install next-swagger- Create a Dynamic Swagger UI Component
Since the swagger-ui-react library is not compatible with server-side rendering (SSR), I used dynamic imports to load the SwaggerUIcomponent only on the client side. Here’s how I did it in the page.tsx file:
const SwaggerUI = dynamic(() => import("swagger-ui-react"), {
  ssr: false,
  loading: () => Loading API Documentation...,
});- Fetch Swagger JSON and Render the UI
In the page.tsx file, I fetched the Swagger JSON from the /api/docs endpoint and rendered it using the SwaggerUI component:
export default function ApiDoc() {
  const [swaggerConfig, setSwaggerConfig] = useState(null);
  useEffect(() => {
    fetch("/api/docs")
      .then((res) => res.json())
      .then((data) => setSwaggerConfig(data));
  }, []);
  if (!swaggerConfig) return Loading API documentation...;
  return (


  );
}
Now, visiting /swagger would display an interactive Swagger UI, allowing users to explore and test the API endpoints right from the documentation.
Creating layout.tsx for Swagger UI
To render the Swagger UI within the Next.js app.
-
layout.tsxto define the layout:
export default function SwaggerLayout({ children }: { children: React.ReactNode }) {
  return (

      {children}

  );
}


    Enter fullscreen mode


    Exit fullscreen mode


With these files, the Swagger documentation was neatly integrated into the Next.js app, providing a polished, user-friendly experience for API consumers.


  Conclusion
Adding Swagger documentation to the website was a rewarding experience. It not only made the code more maintainable but also made it easier for other developers to understand and use the APIs. Here’s a quick recap of what we did:If you’re working on a Next.js project, I highly recommend integrating Swagger documentation. It’s a small effort that can go a long way in making your API more usable and easier to maintain. Happy coding!Feel free to share your thoughts or questions in the comments below. If you’ve already added Swagger to your project, I’d love to hear about your experience!