Not a year goes by without another "how to use favicon this year" article. Let's recap what has changed over the years: Favicons began as simple .ico files introduced by Microsoft with Internet Explorer 5 in 1999. These were small, square icons, typically in resolutions of 16×16 or 32×32 pixels. The .ico file format can support images up to 256×256 pixels. They were designed to appear in browser tabs, bookmarks, and address bars.
To add a favicon to a web page, we add a line of code to the section of an HTML page:
rel="icon" type="image/x-icon" href="/favicon.ico">Over time, the format evolved to support more modern web standards and higher resolution displays. Developers began using formats such as PNG, SVG, and even adaptive icons for mobile platforms, leading to the rise of specialized favicon generators and meta tag configurations. Modern favicons now often include multiple sizes and formats to accommodate different devices, operating systems, and browser requirements, becoming a small but surprisingly complex part of web development. So-called "Apple Touch Icon" sizes are designed to provide optimized icons for different Apple devices and screen resolutions, ensuring a crisp display when a user saves a website to their Home screen. Each size corresponds to specific devices - from older iPhones and iPads (e.g., 57×57, 72×72) to modern Retina displays (e.g., 120×120, 180×180) - and allows iOS to choose the most appropriate icon. So in 20 years, we went from having to worry about an .ico file to a list that looks something like this:
rel="apple-touch-icon" sizes="57x57" href="/apple-icon-57x57.png">
 rel="apple-touch-icon" sizes="60x60" href="/apple-icon-60x60.png">
 rel="apple-touch-icon" sizes="72x72" href="/apple-icon-72x72.png">
 rel="apple-touch-icon" sizes="76x76" href="/apple-icon-76x76.png">
 rel="apple-touch-icon" sizes="114x114" href="/apple-icon-114x114.png">
 rel="apple-touch-icon" sizes="120x120" href="/apple-icon-120x120.png">
 rel="apple-touch-icon" sizes="144x144" href="/apple-icon-144x144.png">
 rel="apple-touch-icon" sizes="152x152" href="/apple-icon-152x152.png">
 rel="apple-touch-icon" sizes="180x180" href="/apple-icon-180x180.png">
 rel="icon" type="image/png" sizes="192x192" href="/android-icon-192x192.png">
 rel="icon" type="image/png" sizes="32x32" href="/favicon-32x32.png">
 rel="icon" type="image/png" sizes="96x96" href="/favicon-96x96.png">
 rel="icon" type="image/png" sizes="16x16" href="/favicon-16x16.png">
 rel="manifest" href="/manifest.webmanifest">
Okay, I admit I cheated a bit in the code snippet above. When I tested the tool, it gave me a manifest.json and not a manifest.webmanifest. See footnote 1 for more information. We will use the .webmanifest file for the rest of this article.
Manifest
Wow, that's a lot. So what is this manifest.webmanifest? Let's take a look at a sample manifest file:
{
 "name": "Vannsl's Blog",
 "icons": [
  {
   "src": "/icon-36x36.png",
   "sizes": "36x36",
   "type": "image/png"
  },
  {
   "src": "/icon-48x48.png",
   "sizes": "48x48",
   "type": "image/png"
  },
  {
   "src": "/icon-72x72.png",
   "sizes": "72x72",
   "type": "image/png"
  },
  {
   "src": "/icon-96x96.png",
   "sizes": "96x96",
   "type": "image/png"
  },
  {
   "src": "/icon-144x144.png",
   "sizes": "144x144",
   "type": "image/png"
  },
  {
   "src": "/icon-192x192.png",
   "sizes": "192x192",
   "type": "image/png"
  }
 ]
}
The tag points to a Web App Manifest file, which provides metadata about a web application in JSON format. This file contains information such as the name of the application, icons in different sizes, theme colors, display mode (full screen, standalone, etc.), and more. It's especially important for progressive web apps (PWAs) because it allows browsers (especially on Android) to provide "add to home screen" functionality with proper icons and branding. More information about this can be found on the web app manifest page.
Implementation
So... do you have to remember all the different formats and sizes? Write all the HTML yourself, create all the favicons? Of course not! But be careful about using NPM packages and libraries to create them for you. Let me explain why.
When I built this blog with Eleventy by forking the eleventy-base-blog repository, I also checked if there was a favicon plugin available. And I found this one. This plugin has two bugs:
- Since the last update to the repository was 4 years ago, I think it's fair to say that it's deprecated. While this isn't a problem per se- (it really isn't!). Of course we can use "deprecated" software! But that's another topic for another time)-it unfortunately comes with vulnerable dependencies. So to use it, you'd have to fork it, update the dependencies yourself, make a pull request, wait for it to be published-or use your fork as a plugin.
- The README says: "Currently, the plugin does not generate the
manifest.jsonsuggested by this article". But as we learned above, we might want one.
So... actually creating all the favicons and writing the HTML and manifest is it? No, still not! The rest of this article is another shout-out to the amazing Tiny Helpers website by [Stefan Judis]. Because it's got you covered! You can use the Favicon Generator2 to convert an image from PNG to ICO, from JPG to ICO, or from GIF to ICO, as well as all application icons. The .zip file also contains the manifest. You may also want to rename manifest.jsontomanifest.webmanifest1:1.
But wait—do we really need all of this?
No, maybe not. In the code above, you can see that I used PNG files for favicons. But we have something better: SVGs. [SVG favicons are supported by some modern browsers (https://caniuse.com/link-icon-svg). And for browsers that do not support them, we can still add the .ico file as a fallback. This again reduces the LOC to something like this:
rel="icon" href="/favicon.ico" sizes="16x16">
 rel="icon" href="/favicon.svg" sizes="any" type="image/svg+xml">
 rel="manifest" href="/manifest.webmanifest">
Again, you can use the Favicon Generator2:1 to create the 16×16px fallback .ico file. Again, it comes with a manifest file. However, I'd advise you to modify the HTML output the tool provides. When I tested it, the favicon Generator did not set the sizes attribute of the .ico file to 16x16, but to any. This can cause Chrome to pick the .ico file instead of the .svg file as Colby Fayock explained in his article.
If you want to make it as simple as it was in 1999, you can also just provide the SVG file:
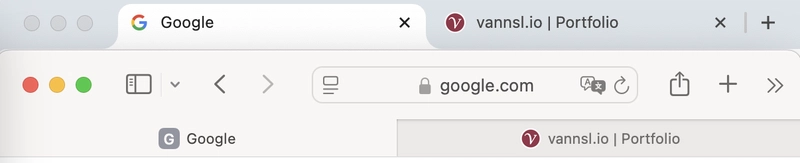
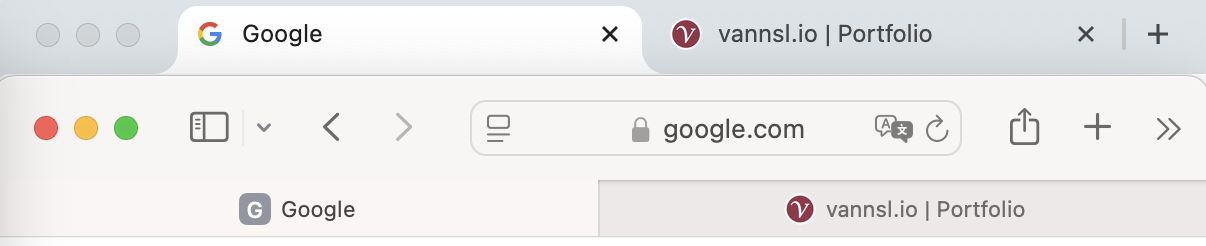
rel="icon" href="/favicon.svg" type="image/svg+xml">Browsers that do not support SVG favicons will create some sort of fallback. For example, this is the google.com favicon in a Chromium browser. And in Safari, the browser falls back to a simple "G" on a gray background. You can see this effect in the screenshot below, looking at the left tab in both browsers (Chrome on top, Safari on bottom). On the right tab, I opened vannsl.io, which uses .png favicons that work in both browsers.
PNG vs. SVG: What to do?
Personally, I will stick with the PNG solution. As I have shown, it is not difficult to create them with the tools provided. I prefer crisp and beautiful favicons on all devices and screen sizes. I don't want to see a 16×16px .ico fallback on a 5K display. (Not that I have one 🤑) However, the SVG solution has better performance and maintainability. You don't have to worry about different resolutions anymore. The SVG file will scale and look good even on a 5K display. It is also very small in size and you will save some bytes, which might be what you prefer! There is another reason why you might want to go with SVGs - because you can play around with them, as described in the next section.
SVG Favicons Dark Mode
Using SVG means that you can add a block. Adding means you can add a dark mode. You can find a demo here on GitLab along with its GitLab repository and a demo here on GitHub along with its GitHub repository.
The favicon contains embedded CSS that changes colors based on the user's system color scheme (light or dark mode). This is achieved by using the prefers-color-scheme media query within the SVG.
xmlns="http://www.w3.org/2000/svg" width="250px" height="250px" viewBox="0 0 24 24" stroke-width="1.00" fill="none" stroke-linecap="round" stroke-linejoin="round">
<span class="na">xmlns="http://www.w3.org/2000/svg">
.favicon-fill {
fill: rgb(244, 255, 141);
}
.favicon-stroke {
stroke: black;
}
@media (prefers-color-scheme: dark) {
.favicon-fill {
fill: black;
}
.favicon-stroke {
stroke: rgb(244, 255, 141);
}
}
class="favicon-fill" cx="50%" cy="50%" r="50%" stroke="none" stroke-width="0" />
class="favicon-stroke" transform="translate(2.40, 2.40) scale(0.8)">
stroke="none" d="M0 0h24v24H0z" fill="none"/>
x="4" y="4" width="16" height="16" rx="2"/>
x1="4" y1="16" x2="20" y2="16"/> d="M4 12l3 -3c.928 -.893 2.072 -.893 3 0l4 4"/> d="M13 12l2 -2c.928 -.893 2.072 -.893 3 0l2 2"/>
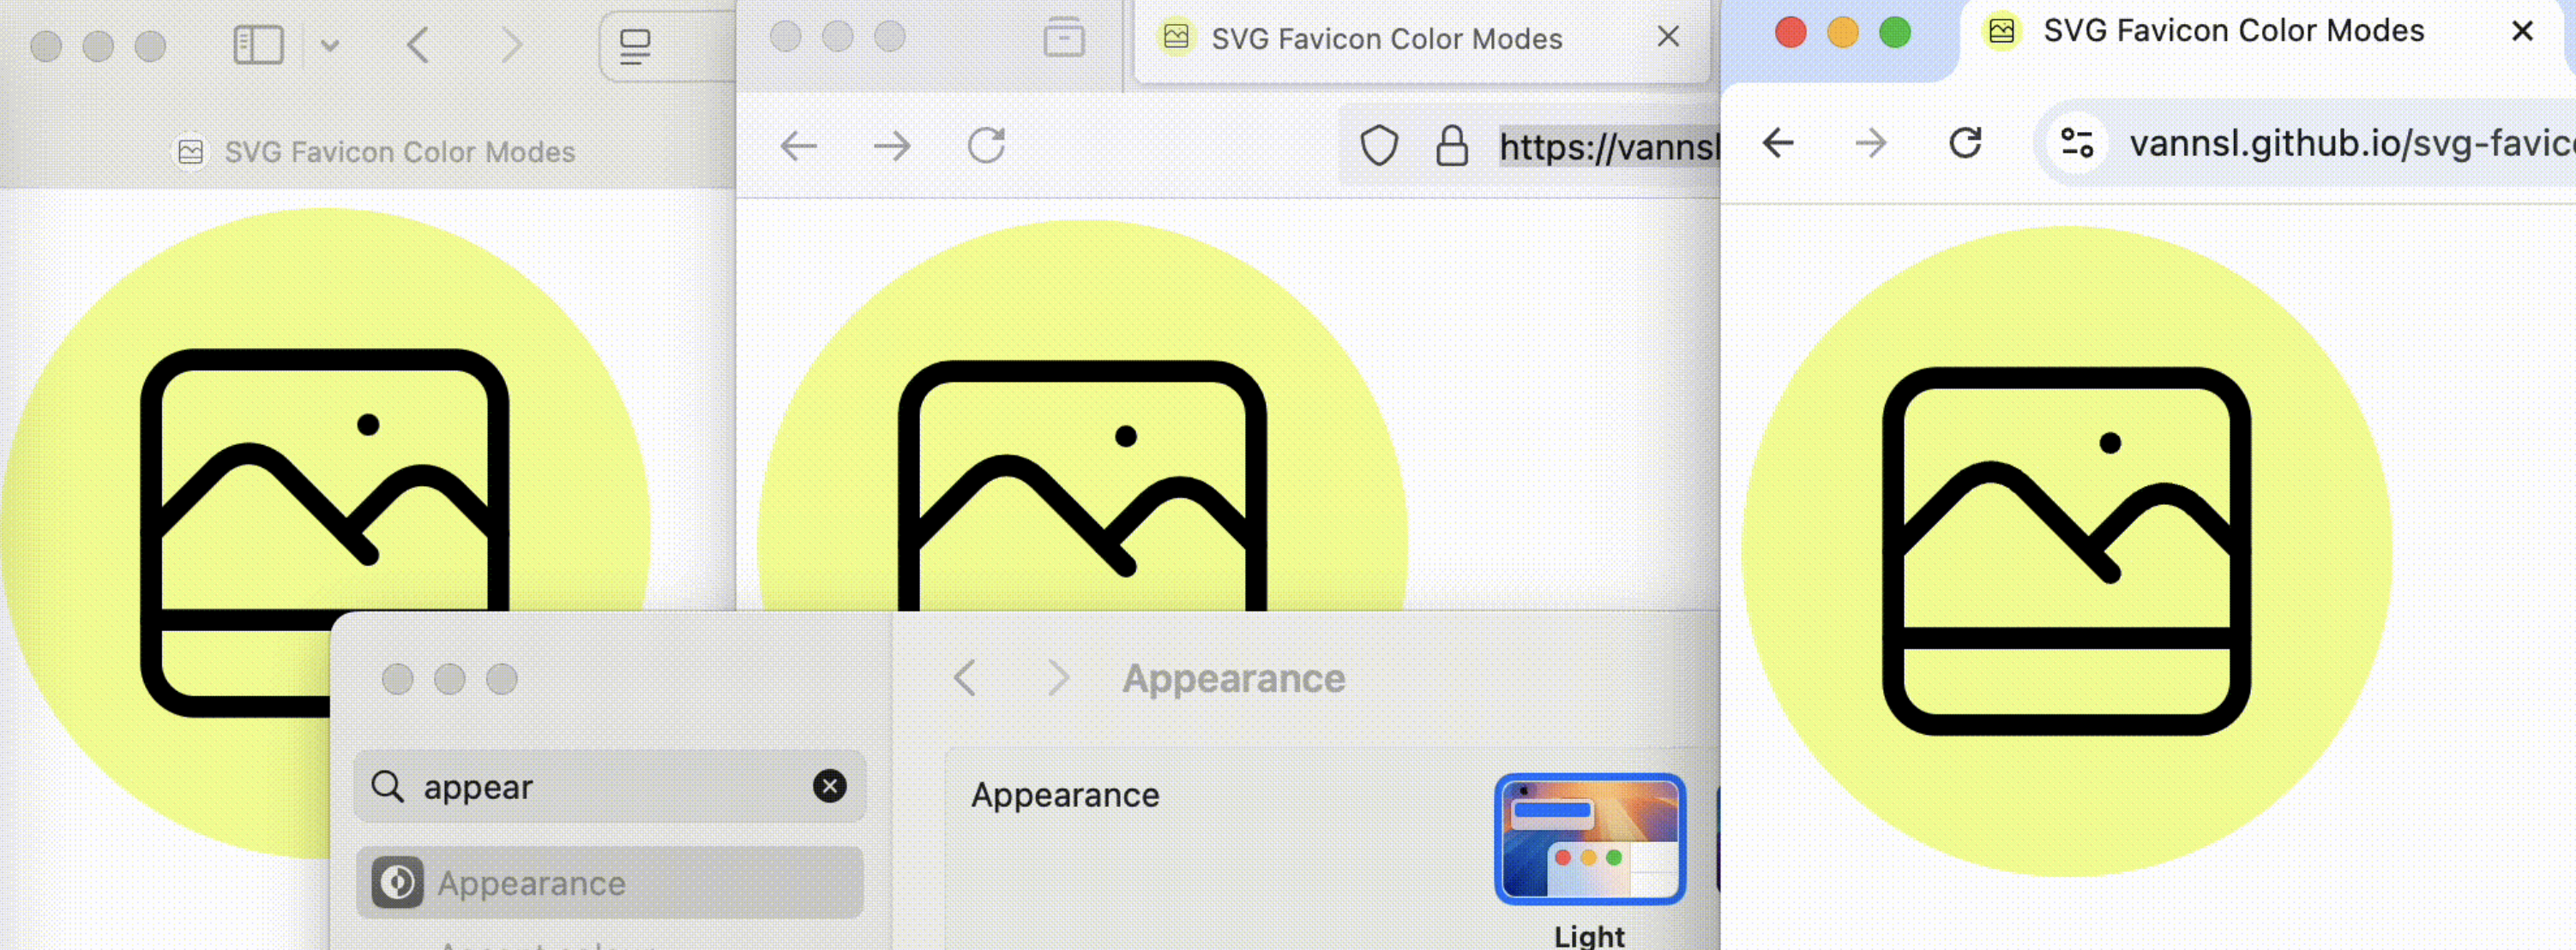
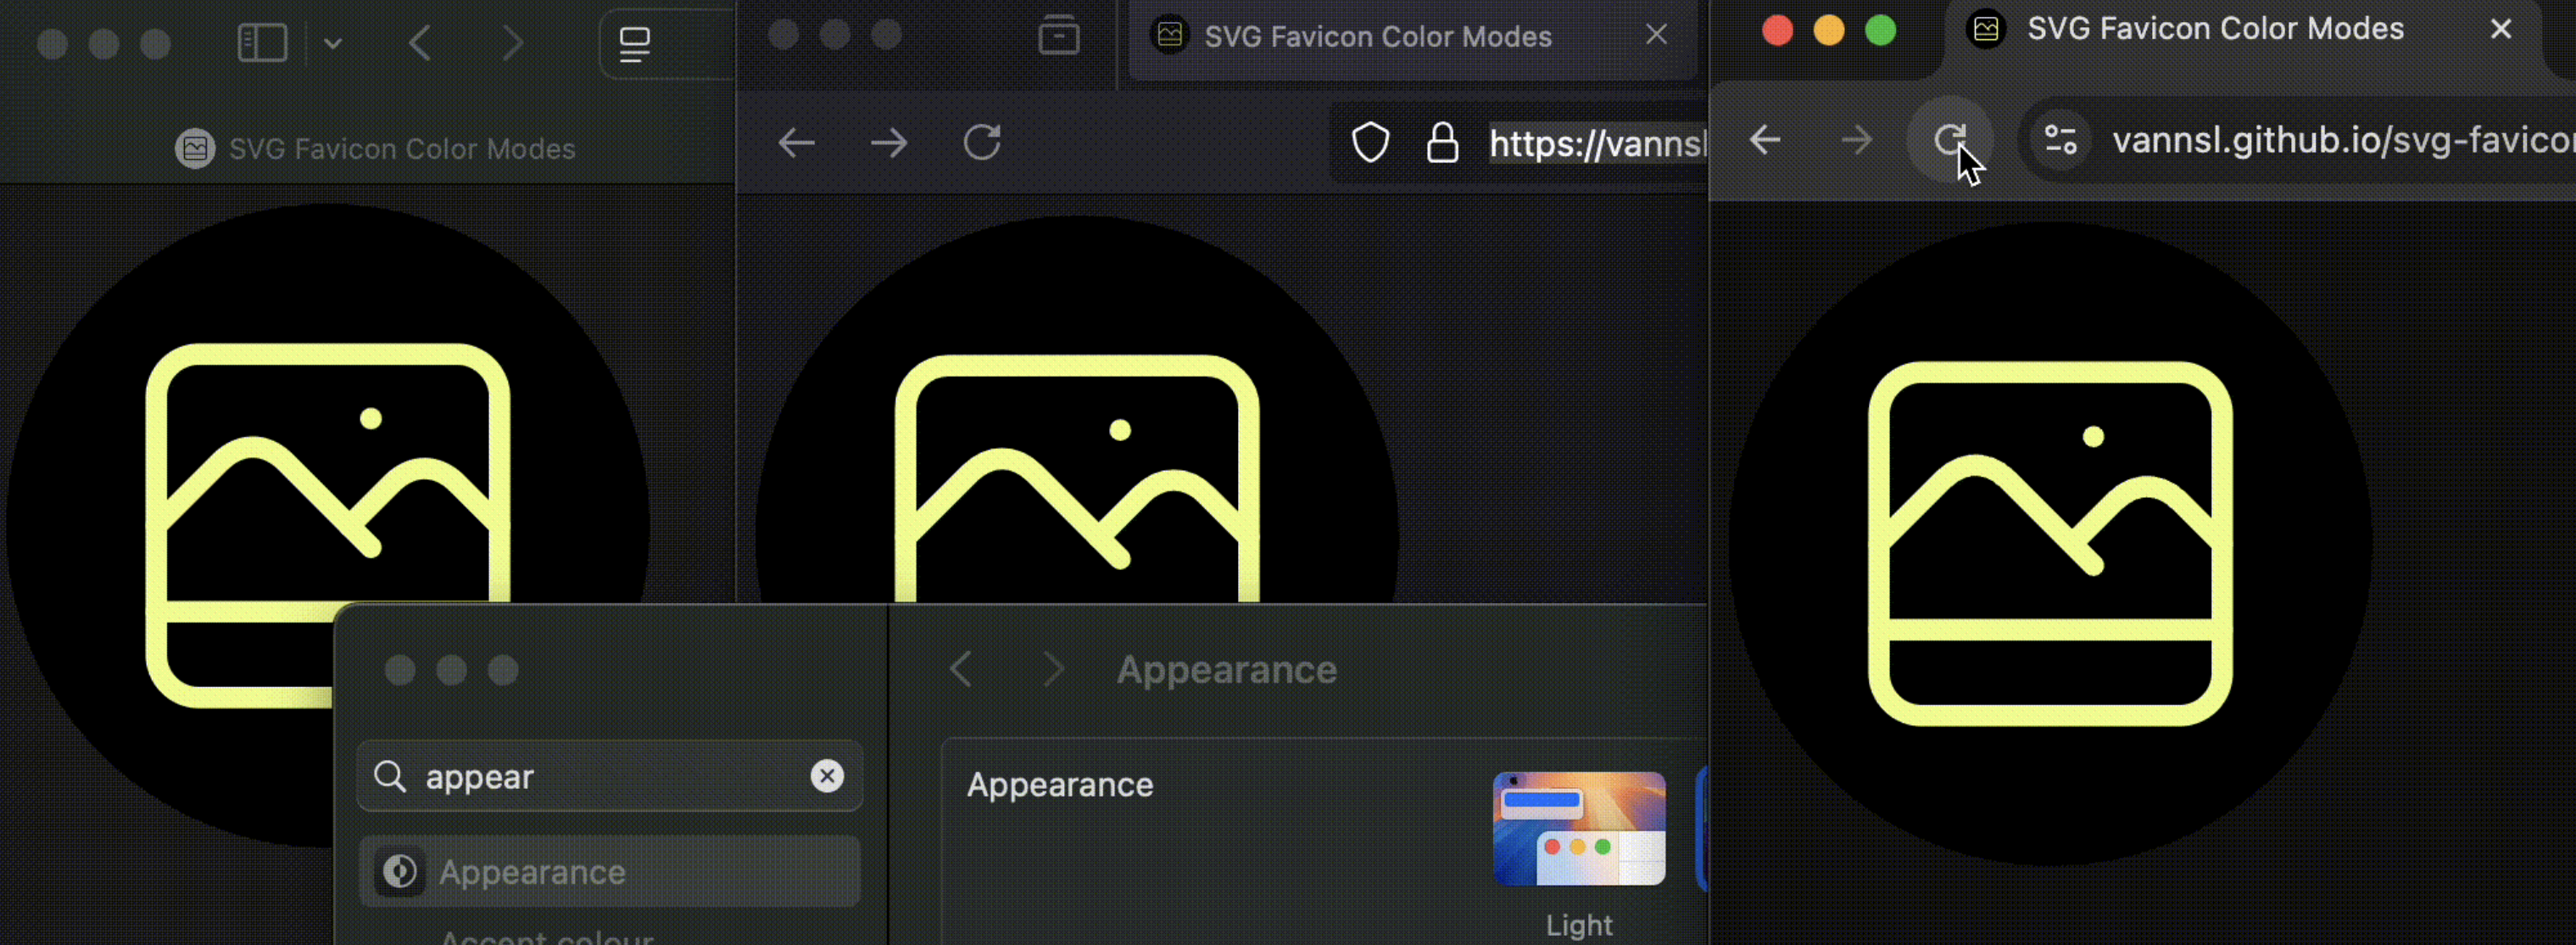
x1="14" y1="7" x2="14.01" y2="7"/>The following images show the Safari, Chrome, and Firefox browsers (from left to right) in light and dark mode. Safari does not use the SVG favicon, but an .ico fallback. Chrome and Firefox show the SVG favicon in the correct color mode. Chrome requires a tab reload to update the icon when changing the color mode.
The following images show only the tabs with the favicons:


Troubleshooting
If you're playing around with favicons, be sure to set the sizes correctly, as shown here:
rel="icon" href="/favicon.ico" sizes="48x48" />
 rel="icon" href="/favicon.svg" sizes="any" type="image/svg+xml" />
Otherwise, at least Chrome will take the .ico fallback even though it could render an SVG favicon.
-
You might see
manifest.jsonandmanifest.webmanifestfiles. As defined in the specs it should be.webmanifest. However, currently both formats are working. People discussed this on a W3C GitHub issue. I'd recommend using.webmanifestbecause: a) it's what the specs say and b) (I think) VS Code can be configured to check.webmanifestfiles explicitly against the schema needed for a manifest and therefore also provides autocompletions. I have not tested this though. ↩︎ ↩︎ -
You can find these and other useful websites on Tiny Helpers from Stefan Judis. ↩︎ ↩︎
