It probably took me more time to find a banner for this article than it did to actually write it 😅.
That said, this guide is exactly what I wish I had when I first set out on the quest of finding a file in SharePoint via API.
Backstory:
I work at a company that processes stuff synonymous to orders(Insurance Claims) in large volumes, so we use forms to create these orders. Users being users, someone suggested we allow bulk uploading of orders via spreadsheets — because of times they had thousands of backlogged orders. That feature was built and is still in use (amazing mental gymnastics, by the way).
But of course, evil users were not satisfied, pitch forks were raised.
Then one user requested:
"Why can't i just add only the names/ids of my invoices to the spreadsheet, then your code fetch the invoice file (PDF) from our storage, extract its content, and automatically create the order?"
We thought, sure, that’s reasonable.
If your invoices are on S3 or Google Drive — easy!
But nooo… they’re on SharePoint.
And that’s where the ordeal begins.
We will be navigating this maze using any HTTP request client you are familiar with(I used postman) and Microsoft Graph — the API suite for accessing Microsoft 365 resources like Outlook, Teams, and OneDrive.
SharePoint’s included, of course… just hidden behind ten layers of abstraction and some minor heartbreak.
As of the time of this writing, we’re able to fetch files directly using either their file ID or file name by making an authenticated HTTP request to one of the following endpoints:
A. Fetch By File ID -: https://graph.microsoft.com/v1.0/sites/{Site ID}/drives/{DRIVE ID}/items/{File ID}/content
B. Fetch By File name.ext -: https://graph.microsoft.com/v1.0/sites/{Site ID}/drives/{DRIVE ID}/root/children/{file_name.ext}/content
This article will outline the steps required to retrieve the components that make up the endpoints mentioned above:
- User Management on SharePoint(with the help of another article).
- Obtaining an authentication token.
- Retrieving your Site ID and Drive ID.
- Might Add Folder ID.
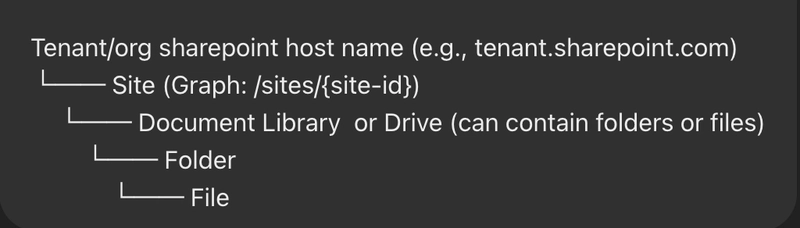
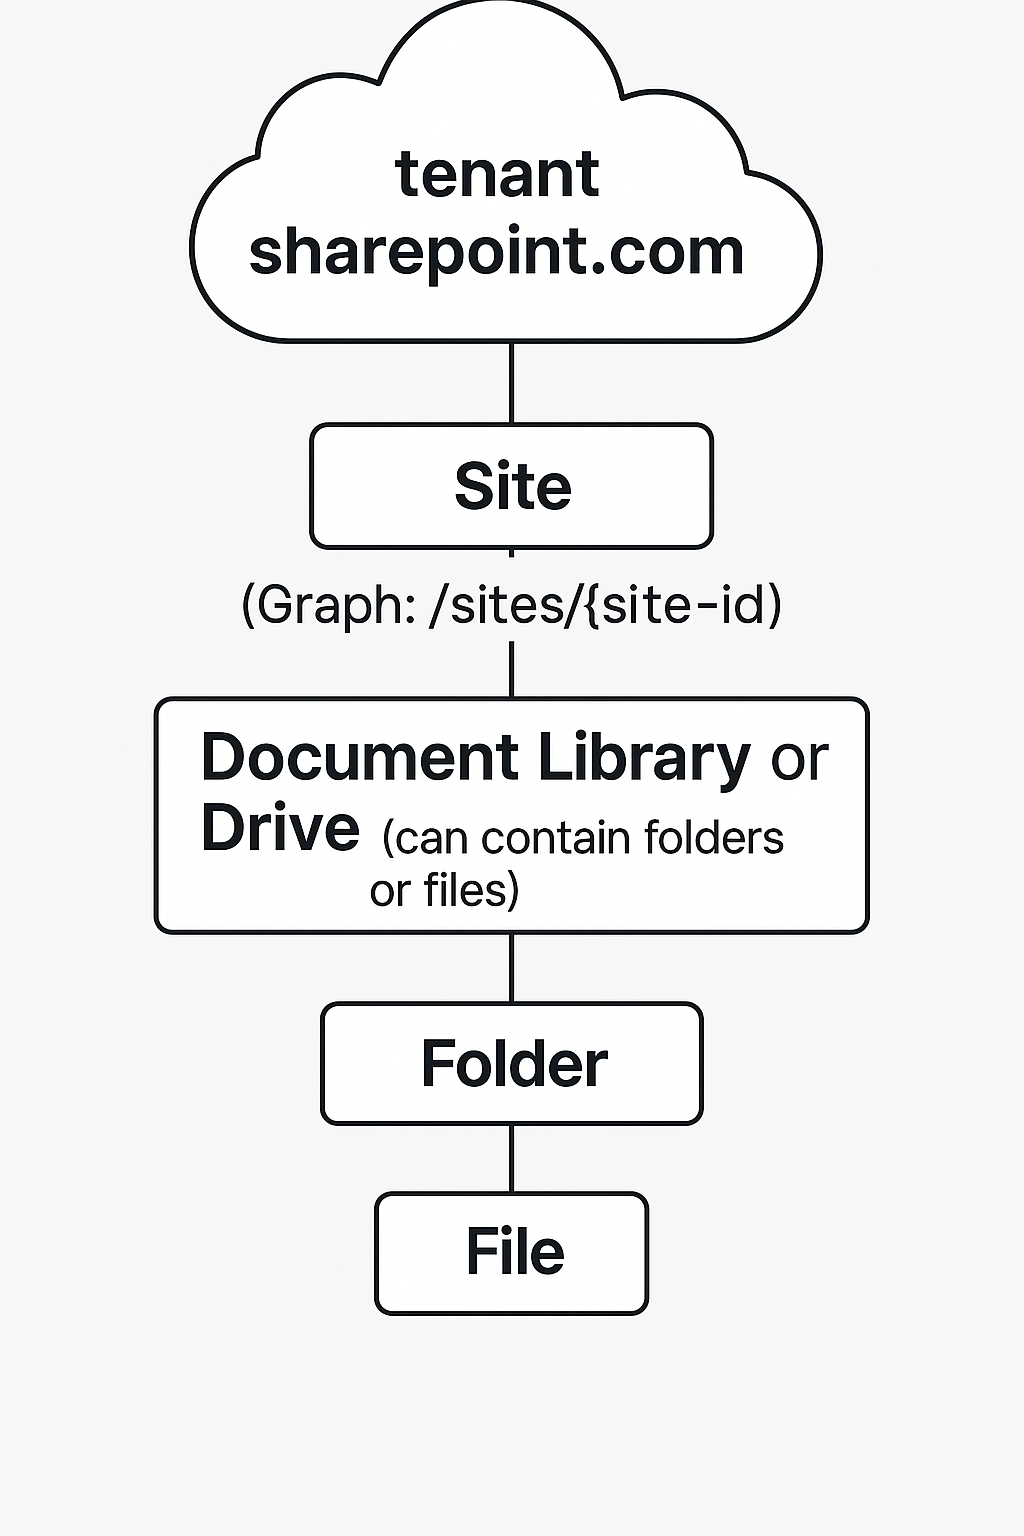
Before Jumping in, here is an helpful visualization.

A. USER MANAGEMENT
Like every other big corp (Google, AWS, even you), access management and documentation was a nightmare.
Thankfully, with help from my manager, we found this link that walks through the steps to set up an application user with app-only permissions.
In short, this setup allows you to authenticate via the API using expirable tokens — without needing a real user to log in.
Once you successfully create the app user on SharePoint, you’ll get the following credentials:
IMPORTANT
Display name: user/app name
Client Id: d806f38b-a107*-1ec8e90c8ccc
Client Secret: XZW8Q855JDEw1cxP
Tenant ID: 31******95c59c1b
Scope: https://graph.microsoft.com/.default
🔑 What each of these parameters means:
   1. client_id
      This is the public identifier for the application that's
      requesting access, It’s issued when the app is registered
      in Azure Active Directory (Azure AD).

   2. scope
      Defines the level of access your app is requesting.
      https://graph.microsoft.com/.default means:

      "Give this app the default permissions it was granted for
       Microsoft Graph in Azure AD.".

   3. client_secret
      This is the private key used along with the client_id to
      authenticate the app, It’s like a password—keep it secret!

   4. grant_type
      Specifies the OAuth 2.0 flow being used, In our case,
      "client_credentials" means:
      "This is a server-to-server (no user involved)
       authentication. Just authenticate my app."
B. AUTHENTICATION
To access any of the endpoints needed to retrieve file details, you'll first need an authentication token.
This token is valid for about 10-15 minutes, after which you'll need to request a new one.
To generate the token, you’ll make an http request to an endpoint that requires your Tenant ID — one of the key credentials obtained from step A above.
1. Auth Endpoint -: https://login.microsoftonline.com/Tenant
   ID/oauth2/v2.0/token

2. Request Method -: POST

3. Request Body -: The request body is made up most of the
   important details from 1: client_id, scope, client_secret,
   grant_type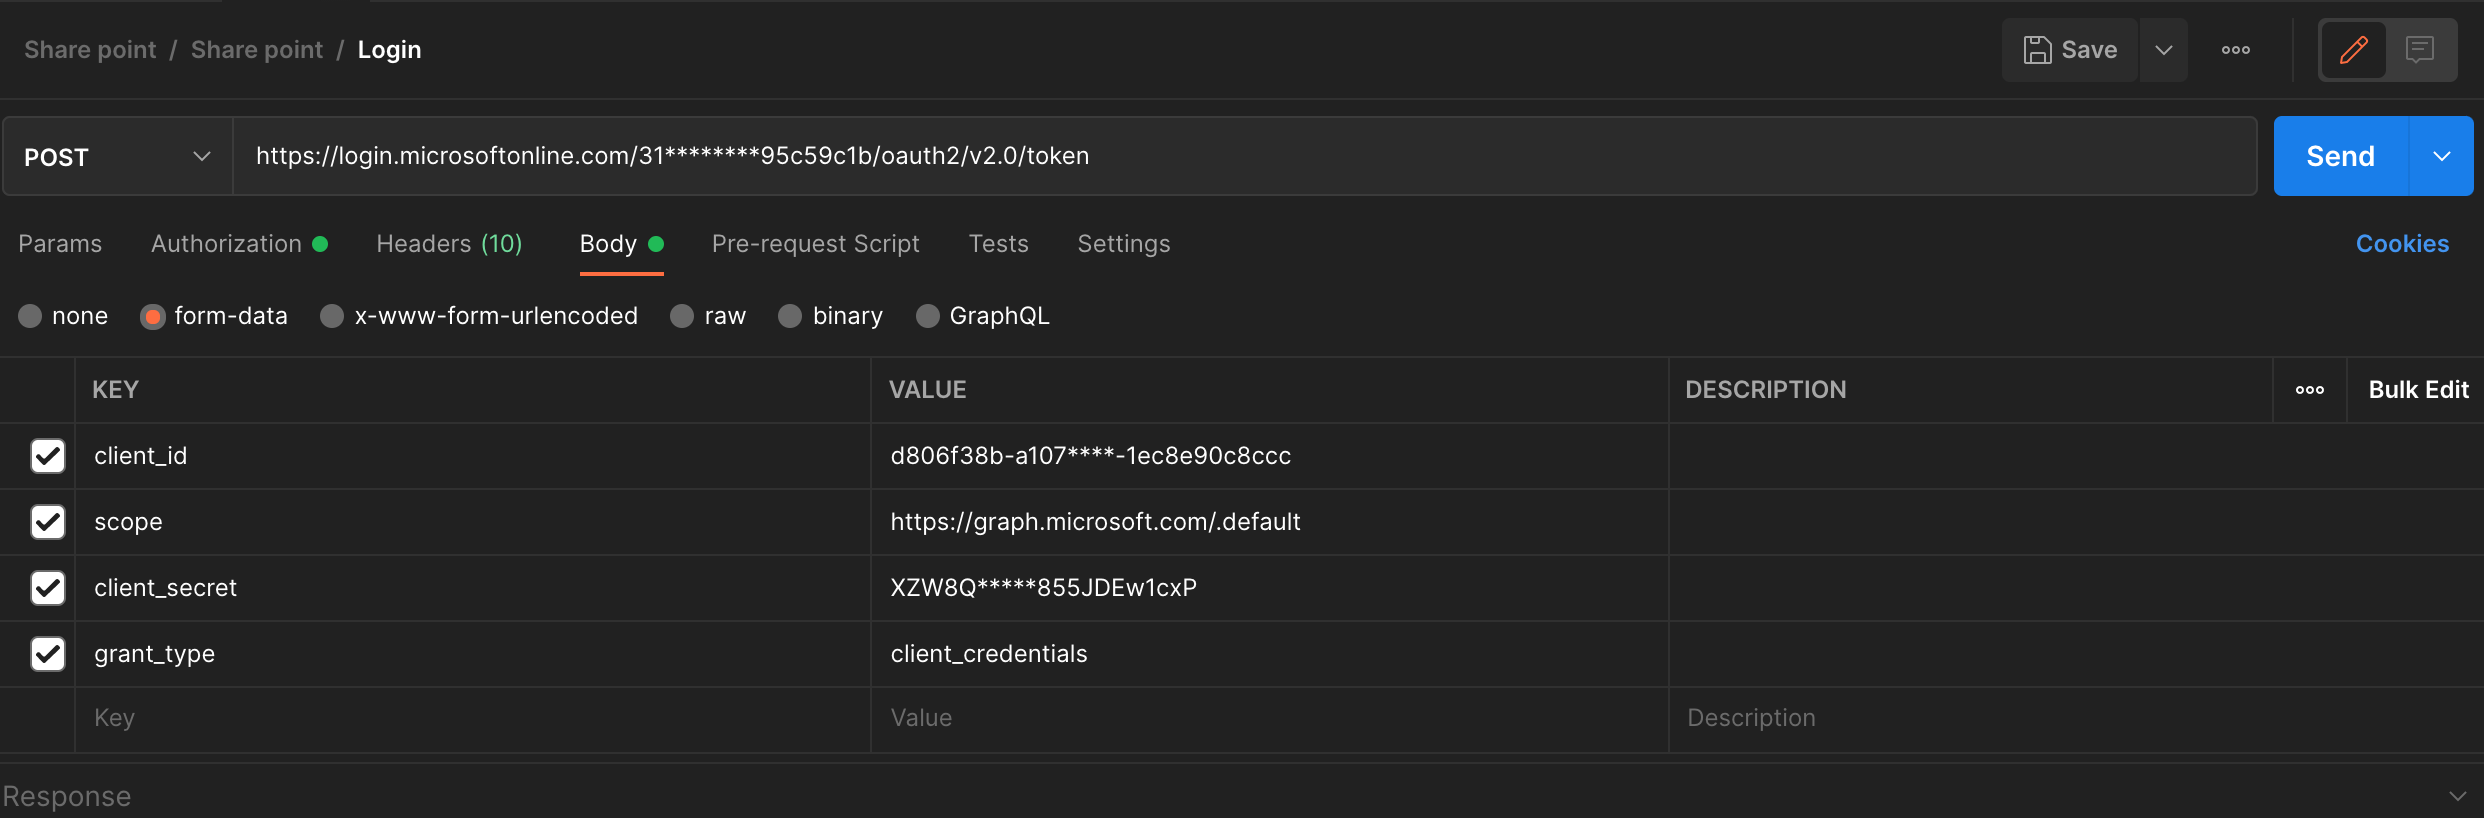
And on successful request you get the below details
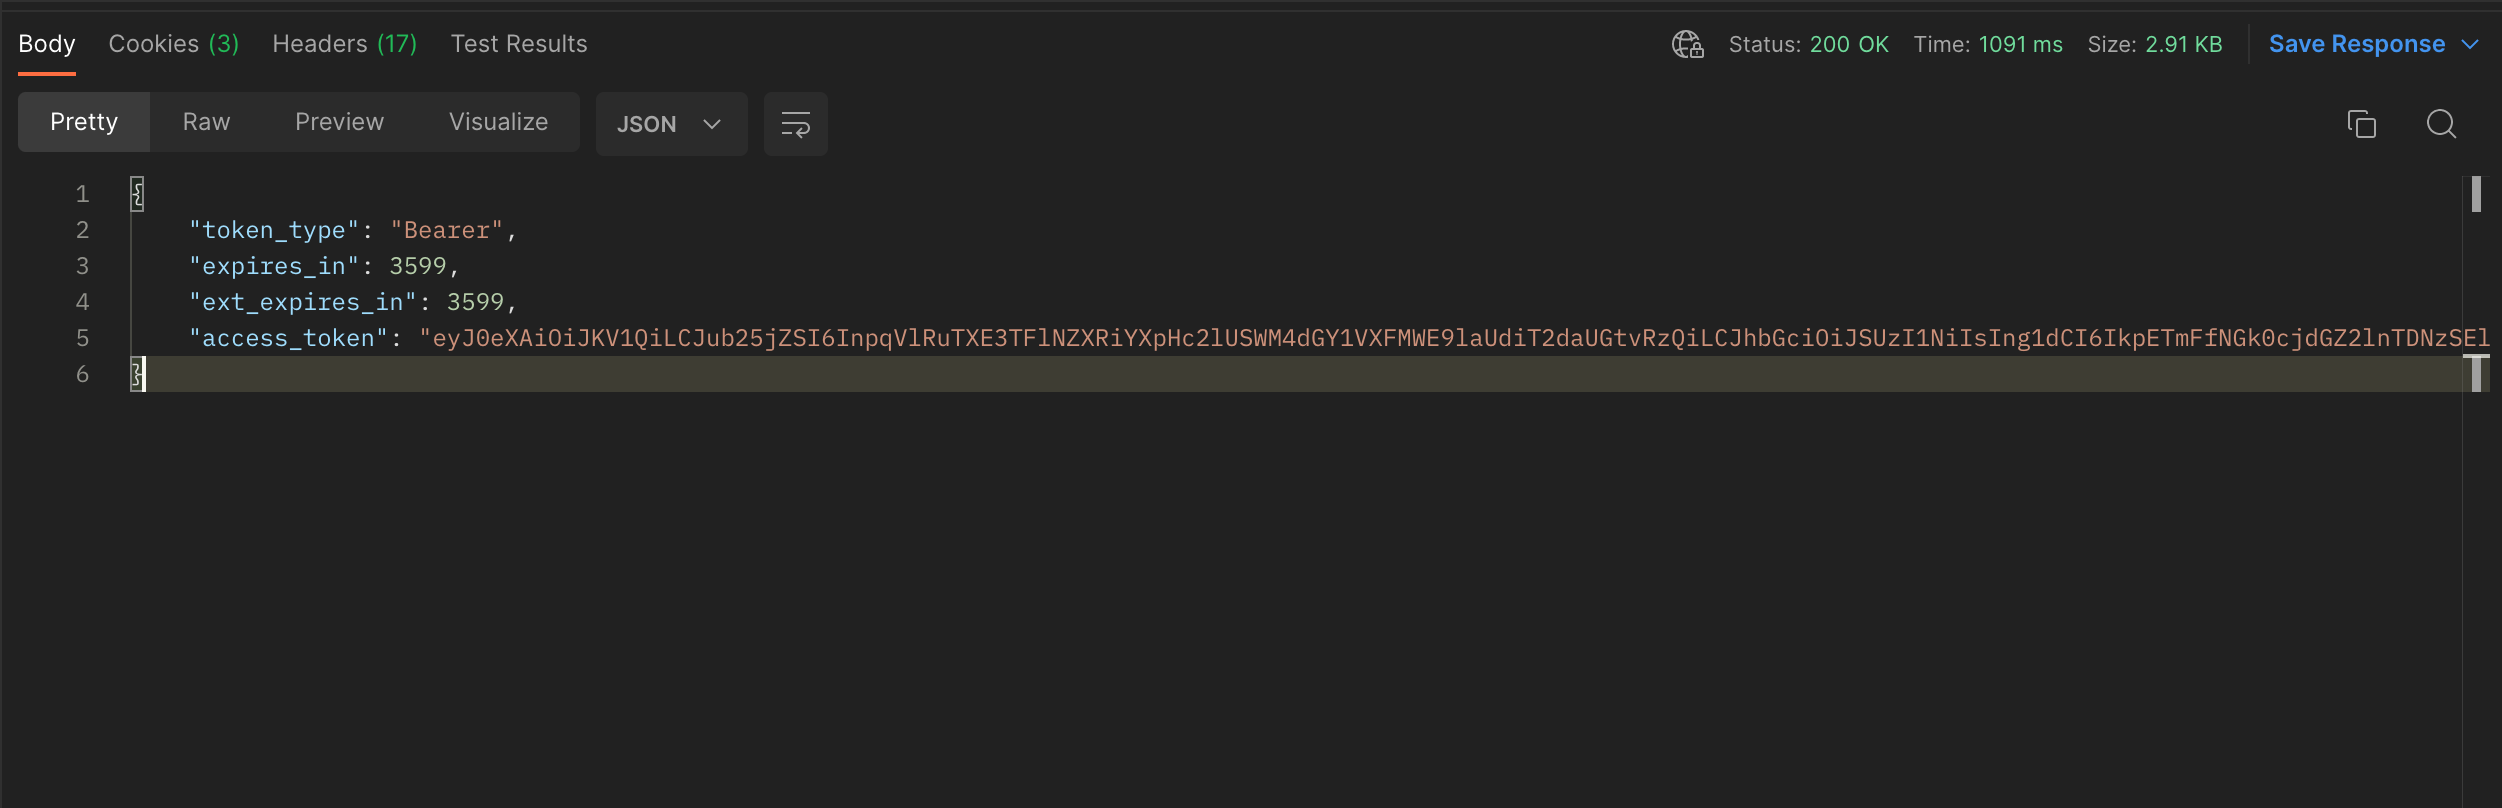
P.S. Not sure why the token claims to expire in 59 minutes when it becomes invalid under 10-15 minutes. So, you’ll need to implement some sort of short-lived cache system (less than expiry minutes) to manage it more efficiently, requesting a new token when the one in your cache expires.
C. LIST SITES
Sites are the building blocks of the SharePoint storage system. They exist within a Tenant (a client-specific SharePoint host, e.g., client.sharepoint.com) and act as containers for content and collaboration.
Think of each site like a mini intranet hub or project root folder — tailored for a specific team, project, or purpose.
To get a list of your client’s sites, make the following request using the authentication token obtained in step 2 above:
1. Endpoint -: https://graph.microsoft.com/v1.0/sites/{Tenant Host Url}/sites?search=*

2. Request Method -: GET
If the request is successful, you should receive a list of all Sites within that Tenant — or at least those accessible directories under your app user's SharePoint storage.
Response should look something like what’s shown below.
{
  "@odata.context": "https://graph.microsoft.com/v1.0/$metadata#sites",
  "@odata.nextLink": "https://graph.microsoft.com/v1.0/sites/example.sharepoint.com/sites?search=*&$skiptoken=randomtoken123",
  "value": [
    {
      "createdDateTime": "2023-02-15T08:45:10Z",
      "id": "example.sharepoint.com,a1b2c3d4-e5f6-7890-ab12-34567890cdef,12345678-90ab-cdef-1234-567890abcdef",
      "lastModifiedDateTime": "2025-03-29T18:10:42.0000000Z",
      "name": "Project-Delta",
      "webUrl": "https://example.sharepoint.com/sites/Project-Delta",
      "displayName": "Project Delta",
      "root": {},
      "siteCollection": {
        "hostname": "example.sharepoint.com"
      }
    },
    {
      "createdDateTime": "2022-11-10T14:20:05Z",
      "id": "example.sharepoint.com,abcd1234-5678-90ef-gh12-3456ijklmnop,abcdef12-3456-7890-abcd-ef1234567890",
      "lastModifiedDateTime": "2025-03-28T11:05:29.1234567Z",
      "name": "Archive-Hub",
      "webUrl": "https://example.sharepoint.com/sites/Archive-Hub",
      "displayName": "Archive Hub (Legacy)",
      "root": {},
      "siteCollection": {
        "hostname": "example.sharepoint.com"
      }
    }
  ]
}
D. Single Site Details
Now let’s access the details of a specific Site — the one where the files/folders you need are actually stored.
1. Endpoint -: https://graph.microsoft.com/v1.0/sites/{Tenant Host
   Url}:/sites/{Site Name}

   2. Request Method -: GET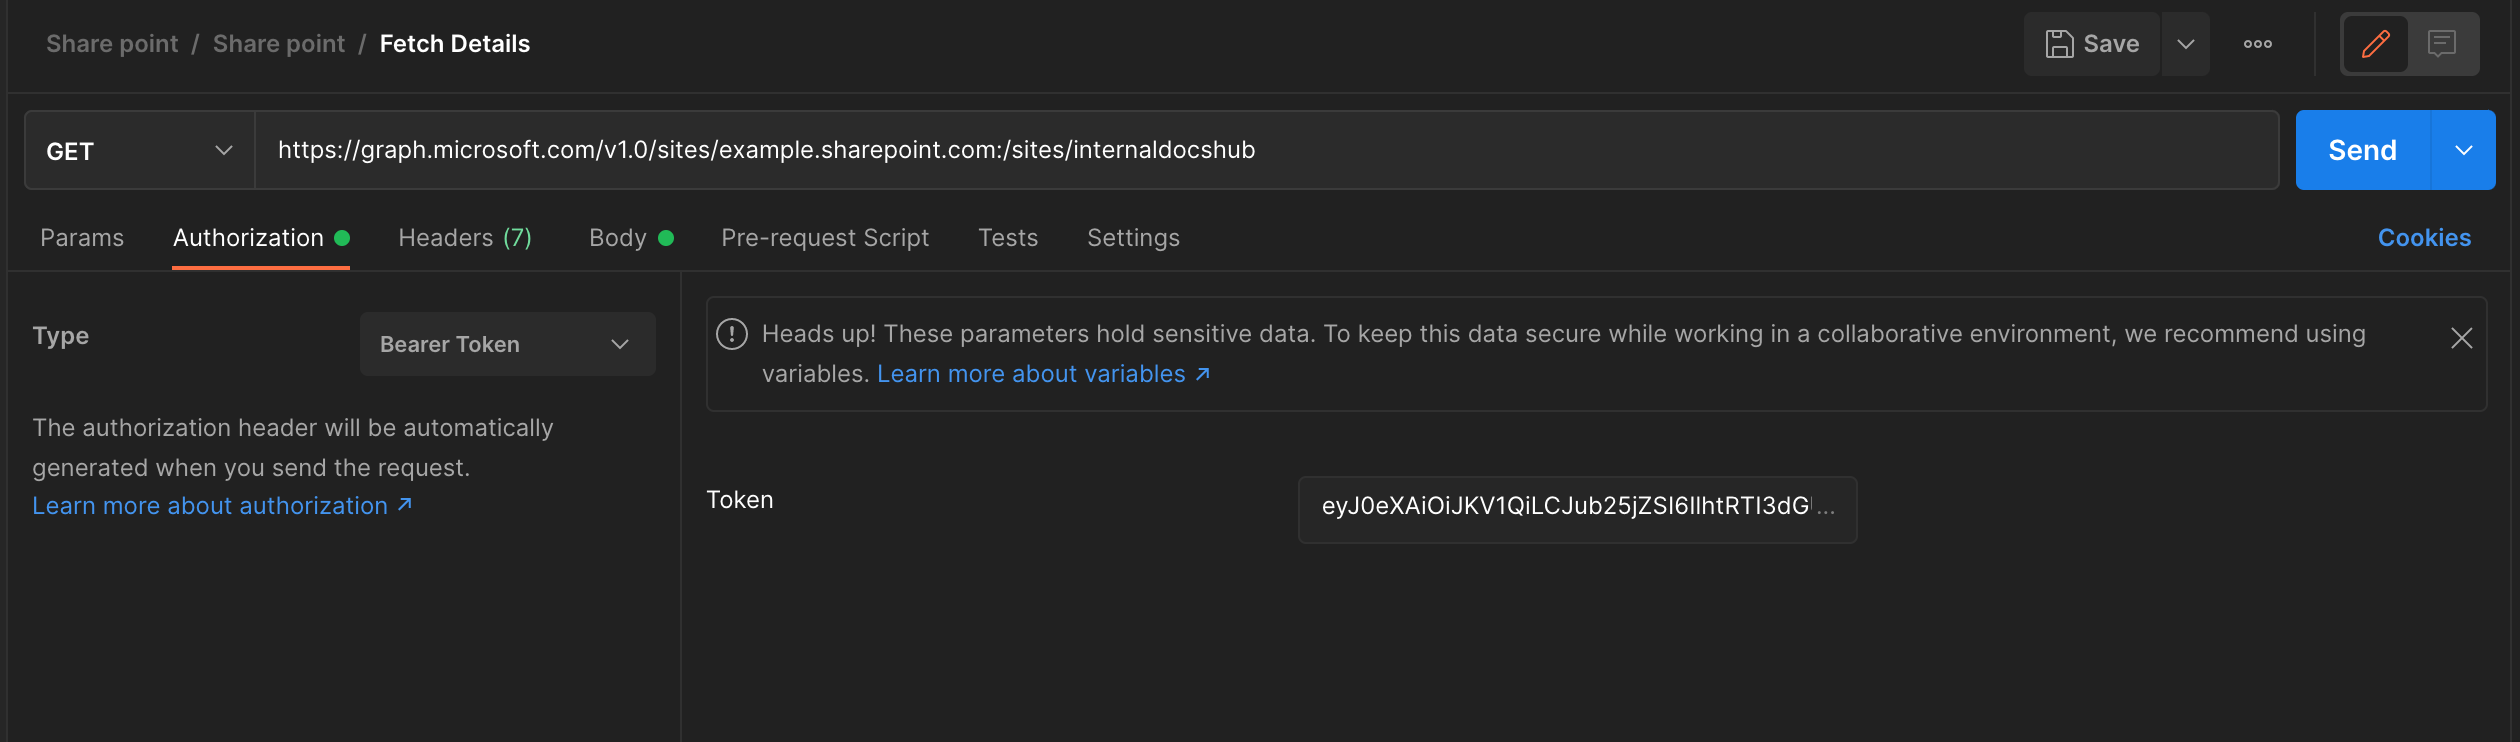
Response
{
  "@odata.context": "https://graph.microsoft.com/v1.0/$metadata#sites/$entity",
  "createdDateTime": "2023-09-15T10:30:00Z",
  "description": "Internal document hub",
  "id": "example.sharepoint.com,abcd1234-5678-90ef-abcd-1234567890ef,12345678-abcd-90ef-1234-abcdef123456",
  "lastModifiedDateTime": "2025-03-28T13:00:00Z",
  "name": "internaldocshub",
  "webUrl": "https://example.sharepoint.com/sites/internaldocshub",
  "displayName": "Internal Docs Hub",
  "root": {},
  "siteCollection": {
    "hostname": "example.sharepoint.com"
  }
}
What we need from this detail is the site 'id' value,
"id": "example.sharepoint.com,abcd1234-5678-90ef-abcd-
1234567890ef,12345678-abcd-90ef-1234-abcdef123456",
Site Name – This refers to the value of the "name" field assigned to each site for identification. (It usually has no spaces.)
It’s one of the key reasons we made the endpoint call in Step C — to retrieve this value programmatically.
However, in most cases, you can also see the Site Name directly from the web URL when browsing SharePoint through the web interface.
So, calling the endpoint in Step C is optional if you already have this detail handy.
E. List Drives
Inside each Site is a list of Drives — think of them as document libraries or top-level folders. These drives contain the directories and files you're ultimately looking for.
To get a list of Drives for the siteId obtained in step D, make the following request using the authentication token from step B:
1. Endpoint -: https://graph.microsoft.com/v1.0/sites/{Site ID FROM STEP D}/drives.

2. Request Method -: GET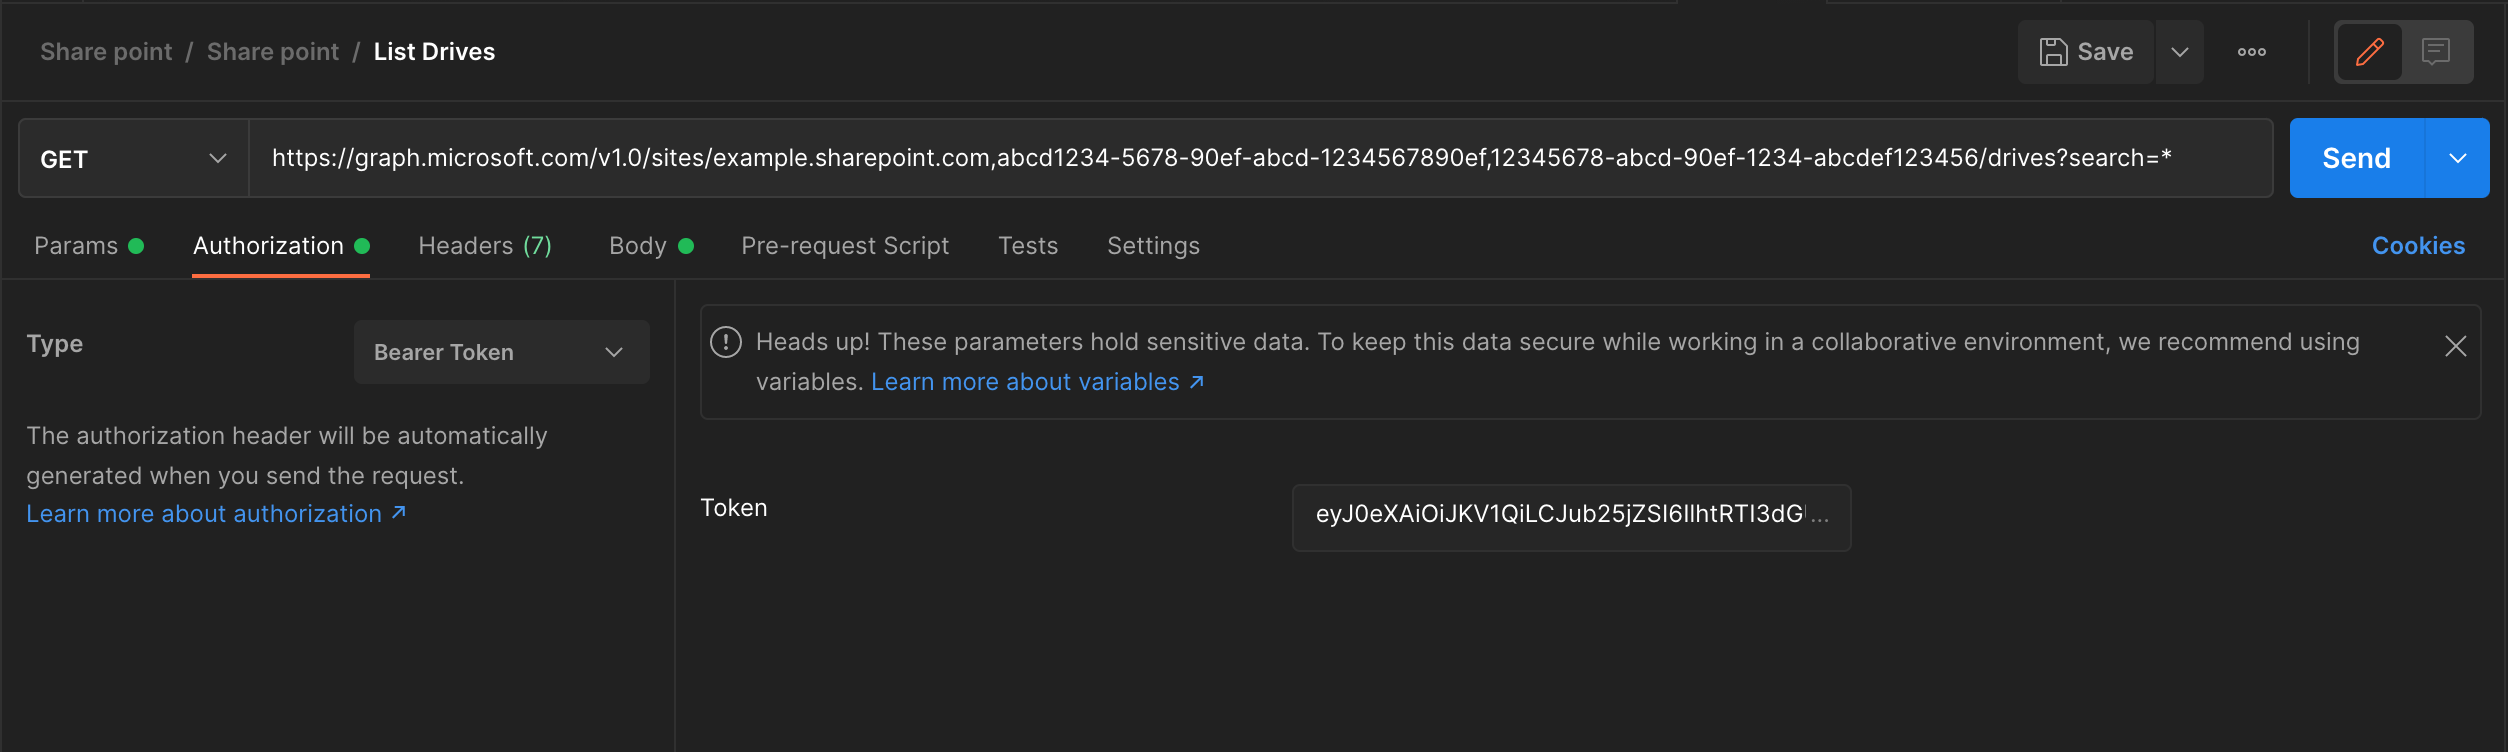
If the request is successful, you’ll get a list of all Drives for that Site — as shown below.
{
  "@odata.context": "https://graph.microsoft.com/v1.0/$metadata#drives",
  "value": [
    {
      "createdDateTime": "2023-10-15T18:22:32Z",
      "description": "",
      "id": "b!abc123xyzFakeDriveID5678",
      "lastModifiedDateTime": "2025-01-10T09:47:50Z",
      "name": "Documents",
      "webUrl": "https://example.sharepoint.com/sites/internaldocshub/Shared%20Documents",
      "driveType": "documentLibrary",
      "createdBy": {
        "user": {
          "displayName": "System Account"
        }
      },
      "lastModifiedBy": {
        "user": {
          "displayName": "System Account"
        }
      },
      "owner": {
        "user": {
          "email": "[email protected]",
          "id": "user-id-1",
          "displayName": "Site Admin"
        }
      },
      "quota": {
        "deleted": 0,
        "remaining": 6048973404507,
        "state": "normal",
        "total": 27487790694400,
        "used": 21438817289893
      }
    },
    {
      "createdDateTime": "2023-11-01T07:30:41Z",
      "description": "Library created for publishing resources used throughout the site.",
      "id": "b!def456uvwAnotherFakeDriveID91011",
      "lastModifiedDateTime": "2023-11-01T07:30:41Z",
      "name": "Site Collection Documents",
      "webUrl": "https://example.sharepoint.com/sites/internaldocshub/SiteCollectionDocuments",
      "driveType": "documentLibrary",
      "createdBy": {
        "user": {
          "email": "[email protected]",
          "id": "user-id-2",
          "displayName": "Content Manager"
        }
      },
      "owner": {
        "user": {
          "email": "[email protected]",
          "id": "user-id-2",
          "displayName": "Content Manager"
        }
      },
      "quota": {
        "deleted": 0,
        "remaining": 6048973404507,
        "state": "normal",
        "total": 27487790694400,
        "used": 21438817289893
      }
    }
  ]
}
What we need from this result is the id of the Drive that contains the file we’re looking for.
Again, if you’ve navigated the SharePoint web interface before, you should be able to spot the Drive name or even the Drive ID directly within the websites url.
Alternatively, you add the search url parameter (just like we did
when fetching sites) to narrow it down, with the drive name(if you know it) or use a wild card (*), to see all.
F. Items In A Drive
Now that we have our Drive ID, we can go ahead and list the contents of that drive — including folders and individual items.
This step is technically optional, especially if you already know the exact item you're looking for.
But if you want to explore or locate specific files manually, here’s how you’d retrieve the contents:
1. Endpoint -: _https://graph.microsoft.com/v1.0/sites/{Site ID FROM STEP D}/drives/{DRIVE ID FROM STEP E}/root/children_

   2. Request Method -: GET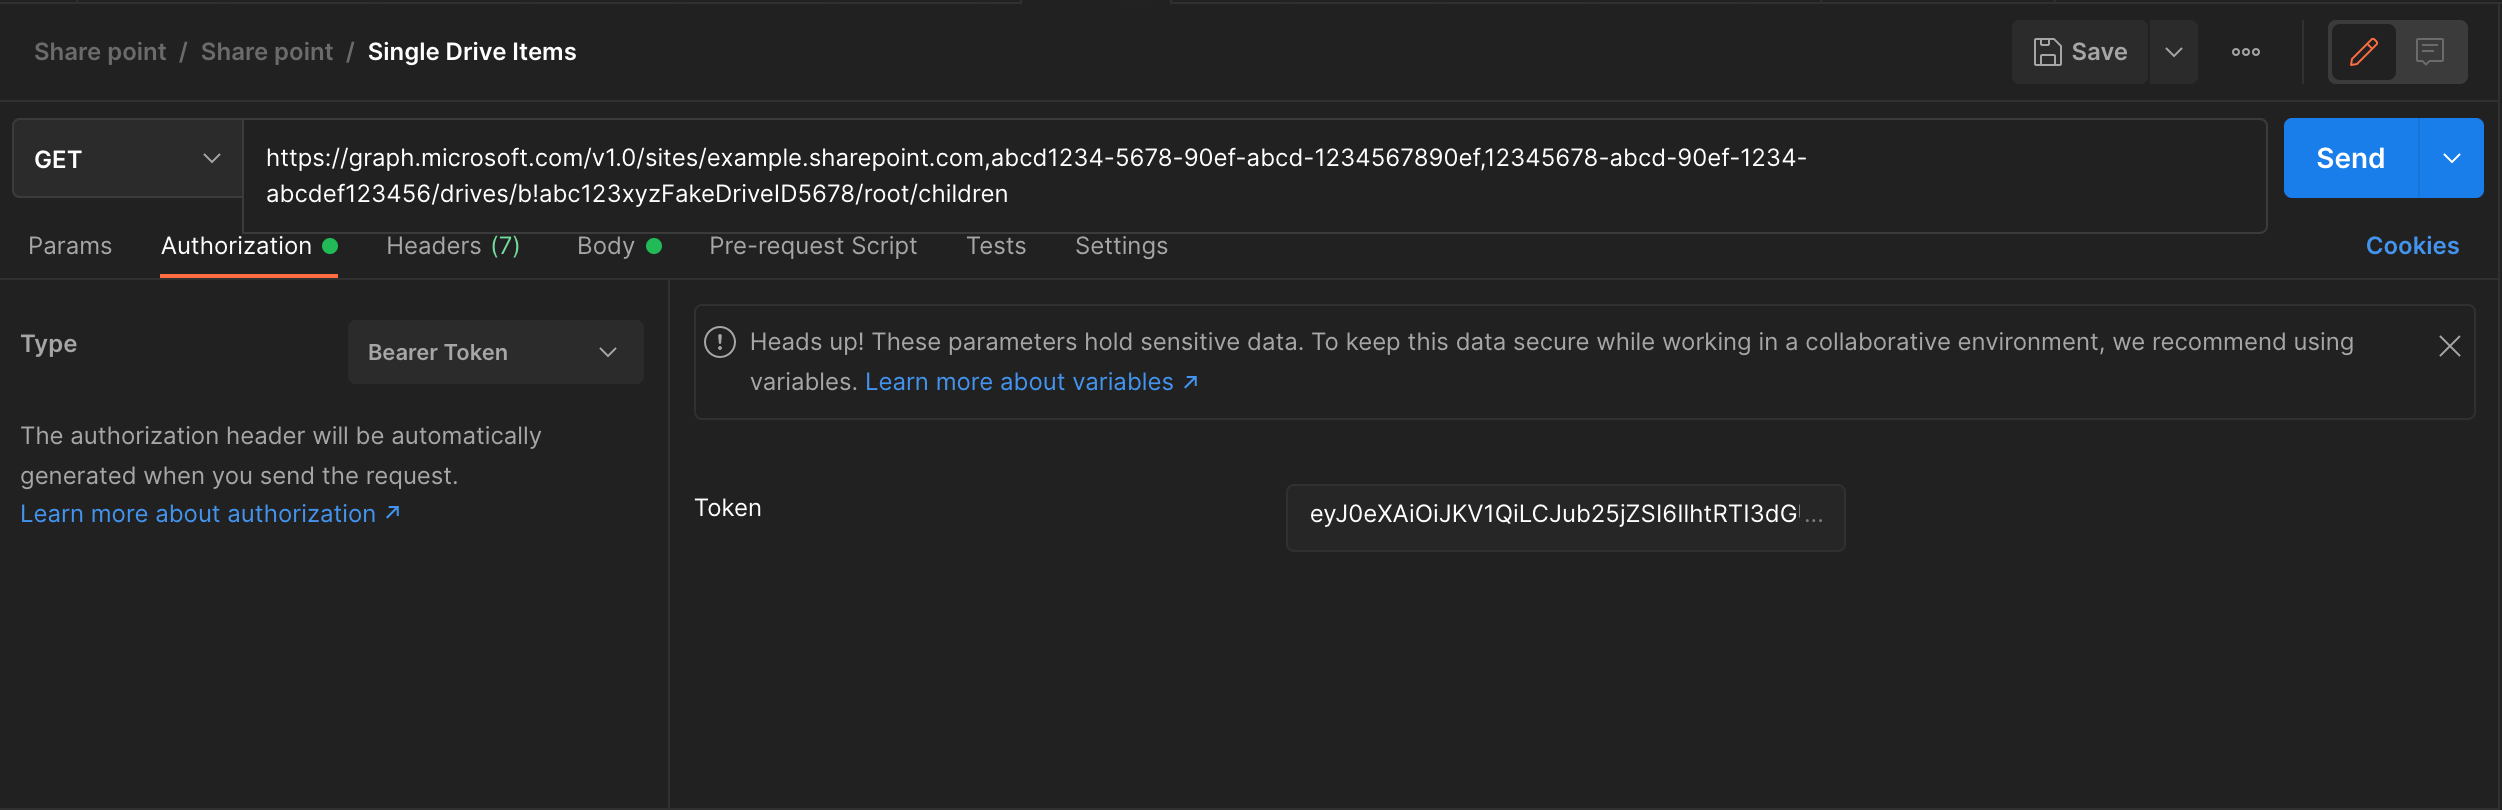
This will give you a list of all items within the drive with the specified ID
G. Fetch Specific File
Finally, we can fetch the file we need.
There are two ways to do this as stated earlier, using two different endpoints, depending on what details you have:
- Fetch By File ID -: https://graph.microsoft.com/v1.0/sites/{Site
     ID FROM STEP D}/drives/{DRIVE ID FROM STEP E}/items/{File ID
     FROM STEP F}/content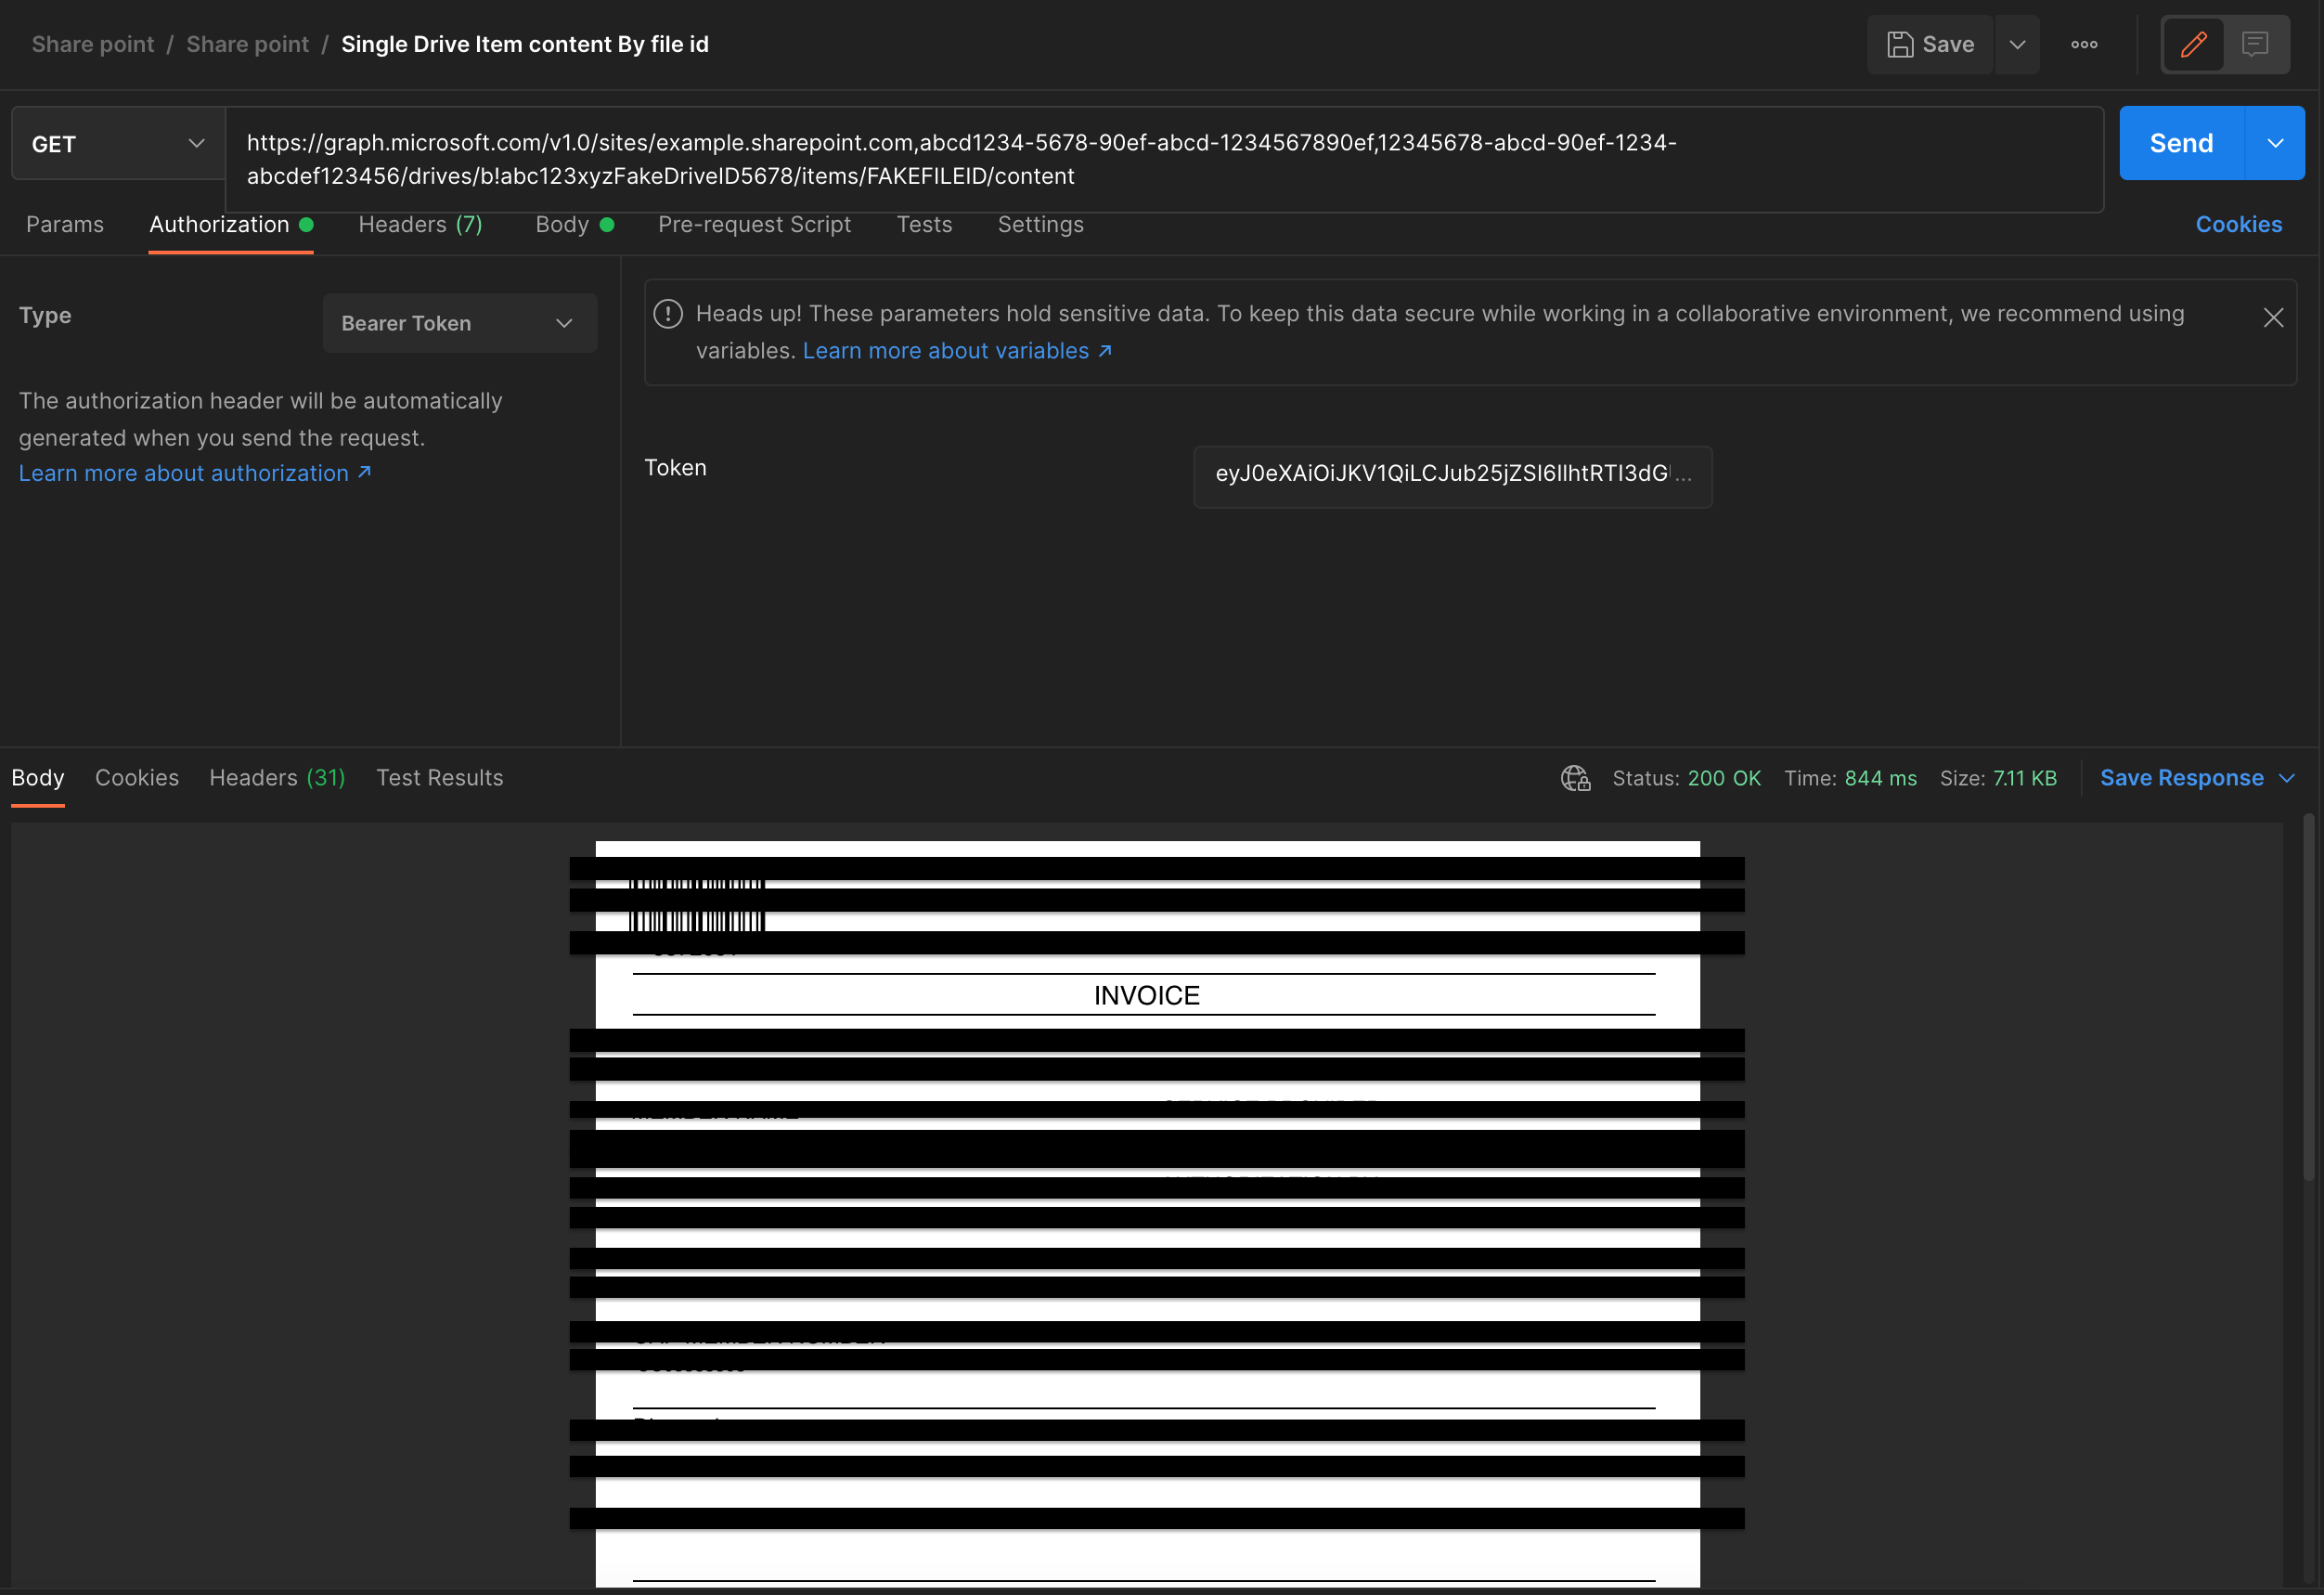
- Fetch By File name.ext -: https://graph.microsoft.com/v1.0/sites
     /{Site ID FROM STEP D}/drives/{DRIVE ID FROM STEP E}/root/children/{file_name.ext}/content
Both endpoints use the GET method and will fetch you the actual file
Now, you might be thinking: “Surely the AI agents could’ve helped here?”
Brothers and sisters — we tried.
Some were leading me astray,
Others gave redacted endpoints,
And a few just dropped the endpoints without proper scopes or clear guidance on how to get the components needed.
Most required a dozen more prompts to make any sense.
So, in the event that you do manage to get the correct endpoints, I hope this breakdown helps explain how to actually assemble and use them — without losing your mind in the process.
OTHER HELPFUL ENDPOINTS
List Folders -: https://graph.microsoft.com/v1.0/sites/{Site ID
FROM STEP D}/lists/List Folder Contents -:
https://graph.microsoft.com/v1.0/sites/{Site ID FROM STEP
D}/lists/{Folder ID}/itemsMeta Data Of A File In A Drive -:
https://graph.microsoft.com/v1.0/drives/{DRIVE ID FROM STEP
E}/root/search(q='file_name.pdf')
REFERENCED RESOURCES
